The Never Going Home Early Brown Butter Chocolate Chunk Cookies
- Unlocking the Secret to Next-Level Cookies Recipe Depth
- Why Brown Butter Transforms a Standard Chocolate Chunk Classic
- Assembling Your Arsenal: Essential Components for This Cookies Recipe
- Precision Pantry Check: Measuring for Perfection
- The Transformation Phase: Browning the Butter Correctly
- Crafting the Dough: Mixing Techniques That Matter
- Baking Dynamics: Oven Placement and Timing
- Maximizing Longevity: Storing Your Freshly Baked Goods
- Troubleshooting and Customizing Your Perfect Batch
- Recipe FAQs
- 📝 Recipe Card
Unlocking the Secret to Next Level Cookies Recipe Depth
Welcome, fellow baking enthusiasts! Today, we are diving deep into a cookies recipe that transcends the ordinary, moving past the simple handful of ingredients into something truly memorable.
We aren't just aiming for "good"; we are striving for the perfect balance of chewy texture, crisp edges, and profound flavour complexity. Forget the quick fix; we are mastering the art of the Golden Brown Butter Cookies .
This specific preparation transforms a standard treat into the "Never Going Home Early" Brown Butter Chocolate Chunk Cookies a name that speaks for itself regarding their addictive quality.
Why Brown Butter Transforms a Standard Chocolate Chunk Classic
The hallmark of this particular bake is the intentional step of caramelising the butter. Many straightforward recipes rely on simple melted or softened butter, which provides structure but little character. Our approach requires a touch more patience but yields rewards exponentially greater than the effort expended.
The Allure of Caramelized Fat: A Flavor Introduction
When butter is gently cooked, the milk solids separate and toast, releasing volatile compounds that create a deep, almost hazelnut like, toffee flavour profile. This process fundamentally shifts the entire base note of the dough.
When you reach for a cookies recipe easy version, you often skip this, but here, that nutty depth is non-negotiable. It pairs spectacularly with the rich sweetness of the sugars and the slight bitterness of dark chocolate.
Setting Expectations: What Makes These Cookies Unforgettable
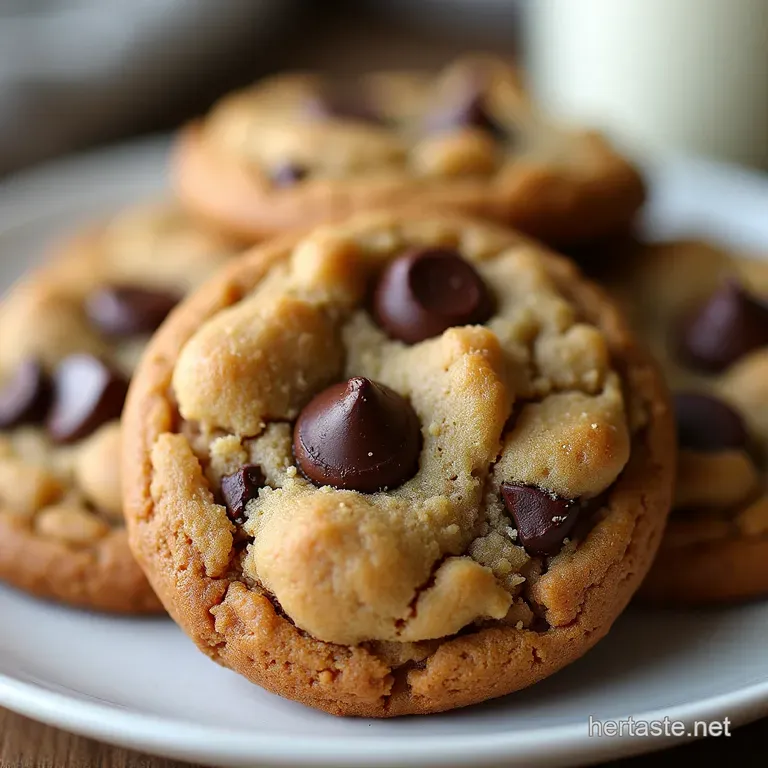
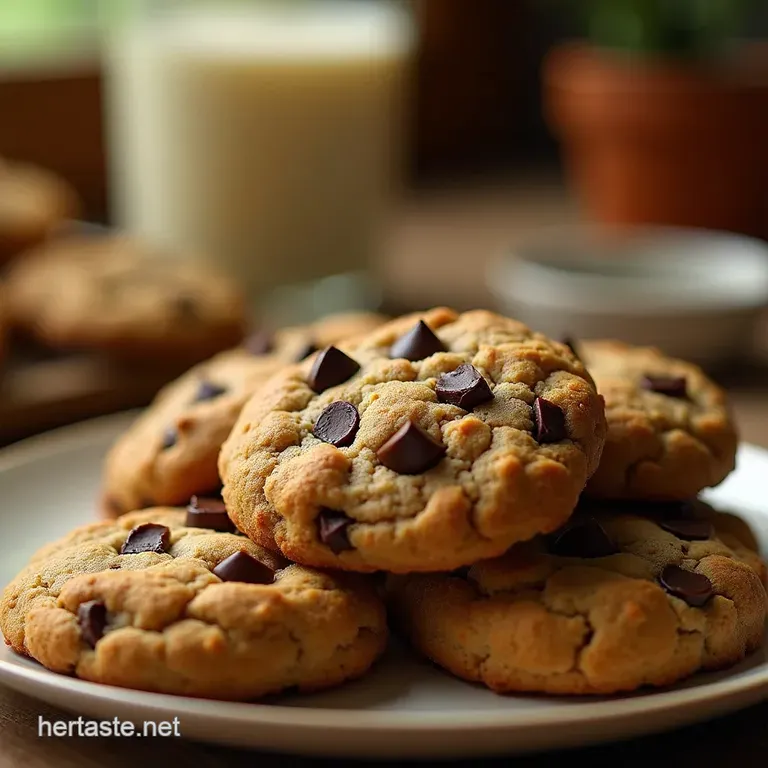
These Sea Salt Chocolate Chunk Cookies are engineered for texture harmony. Expect a satisfyingly crisp circumference that gives way to a wonderfully soft, dense centre.
The addition of flaky sea salt on top is not merely aesthetic; it cuts through the richness of the brown butter and melted chocolate, creating those addictive salty sweet pockets that keep you reaching for just one more.
A Quick Look Ahead at Our Baking Journey
Our journey together involves mastering the browning stage, understanding the critical role of chilling the dough, and employing precise oven management. This is a cookies recipe without brown sugar if you prefer, but we leverage its molasses content for moisture, balancing it with granulated sugar for structure.
We'll also touch upon making this a fantastic cookies recipe without butter if you need an alternative, though the core flavour hinges on that nutty fat.
Assembling Your Arsenal: Essential Components for This Cookies Recipe
To achieve 20 to 24 large, perfect cookies, preparation is everything. We are using a slightly elevated ingredient list to match the complexity of the brown butter technique. The recipe calls for one cup of unsalted butter, destined for transformation.
We pair this with one cup of packed light brown sugar and half a cup of granulated sugar, which work in tandem to provide chewiness and spread control, respectively.
For structure, we need 2 ¼ cups of sifted all-purpose flour, along with one teaspoon of baking soda for lift. The wet components are simple: two large eggs at room temperature and two teaspoons of pure vanilla extract.
The stars of the show, however, are the mix-ins: a generous 1 ½ cups of high-quality chocolate chunks a mix of semi sweet and dark works best and, critically, flaky sea salt for that final flourish.
Precision Pantry Check: Measuring for Perfection
Baking is a science, and slight deviations in measurement can drastically alter the final texture. While many home bakers might attempt a cookies recipe without brown sugar by eye, here we demand precision.
The Butter Blueprint: Achieving That Golden Nutty Base
We begin with one full cup (two sticks) of unsalted butter. This entire amount must be used for browning. The quality of the butter significantly impacts the final taste; opt for a good quality brand, as its fat content will directly influence the richness of the browned solids we extract.
Selecting Superior Chocolate Chunks and Flaky Sea Salt Accent
Resist the urge to use standard chips; they contain stabilizers that prevent them from melting into those glorious, flowing pools we adore. Seek out high-quality baking bars and chop them roughly into chunks, ranging from small chips to larger, coin sized pieces.
For the salt, Maldon or any flaky finishing salt is mandatory. Its texture and clean salinity are incomparable to regular table salt, providing that necessary bright counterpoint to the deep caramel notes.
Essential Equipment Beyond the Basics
While a mixer is helpful, the most important piece of hardware here is a light coloured, heavy bottomed saucepan for browning the butter avoid non-stick if possible, as you need to visually monitor the milk solids sinking and toasting at the bottom.
Parchment paper or silicone mats are also essential for easy clean-up and ensuring the bottoms don't stick or burn prematurely.
Related Recipes Worth Trying
- Best Copycat Olive Garden Breadsticks Recipe Easy Fluffy — Stop queuing Bake these homemade breadstickssoft garlicky and better than the restaurant version This easy recipe delivers the perfect copycat Olive Garden...
- The Ultimate Olive Garden Breadsticks Copycat Recipe — Make fluffy garlicky Homemade Olive Garden Breadsticks that taste better than takeout Foolproof yeast instructions and the perfect butter glaze
- The Best Homemade Breadsticks Recipe Soft Garlicky — Forget the takeout Make these incredibly soft pillowy Homemade Breadsticks topped with rich garlic butter Theyre easier than you think Get the full recipe
The Transformation Phase: Browning the Butter Correctly
This step is non-negotiable for achieving the distinct flavour of our Golden Brown Butter Cookies . Place the full cup of butter in your saucepan over medium heat. As it melts, it will foam vigorously. Keep swirling the pan gently.
Soon, you’ll notice the foam subsiding, and tiny specks of milk solids will begin to sink and turn golden, then brown. This entire process takes about 5 to 8 minutes. The smell will change from simply buttery to intoxicatingly nutty.
The instant the solids reach a rich amber colour, immediately pour the butter (including all those precious brown bits) into a clean, heatproof bowl to halt the cooking process. Allow this to cool for about 15 minutes before proceeding.
Crafting the Dough: Mixing Techniques That Matter
With the browned butter slightly cooled but still liquid, we move to the creaming stage. In your mixer bowl, beat the cooled brown butter vigorously with the brown sugar and granulated sugar for a solid three minutes until the mixture is visibly lighter and fluffier. This aeration is vital for structure.
Next, incorporate the two eggs, one at a time, ensuring full emulsification before adding the next, followed by the vanilla. This foundational structure prevents the final cookies from becoming dense.
Incorporating Dry Elements Without Overdeveloping Gluten
In a separate bowl, whisk your sifted flour, baking soda, and fine salt. Add this dry mixture to the wet ingredients on the lowest mixer speed. Mix only until the last streaks of flour disappear. Overmixing develops gluten, leading to tough, cakey results rather than the desired chewiness.
Immediately stop the mixer.
The Crucial Chill: Resting the Dough for Maximum Spread Control
This step is the secret weapon against cookies that spread into thin, greasy pancakes. Gently fold in your chocolate chunks. Cover the bowl tightly and refrigerate the dough for a minimum of one hour though two hours is even better.
This resting period allows the flour to fully hydrate and the butter to re-solidify, ensuring the cookies bake up thick and chewy. If you are looking for a cookies recipe without butter substitutes, chilling is even more crucial to mimic the firmness that cold fat provides.
Baking Dynamics: Oven Placement and Timing
Preheat your oven precisely to 375° F ( 190° C). Ensure your racks are in the middle position for even heat circulation.
Step-by-step Guide to Achieving Nutty Brown Butter Solids
Since we have already browned our butter solids, the dough is now infused. Scoop the chilled dough using a 3-tablespoon scoop and place the mounds about two inches apart on baking sheets lined with parchment paper.
Achieving the Perfect Golden Edge on Your Finished Cookies
Before baking, lightly press the top of each dough ball down slightly with the palm of your hand; this helps promote even spreading from the centre outward. Sprinkle generously with the flaky sea salt. Bake for 10 to 12 minutes.
You are looking for edges that are deeply golden brown and set, while the very centre still appears slightly soft and perhaps a touch underdone. This residual heat will finish the cooking process once they are removed from the oven.
Let them rest on the hot sheet for five minutes before transferring to a wire rack to cool completely, which is vital for achieving that perfect textural contrast.
Maximizing Longevity: Storing Your Freshly Baked Goods
Once completely cooled, these cookies can be stored in an airtight container at room temperature for up to four days. If you find yourself needing a longer term solution, which is common with such successful baking, look below for detailed freezing advice.
Troubleshooting and Customizing Your Perfect Batch
If you're new to working with browned butter, you might encounter minor hiccups. We have solutions for those, and plenty of ideas for flavour variations.
Troubleshooting Common Cookie Failures (Too Flat or Too Cakey)
If your cookies recipe chocolate chip batch spreads too thin, it almost always means your butter was too warm when mixed in, or you skipped the chilling phase. Next time, ensure the brown butter is only lukewarm before creaming.
Conversely, if the cookies are too cakey, you likely overmixed the flour, leading to too much gluten development. Keep that mixer speed low when incorporating the dry goods!
Elevating Your Cookies Recipe with Flavor Swaps
These are highly adaptable. For a sophisticated twist, try adding ½ teaspoon of ground cinnamon and a pinch of nutmeg to the flour mixture. If you prefer a richer, almost bitter profile, swap some of the chocolate chunks for high-quality cocoa nibs.
If you were attempting a cookies recipe without butter entirely, using quality coconut oil might work, but the flavour profile will naturally shift away from the desired nutty notes.
Nutritional Snapshot of These Indulgent Treats
These are rich treats, yielding approximately 280 300 calories per large cookie, primarily from healthy fats and natural sugars, offering about 3 grams of protein. They are best enjoyed in moderation alongside a strong coffee.
Freezing Strategies for Dough Balls and Baked Cookies
The dough freezes brilliantly. Scoop the dough onto a lined tray, freeze until solid, then transfer the frozen balls to a heavy duty freezer bag for up to three months. Bake them directly from frozen, adding 2– 3 minutes to the baking time.
Baked cookies can also be frozen; place parchment between layers in an airtight container for up to two months.
Understanding Serving Size and Caloric Density
As these are large, decadent cookies yielding about 20 24 servings, they represent a substantial indulgence. Given the rich butter base, they are calorically dense, reinforcing their status as an occasional, luxurious treat rather than an everyday snack.
Serving Suggestions
The best way to enjoy these is slightly warm, allowing the chocolate to remain molten. Pair them, as tradition dictates, with a very cold glass of milk, or for an adult pairing, perhaps a dry stout or a robust dark roast coffee.
Recipe FAQs
Why do my cookies spread out too flat? I want them thick like in the pictures for this Cookies Recipe!
This is usually down to two main culprits: not enough flour, or skipping the chilling stage. Make sure you're spooning your flour or weighing it accurately, as packing it in the cup will result in a flat bake.
Most importantly, the dough needs at least an hour in the fridge; this solidifies the brown butter so it melts slowly in the oven, keeping those gorgeous thick edges.
I'm worried about burning the butter; how do I know exactly when the brown butter is perfect?
Don't panic, it’s an easy step to master once you know the signs! You’ll see white foam subside, the milk solids will sink to the bottom and turn nutty brown, and most importantly, it will smell like toffee or toasted hazelnuts not burnt toast.
If you see black bits, you’ve gone too far, so pull it off the heat immediately!
Can I make the dough ahead of time, and how long will it keep in the fridge?
Absolutely, making the dough ahead is a top baker’s trick! Chilling the dough for up to 72 hours actually deepens the flavour profile, letting those brown butter notes really mature.
Just make sure it's well wrapped in cling film before popping it in the fridge; taking it out 15 minutes before scooping can help with handling.
My finished cookies are a bit too hard; what can I do next time to ensure they are chewy?
To achieve that perfect chewy centre, pull the cookies out of the oven when the edges look golden brown but the very centre still looks slightly underbaked. They will continue to set on the hot baking sheet for five minutes after leaving the oven, which is the secret to a gooey middle.
Also, using more brown sugar than granulated sugar helps maintain moisture!
I don't have high-quality chocolate chunks; can I just use standard chocolate chips?
You certainly can, but for a truly brilliant cookie, the chocolate makes a huge difference. Standard chips often contain stabilizers that prevent them from fully melting into puddles.
If you only have chips, try chopping up a good quality dark chocolate bar instead; you’ll get those lovely, melty pools that make this recipe shine.
How should I store these cookies to keep them fresh for teatime tomorrow?
Once they’ve cooled completely on a wire rack, store them in an airtight container at room temperature. They’re best enjoyed within three to four days, but if you want to keep them for longer, they freeze like a dream!
Pop cooled cookies into a freezer bag, and they'll be perfect for defrosting later, perhaps even with a quick zap in the microwave to refresh them.
Brown Butter Chocolate Cookies

