The Village Bakehouse Cherry Cobbler Perfectly Tart Filling Under a Golden Buttery Biscuit Topping
- Unlocking the Charm: Why This Cherry Cobbler Tastes Like a Cotswolds Getaway
- The Philosophy Behind 'The Village Bakehouse' Dessert Standard
- Assembling the Components: Essential Provisions for Perfect Cherry Cobbler
- The Methodical Path to Golden Perfection: Step-by-Step Baking Guide
- Pro Baker Secrets: Troubleshooting and Enhancements for Next Time
- Serving Suggestions: Pairing Your Finished Bake
- Recipe FAQs
- 📝 Recipe Card
Unlocking the Charm: Why This Cherry Cobbler Tastes Like a Cotswolds Getaway
There is something deeply soul soothing about a perfectly executed Homemade Cherry Cobbler . It’s the dessert equivalent of pulling on your favourite well worn sweater familiar, warm, and infinitely comforting.
For me, the scent of baking cherries immediately transports me back to crisp afternoons exploring quaint English villages. This Cherry Cobbler Recipe , which I call "The Village Bakehouse Cherry Cobbler," isn’t just another sweet ending; it’s an experience.
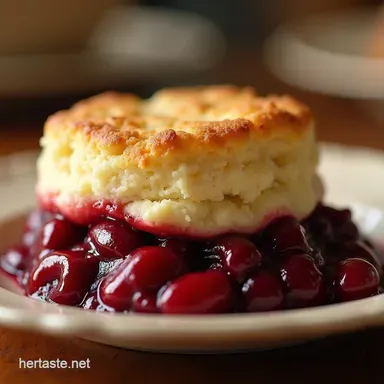
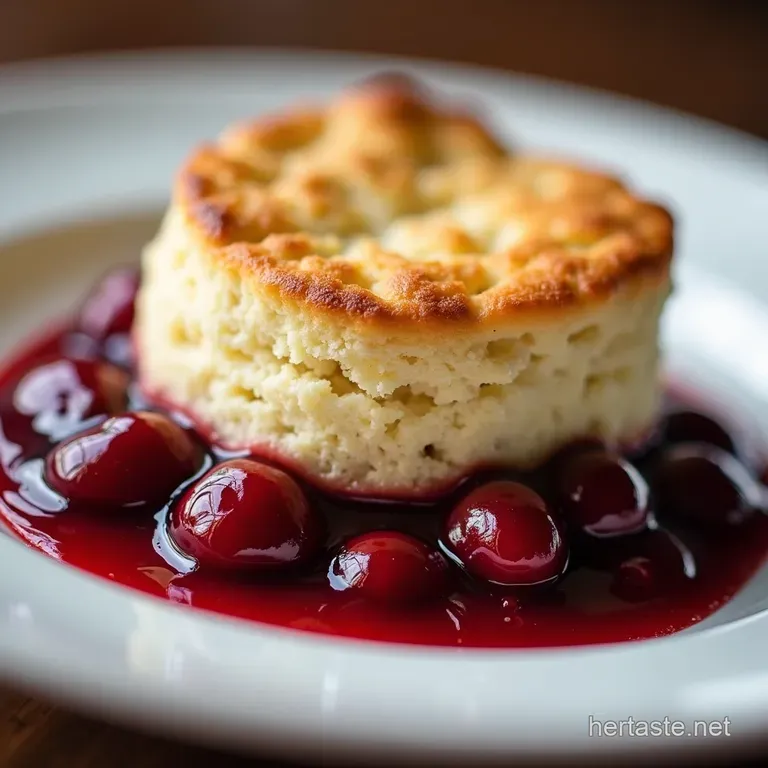
We focus on achieving that perfect textural contrast: a molten, slightly sharp fruit base peeking out from under a crown of tender, golden biscuits. It’s wonderfully Easy Cherry Cobbler to make, bypassing the fussiness of traditional pastry while delivering maximum reward.
The Philosophy Behind 'The Village Bakehouse' Dessert Standard
My aim is to elevate the humble fruit dessert without complicating the process. A truly great cobbler requires balance, a concept often overlooked when home cooks default to excessive sweetness.
We are aiming for something closer to a scone topping than a heavy cake, ensuring the bright, slightly aggressive tartness of the fruit is the star.
Crafting Comfort: Setting Expectations for a Flawless Bake
This recipe is designed for success, requiring only about 20 minutes of active preparation time, making it a perfect candidate for a weeknight treat or a simple Sunday dessert. We are covering two main elements: the intensely flavoured fruit filling and the light, buttery biscuit topping.
Don't worry about pastry skills; we are using a straightforward drop biscuit method that guarantees a light, flaky texture a true hallmark of exceptional Comfort Food Desserts .
Why the Balance of Tartness and Sweetness Matters Here
Cherries, especially the tart varieties often used in baking, possess a wonderful natural acidity. If we overpower this with too much sugar, the flavour becomes flat. In this recipe outline, we carefully balance just 3/4 cup of granulated sugar across 6 cups of fruit.
This allows the slight sharpness to shine through, beautifully complemented by a whisper of almond extract (1/2 teaspoon), which acts as a flavour amplifier for the cherry notes.
A Nod to Tradition: Elevating the Simple Fruit Dessert
While many turn to canned Cherry Cobbler with Pie Filling for convenience, we are embracing the real fruit experience. Whether you opt for 6 cups of fresh, pitted sour cherries or opt for un-thawed frozen ones, the result is far superior in texture and flavour depth.
This methodology ensures every spoonful delivers that authentic burst of fruit that defines a remarkable bake.
Assembling the Components: Essential Provisions for Perfect Cherry Cobbler

To ensure we achieve that golden, flaky success, precise measurements and high-quality ingredients are key. We will divide our provisions into two distinct groups: the foundation for the filling and the components for the buttery topping.
You will need a standard 9x13 inch baking dish or a large, deep 10 inch round dish to accommodate the generous fruit load.
Sourcing Secrets: Choosing Your Cherries and Starches
For the filling, the star is undoubtedly the cherry. If using Cherry Cobbler with Frozen Cherries , resist the urge to thaw them; they will release their juices slowly during the bake. The thickener required is cornflour (or cornstarch), taking three tablespoons.
This works quickly to manage the juice released during baking, ensuring your cobbler isn’t watery. We finish the filling with a dash of fresh lemon juice (1 tablespoon) to brighten the profile.
The Foundation: Detailed Checklist for the Buttery Topping Mix
The topping is crucial; it defines this dessert as a cobbler rather than a crisp or crumble. You will require 2 1/4 cups of sifted all-purpose flour, along with 1 tablespoon of baking powder for lift, 1/4 cup of sugar for slight sweetness, and 1/2 teaspoon of salt.
The magic ingredient here is the very cold, cubed unsalted butter a full 1/2 cup (one standard stick). This cold fat, combined with 3/4 cup of heavy cream, creates the characteristic flaky texture.
Essential Equipment: Tools to Guarantee Golden Success
While this is an Easy Cherry Cobbler , having the right tools streamlines the process. You’ll need your main mixing bowls, a whisk for the dry ingredients, and crucially, a pastry blender or two sturdy knives for cutting the butter into the flour.
A rubber spatula is helpful for mixing the dough minimally, and a small pastry brush is essential for achieving that professional, golden finish on the biscuit tops.
Related Recipes Worth Trying
- The Best Rustic Peach and Cherry Cobbler Recipe — Forget fussy pastry This easy Peach and Cherry Cobbler recipe features a tender buttermilk biscuit topping for the perfect summer fruit dessert
- The Best OldFashioned Cherry Bake Recipe with Flaky Crust — Forget fussy tartsthis OldFashioned Cherry Bake features a rich buttery crust and comforting filling Get the foolproof recipe
- My GoTo DELICIOUS HOMEMADE CHERRY PIE Recipe — Bake the best DELICIOUS HOMEMADE CHERRY PIE This recipe is bursting with flavor and surprisingly easy Tart cherries meet flaky crust a musttry Get the...
The Methodical Path to Golden Perfection: step-by-step Baking Guide
Once your ingredients are gathered, the process moves swiftly. First, you must preheat your oven to 375° F ( 190° C) and lightly grease your chosen baking dish.
Mastering the Biscuit Layer: Techniques for Tender Topping
The secret to light Cherry Cobbler Biscuits lies in temperature control and minimal handling. In one bowl, whisk your dry topping ingredients thoroughly. Then, incorporate the cold, cubed butter using a pastry blender or your fingertips, working quickly until the mixture resembles coarse crumbs with some visible pea-sized butter chunks remaining.
Immediately pour in the 3/4 cup of heavy cream. Stir just until a shaggy, slightly sticky dough forms. Stop stirring the moment the flour is incorporated; overmixing develops gluten, resulting in a tough topping.
Prepping the Fruit: Achieving the Ideal Filling Consistency
In your larger bowl, combine the 6 cups of cherries (frozen or fresh) with the 3/4 cup sugar, 3 tablespoons cornflour, lemon juice, salt, and optional almond extract. Toss gently with a spatula until every cherry is coated in the sugary starch mixture.
This starch is what transforms the raw juices into a thick, luscious sauce as it bakes. Transfer this entire mixture into your prepared baking dish, spreading it into an even layer.
Combining and Setting: Preparing the Dish for the Oven
Using a large spoon or an ice cream scoop, drop spoonfuls of the biscuit dough evenly over the fruit filling. It is vital not to spread the dough to cover the entire surface; leave visible gaps between the mounds.
These openings allow the filling to bubble up vigorously and steam the biscuits from below, ensuring they cook through and maintain their tender interior.
Baking Times and Temperature Checks: How to Tell It's Done
Brush the tops of the biscuit mounds lightly with the reserved tablespoon of cream this promotes a beautiful, rich golden colour. Place the dish into the preheated 375° F ( 190° C) oven. Bake for 40 to 45 minutes.
The cobbler is done when the topping is deeply golden brown and, most importantly, the cherry filling is visibly and vigorously bubbling up through every available crevice. If the topping starts browning too quickly, you can loosely tent it with foil for the last 10 minutes.
The Critical Cooling Stage: Resting Your Beautiful Cobbler
Resist the urge to dive in immediately! After removing the cobbler from the oven, allow it to rest on a cooling rack for a minimum of 20 minutes. This seemingly simple step is non-negotiable; it allows the cornflour thickened juices to set up slightly.
If you cut into it too soon, the filling will run like soup. Patience yields a scoopable, decadent slice.
Pro Baker Secrets: Troubleshooting and Enhancements for Next Time
Every bake offers a lesson. If your topping seems too dense, you likely overworked the dough remember, gently coax it together, don't knead it. If your filling remained thin, ensure your oven temperature was accurate and that you saw that vigorous bubbling; sometimes, a quick stir of the fruit before baking can ensure the cornflour is evenly distributed.
For a different take, you could experiment with a Cherry Cobbler with Cake Mix , though this alters the texture significantly away from the classic biscuit style.
Serving Suggestions: Pairing Your Finished Bake
This rich dessert shines brightest when accompanied by something cool and creamy. While some prefer a simple drizzle of caramel sauce, my personal favourite remains a generous scoop of high-quality vanilla bean ice cream, allowing the melting cold cream to mingle with the warm, tart cherries.
Storage Solutions: Keeping This Comfort Food Fresh for Days
Any leftover Cherry Cobbler keeps wonderfully. Cover the baking dish tightly with plastic wrap or transfer leftovers to an airtight container. Stored correctly at room temperature, it remains delicious for up to two days.
Reheat slices briefly in a microwave or a low oven until the topping is crisp again.
Flavor Twists: Inspiring Variations on the Classic Cherry Cobbler
To introduce nuance, consider adding 1/2 teaspoon of ground cinnamon and a pinch of nutmeg to the dry topping mixture for an autumnal warmth. Alternatively, you could swirl a couple of tablespoons of finely chopped dark chocolate into the fruit filling just before topping it; the slight bitterness marries beautifully with the tart fruit.
Altitude Adjustments: Fine Tuning for Higher Kitchens
If you live at a high altitude, the lighter texture of the biscuit topping can sometimes struggle. I recommend increasing the liquid in the topping by one or two tablespoons of cream, and slightly reducing the baking powder to 2 1/4 teaspoons to control the rise and prevent crumbling.
Nutritional Snapshot: Understanding the Indulgence
While this is decidedly a treat, understanding the components helps frame the enjoyment. This Cherry Cobbler Recipe provides substantial energy from the buttery topping (approximately 18g of fat per slice) balanced by natural sugars and fibre from the fruit.
Enjoyed in moderation, it’s a wholly worthwhile indulgence that celebrates the simple joy of Comfort Food Desserts .
Recipe FAQs
Can I use frozen cherries instead of fresh ones in this Cherry Cobbler recipe?
Absolutely! Frozen cherries are a brilliant substitute, especially when fresh ones are out of season. The key, as noted in the recipe, is not to thaw them first; use them straight from the freezer. This prevents them from releasing too much liquid into your filling before it gets into the oven.
My topping always comes out dense and biscuit like instead of light. What am I doing wrong?
That’s a common hitch, usually caused by overworking the dough! Remember, this topping is meant to be very rustic, much like a scone. Make sure your butter is ice cold, and once you add the cream, stir it just until everything comes together into a shaggy mess don’t try to make a smooth dough ball.
How should I store leftover Cherry Cobbler, and how long will it keep?
Cover the cooled cobbler tightly with cling film or foil and keep it in the fridge. It’s generally best enjoyed within 3 to 4 days. When you fancy a slice, I highly recommend reheating it gently in the oven for about 10 minutes to crisp up the topping again, then serving it warm with a cold splash of cream.
Why does the recipe insist on using tart cherries instead of sweet ones?
It’s all about balance! Sweet cherries can turn a cobbler sickly, but the tart ones (like sour cherries) provide that lovely acidic zip that cuts beautifully through the richness of the buttery topping. If you must use sweet cherries, reduce the added sugar in the filling by about a quarter cup.
My filling didn’t thicken up properly, it was very runny. What ingredient controls the thickness?
The cornflour (cornstarch) is your thickening agent, so make sure you've measured it precisely. Also, ensure the cobbler bakes long enough for the filling to reach a rolling boil bubbling up through the topping; this boiling activates the starch to set properly. Give it 5-10 extra minutes if the bubbles aren't hearty!
Village Bakehouse Cherry Cobbler