The Speedy Suppersmith Flashfried Sesame Tuna Bowl
- Ditching the Dull: Why This Sesame Tuna Bowl Replaces Your Weeknight Routine
- The Blueprint for a Lightning-Fast, Flavor-Packed Tuna Rice Bowl
- Mastering the Components: What You'll Need for Your Bowl
- Tools of the Trade: Essential Gear for Assembly
- Step-by-Step Execution: Building Your Flash-Fried Masterpiece
- Elevating Your Creation: Creative Toppings and Remixes
- Storage Solutions: Keeping Your Leftovers Fresh and Flavorful
- Nutritional Snapshot: Powering Up with Protein
- Recipe FAQs
- 📝 Recipe Card
Ditching the Dull: Why This Sesame Tuna Bowl Replaces Your Weeknight Routine
There are certain meals that deserve a permanent spot in your culinary rotation dishes that manage to deliver complex flavour profiles while demanding shockingly little time or effort. This Tuna Rice Bowl falls squarely into that elite category.
Forget those dreary, mayonnaise laden sandwiches made with tinned fish; we are elevating canned tuna’s cousin, the beautiful, vibrant Ahi loin, into an experience that rivals your favourite takeout spot.
This "Flash Fried Sesame Tuna Bowl with Quick Pickled Cucumber" is designed for speed, boasting clean Japanese inspired tastes perfectly balanced by zingy acidity and nutty crusts.
It’s nutritious, satisfying, and crucially, it delivers a proper Quick Tuna Dinner that feels gourmet, despite being ready in about 30 minutes total.
The Blueprint for a Lightning Fast, Flavor Packed Tuna Rice Bowl
When crafting a truly memorable Tuna Rice Bowl Recipe , we focus on contrast: hot versus cool, crunchy versus soft, and sweet versus savoury. This particular blueprint is achievable for cooks of all skill levels.
The beauty of this dish lies in its simplicity; the techniques involved are nothing more than basic slicing, mixing, and a very quick sear. For those seeking a Healthy Tuna Rice Bowl without relying on heavier dressings, the searing method keeps the protein lean while the homemade quick pickle adds phenomenal brightness.
This approach moves miles away from a standard Tuna Rice Bowl No Mayo requirement, offering natural flavour enhancement instead.
Flavor Profile Unpacked: Sweet, Savory, and Slightly Zingy
The harmony in this bowl comes from three key elements working in concert. First, the tuna itself is coated in toasted sesame seeds, lending a deep, earthy nuttiness. This is complemented by the umami depth from any soy sauce element used in assembly. The third, essential component is the quick pickled cucumber.
Made simply with rice vinegar, sugar, and salt, these slices offer an immediate, sharp, zingy counterpoint that cuts through the richness of the seared fish and the warmth of the sushi rice, ensuring every bite feels fresh and clean.
Time Commitment: How Fast This Dish Truly Comes Together
One of the major draws of this recipe is its efficiency. We estimate a total time commitment of around 30 minutes, assuming you have access to pre-cooked or quickly steamed sushi rice.
The Prep Time clocks in at about 20 minutes, primarily spent thinly slicing the cucumber for the pickle and getting the tuna ready for its crust.
The active Cook Time is a mere 10 minutes, as the tuna requires only about a minute per side on a searing hot surface. This makes it a superior option when you need a Quick Tuna Dinner solution.
The All-Star Ingredient: Sourcing Your Best Tuna Cut
For this style of preparation, where the centre of the fish remains rare, sourcing is paramount. You must seek out sushi grade or sashimi grade Ahi Tuna Loin . This designation ensures the fish has been handled and frozen according to safety standards suitable for raw consumption.
If you are hesitant about searing tuna rare, remember this preparation method is very forgiving; searing for longer will yield a medium result, though the textural difference is worth attempting the rare centre for your first Tuna Poke Bowl Recipe -inspired experience.
Mastering the Components: What You'll Need for Your Bowl
To create a perfect experience a real Tuna Sushi Bowl experience we need to manage our ingredients thoughtfully. For the pickled cucumber component, you’ll need one English cucumber, thinly sliced, submerged in a simple brine of 2 tablespoons of rice vinegar, 1 teaspoon of sugar, and a quarter teaspoon of salt.
The star, the tuna, requires about one pound of loin, which must be patted absolutely dry. This dryness is non-negotiable for a good sear. For coating, a mix of white and black sesame seeds (about 2 tablespoons total) seasoned lightly with kosher salt and pepper is ideal.
The base relies on two cups of perfectly cooked, warm sushi rice, complemented by bright additions like shelled edamame and shredded carrots.
Tools of the Trade: Essential Gear for Assembly
While the ingredients are high quality, the tools required are decidedly basic. You will need a sharp chef’s knife for precise slicing of the tuna and cucumber. A small mixing bowl is necessary for whisking up that quick pickle brine.
Crucially, the searing requires a large, heavy bottomed skillet; cast iron excels here as it retains the high, even heat necessary to develop a crust quickly without overcooking the interior of the tuna. Finally, a small, shallow plate or dish is needed to hold your sesame seed mixture for easy coating.
The Quick Pickle Prep: Achieving Perfect Cucumber Crunch
The goal of the quick pickle is simple: retain the cucumber’s crunch while infusing it with bright acidity. After thinly slicing your English cucumber (about 1/4 inch thick), whisk together the rice vinegar, sugar, and salt until fully dissolved. Pour this mixture over the slices, ensuring they are submerged.
Even 15 minutes of marination will transform the cucumber, making it pleasantly tart and firm, a perfect counterpoint to the richness of the seared fish in your Tuna Rice Bowl Ideas repertoire.
Sesame Crust Dynamics: Coating Thickness and Adhesion Secrets
The thickness of the sesame crust impacts both texture and searing time. You want an even, relatively thin coating on all sides of the tuna block. To achieve excellent adhesion, the tuna must be bone dry before it touches the seeds. Press the sesame mixture firmly onto the exterior of the loin.
Too thick, and the seeds will burn before the tuna surface browns; too thin, and you miss that signature nutty crunch that defines this version of the Tuna Rice Bowl .
Beyond the Basics: Optional Boosters for Next Level Flavor
While the core recipe is fantastic, consider adding a fried egg on top for extra richness a runny yolk acts as a natural sauce. If you prefer something closer to a traditional Tuna Poke Bowl Recipe profile, incorporate cubes of avocado or perhaps some thinly sliced radish.
These additions not only enhance visual appeal but introduce varied textures within the bowl structure.
Related Recipes Worth Trying
- The Wok Star Speedy Chicken Veggie Rice Noodle StirFry — Master the perfect nonsticky Rice Noodle Stir Fry with this easy recipe Featuring a vibrant sauce recipe and tender chicken dinner is ready in 35 minutes
- Quick Wok Wonders Speedy Rice Noodle StirFry Recipe — Ditch the takeaway menu This authentic Rice Noodle StirFry recipe is ready in 30 minutes featuring perfectly slippery noodles and a zingy soyginger sauce A...
- Easy Cookies From Scratch Foolproof OneBowl Recipe — Need simple cookie recipes in a hurry This onebowl wonder makes easy cookies that are wonderfully chewy and ready fast Perfect for beginner bakers
Step-by-step Execution: Building Your Flash Fried Masterpiece
The construction of this bowl happens in phases: prepping the cold elements first, then quickly applying heat to the protein. Begin by making the quick pickle and allowing it to sit while you prepare everything else. Next, focus on your rice it should be warm when you start the final assembly.
With the rice ready, the last active stage is searing the sesame crusted tuna loin, which is the quickest cooking step but requires your full attention to nail the timing. Finally, it’s assembly time, arranging the components artfully for maximum visual appeal.
The Art of the Sear: Achieving Golden Brown Perfection on the Tuna
This is the critical moment. Ensure your sesame oil is shimmering hot in the cast iron skillet you want high heat, bordering on smoking, before the tuna enters the pan. Carefully place the coated tuna loin into the hot oil.
You are aiming for a sear of only 45 to 60 seconds per side, focusing on creating a crisp, golden crust on all four long sides. Immediately remove the tuna to a cutting board to rest for two minutes. This short rest prevents the juices from running out everywhere when you slice it.
Perfecting the Sushi Rice Base: Fluff and Seasoning
The rice provides the foundational warmth and structure for your entire Tuna Rice Bowl . Whether you use traditional sushi rice seasoned with vinegar, sugar, and salt, or a simpler Jasmine rice, ensure it is fluffy and warm.
The warmth of the rice provides a delightful temperature contrast to the cool, crisp cucumber and the just warm centre of the seared tuna. For a complete Tuna Sushi Bowl , season the rice lightly to taste before spooning it into the serving vessels.
The Swift Sauté: Blanching the Veggies (If Applicable)
While this recipe primarily uses raw/crisp vegetables like shredded carrot and edamame, if you choose to incorporate other greens like spinach or bok choy, they require minimal heat. Blanching is the fastest method: drop them into boiling water for 30 seconds, then immediately transfer them to an ice bath.
This sets their colour and retains a pleasant bite, preventing them from becoming soggy distractions in your otherwise crisp meal.
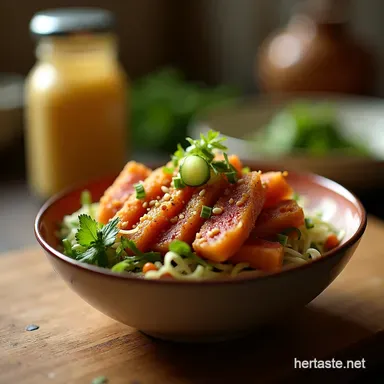
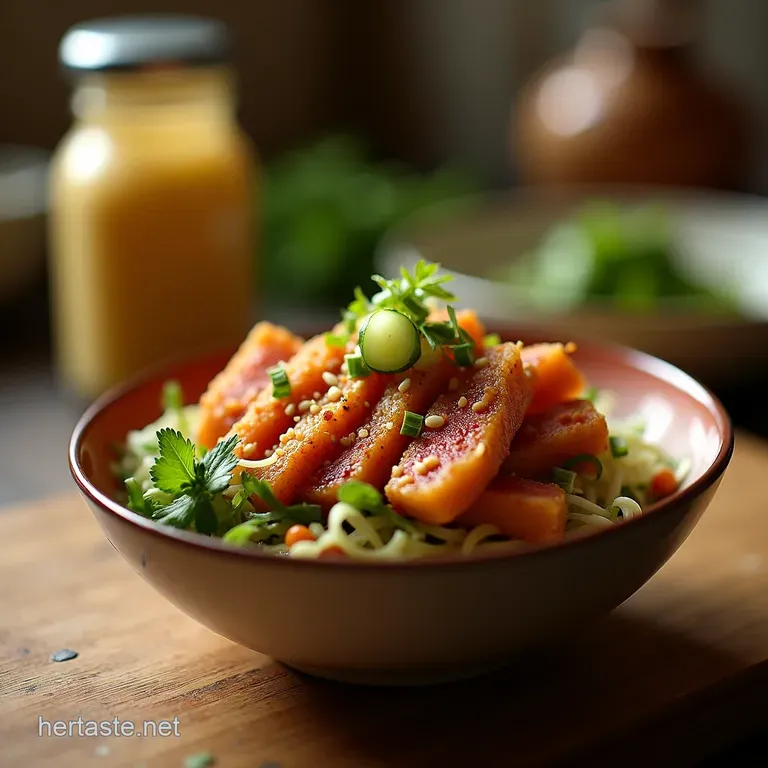
Final Plating Strategy: Arranging Your Stunning Tuna Rice Bowl
Plating is where this easy meal truly shines. Divide the warm rice evenly into your two bowls. Arrange the supplementary vegetables edamame and carrots neatly around one half of the rice mound.
Slice the rested, seared tuna against the grain into beautiful 1/4 inch thick pieces and fan them artfully over the rice. Drain the pickled cucumbers well and scatter them generously. Garnish with thinly sliced scallions, which add a final layer of sharp freshness.
Elevating Your Creation: Creative Toppings and Remixes
To truly customize your Tuna Rice Bowl Ideas , think about texture and sauce. A popular elevated topping involves whipping up a spicy mayo using Kewpie mayonnaise, a dash of soy sauce, and a squeeze of fresh lime juice a drizzle of this adds richness without being heavy.
For added crunch, consider sprinkling toasted nori (seaweed) strips or crunchy fried onions over the top. This ability to customize makes it easy to transform this Easy Tuna Rice Bowl into something new every week.
Storage Solutions: Keeping Your Leftovers Fresh and Flavorful
Ideally, this bowl is best enjoyed immediately, especially to maximize the texture contrast between the warm rice and the seared tuna. However, if you have leftovers, it is best to store the components separately. Keep the sliced tuna (if fully cooked, it stores better than rare) refrigerated in an airtight container.
Store the rice, pickles, and vegetable toppings separately. Reheat the rice gently with a tablespoon of water to steam it back to life, and then assemble everything fresh; never reheat the fish or the pickles together.
Nutritional Snapshot: Powering Up with Protein
This dish is inherently lean and packed with high-quality protein, making it an excellent choice for fitness goals. A serving provides robust amounts of Omega-3 fatty acids thanks to the Ahi tuna, coupled with complex carbohydrates from the rice and fibre from the vegetables.
This nutrient dense profile supports sustained energy release, proving that eating well doesn't need to involve slow cooking.
Spicy Variations: Incorporating Frank's RedHot® for a Kick
If you want to integrate some fiery warmth without muddying the pure sesame flavour, using a high-quality, flavourful hot sauce is the answer. A brilliant way to do this, especially if you are aiming for a Tuna Rice Bowl No Mayo option, is to whisk a teaspoon of Frank's RedHot® directly into a small serving of soy sauce mixed with a tiny splash of sesame oil.
Drizzle this fiery mixture directly over the rare tuna slices just before serving for an immediate, vibrant heat boost.
Meal Prep Mastery: Structuring Bowls for the Week Ahead
While the seared tuna is best fresh, this framework adapts wonderfully for meal prepping. For lunches throughout the week, prepare the rice, the quick pickles, and the vegetable components (edamame, carrots) ahead of time. Store these elements in separate containers.
When it’s time to eat, quickly sear a fresh portion of tuna for that perfect crust, slice it, and assemble. This strategy ensures you enjoy the best texture for the protein while having all the hard prep work done days in advance.
Troubleshooting Common Cooking Conundrums
If your sesame seeds burned during the sear, the pan was likely too hot when the tuna was added, or the tuna wasn't dry enough, causing the oil to smoke excessively. If your tuna is grey throughout instead of rare, you simply left it in the pan too long; next time, set a timer for 45 seconds per side.
If your quick pickle tastes flat, the balance of salt and sugar needs adjustment a pinch more sugar usually balances the sharpness of the vinegar beautifully.
Recipe FAQs
Is it absolutely necessary to use sushi grade tuna for this Tuna Rice Bowl?
If you plan on serving the tuna rare, then yes, absolutely! You must use sushi or sashimi grade tuna to ensure it's safe to eat uncooked or lightly seared. For beginners worried about sourcing, you can substitute with high-quality canned tuna, but you'll need to flake it rather than slice and sear it.
My tuna sear either burns or doesn't crust up. What am I doing wrong?
The secret lies in the heat, mate it needs to be roaring hot! Make sure your skillet is smoking hot before you add the sesame oil, and the oil should shimmer immediately. Also, ensure your tuna loin is patted completely bone dry; any moisture will steam the fish instead of searing it beautifully.
Can I prepare the quick pickled cucumbers ahead of time?
That’s a brilliant idea, as they taste even better after a bit of a chill! You can safely make the cucumbers up to 24 hours in advance. Just keep them stored in their pickling liquid in an airtight container in the fridge. They add a fantastic zingy contrast to the rich tuna.
How should I store leftovers of this Tuna Rice Bowl?
For best results, only store components you are certain about. The seared tuna should ideally be eaten the same day due to safety concerns. You can store the rice and the pickles separately in the fridge for 1-2 days, but you’ll need to cook or source fresh tuna when you fancy another bowl.
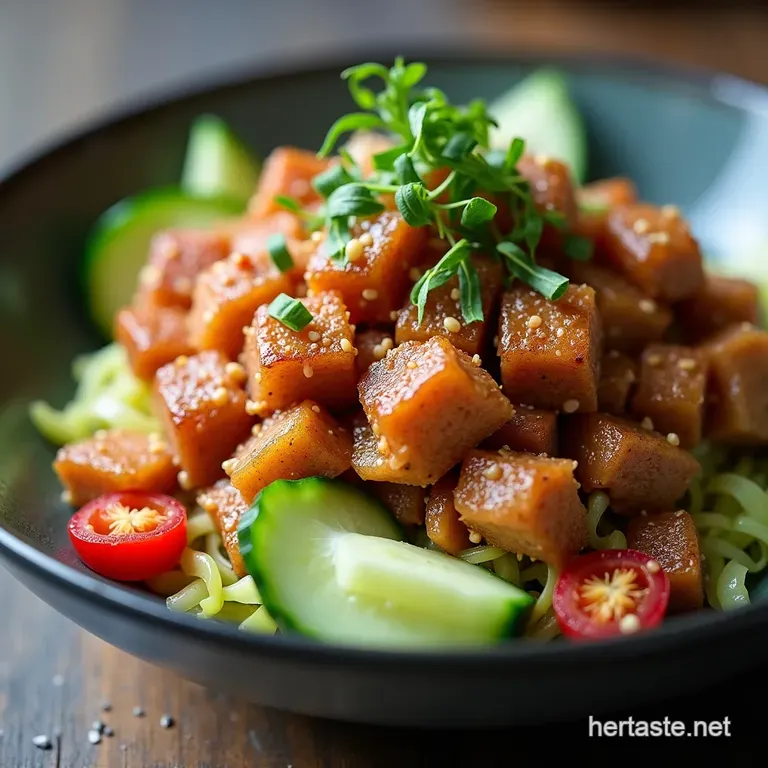
I'm not a fan of raw fish. What's the best variation for a well done Tuna Rice Bowl?
If you want it cooked through, just keep the sesame crusted tuna in the hot pan for an extra minute or two on each side until it reaches your desired doneness. You’ll lose that lovely pink centre, but the sesame crust will still be delicious and nutty!
What can I use instead of sushi rice if I’m short on time?
If you’re in a right pickle and need to save time, Jasmine rice is a perfectly acceptable substitute; it has a slightly different texture but still carries the flavours well. For an even quicker fix, look for pre-cooked microwaveable pouches of rice, which are surprisingly decent these days!
Sesame Tuna Rice Bowl Recipe