The Autumn Gold Perfectly Spiced Pumpkin Pie with Brown Butter Crust
- Unveiling the 'Autumn Gold' Standard: Why This Recipe Triumphs
- The Alchemy of Autumn: Defining Our Perfect Pumpkin Pie Experience
- Gathering the Necessities for Culinary Success
- Essential Tools for Crafting the Ultimate Filling
- Step-by-Step Mastery: From Dough to Golden Edges
- The Baking Ritual: Achieving Zero Cracks in Your Custard
- Troubleshooting and Advanced Pumpkin Pie Techniques
- Serving Suggestions and Storage Strategies
- Recipe FAQs
- 📝 Recipe Card
Unveiling the 'Autumn Gold' Standard: Why This Recipe Triumphs
There is something almost sacred about the first slice of truly magnificent Pumpkin Pie . It signals the turn of the season, conjures memories of hearth fires, and anchors every celebratory autumn meal. However, not all pies are created equal.
Many recipes yield a filling that is too watery, too sweet, or worse a filling that cracks into an unappetizing mosaic upon cooling. This Pumpkin Pie Recipe , which I affectionately call the "Autumn Gold," is engineered to eliminate those pitfalls entirely.
We are not aiming for adequate; we are aiming for definitive. This is the Best Pumpkin Pie Recipe you will encounter, built on foundational baking techniques that ensure every slice is a velvety triumph.
The Alchemy of Autumn: Defining Our Perfect Pumpkin Pie Experience
Crafting the ideal Pumpkin Pie is a delicate balance between texture and flavour intensity. We want the deep, earthy sweetness of pumpkin to shine through, complemented, not masked, by warming spices. Our approach hinges on elevating two main components: the crust and the filling preparation.
This journey, resulting in a glorious Homemade Pumpkin Pie From Real Pumpkins —or high-quality canned purée is immensely rewarding.
Beyond store-bought: Elevating the Classic Dessert
Many home bakers rely on pre-made crusts or condensed mixes, but the distinction between good and great lies in crafting elements Pumpkin Pie From Scratch .
The flavour profile here is deepened significantly by incorporating freshly grated nutmeg and a hint of clove, moving far beyond the standard pre-mixed Pumpkin Pie Spice Recipe . We treat the spices as individual notes that must harmonize perfectly with the natural sweetness of the pumpkin.
A Note on Texture: Achieving True Velvety Smoothness
The biggest complaint about homemade custard pies is a grainy or coarse texture. We actively combat this by using a combination of sugars (light brown for molasses notes, granulated for clean sweetness) and ensuring our dairy components provide just the right richness.
Achieving that perfect, smooth custard requires careful temperature control during both mixing and baking, leading directly to our desired Creamy Pumpkin Pie Recipe result.
The Secret Weapon: Why Brown Butter Matters in the Crust
While traditional recipes call for cold, plain butter in the pastry, we introduce an element of sophistication: brown butter. Browning the butter transforms its flavour, imbuing the crust with deep, nutty, almost toffee like undertones.
This flavour layer acts as the perfect anchor for the sweet, soft filling, providing a crucial textural contrast that makes every bite interesting.
Gathering the Necessities for Culinary Success
Before we begin the 45 minutes of active preparation time required for this medium difficulty bake, ensure all components are assembled. While the active total time is just over two hours, remember that cooling is mandatory for perfect slicing, so plan accordingly for a celebratory meal.
You will need standard 9 inch pie dish, preferably glass or ceramic, which helps monitor the crust’s bottom browning.
Essential Tools for Crafting the Ultimate Filling

A simple whisk and a large mixing bowl will suffice for the filling, but for unparalleled smoothness the kind that makes people ask for your secret to a Creamy Pumpkin Pie Recipe —a fine mesh sieve is highly recommended to pass the final custard through before pouring.
The Foundation: Ingredients for the Nutty Brown Butter Pastry Shell
To create that signature nutty base, you need 1 ¼ cups of all-purpose flour, ½ teaspoon of salt, 1 teaspoon of granulated sugar, and approximately 6 tablespoons of unsalted butter that you will first brown, plus 2 extra tablespoons of cold, cubed butter to ensure flakiness.
The binding agent will be ice-cold water, added sparingly until the dough just coheres into a manageable disk.
Spice Cabinet Deep Dive: Mastering the Perfect Pumpkin Pie Seasoning Blend
The soul of our Pumpkin Pie rests in its spices. You will require 1 ½ teaspoons of ground cinnamon, ½ teaspoon each of ground ginger and freshly grated nutmeg, and ¼ teaspoon of ground cloves.
These are combined thoroughly with both packed light brown sugar (½ cup) and granulated sugar (¼ cup) to evenly distribute their flavour through the mixture before the wet ingredients are introduced.
Curating Your Pureed Pumpkin: Fresh vs. Canned Decisions
For consistency and ease, this recipe relies on one standard 15-ounce can of 100% pure pumpkin purée. If you choose to make a Homemade Pumpkin Pie From Real Pumpkins , ensure your purée is extremely dry; excess moisture is the enemy of a firm custard set.
To this pumpkin, we add richness via ¾ cup of heavy cream and ¼ cup of whole milk (or evaporated milk for a firmer traditional set), along with two large eggs and one extra egg yolk for deep colour and body.
Related Recipes Worth Trying
- The Best Classic Pumpkin Pie Recipe Flaky Crust Silky Filling — Ditch the soggy bottoms Master the perfect Homemade Pumpkin Pie from scratch with this trustworthy recipe featuring a flaky allbutter crust and rich spiced...
- Best Flaky Crust Pumpkin Pie Recipe From Scratch — Ditch the soggy bottom Learn to make the perfect creamy Pumpkin Pie filling with a shatteringly flaky allbutter crust Its the ultimate autumn bake
- Best Homemade Apple Pie Recipe Flaky AllButter Crust — Learn how to make a truly classic Apple Pie with a flaky allbutter crust and a deeply spiced filling This stepbystep recipe guarantees perfection
Step-by-step Mastery: From Dough to Golden Edges
Our process begins with the crust. Melt the butter slowly in a skillet until the milk solids toast and turn a deep amber, smelling richly nutty this is the brown butter. Quickly pour this into a bowl to halt the cooking. In your food processor or pastry blender, combine the flour, salt, and sugar.
Cut in the cooled brown butter until the texture resembles coarse sand. Add ice water, one tablespoon at a time, just until the dough comes together. Form this into a disk, wrap it, and let it rest in the refrigerator for a minimum of 30 minutes.
Once chilled, roll the dough into a 12 inch circle and gently nestle it into your pie dish, crimping the edges attractively. Pop it back into the fridge for a final 15-minute chill before baking.
The Baking Ritual: Achieving Zero Cracks in Your Custard
The magic of a perfect bake involves precise handling of both the pastry and the custard to ensure a flawless surface and sliceable centre.
Preparing the Brown Butter Crust: Chilling and Rolling Technique
Remember, cold butter is your friend here. If the dough becomes sticky while rolling, do not force it; chill it for 10 minutes. Rolling should be done swiftly on a lightly floured surface. The final chill prevents shrinkage during the initial bake.
Whisking the Filling: Integrating Air Without Over Mixing
In a large bowl, whisk your dry sugar and spice blend together first. Then, incorporate the pumpkin purée until smooth. In a separate container, lightly whisk your eggs and milk/cream mixture. Introduce the wet ingredients to the pumpkin mixture slowly, whisking constantly but gently.
Excessive whisking incorporates too much air, which expands during baking and is the primary cause of those dreaded surface cracks.
Blind Baking Wisdom: Protecting Your Pie Base from Sogginess
To guarantee you don't end up with a soggy bottom a cardinal sin in any Pumpkin Pie —we must blind bake. Prick the chilled crust all over, line it with parchment paper weighted down with pie weights or dried beans, and bake at 400° F ( 200° C) for 15 minutes.
Remove the weights and bake for another 5 minutes until the base looks dry and slightly set. This seals the pastry before the wet filling is introduced.
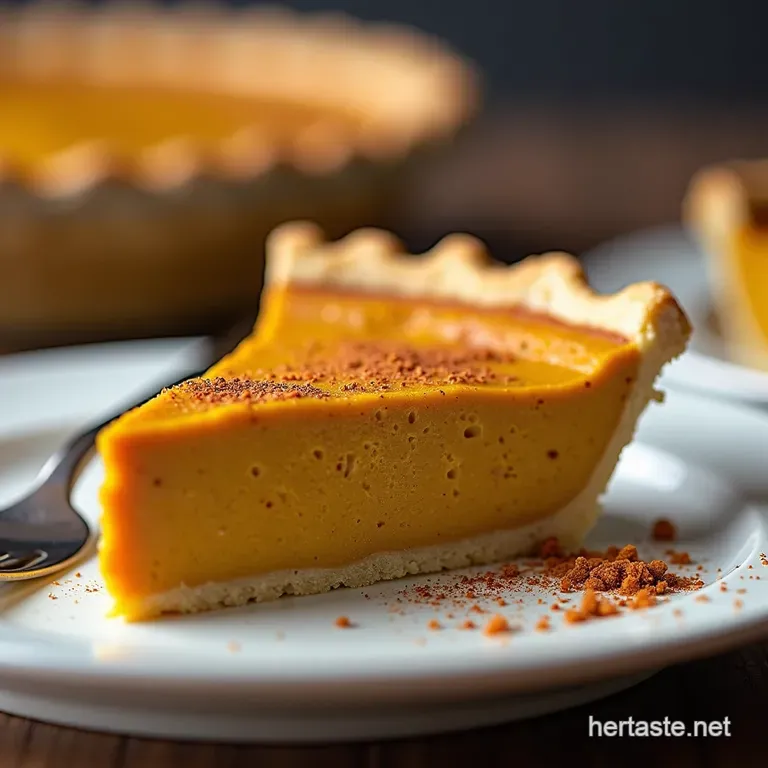
Cooling Protocol: Essential Steps for Setting the Perfect Slice
Once baked, remove the pie from the oven and place it on a wire rack to cool completely at room temperature for at least three hours. If you attempt to slice it warm, the custard will collapse. Chilling for an additional hour or two solidifies the custard into that perfect, sliceable consistency.
Troubleshooting and Advanced Pumpkin Pie Techniques
Even expert bakers can encounter issues, but with this recipe, most problems are avoidable. If you are new to baking custards, read this section closely to avoid common pitfalls like a grainy texture or a cracked top.
Expert Tips for Avoiding the dreaded 'Cranky Top'
The main culprit for a cracked Pumpkin Pie top is baking too long or too hot. We start the bake slightly higher ( 375° F/ 190° C) to set the edges quickly, but the key is removal time.
Your pie is done when the outer inch is firm, but the centre two inches still exhibit a significant, gentle wobble. It will finish setting outside the oven. If you notice the edges browning too quickly, fashion a simple foil ring to shield them during the last 15 minutes of baking.
Flavor Enhancements: Optional Caramel Drizzle Integration
While this pie stands beautifully on its own, for a truly decadent experience, consider pairing it with a homemade salted caramel. Drizzle a thin stream over each slice just before serving.
The interplay between the spiced pumpkin, the nutty brown butter crust, and the salty sweet caramel elevates this dessert to show stopping status.
Extending Shelf Life: Safe Handling of Custard Desserts
Because this filling contains eggs and dairy, proper cooling and storage are essential. Always cool the pie completely on the counter, then cover and refrigerate. It will keep safely for up to four days, making it an excellent option for early holiday prep.
Substitutions for Dietary Considerations (gluten-free Crust Ideas)
Should you need to adapt this, the filling is naturally gluten-free if you skip the optional bourbon. For the pastry, substituting the all-purpose flour with a high-quality 1-to-1 gluten-free blend will yield results comparable to the traditional version; you might just need a touch more ice water as GF flours often absorb liquid differently.
If you are looking for an even easier format, this recipe adapts brilliantly to individual Pumpkin Pie Bars baked in a rectangular pan.
Serving Suggestions and Storage Strategies
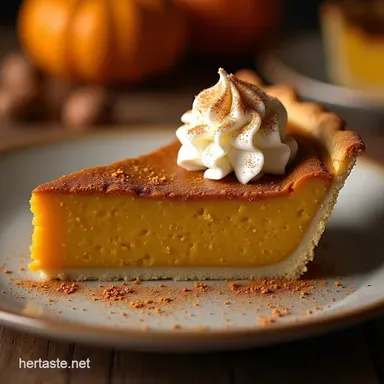
Once your Pumpkin Pie has achieved its perfect set, serve it cool. While a simple cloud of unsweetened whipped cream is the traditional companion, don't hesitate to add a dusting of extra fresh cinnamon or nutmeg on top of the cream for presentation.
Enjoy the rich, deeply satisfying taste of your expertly crafted autumn dessert.
Recipe FAQs
Why is my Pumpkin Pie cracking on top after baking?
This is usually down to overbaking, which causes the proteins in the eggs to seize up too tightly. To avoid this next time, remember that the pie is done when the edges are set, but the centre still has a slight, jello like wobble it will firm up as it cools down.
Also, ensure your filling isn't too hot when it goes into the oven!
How can I stop my homemade Pumpkin Pie from having a soggy bottom crust?
Ah, the dreaded soggy bottom a true baking nemesis! The best defense is a good offense: always blind bake the crust until it’s dry and slightly golden before adding the wet filling. If you skipped that step, try chilling your entire assembled pie in the freezer for 15 minutes right before it hits the oven.
Can I make the pumpkin pie filling ahead of time, or should I prep the crust first?
You can certainly make the pastry dough up to two days in advance and keep it chilled; that’s often better for handling! The filling, however, must be mixed and baked the same day for the best texture. Once baked, the whole pie needs several hours to cool completely to set properly.
My recipe calls for brown butter, but I've never done that is it complicated?
Not at all, it's simply melted butter cooked until the milk solids toast and turn nutty brown, which adds a brilliant depth of flavour that standard butter lacks. Just melt it slowly over medium heat until you see brown flecks forming at the bottom and smell a lovely aroma, then immediately take it off the heat so it doesn't burn!
How long does leftover Pumpkin Pie last, and should I refrigerate it?
Absolutely, this pie must be refrigerated due to the custard filling! Once cooled completely, cover it tightly with cling film and it should keep beautifully for 3 to 4 days in the fridge. Bring it out about 30 minutes before serving so it’s not stone cold.
Can I use fresh pumpkin purée instead of canned for this Pumpkin Pie recipe?
Yes, using fresh purée tastes wonderful, but you must ensure it’s very dry! Freshly roasted pumpkin holds a lot more water than canned varieties, so strain your homemade purée through cheesecloth for several hours or even overnight to drain excess moisture.
Otherwise, your pie might not set correctly.
Autumn Gold Pumpkin Pie