Grandmas Gold Standard the Perfect Creamy Pumpkin Pie with a Flaky Allbutter Crust
- Why This Spiced Autumn Dessert Outshines All Others
- The Quest for the Ultimate Homemade Pumpkin Pie Texture
- Assembling the Cornerstone Components for Flavour Perfection
- What Tools You'll Need Before You Start Mixing
- Step-by-Step Mastery: Building Your Golden Spiced Dessert
- Baking the Perfect Pumpkin Pie: Heat Management Secrets
- Troubleshooting and Next-Level Serving Suggestions
- Recipe FAQs
- 📝 Recipe Card
Why This Spiced Autumn Dessert Outshines All Others
There is a particular magic that descends when the air turns crisp, signaling the return of true comfort baking. While many autumnal bakes vie for attention, nothing captures the essence of harvest season quite like a truly exceptional Pumpkin Pie .
This isn't just another holiday filler; it’s a carefully balanced structure of warmth, spice, and texture. We’re setting our sights higher than the usual wobbly, overly sweet rendition.
Our goal today is to produce a magnificent, deeply flavoured, and richly spiced dessert that honours tradition while delivering a superior eating experience. If you’ve ever been disappointed by a watery centre or a soggy base, prepare to learn the secrets behind the Best Pumpkin Pie you’ve ever made from scratch.
The Quest for the Ultimate Homemade Pumpkin Pie Texture
Achieving that iconic, velvety mouthfeel requires respecting two distinct components: the pastry and the filling. Many home bakers rush these stages, which inevitably leads to textural disappointment. We must dedicate equal attention to both to earn the title of Perfect Pumpkin Pie .
Setting the Scene: A True British Baking Tradition
While pumpkins are synonymous with North American festivities, the concept of a spiced, baked custard tart is deeply rooted in British seasonality, often using squash or root vegetables in earlier forms.
This recipe leans into that sturdy, reliable heritage, ensuring our pastry casing is substantial enough to support the rich custard within. Forget flimsy, pre-made shells; we are embracing the satisfying challenge of creating a Flaky Crust Pumpkin Pie that shatters beautifully with every forkful.
Ditching Watery Fillings: Our Secret to Velvet Smoothness
The number one culprit for a sad Pumpkin Pie Filling is excess moisture. This is often caused by using fresh purée that hasn't been properly drained, or by incorporating too much air during mixing.
Our method combats this head-on by ensuring every element from the cold butter in the crust to the gentle incorporation of eggs is controlled. On top of that,, incorporating brown sugar alongside granulated sugar doesn't just add sweetness; it imparts molasses notes that deepen the overall profile, creating a Sweet Taste Pumpkin Pie that is complex, not cloying.
Your Easy Entry Point into Serious Home Baking
While the final result suggests complexity, this Pumpkin Pie Recipe is entirely approachable. We estimate a medium difficulty level because it demands patience, particularly during the chilling and cooling phases. However, the filling itself is a simple whisk and-pour procedure.
Mastering the blind baking technique for the shell is the main hurdle, but once conquered, you’ll find it an indispensable skill for all your future custard and fruit tarts, making this journey into a proper Pumpkin Pie from Scratch incredibly rewarding.
Assembling the Cornerstone Components for Flavour Perfection
Before we even preheat the oven, we need to gather and prepare our foundational elements. Success here is about temperature control and proportion. We are aiming for a 9 inch pie that serves eight generous portions, and the flavour balance relies heavily on the spices we choose.
Related Recipes Worth Trying
- Best Homemade Apple Pie Recipe Flaky AllButter Crust — Learn how to make a truly classic Apple Pie with a flaky allbutter crust and a deeply spiced filling This stepbystep recipe guarantees perfection
- The Foolproof Flip Easy NoRoll Pie Crust Recipe with Butter — Toss the rolling pin This easy NoRoll Pie Crust recipe yields a flaky buttery base pressed right into the dishperfect for your next quiche or pie Get the...
- Foolproof AllButter Pie Dough Recipe for Flaky Perfection — Learn how to make the best homemade pie dough from scratch This easy recipe guarantees flaky buttery layers for all your savoury or sweet pies
What Tools You'll Need Before You Start Mixing
To execute this recipe flawlessly, gather your arsenal: a standard 9 inch ceramic or glass pie dish is ideal for even heat distribution. A food processor or a dedicated pastry blender is essential for creating that coarse, crumbly texture needed for the crust without overworking the butter.
You will also need a rolling pin, a reliable whisk, and, crucially for the blind bake, pie weights dried beans or specialized ceramic weights work perfectly. Don’t forget a sturdy baking sheet placed underneath the pie dish during baking to manage drips and aid in temperature stability.
The All-Butter Foundation: Ingredients for the Flaky Pastry Shell
The crust needs to be robust enough to prevent a soggy bottom, meaning we rely on exceptionally cold, high-quality fat. For our Flaky Crust Pumpkin Pie , we combine 1 ¼ cups (150g) of all-purpose flour with just a teaspoon of granulated sugar and half a teaspoon of fine sea salt.
The star, however, is the ½ cup (113g) of unsalted butter, cut into small cubes and kept near freezing. We will hydrate this mixture with just 3 to 5 tablespoons of ice water the less water needed, the flakier the result.
Crafting the Heart of the Pie: Spice Ratios That Sing
The defining feature of any great autumnal dessert is the spice blend. To achieve that signature warmth, our recipe requires 1 ½ teaspoons of ground cinnamon, ¾ teaspoon of ground ginger, ½ teaspoon of ground nutmeg, and a precise ¼ teaspoon of ground cloves.
This ratio ensures the cinnamon leads, supported by the heat of the ginger and anchored by the deep warmth of the clove and nutmeg. We highly recommend blooming these spices later on to unlock their full aromatic potential.
A dedicated Pumpkin Pie Spice Recipe is great, but ensuring yours has a strong cinnamon base is key.
Essential Pantry Staples for Achieving Creamy Depth
The luscious body of our filling relies on two primary elements: the pumpkin and the dairy. You will need one standard 15-ounce (approx. 425g) can of pure pumpkin purée ensure it is not the pre-mixed pie filling.
For richness, we use a full 12-ounce can (354ml) of full fat evaporated milk, which thickens beautifully during baking. To bind and structure the custard, we use 2 large eggs plus 1 extra yolk, which adds extra richness without making the final product too dense.
Sweetness comes from ¾ cup of packed light brown sugar and ¼ cup of granulated sugar, alongside ½ teaspoon of fine sea salt to ensure the spices truly pop against the sweetness.
Step-by-step Mastery: Building Your Golden Spiced Dessert
Crafting this Pumpkin Pie from Scratch is a multi stage process that respects the need for cold dough and perfectly tempered filling. Remember, the total active prep time is around 45 minutes, but allow a mandatory two hours for the pastry to chill before rolling.
Baking the Perfect Pumpkin Pie: Heat Management Secrets
The secret to a shatteringly crisp base lies entirely in managing the crust temperature before the wet filling ever touches it. The filling itself requires careful oven monitoring to avoid curdling or cracking.
Preparing the Crust: Blind Baking for Ultimate Crispness
Begin by pulsing the flour, salt, and sugar with the cold, cubed butter until it resembles coarse meal with visible pea-sized butter fragments. Slowly stream in the ice water until the dough just gathers. Form this into a flat disc, wrap it, and chill for two hours.
Once chilled, roll the dough into a 12 inch circle, place it into your pie dish, crimp the edges, and chill again for 30 minutes. Preheat your oven to 400° F ( 200° C).
Line the chilled shell with parchment paper and fill it with pie weights. Bake for 15 minutes. Remove the weights and paper and continue baking for another 5– 7 minutes until the base looks dry and pale gold.
Crucially, once you pull the weights out, reduce the oven temperature immediately to 350° F ( 175° C) this lower temperature is where the custard will set gently.
Whisking Harmony: Combining Wet and Dry Filling Elements
While the crust is doing its initial bake, prepare the filling. For maximum impact, gently warm the evaporated milk with the brown sugar and all the dry spices (cinnamon, ginger, nutmeg, cloves) in a small saucepan for about three minutes.
This brief heating process, known as blooming, releases the oils in the spices, leading to a far more robust flavour profile. Allow this mixture to cool slightly. In a separate bowl, whisk the 2 eggs and 1 yolk lightly.
Now, gradually whisk the cooled spice milk mixture, the pure pumpkin purée, and the salt into the eggs until the mixture is uniformly smooth. Resist the urge to whisk vigorously; we want to avoid incorporating air bubbles which can lead to cracking.
The Oven Technique: Achieving the Perfect Centre Set
Pour the velvety filling into your warm, pre-baked pastry shell. Place the pie dish on top of a sturdy baking sheet this offers stability for transfer and helps insulate the bottom slightly.
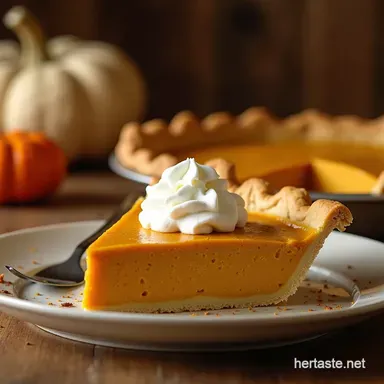
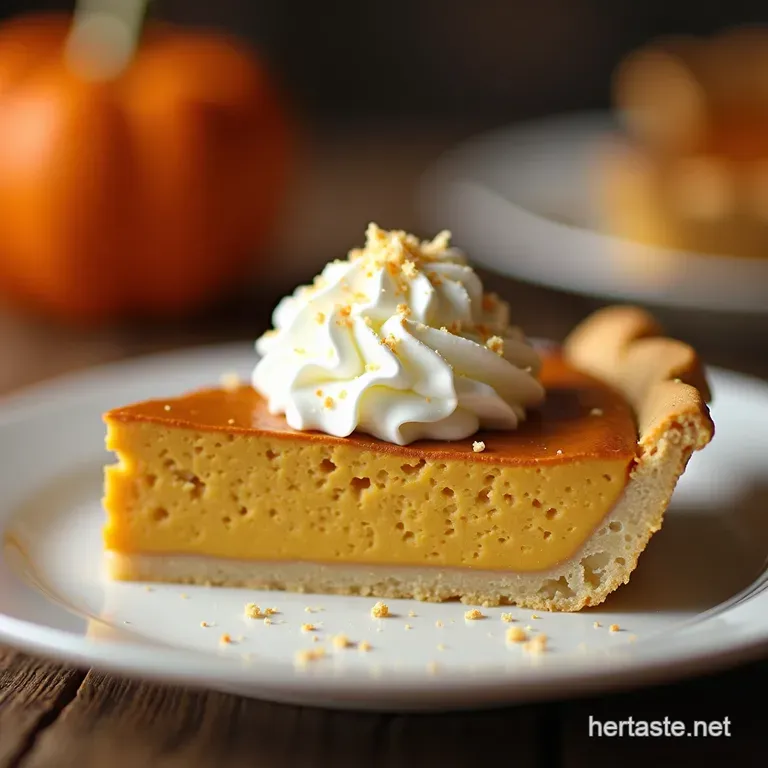
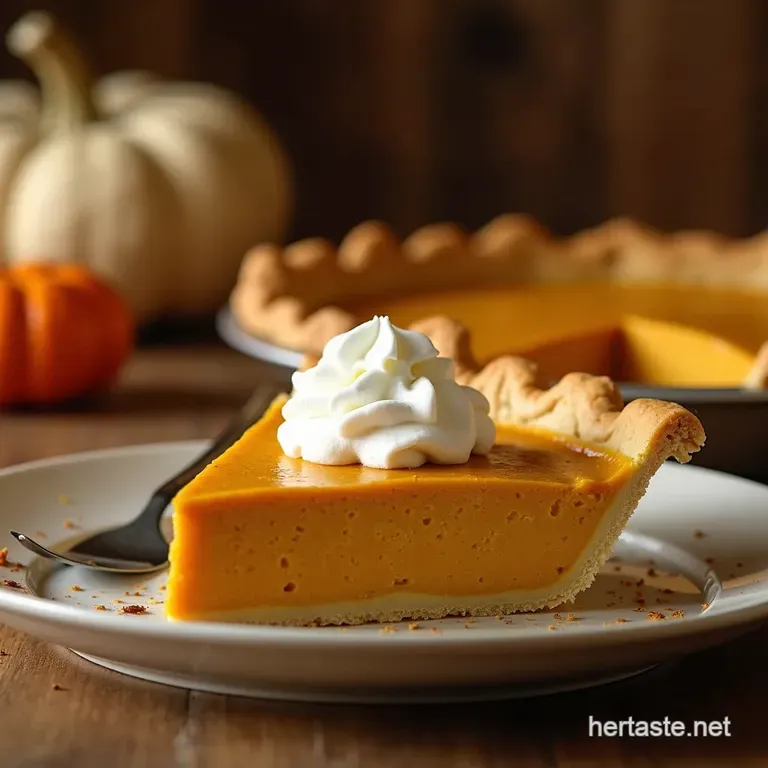
Bake at the reduced 350° F ( 175° C) for 45 to 55 minutes. You are looking for the edges of the filling to be fully set, firm to the touch, but the very centre should still exhibit a slight, gentle wobble, much like firm jelly.
If you wait until the centre is completely solid, you will overbake the outer portions.
Cooling Down: Patience for the Final Slice
This step is arguably the hardest but most vital. Immediately transfer the Pumpkin Pie onto a wire rack to cool completely. It requires a minimum of 3 to 4 hours at room temperature for the custard to fully stabilize and firm up properly.
Slicing too early guarantees a runny mess. This resting period allows the structure to fully develop, ensuring every slice holds its shape perfectly.
Troubleshooting and Next Level Serving Suggestions
Even with precise instructions, baking can present minor challenges. If your filling cracks, it usually means it baked too long or the temperature was too high. If the bottom is soggy, the blind baking wasn't long enough or the shell wasn't fully chilled before filling.
Elevating Your Serve: Whipped Toppings Beyond the Basics
While a simple cloud of whipped cream is always welcome, consider jazzing up your topping. Beat heavy cream with a touch of powdered sugar, a splash of vanilla extract, and perhaps a tiny grating of fresh nutmeg or a pinch of ground cardamom.
This homemade topping provides a contrasting, airy texture to the dense, creamy filling. For an extra flourish of that Sweet Taste Pumpkin Pie experience, a light drizzle of salted caramel sauce just before serving adds complexity.
Making Ahead: Can This Pie Be Frozen?
Absolutely. Once completely cooled (after its mandatory 4-hour rest), you can wrap the Pumpkin Pie tightly in plastic wrap followed by a layer of foil. It freezes beautifully for up to three months.
Thaw overnight in the refrigerator before serving, allowing it to come back to room temperature for about an hour before you plan to slice it.
Adjusting Spices for a More Intense Autumn Flavour Profile
If you find yourself craving a deeper autumnal resonance, you can intensify the experience. Consider blooming the spices not just in the milk, but adding a small splash of bourbon or dark rum to the mixture while warming this enhances the notes in the brown sugar.
On top of that,, if you prefer a sharper, more pungent profile akin to some traditional Pumpkin Bars , slightly increase the ginger and nutmeg measurements by a quarter teaspoon each.
Recipe FAQs
How do I stop my Pumpkin Pie crust from getting soggy underneath?
Ah, the dreaded soggy bottom a true baking disaster! The key to avoiding this is thorough blind baking, just like the recipe mentions. Make sure your pastry edges are fully set before you remove the weights, and don't skip chilling the pastry twice; that cold butter creates those essential steam pockets for flakiness.
Can I make this Pumpkin Pie ahead of time, and how should I store leftovers?
Absolutely, making it ahead is ideal as it needs a good long chill to fully set! You can bake it a day in advance, cover it loosely with cling film, and keep it in the fridge. Leftovers are best stored in the fridge for up to 3 4 days, though honestly, it rarely lasts that long once the family gets wind of it.
My custard filling cracked! What did I do wrong with my Pumpkin Pie?
Cracking usually means the custard got too hot and overbaked, causing it to seize up and split as it cooled. Try reducing the oven temperature slightly sooner, or next time, use the "jiggle test" pull the pie when the very centre is still slightly jiggly, like set jelly, as it will continue cooking outside the oven.
I don’t have evaporated milk; what’s a good substitution for the filling?
Evaporated milk gives that classic dense richness, but if you’re caught short, full fat coconut milk is a surprisingly good alternative, giving a slightly richer flavour profile.
Alternatively, you can use whole milk mixed with a touch of cornflour to help mimic the thickening power, though the texture won't be quite the same.
My spices are a bit bland; how can I make the flavour of this Pumpkin Pie really pop?
For maximum spice impact, try "blooming" them! Gently warm your evaporated milk with the brown sugar and all your dry spices in a small pan before mixing them into the wet ingredients.
This process releases the essential oils in the cinnamon and cloves, giving you a much more robust and warming flavour that truly sings.
Creamy Pumpkin Pie Recipe