The Allbutter Doubleaction Flaky Pie Crust Your Ticket to Pastry Perfection
- Deconstructing the Myth: Why This Flaky Pie Crust Will Change Your Baking Game
- The Pursuit of Pastry Nirvana: Defining True Flakiness
- The Essential Components for Superior Structure and Flavor
- Precision Pointers for Gathering Your Baking Arsenal
- Mastering the Mixing: Step-by-Step Assembly of Your Flaky Pie Crust
- Troubleshooting and Long-Term Management of Your Pastry
- Beyond the Basics: Enhancing Your Finished Flaky Pie Crust
- Recipe FAQs
- 📝 Recipe Card
Deconstructing the Myth: Why This Flaky Pie Crust Will Change Your Baking Game
For too long, pie crust has held a reputation for being the bane of the home baker’s existence a delicate tightrope walk between soggy bottom and rock hard edge. Many believe that a truly flaky result requires professional grade equipment or years of practice.
I am here to tell you that this is simply not true. Crafting the Flaky Pie Crust of your dreams one that shatters delicately upon impact, releasing a burst of pure, buttery flavour is entirely achievable with the right approach.
This guide focuses on the foundational elements that guarantee success, turning the intimidating into the incredibly satisfying. We are aiming for that golden standard that elevates any filling, whether it’s a deep dish savoury delight or a tender fruit tart.
The Pursuit of Pastry Nirvana: Defining True Flakiness
What exactly separates an average crust from a transcendent one? It boils down to architecture. Flakiness is not uniformity; it is the result of distinct, thin layers of pastry separated by air pockets.
These pockets are formed when small, flattened pieces of fat melt during baking, releasing steam that pushes the layers of dough apart, resulting in that desirable, layered texture.
From Tough to Tender: The Fundamental Shift in Technique
The primary culprit in tough pastry is overworking the dough, which develops the gluten in the flour too much. Our goal is to hydrate the flour just enough to hold the structure together, but not enough to make it elastic.
This gentle handling is the philosophical underpinning of this No-fail Pie Crust Recipe . We treat the dough with respect, folding and pressing it minimally, ensuring that the final product is tender and melts in the mouth rather than requiring significant chewing effort.
More Than Just Dough: The Importance of Cold Fat Integration
If you are searching for the Best Flaky Pie Crust Recipe , the secret lies overwhelmingly in the temperature of your fat. Butter must remain in distinct, chilled pieces throughout the mixing process. These cold shards create the scaffolding.
When they hit the heat of the oven, the butter melts rapidly, creating steam, and the resulting gaps are what we recognize as flaky layers. If the butter melts during mixing (which happens easily on a warm day), it emulsifies with the flour, creating a smooth, dense texture the very opposite of what we desire.
Anticipation Building: What to Expect From This Recipe
When you follow the procedures outlined here, you should anticipate a dough that feels slightly shaggy, not smooth and pliable like bread dough. Once chilled, it should be firm enough to roll without sticking excessively, and when you slice into a baked edge, you should see visible striations those distinct layers created by the separated butter pockets.
This robust foundation is versatile enough to serve as a Flaky Pie Crust For Pot Pie or the base of a delicate custard tart.
The Essential Components for Superior Structure and Flavor
To achieve true pastry perfection, we rely on simplicity, allowing the quality of the ingredients to shine. We are focusing on an all-butter approach here because, while alternatives exist, nothing beats the flavour profile of pure butter.
For this Buttery Flaky Pie Crust Recipe , we use 2 ½ cups of all-purpose flour, 1 teaspoon of fine sea salt, and an optional tablespoon of sugar (a touch of sweetness balances rich savoury fillings beautifully).
The star, however, is the cold fat: one full cup (two sticks) of unsalted butter, cut into small, precise half inch cubes.
Related Recipes Worth Trying
- The Perfect Flaky Buttery Homemade Pie Crust Recipe — Tired of soggy bottoms Master the classic allbutter pie crust from scratch for truly flaky shatteringly crisp results Your apple pie deserves this
- The Best AllButter Pie Crust Recipe for Flaky Results — Forget shortening This foolproof all butter pie crust recipe uses grated frozen butter for the flakiest most flavourful pastry imaginable Master this...
- Best Creamy Pumpkin Pie Recipe From Scratch — Ditch the bland tins This Pumpkin Pie Recipe features a brown butter crust and a silky perfectly spiced filling Your new goto for Thanksgiving Get the recipe
Precision Pointers for Gathering Your Baking Arsenal

Success hinges not only on what you use but how you prepare your elements before they even touch the flour.
Selecting the Ideal Butter: Fat Content Matters Immensely
For the ultimate result in this Flaky Pie Crust Recipe With Butter , opt for high fat, high-quality European style butter, if available. Higher butterfat content means less water content, which translates directly into less gluten development and a more tender final product.
Crucially, that butter must be rock solid. Cut it, spread it on a plate, and return it to the freezer for at least 15 minutes before you begin assembling the dough.
Water Temperature Triumphs: Achieving the Perfect Hydration Level
Hydration is the delicate dance between bringing the dry ingredients together and avoiding gluten activation. The water you use must be ice cold, hence the necessity for ice water. Begin by using 6 tablespoons of this frigid liquid.
If you’re considering a Pie Crust Recipe Using Oil as a substitute, you must remember that oil cannot create steam pockets, yielding a mealy rather than flaky texture. For water, it’s a slow drizzle, only adding more if the dough resists coming together at all.
Must Have Tools: Equipment That Guarantees Success
While a stand mixer can make quick work of cutting in fat, I strongly advocate for a classic approach for this specific result. Your hands, a pastry blender, or even two sturdy dinner knives work best because they limit heat transfer.
The most vital tool, however, is your freezer; treat it as a mandatory rest stop throughout the process.
Mastering the Mixing: step-by-step Assembly of Your Flaky Pie Crust
The assembly phase is where patience pays dividends. In a large bowl, whisk together the 2 ½ cups of flour, salt, and optional sugar. Now introduce the ice-cold butter cubes. Work quickly using a pastry blender or your fingertips to cut the butter into the flour.
You are aiming for a coarse mixture where the largest pieces are about the size of small peas, interspersed with smaller, lentil sized crumbs. Stop immediately when you reach this stage; these larger, distinct pieces are your future flaky layers.
The Crucial Chill: Why Resting is Non-Negotiable
This rest period is the most frequently skipped step, yet it is the key to an Easy Flaky Pie Crust Recipe . Once you drizzle in the ice water (starting with 6 tablespoons), gently toss the mixture with a fork until the dough barely clings together when squeezed.
Turn this shaggy mass out onto a counter do not knead! and gently press it into two equal halves.
Cutting the Fat: Achieving Pea-Sized Pockets of Glory
Form each half into a flat disc, wrap it tightly in plastic wrap, and flatten it slightly with your palm to encourage even chilling. These discs must now go into the refrigerator for a minimum of two hours, though four hours or overnight is preferable.
This crucial step allows the flour to fully hydrate, the gluten network to relax, and the butter to firm up completely, preparing it for rolling.
Shaping the Disc: Preparing Your Dough for Its Deep Slumber
When you are ready to roll, remove one disc at a time, letting it sit on the counter for just 3 to 5 minutes long enough to soften slightly so it won’t crack immediately, but not long enough for the butter to warm.
Rolling Out Secrets: Techniques for Even Thickness
Lightly flour your work surface and rolling pin. Begin rolling the disc outward from the centre, turning the dough a quarter turn after every stroke to ensure even shaping and prevent sticking. Aim for a circle approximately 12 to 13 inches in diameter, about 1/8 inch thick.
If the dough begins to stick, quickly slide a bench scraper underneath, or dust lightly with more flour. Do not force the dough to roll if it resists; return it to the fridge for 10 minutes.
Troubleshooting and Long Term Management of Your Pastry
Even with the best Flaky Pie Crust From Scratch recipe, minor issues can arise. The most common is shrinkage during baking. This happens because the gluten network, tightened during rolling, snaps back when exposed to high heat.
The solution is simply chilling: chilling the shaped, unbaked pie shell for 30 minutes before it goes into the oven relaxes those gluten strands, ensuring it holds its form beautifully whether you are baking a fruit pie or preparing a Flaky Pie Crust For Pot Pie .
Beyond the Basics: Enhancing Your Finished Flaky Pie Crust
Once you’ve mastered the basic technique, you can begin to explore minor customizations to suit specific culinary needs.
Storage Solutions: Freezing, Chilling, and Thawing Best Practices
This recipe doubles beautifully. If you are not using the second disc immediately, it freezes exceptionally well. Wrap the chilled disc tightly in two layers of plastic wrap and then foil. It can be stored in the freezer for up to three months. To thaw, transfer the wrapped disc to the refrigerator overnight.
Never try to roll it while frozen solid.
Savory vs. Sweet Adjustments: Minor Tweaks for Different Fillings
As noted, omitting the tablespoon of granulated sugar transforms this into a perfect base for quiches or pot pies. For savoury applications, consider adding a small pinch of freshly ground black pepper or dried herbs like thyme or sage directly into your dry ingredients for an added aromatic layer to your Flaky Pie Crust .
When Things Go Wrong: Addressing Dough Shrinkage and Toughness
If your crust becomes tough after baking, it’s almost always due to over mixing or insufficient chilling time before baking. If it shrinks dramatically, it needed a longer cold rest period after it was shaped in the pie plate.
If your crust seems greasy, the butter was too warm when you incorporated it. A tough, greasy crust often benefits from a quick burst of steam try adding a tiny splash more ice water next time.
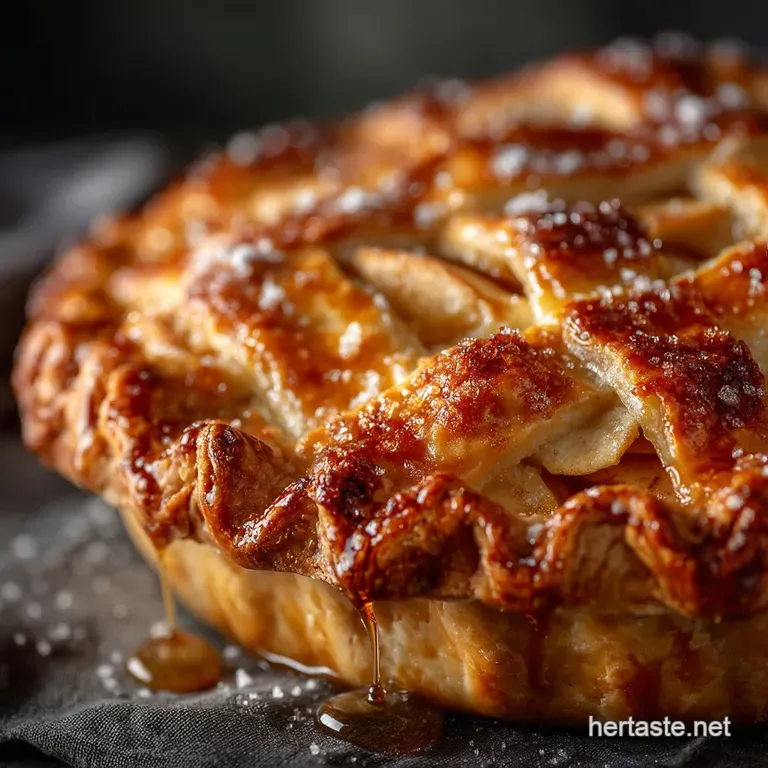
Baking Blind Simplified: Achieving Golden Brown Edges
To blind bake this Flaky Pie Crust , ensure you prick the bottom liberally with a fork (docking) to allow steam to escape. Line the shell with parchment paper and fill completely with ceramic pie weights or dried beans.
Bake at 400° F ( 200° C) for 15 minutes with the weights, remove them, and bake for another 5– 10 minutes until the bottom is set and lightly coloured.
This preparation ensures you have a structurally sound, deeply flavourful base ready for any filling you can dream up.
Recipe FAQs
My Flaky Pie Crust always shrinks when I bake it. What's the secret to keeping it perfectly fitted in the tin?
Ah, that's the dreaded shrinkage, usually caused by overworked or warm dough! The absolute key is patience: ensure your dough chills for at least 2 hours, and crucially, pop the lined pie shell back in the fridge for a solid 30 minutes right before filling or blind baking.
This forces the gluten to relax, preventing it from pulling the edges up the sides of the dish.
Why does this recipe insist on using ice-cold butter? Can I use soft butter if I’m in a rush?
Absolutely not, mate that’s a one-way ticket to a tough crust! The butter needs to stay in distinct, cold pieces. As the pie bakes, these cold butter chunks melt, releasing steam that pushes the layers of dough apart, creating that lovely flakiness we’re after.
Soft butter just blends in, resulting in a greasy, biscuit like texture instead of layers.
How do I know when I’ve added enough water to the dough without making it sticky?
The general rule is to add water until the dough just barely holds together when squeezed it should still look shaggy, not smooth. Think of it like packing a damp sandcastle; you want it holding its shape without being soggy.
If you have dry flour left at the bottom of the bowl, add water one teaspoon at a time until those last bits stick together when pressed.
Can I make this Flaky Pie Crust dough ahead of time, and how should I store it?
You certainly can! Making it ahead is highly recommended as it improves the texture. Wrap the chilled discs tightly in cling film and they will keep beautifully in the fridge for up to three days.
For longer storage, you can freeze the wrapped discs for up to three months; just remember to thaw them slowly in the fridge overnight before rolling them out.
I’m making a fruit pie; should I blind bake the bottom crust, and if so, how long?
For wet fillings like quiche or custard, yes, blind baking is essential to prevent a soggy bottom a culinary tragedy! If you're using a very wet filling, bake it empty for about 15 minutes, remove the weights, and bake until just slightly golden.
For fruit pies, often just a 10-minute pre-bake is enough before adding your filling to stop it collapsing.
Allbutter Flaky Pie Crust 2

