The Crusty Charm Dry Rub Ribs Slowsmoked Flavour Oven Easy
- Sizzling Sensations: Getting Stuck into Proper Barbecue
- Decoding the Quest for Perfect Pork Ribs
- Building the Barrier: Your Secret Weapon Seasoning Blend
- Core Shopping List: What You Need for Proper Pig
- Crafting The Flavor Architecture
- Essential Prep and Setup Advice
- Preparing Your Meat for Flavour Absorption
- Resting Period: Where the Magic Starts Brewing
- Executing the Low and Slow Cook Sequence
- Sorting Out Leftovers and Emergency Fixes
- The 'Crusty Charm' Dry Rub Ribs: Slow-Smoked Flavour, Oven Easy
- Key Steps for Ultimate Tenderness
- Elevating the Final Presentation
- Nutritional Adjustments for Different Diets
- Quick Storage Advice for Leftovers
- Frequently Asked Questions
- 📝 Recipe Card
Sizzling Sensations: Getting Stuck into Proper Barbecue
Right then, let’s get these ribs sorted! There's nothing quite like that first bite when the meat genuinely is falling off the bone . You know the feeling that rich, spicy crust that crackles just a bit?
Forget those recipes that just splash on sauce at the end; that’s just window dressing. We are here to build flavour deep into the meat using a killer dry rub. This is the bedrock for truly brilliant Dry Rub Ribs , whether you are using a smoker or just relying on your trusty home oven.
Decoding the Quest for Perfect Pork Ribs
I know what you’re thinking before you even scroll down. How do I stop them from being tough? Will this Dry Rub Ribs Recipe taste too salty? And honestly, is this something I can manage without setting up a full outdoor smoker rig? Those are the three major hurdles people hit. Fear not!
This guide nails the low-and-slow wrapping technique that guarantees tenderness, balances the salt perfectly, and gives you fantastic results even when making Dry Rub Ribs in Oven . Unlike those other quick fix blogs, we focus on that beautiful, deep bark.
Laying the Groundwork: Preparing for the Best Dry Rub Ribs
Before we even think about heat, we need the meat prepped right. If you’re aiming for Falling Off The Bone Ribs , you must deal with that silvery membrane on the back. Get a dull knife under that thin skin, use a bit of paper towel for grip, and peel it off.
Honestly, it’s a bit fiddly, but skip it and you’ve got a chewy barrier stopping all the good stuff soaking in.
Building the Barrier: Your Secret Weapon Seasoning Blend
This rub is key to making the Best Dry Rub Ribs you’ve ever made. It’s not just about paprika and sugar; it’s about ratios that create that rich colour and savoury crust.
We’re mixing brown sugar for caramelisation, smoked paprika for that lovely BBQ depth, and just a whisper of cayenne for a pleasant warmth that doesn't set your mouth on fire. Make the whole batch! You can save the leftovers for chicken later.
Remember to slather a thin coat of cheap yellow mustard on first it acts like glue for this glorious mix, and don’t worry, you won’t taste it later, honest!
The Magic Rest Period: Why Overnight Seasoning Matters
Once the rub is on, don’t rush things. I learned this the hard way years ago throwing ribs straight into the heat leaves you with gritty seasoning on the outside and bland meat inside. For truly impactful Ribs with Dry Rub , you need time.
Wrap those beauties tight and stick them in the fridge for at least four hours, but overnight is truly cracking. This allows the salt to do its job, tenderising the meat while infusing that spice blend right through. It makes the difference between an okay meal and a proper weekend feast.
Related Recipes Worth Trying
- The Best AllPurpose Dry Rub for Ribs Recipe 10 Mins Prep — Forget watery meatthis is the ultimate crowdpleasing Dry Rub for Ribs recipe It creates a perfect smoky bark whether you are cooking on the grill or in the...
- Best Homemade Rib Rub Easy Sweet Spicy Recipe — Whip up the best Homemade Rib Rub for Smoking in just 5 minutes This easy recipe delivers a sweet and savory crust that transforms your BBQ ribs Get the...
- Easy Dry Rubbed BBQ Ribs Tender NoFuss Oven Recipe — Master the perfect falloffthebone texture with this straightforward Easy Dry Rubbed BBQ Ribs recipe Features a simple homemade dry rub ready in minutes
Right then, let’s get these ribs sorted! There's nothing quite like a proper rack of ribs, falling off the bone, with that beautiful crust of spice. Forget those watery sauces slathered on at the end; we’re focusing on building flavour right into the meat with a killer dry rub.
Think of this as the foundation for a truly cracking barbecue, even if you’re just doing it in the oven we’ll cover the tricks for that lovely char. This Dry Rub Ribs Recipe is about deep flavour, not quick fixes.
Core Shopping List: What You Need for Proper Pig
First up, the meat. Grab yourself a couple of racks of pork ribs. I usually go for Spare Ribs if I can find them well trimmed, but Baby Backs are great too if you want something a bit leaner. You’ll want about 3 lbs (1.4 kg) of each rack for a good feed.
Quality matters, but don’t sweat the brand too much here; trimming the excess fat is more important than a fancy label.
For the binder that stuff that makes the rub stick like glue I swear by Yellow Mustard . Yes, mustard! Use about 2 tablespoons (30 ml) . Don't panic; the flavour cooks right out.
If you absolutely cannot face the mustard, a bit of olive oil works, but mustard just grabs everything better.
Crafting The Flavor Architecture
This is where the magic happens for these Best Dry Rub Ribs . We are layering tastes. The brown sugar (about 1/2 cup or 110g ) provides the lovely caramelisation and sets the base sweetness.
Smoked paprika, about 1/4 cup (30g) , gives us that smoky depth, even if these are Dry Rub Ribs in Oven fare. Then we pile on the salt ( 2 Tbsp or 30g ), garlic powder, onion powder, cumin, and a proper pinch of cayenne for the necessary rear guard action.
If you happen to run out of smoked paprika it happens you can lean on a smoked salt mixed with regular paprika. However, for true flavour depth, I’ve heard some folks use a dash of MSG (the umami booster) if they're worried about the depth, though I find enough garlic and good quality pepper does the trick for my usual Easy Dry Rub Ribs .
Essential Prep and Setup Advice
You need a big board for trimming the silverskin off the back. That membrane stops your rub from working its charm, leading to chewy spots. Seriously, peel it off! For the actual cooking, a standard roasting tray lined well with heavy duty foil is absolutely fine if you’re not using the smoker.
This will be key for when we wrap these up later to get those Falling Off The Bone Ribs .
My biggest tip for any Ribs with Dry Rub is the resting phase after seasoning. Once you’ve slapped that rub on thick don't be shy, press it in hard wrap them tight and leave them in the fridge for at least 4 hours .
I often prep them the night before for the Overnight Dry Rub Ribs experience. It makes a massive difference in how deep the flavour penetrates before they hit the heat.
Trust me on this one, it’s a game changer for the final result of your Dry Rub Ribs on the Grill or in the oven.
Right then, let’s get these ribs sorted! There's nothing quite like a proper rack of ribs, falling off the bone, with that beautiful crust of spice. Forget those watery sauces slathered on at the end; we’re focusing on building flavour right into the meat with a killer dry rub.
Think of this as the foundation for a truly cracking barbecue, even if you’re just doing it in the oven we’ll cover the tricks for that lovely char. This Dry Rub Ribs Recipe is going to sort you right out.
Preparing Your Meat for Flavour Absorption
Before we even think about heat, we need to make sure the meat is ready to soak up all that good stuff. First off, get rid of that tough, shiny membrane on the back of the ribs it’s called silverskin. If you don't take it off, your ribs will be chewy, no matter how long you cook them.
Trust me, learning how to do that properly is half the battle won.
Next up is the binder. I know, I know, using mustard sounds bonkers. But we're only using a thin smear of yellow mustard or olive oil just to give the dry rub something to stick to. It vanishes during cooking; you won't taste it! Get your rub on thick.
I mean really thick, like you're painting a fence. This is how you guarantee the Best Dry Rub Ribs .
Resting Period: Where the Magic Starts Brewing

This is the bit everyone skips, and it’s why their Ribs with Dry Rub end up tasting a bit bland. After you’ve slapped that beautiful mix onto the meat, you need to let it sit. Pop those seasoned racks tightly wrapped in the fridge for at least one hour.
If you can manage it, overnight dry rub ribs are miles better. The salt in the rub gets to work drawing moisture out, dissolving, and then soaking back in, seasoning the meat from the surface inwards. That time allows the spices to properly marry up before the cooking starts.
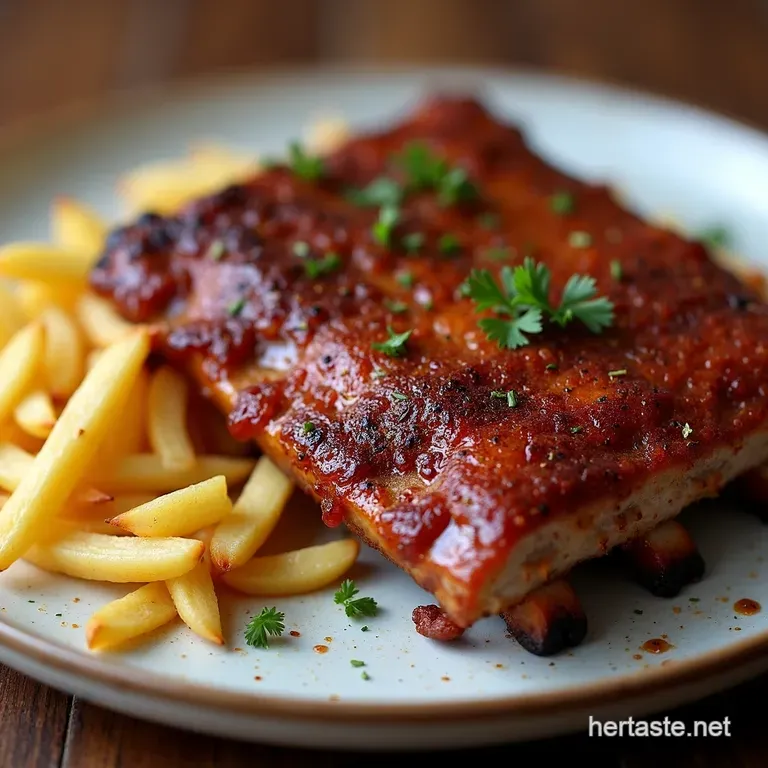
Executing the Low and Slow Cook Sequence
When you’re ready to cook your Easy Dry Rub Ribs , preheating is non-negotiable. For the Dry Rub Ribs in Oven method, we're aiming low and slow set your oven to 275° F ( 135° C) .
Put the ribs bone side down on a tray lined with foil. Cook them unwrapped for the first two hours. You’re looking for the colour to darken nicely; the rub should look dry, not wet.
After two hours, we wrap ‘em up tight in foil, maybe with a tiny splash of apple juice underneath. This steams the meat until it’s proper tender. About an hour and a half later, unwrap them and crank the heat up to 375° F ( 190° C).
This final blast is what sets that crust, or 'bark', which is key to great Dry Rub Ribs . Keep an eye on them for the last 20 minutes until they look gorgeous and slightly sticky.
Sorting Out Leftovers and Emergency Fixes
Look, nobody’s perfect, and sometimes things go a bit wonky. If your ribs taste a bit too salty which can happen if your initial rub had too much salt don't panic!
The emergency fix is to serve them with something plain or slightly sweet, like creamy mashed potatoes or plain applesauce, to balance it out.
If they look a bit dry when you unwrap them from the foil stage, just add an extra splash of liquid (apple juice or even water) before wrapping them back up for that final 90 minutes. Storing leftovers? Once cooled, wrap them well and they’ll keep in the fridge for three days.
The flavour actually deepens overnight, making them great cold the next day proper leftovers! This method gives you Falling Off The Bone Ribs every time, whether you’re using a Dry Rub Ribs Smoker Recipe or just your home oven.
Right then, let’s get these ribs sorted! There's nothing quite like a proper rack of ribs, falling off the bone, with that beautiful crust of spice. Forget those watery sauces slathered on at the end; we’re focusing on building flavour right into the meat with a killer dry rub.
Think of this as the foundation for a truly cracking barbecue, even if you’re just doing it in the oven we’ll cover the tricks for that lovely char. Here is the master plan for our ultimate Dry Rub Ribs .
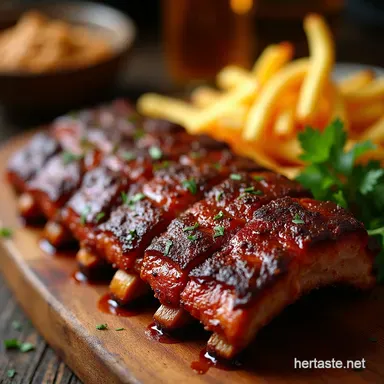
The 'Crusty Charm' Dry Rub Ribs: Slow Smoked Flavour, Oven Easy
Forget those sticky, overly sweet ribs; this recipe focuses on building a deep, complex savoury and slightly spicy crust what we chefs call the bark . We use a generous, balanced dry rub packed with smoked paprika, brown sugar for caramelisation, and a few secret weapons for depth.
Whether you’re firing up the smoker or keeping it simple in the home oven, these ribs will have everyone asking for the recipe. They are pure comfort food, proper good grub.
Key Steps for Ultimate Tenderness
Peeling the tough silverskin membrane off the back of the ribs is absolutely crucial. Trust me on this one; if you skip it, you end up with tough, chewy meat against the bone. That membrane stops the spice from soaking in properly too.
I learned that the hard way years ago when I was first trying out a proper Dry Rub Ribs Recipe . After applying the mustard binder yes, mustard! press that gorgeous rub mix right into the meat like you mean it. Then, we chill them.
Giving them a few hours in the fridge lets the salt work its magic.
Elevating the Final Presentation
Once they are cooked low and slow, the final blast in a hot oven (or under the grill) sets that beautiful, dark crust. Think less soggy takeaway, more picture perfect BBQ pitmaster aesthetic.
Instead of just piling them on a plate, try slicing the finished ribs into individual bones and serving them upright in a simple metal pail or basket lined with checkered paper very authentic pub grub style.
For a seasonal riff, try dusting them with a tiny pinch of finely chopped rosemary right before serving; it cuts through the richness beautifully. This method beats those floppy, sauce drenched ribs you get everywhere else because we’ve focused on building that amazing texture in the Dry Rub Ribs .
Nutritional Adjustments for Different Diets
If you're watching the sugar, don't despair! While brown sugar helps create that signature crust, you can swap it out 1:1 with a good quality granular sweetener for a much lighter calorie profile.
For gluten or dairy concerns, this Easy Dry Rub Ribs approach is brilliant as it’s naturally free of both, provided you use oil instead of mustard as the binder. Per serving, expect around 580 calories, which is decent for a main event meal, but you’re getting a serious protein hit.
Quick Storage Advice for Leftovers
These are even better the next day, I swear! Once fully cooled, wrap them tightly in foil and they’ll keep nicely in the fridge for up to four days. To reheat, the best trick for Falling Off The Bone Ribs texture is to wrap them back up in foil (maybe add a splash of apple juice inside the wrap) and reheat them slowly in a low oven, say 250° F ( 120° C) , for about 30 minutes.
This steams them back to life without drying out that wonderful bark we worked so hard to achieve. If you’ve got fantastic cast iron cookware a proper solid piece you can even reheat them low and slow on the stovetop in that, which feels very satisfyingly traditional.
Give this Best Dry Rub Ribs method a go this weekend; you won't regret it!
If you're craving more ideas, explore TearJerkingly Good gluten free Dry Onion Soup Mix , Butter Steak Bites Potatoes Pub Grub Made Easy and Slow Cooker BBQ Pulled Pork Proper Pub Grub Made Easy .
Frequently Asked Questions
How do I make sure my Dry Rub Ribs actually come out tender and not chewy?
The secret to tenderness lies in the "low and slow" cooking method; you need patience, like waiting for the kettle to boil on a Sunday morning. Cook them low (around 275°F/135°C) for several hours, often wrapping them halfway through to trap moisture.
They are done when a skewer or thermometer slides in with little resistance, usually around 200°F internal temperature.
Do I really need to let the rub sit on the ribs overnight, or is 30 minutes enough for these Dry Rub Ribs?
While 30 minutes will taste fine, overnight is a game changer think of it as marinating, but dry! Allowing the salt and spices to penetrate for 4 to 12 hours pulls moisture out and then reabsorbs the flavour deep into the meat. If you're short on time, at least aim for 2-4 hours in the fridge.
What is the "binder," and can I skip the mustard if I don't like the taste?
The binder is simply something sticky to help the dry rub adhere to the meat; mustard is popular because its acidity helps tenderise slightly, and its flavour completely vanishes during the long cook. If you absolutely can't use it, a light coating of olive oil or Worcestershire sauce will do the trick just as well.
My ribs came out great, but how should I store leftovers so they aren't dry the next day?
Store leftover ribs tightly wrapped in foil or in an airtight container in the fridge for up to three days. To reheat, the best way to restore moisture is to wrap them back up in foil and heat them gently in the oven at a low temperature (about 300°F/150°C) until warmed through, maybe with a tiny splash of apple juice in the foil packet.
Can I use this dry rub recipe if I'm using a smoker instead of an oven?
Absolutely! This dry rub mix is perfectly suited for smoking, perhaps even better, as it develops a fantastic "bark." Maintain a consistent low temperature (around 225°F 250°F) in your smoker, and follow the same wrapping technique halfway through to ensure maximum tenderness.
I want a stronger crust should I crank the heat up sooner on my Dry Rub Ribs?
Hold your horses! If you crank the heat too early, the outside will burn before the inside has had a chance to become tender that’s a recipe for disappointment. Build the crust at the very end by increasing the heat to about 375°F (190°C) for the last 15-20 minutes after the meat is already tender.
The Crusty Charm Dry Rub Ribs Slowsmoked Flavour