The Proper Job Easy Dry Rubbed Bbq Ribs Oven Grill Friendly
- That First Bite Feeling: Mastering Easy Dry Rubbed BBQ Ribs
- Core Shopping List
- Flavour Architecture
- Equipment & Mise en Place
- Before You Cook
- Guided Cooking Sequence for Tender Ribs
- Save-It Section
- Taste & Texture Upgrades
- Nutrition & Dietary Paths
- Serving & Pairing Ideas
- Frequently Asked Questions
- 📝 Recipe Card
That First Bite Feeling: Mastering Easy Dry Rubbed BBQ Ribs
Remember that time you bit into a rib and it was tough? Like trying to chew through an old leather boot? Right, we’re never doing that again. The aroma when the spice crust starts to set is just unbeatable that’s the sign you’re nailing these Easy Dry Rubbed BBQ Ribs .
This method guarantees meat so tender, you’ll wonder why you ever bothered with endless basting.
Why This Recipe Cuts the Mustard
I’ve tried every method going, trust me. People get stuck worrying about the smoker temperature or complex mopping schedules. Your main questions are probably: "How do I get them tender without being floppy?" "What’s the best Rib Rub Recipe that isn't too sweet?" And, "Can I actually make decent BBQ ribs without standing over a grill all afternoon?" Yes, you absolutely can.
This guide focuses on getting fantastic flavour using simple Oven Baked Ribs techniques, which are far more reliable for the home cook.
My Secret to Cracking the Crust
Most recipes online just list ingredients. What they don't tell you is the importance of preparation. When making your Homemade Dry Rub , make sure that brown sugar is completely lump free. I learned this the hard way lumps just burn instead of caramelising properly.
We are using Baby Back Ribs Oven style here because it’s foolproof for beginners. The key to using a Pork Ribs Dry Rub properly is the low and slow cook time. Don't rush it, mate.
Building Your Perfect Pork Rib Seasoning
Right, let’s stop chatting and get down to the flavour. We need a cracking Simple Dry Rub Recipe that balances sweet, salty, and smoky. This blend acts as our BBQ Rib Seasoning .
You’ll find this is the ultimate Easy Dry Rub for Pork Ribs , needing just a few pantry staples. Once you’ve rubbed them down, let them chill. A good hour allows the salt to start doing its magic before they hit the heat.
We’re aiming for serious flavour depth, not just surface dressing.
Related Recipes Worth Trying
- Best Fresh Mango Margarita Recipe Easy Summer Sipper — Learn how to make the best fresh mango margarita This easy recipe blends ripe mango for a perfectly balanced vibrant summer cocktail Get the foolproof tips here
- Authentic Fresh Mango Margarita Recipe Easy On the Rocks — Ditch the neon mixes This Fresh Mango Margarita recipe uses ripe fruit for a bright balanced flavour Learn the easy method for the best Mango Margaritas on...
- Easy Caesar Salad Dressing No Anchovies FlavourPacked Fast — Ditch the jar Make this truly homemade Caesar Salad Dressing without anchovies in just 10 minutes Its creamy garlicky and delivers that classic deeply...
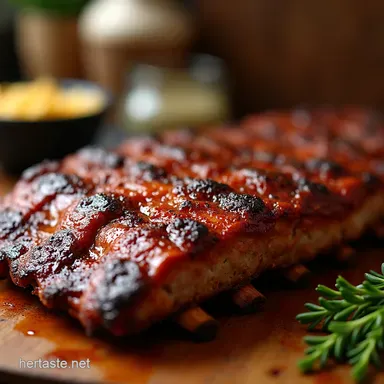
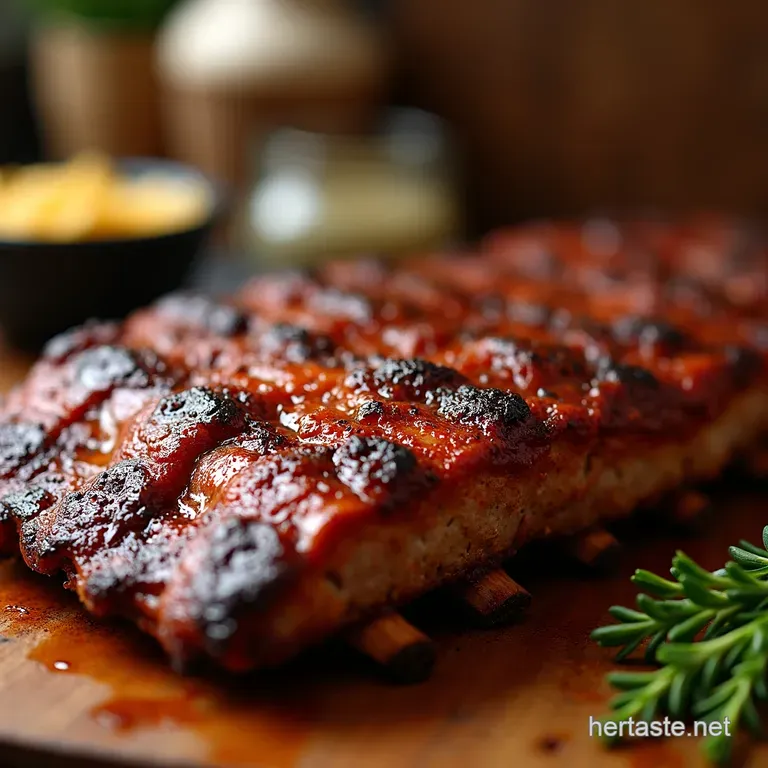
Right then, let's get these ribs sorted! There's nothing quite like a proper rack of ribs, sticky and tender, clinging to the bone. This recipe focuses on a straightforward, deeply flavourful dry rub no messing about with watery sauces until the end, if you fancy it.
We’re aiming for that classic, backyard BBQ vibe, something that'll have the neighbours sniffing the air. This is my blueprint for Easy Dry Rubbed BBQ Ribs .
Core Shopping List
When you’re hitting the supermarket, grab yourself a decent rack. For ease, I always recommend Baby Back Ribs Oven cooks as they are leaner and cook a tad faster. Aim for around 3 lbs / 1.4 kg total.
If you go for spare ribs, just know they might take an extra half hour. Crucially, make sure the silver skin membrane is off the bone side; if the butcher hasn't done it, peel it off yourself it makes all the difference to tenderness!
For the rub, don’t skimp on the brown sugar; make sure it’s packed tight in the cup measure.
Flavour Architecture
This Rib Rub Recipe is where the magic happens. We use smoked paprika for that 'straight from the smoker' scent, even though we are doing Oven Baked Ribs . The sugar doesn't just sweeten; it caramelises during the final blast, creating that fantastic dark crust.
If you’ve run out of smoked paprika (happens to the best of us!), you can use sweet paprika but add just half a teaspoon of liquid smoke to the meat before rubbing. That’s a proper cheat, that is. For umami, the garlic and onion powders do a grand job, hitting those earthy notes beautifully.
My original tip? If you have it lying around, sneak in a tiny pinch of instant coffee granules; it deepens the colour of the Pork Ribs Dry Rub without tasting like coffee.
Equipment & Mise en Place
You don't need a commercial smoker for these Easy Dry Rubbed BBQ Ribs . A sturdy baking sheet lined with heavy duty foil is your best mate here. You’ll need a small bowl for mixing your Simple Dry Rub Recipe .
The biggest pro tip for Mise en Place ? Do your membrane removal and rub mixing the night before. Seriously. Wrap those seasoned ribs tight in cling film and stick them in the fridge.
Letting that BBQ Rib Seasoning sit overnight ensures the salt starts working its magic early. You’ll thank me when you’re only scrubbing up once, not twice! This Easy Dry Rub for Pork Ribs is worth the patience.
Right then, let’s get these proper Easy Dry Rubbed BBQ Ribs sorted! There's nothing quite like a rack of ribs, tender and clinging to the bone, right? Forget turning this into a massive production.
We’re focusing on a cracking Rib Rub Recipe that does all the heavy lifting. My secret, learned after burning a few racks early on, is patience. Seriously, don’t try to rush the low and slow part.
Before You Cook
First things first, prep work. Unlike some recipes that demand a 12-hour overnight rest, we're keeping it snappy. Give your seasoned ribs at least 60 minutes resting in the fridge.
That’s enough time for the salt to start doing its job drawing moisture out and then pulling that beautiful Homemade Dry Rub flavour back in. The biggest pitfall here is soggy texture. If your meat is wet before you rub it, the spices just slide off.
Pat those Baby Back Ribs Oven racks bone dry first. No exceptions!
Guided Cooking Sequence for Tender Ribs
We are aiming for Oven Baked Ribs magic here, which is far more forgiving than standing over a smoker like a garden gnome all day.
- Get Rubbed: Mix up your spices. Get a good, thick coating of the Pork Ribs Dry Rub all over. I mean really work it in use your hands! Make sure you use a very Simple Dry Rub Recipe base like ours, heavy on the brown sugar so it caramelises nicely.
- Wrap Them Up: Tightly wrap the seasoned racks in foil. This is crucial. We need steam to help break down the tough bits. Pop them into an oven preheated to 275° F ( 135° C) .
- The Wait: Let them cook for 2. 5 hours. You'll know they’re getting close when you can gently prod the meat and it gives way easily. If they feel rock solid, give them another 30 minutes.
- The Steam Bath: Carefully unwrap the foil mind the hot blast! Add a splash of cider vinegar underneath the ribs and re-seal the foil loosely. Back in the oven for another 30 minutes . This steaming makes them incredibly tender. This is the non-negotiable stage for melt-in-your mouth results.
- Crust Time: Take them out of the foil and crank the heat up to 400° F ( 200° C) or switch to the broiler. This is where your BBQ Rib Seasoning turns into that gorgeous, mahogany crust. Watch them like a hawk here; five to ten minutes is usually spot on.
Save-It Section
These ribs are brilliant made ahead. Once they’ve done their full low-and-slow cook (before the final crisping step), you can cool them, wrap them, and keep them in the fridge for up to three days. When ready to serve, just unwrap and hit them with that high heat finish.
If you’ve accidentally gone too heavy on the salt in your Easy Dry Rub for Pork Ribs , don't panic. A little squeeze of fresh lemon juice just before serving can often balance out saltiness surprisingly well.
If they taste a bit dry after the final blast, just brush them with a tiny bit of apple juice or water mixed with a teaspoon of that leftover rub powder. It brings the moisture right back. Enjoy, they're always a winner!
Right then, let's talk about getting these beauties right. We’ve got the blueprint for Easy Dry Rubbed BBQ Ribs , but the magic really happens in the details, doesn't it? It’s all about those finishing touches.
Taste & Texture Upgrades
Listen, anyone can shake spices on meat. To make them sing , we need a little flair. For a chef level look, try finely chopped fresh parsley mixed with a tiny bit of lemon zest sprinkled over the top right before serving.
That bright green contrast against the dark rub looks smashing, proper presentation, like something from a nice gastropub. If you want to go seasonal, during summer, a quick brush with a thinned out apricot jam in the final five minutes gives a lovely glaze.
Now, I had a go at those fancy recipes that call for wrapping the ribs in foil with butter and beer for the whole bake. Honestly? They get too steamed and floppy. My Easy Dry Rubbed BBQ Ribs method, using that brief 30-minute steam bath after the initial dry bake, keeps the crust intact while still guaranteeing tenderness.
We want a good, solid chew on that outer layer, not mush.
Nutrition & Dietary Paths
Let's be realistic; these aren’t exactly slimming world fare, are they? We’re talking proper, satisfying Baby Back Ribs Oven cooking. Per serving, expect roughly 500 calories, high in protein (around 38g) and decent fats to keep you full.
The main carb hit comes from that brown sugar in the Simple Dry Rub Recipe .
If you’re dodging gluten, no worries, this Pork Ribs Dry Rub is naturally gluten-free. For dairy-free, we're golden no milk products involved. If you’re after lighter calories, the biggest swap is cutting the brown sugar in the rub by half.
You’ll lose a bit of that caramelisation depth, but it still tastes fantastic because the BBQ Rib Seasoning carries the flavour.
Serving & Pairing Ideas
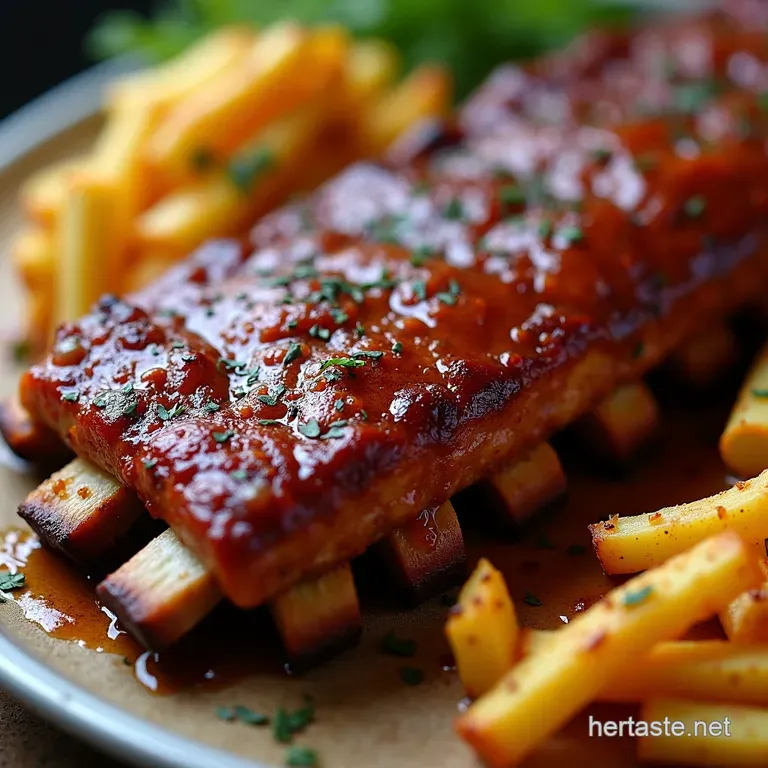
To really nail the experience of these Easy Dry Rubbed BBQ Ribs , you need balance. I always serve mine with something sharp to cut the richness. A vinegary homemade coleslaw is perfect none of that creamy, heavy stuff, mind you.
And honestly, a huge bowl of oven chips, the kind you dunk in vinegar, is non-negotiable sometimes.
These keep brilliantly, too. Store leftovers wrapped tightly in the fridge for up to three days. Reheating is key: if you just microwave them, they go tough. Instead, wrap them loosely in foil and reheat them in a 275° F ( 135° C) oven for about 20 minutes.
That gentle heat brings back the moisture beautifully without ruining the crust.
Honestly, once you master this Homemade Dry Rub , you’ll never look back. Give these a whirl this weekend; they are dead easy and genuinely impressive. Let me know how yours turn out!
If you're craving more ideas, explore Best Ever Moist Banana Bread Recipe Easy Loaf , FlavourPacked Masala Khichdi Recipe Easy Comfort Food and My GoTo Khichdi Recipe Restorative Easy OnePot Indian Comfort Bowl .
Frequently Asked Questions
How do I make sure my Easy Dry Rubbed BBQ Ribs are actually "fall off-the-bone" tender?
The key is the two-stage cooking process: a long, slow bake at a low temperature (275°F/135°C) breaks down the tough bits, followed by that 30-minute steam bath wrapped back in the foil with a splash of vinegar.
This combination ensures the connective tissue melts away, giving you that perfect tender texture without falling apart prematurely.
Can I skip removing the membrane from the ribs; will anyone notice the difference?
While you can skip it, we highly recommend taking the membrane off it's a bit of a fiddly job, but totally worth the effort! The membrane becomes tough and leathery when cooked, preventing the rub and heat from properly penetrating the meat, resulting in a chewier texture.
If I don't have an oven, can I still make these Easy Dry Rubbed BBQ Ribs on the barbecue?
Absolutely! For a grill only method, you’ll need to set up for indirect heat coals banked on one side, ribs on the other keeping the lid closed to maintain a steady low temperature around 275°F (135°C). You'll need to manage your coals, but the low-and-slow principle remains the same.
How long in advance should I apply the dry rub for the best flavour?
For a decent flavour boost, aim for at least an hour in the fridge wrapped tightly; this allows the salt in the rub to start tenderising the meat slightly. However, if you can manage it overnight (up to 8 hours), the flavour penetration will be much deeper, making the final result truly next level.
My rub seems to have burned during the final caramelisation step, what went wrong?
This is usually due to too much direct heat or leaving them on too long without monitoring, especially if you added a sugary glaze! Since the rub has sugar, it cooks quickly; keep the grill on medium or switch your oven to the broiler/grill setting and watch them like a hawk 5 minutes can be the difference between crusty and charcoal.
The Proper Job Easy Dry Rubbed Bbq Ribs Oven Gri