Banana Pudding: Silky and Homemade
- Time: Active 20 minutes, Passive 15 minutes, Total 35 minutes
- Flavor/Texture Hook: Silky vanilla custard layered with softening wafers and fresh fruit
- Perfect for: Family Sunday suppers, potlucks, or when you need pure edible comfort
- Crafting the Soulful Southern Banana Pudding
- The Joy of Layered Custard
- Dessert Specifications and Timing
- Essential Components for the Dish
- Required Kitchen Tools and Gear
- Detailed Steps for Perfect Assembly
- Solving Common Custard Texture Issues
- Smart Substitutions and Flavor Variations
- Storage Rules and Freshness Tips
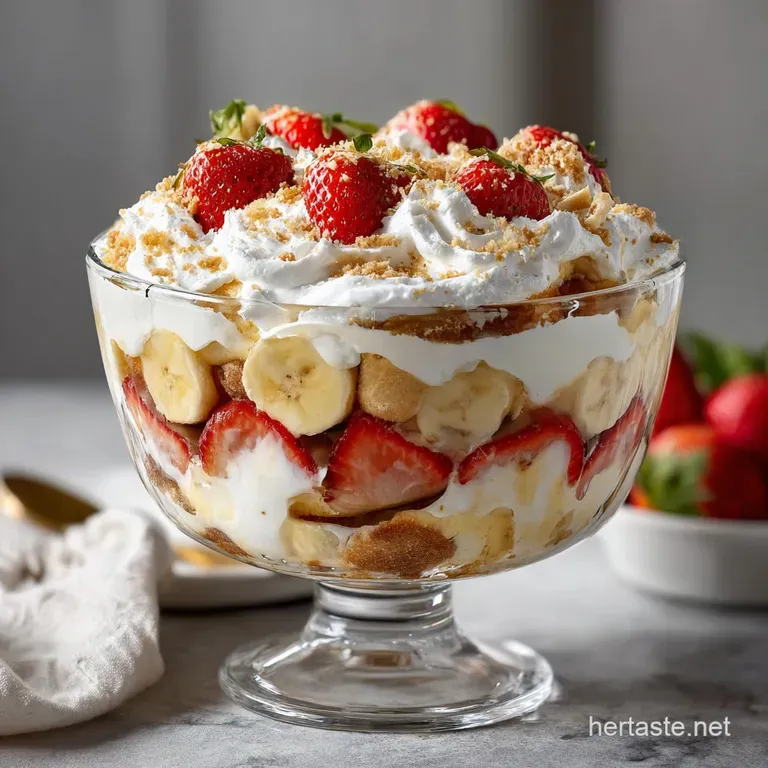
- Final Presentation and Garnishing Secrets
- Recipe FAQs
- 📝 Recipe Card
Crafting the Soulful Southern Banana Pudding
The kitchen is usually the loudest room in the house during our family reunions, but everything goes quiet the moment a massive glass bowl of banana pudding hits the table. I can still hear the soft "schloop" sound of the large serving spoon diving through layers of whipped cream and custard.
There is a specific aroma that defines this dish for me, it's a mix of warm vanilla extract, the floral scent of very ripe fruit, and that toasted sugar smell from the vanilla wafers.
I remember watching my aunt stir the pot for what felt like hours, her eyes never leaving the yellow liquid. She taught me that you can't rush a good custard. If you turn the heat up too high, you'll end up with scrambled eggs instead of dessert.
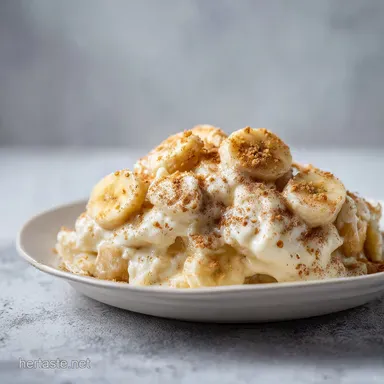
This dish represents a moment of pause, a bit of slow cooking that pays off in a texture so comforting it practically feels like a hug. It's about the contrast between the slightly soggy, cake like cookies and the fresh, firm bite of a banana slice.
We aren't making a quick pudding here, we are building a memory. This version is all about the rustic charm of scratch made components. We use whole milk for the fat content and real egg yolks for that signature golden hue.
There's no shortcut that can replicate the way a homemade custard soaks into a vanilla wafer, turning it into something that resembles a delicate sponge cake. Let's get into the details of how to make this work every single time.
The Joy of Layered Custard
The Cold Start: Whisking the cornstarch and sugar into cold milk and yolks before heating prevents the starches from clumping. This ensures the thickening agent is evenly distributed so the final result is perfectly smooth.
Starch Activation: The cornstarch needs to hit a specific temperature to swell and trap the liquid. Once the first bubble pops on the surface, you know the structure is set and won't thin out later.
Fat Stabilization: Adding cold butter at the very end doesn't just add flavor, it creates a glossy finish and a richer mouthfeel. The butter emulsifies into the warm custard, providing a velvety coating for the tongue.
Oxidation Barrier: Submerging the banana slices completely in the warm custard cuts off their oxygen supply. This simple physical barrier is what keeps the fruit from turning gray and unappealing during the long chill in the fridge.
| Method | Time | Texture | Best For |
|---|---|---|---|
| Traditional Stovetop | 35 minutes | Velvety, rich, and deeply vanilla | Authentic flavor and "cake like" wafers |
| No Bake/Instant | 10 minutes | Light, airy, and very sweet | Last minute cravings or summer heat |
| Baked Meringue | 50 minutes | Warm, toasted, and firm | Holidays and traditional Southern flair |
The stovetop method provides the most control over the sweetness and thickness of your base. While the no bake versions are fine in a pinch, they often lack the structural integrity needed to hold up the heavy fruit layers. The cooked custard develops a much more complex profile as the sugar and milk simmer together. This recipe is a bit more refined than my Banana Pudding Lasagna which focuses more on portability.
Dessert Specifications and Timing
| Ingredient | Science Role | Pro Secret |
|---|---|---|
| Cornstarch | Thickening agent | Whisk into cold liquid first to avoid "lump phobia" |
| Egg Yolks | Emulsifier and color | Use room temp yolks for a smoother integration |
| Whole Milk | Liquid base and fat | Don't use skim, the fat is needed for the wafers to soften |
| Butter | Gloss and mouthfeel | Use cold, cubed pieces so they melt slowly into the mix |
The milk provides the hydration that the cornstarch needs to expand. If you use a lower fat milk, the pudding might feel watery or thin. The egg yolks are the real heroes here, they contain lecithin, which helps the fat from the butter and milk stay bonded to the water based liquids.
This prevents that oily separation that can sometimes ruin a homemade dessert.
Essential Components for the Dish
For the custard base, you will need 3 cups whole milk and 0.75 cup granulated sugar. These form the backbone of the flavor. To get the thickness right, we use 0.33 cup cornstarch and 0.25 tsp fine sea salt.
The richness comes from 4 large egg yolks and 2 tbsp unsalted butter, which we finish with 2 tsp pure vanilla extract.
For the assembly, make sure you have 11 oz vanilla wafers and 5 large ripe bananas. The fruit should be yellow with just a few brown spots, if they are too green, they won't have the sweetness we need. For the cloud like topping, gather 1.5 cups heavy whipping cream and 3 tbsp powdered sugar.
| Original Ingredient | Substitute | Why It Works |
|---|---|---|
| Whole Milk | Evaporated Milk | Adds a toasted, caramelized flavor and extra creaminess |
| Cornstarch | Arrowroot Powder | Provides a similar thicken but results in a more translucent look |
| Vanilla Wafers | Shortbread Cookies | Higher butter content means they stay a bit crisper in the custard |
I've found that using high-quality vanilla extract makes a massive difference. Since the custard is mostly milk and sugar, the floral notes of the vanilla really stand out. For those who love a bit of crunch, you might enjoy my Nutter Butter version as a variation on this theme.
Required Kitchen Tools and Gear

You really need a heavy bottomed saucepan for this. Thin pots have "hot spots" that will scorch the milk before the cornstarch has a chance to thicken. A silicone whisk is also better than a metal one if you are using a non stick pan, but a balloon whisk is best for incorporating air into the whipped cream later.
A glass 9x9 inch dish is the classic choice because you can see the beautiful layers of wafers and fruit. It also keeps the pudding colder for longer than a ceramic dish. You'll also need a couple of mixing bowls, a sharp knife for the bananas, and a stand mixer or hand mixer for the topping.
Detailed Steps for Perfect Assembly
1. The Cold Start Method
In your heavy bottomed saucepan, whisk together 0.75 cup granulated sugar, 0.33 cup cornstarch, and 0.25 tsp fine sea salt until combined. Note: This ensures the starch is separated by sugar granules before the liquid hits.
2. Adding the Liquids
Slowly whisk in the 3 cups cold whole milk and the 4 large egg yolks. Keep whisking until the mixture is completely smooth and no yellow streaks remain.
3. Thickening the Base
Place the saucepan over medium heat. Whisk constantly for 10-15 minutes until the mixture thickens into a glossy custard and just begins to bubble. Note: Do not walk away, the bottom can scorch in seconds.
4. Adding Butter and Vanilla
Remove the pan from the heat immediately. Whisk in the 2 tbsp cold, cubed butter and 2 tsp pure vanilla extract until the butter is completely melted and the custard is silky.
5. Cooling the Custard
Allow the custard to cool on the counter for about 10 minutes. It should be warm but not scalding until it reaches a spreadable, thickened consistency.
6. Creating the Base Layer
In a 9x9 inch glass dish, arrange a single layer of the 11 oz vanilla wafers across the bottom. Follow this with a layer of the 5 large ripe bananas, sliced into rounds.
7. Sealing the Fruit
Pour about half of the warm custard over the bananas. Use a spatula to spread it until every banana slice is completely submerged. Note: This prevents the fruit from browning.
8. The Repeated Layering
Repeat the layers with the remaining wafers, bananas, and the rest of the custard. Press plastic wrap directly onto the surface until the wrap is touching the custard to prevent a skin.
9. Managing Final Chill Time
Place the dish in the refrigerator. Chill for at least 4 hours until the pudding is set and the wafers have softened.
10. Whipping the Cloud Topping
In a chilled bowl, whisk 1.5 cups cold heavy whipping cream and 3 tbsp powdered sugar until stiff peaks form and the cream holds its shape. Spread over the pudding and serve.
Solving Common Custard Texture Issues
Fixing Runny Pudding Bases
If your pudding looks more like a sauce than a custard after chilling, it usually means the cornstarch wasn't "cooked out" properly. Cornstarch needs to reach a simmer to activate its thickening power. If you stop whisking the moment it gets thick but before it bubbles, the bonds might break down as it cools.
| Problem | Root Cause | Solution |
|---|---|---|
| Lumpy Custard | Added milk too fast | Whisk the milk in a tiny bit at a time to create a smooth paste first |
| Weeping/Watery | Over whisking after set | Once the pudding is chilled, don't stir it vigorously or you'll break the starch bonds |
| Scorch Marks | Heat was too high | Always use medium heat and a heavy pot; if it scorches, don't scrape the bottom |
Common Mistakes Checklist
- ✓ Pat the banana slices dry if they seem particularly moist to prevent extra liquid.
- ✓ Use cold butter at the end to help lower the custard temperature quickly.
- ✓ Don't skip the salt; it balances the heavy sugar and fat content.
- ✓ Ensure the plastic wrap actually touches the custard surface while cooling.
- ✓ Whisk the egg yolks thoroughly into the milk before turning on the heat.
Eliminating Custard Lumps
If you do see lumps forming while you are cooking, don't panic. You can usually save it by immediately removing the pan from the heat and whisking like your life depends on it. If that doesn't work, pour the warm custard through a fine mesh sieve into a clean bowl.
This will catch any cooked egg bits or starch clumps, leaving you with a silky smooth base.
Smart Substitutions and Flavor Variations
If you need to scale this recipe down for a smaller household, you can easily halve everything. Use a smaller loaf pan instead of the 9x9 dish. When halving the egg yolks, just use 2 large yolks. The cooking time will be slightly shorter, about 8 minutes instead of 10-15.
To scale up for a big party, double the ingredients but be careful with the spices. I usually only go to 1.5x on the salt and vanilla so the flavor doesn't become overwhelming. You will need a much larger pot and will likely need to whisk for about 20 minutes to get the larger volume of milk up to temperature.
Deepening Flavor With Nuts
For a rustic, textured variation, toss some toasted pecans between the layers. The saltiness of the nuts cuts through the sweetness of the sugar. You could also use crushed graham crackers if you run out of wafers, though the texture will be slightly grainier.
Adding a Boozy Kick
For an adult version, whisk 1 tablespoon of dark rum or bourbon into the custard along with the vanilla. The alcohol adds a sophisticated depth that pairs beautifully with the natural sweetness of the bananas.
Storage Rules and Freshness Tips
Store any leftovers in the refrigerator, kept tightly covered with plastic wrap. It will stay good for about 3 days. After that, the bananas will start to release moisture (weeping), and the wafers will go from "cake like" to "mushy." This dish does not freeze well; the custard texture becomes grainy and the bananas turn black upon thawing.
To reduce waste, if you have leftover bananas that are getting too soft, peel them and freeze them for smoothies. Leftover vanilla wafers can be crushed and kept in a jar to use as a topping for yogurt or ice cream. If you have extra heavy cream, whip it up and use it in your morning coffee for a little treat.
Final Presentation and Garnishing Secrets
A Southern classic like this deserves a beautiful presentation. I like to save a few of the best looking wafers to stand up around the edges of the dish. It gives the pudding a bit of height and structure. You can also crush a handful of wafers into "sand" and sprinkle them over the whipped cream right before serving.
High End Restaurant Visuals
If you want to get fancy, serve the pudding in individual glass mason jars or wine glasses. Layer them just like the big dish, but use smaller banana slices. Top each one with a single whole wafer and a sprig of mint for a pop of color. The clear glass lets everyone see those beautiful, rustic layers.
Classic Southern Finishes
The most traditional way to finish this is with a big, messy pile of whipped cream. Don't worry about making it look perfect. The beauty of banana pudding is in its homemade, unpretentious appearance. A little dusting of cinnamon or nutmeg on top can also add a nice aromatic touch that complements the vanilla.
Remember that the contrast is the most important part. The rich, velvety custard against the soft wafers is what makes this a winner. Whether you are serving it at a fancy dinner or a backyard barbecue, it’s the kind of dish that makes people feel at home.
It’s simple, it’s sweet, and it’s a timeless piece of comfort food history.

Recipe FAQs
What are the ingredients for banana pudding?
Use only these components for the authentic recipe. You will need 3 cups whole milk, 0.75 cup granulated sugar, 0.33 cup cornstarch, 0.25 tsp fine sea salt, 4 large egg yolks, 2 tbsp cubed unsalted butter, 2 tsp pure vanilla extract, 11 oz vanilla wafers, 5 large ripe bananas, 1.5 cups heavy whipping
cream, and 3 tbsp powdered sugar.
Can you mix sweetened condensed milk with pudding mix?
No, this is not recommended. This specific recipe relies on a precise scratch made custard base using cornstarch, sugar, and egg yolks to achieve the correct structural integrity and flavor profile.
When making banana pudding, what do you put down first?
Create a base layer of vanilla wafers in your 9x9 inch glass dish. Follow this immediately with a layer of sliced bananas before pouring the warm custard over the top to submerge the ingredients.
How do you keep bananas from turning black in banana pudding?
Submerge every banana slice completely in the warm custard. This creates an airtight seal that prevents oxidation, keeping the fruit fresh while it sets in the refrigerator.
How to ensure the custard has the perfect consistency?
Whisk the milk, sugar, cornstarch, salt, and yolks thoroughly before turning on the heat. If you enjoyed mastering this cold slurry technique for a smooth custard, the same principle of temperature control is vital for our silky keto banana pudding recipe.
Can I freeze the pudding to make it last longer?
No, avoid freezing this dish. The custard texture will become grainy upon thawing, and the bananas will turn black and lose their structural integrity.
How long can I store this dessert in the refrigerator?
Consume within 3 days for the best quality. After this window, the bananas typically release excess moisture and the vanilla wafers transition from a pleasant, cake like texture into an overly soft, mushy consistency.
Homemade Banana Pudding Recipe
Ingredients:
Instructions:
Nutrition Facts:
| Calories | 493 kcal |
|---|---|
| Protein | 6.5 g |
| Fat | 24.5 g |
| Carbs | 63.4 g |
| Fiber | 2.1 g |
| Sugar | 44.8 g |
| Sodium | 125 mg |
