Truly Chewy Homemade Boba Balls the Ultimate Diy Guide

- The Quest for the Perfect Chew: Elevating Your Bubble Tea Experience
- Why Traditional Shelf-Stable Boba Simply Doesn't Compare
- Assembling Your Tapioca Treasure Trove: Essential Components
- Measuring Precision: Tools for Flawless Dough Formation
- The Step-by-Step Alchemy: From Powder to Perfectly Rolled Spheres
- Boiling and Bathing: Achieving Maximum Tenderness
- Troubleshooting and Texture Tuning: Mastering the Next Batch
- Recipe FAQs
- 📝 Recipe Card
The Quest for the Perfect Chew: Elevating Your Bubble Tea Experience
Tired of boba that tastes more like rubber than chewy delight? This recipe is your ticket to authentic, perfectly springy black tapioca pearls, made right in your own kitchen. Making your own boba pearls at home is a tremendously satisfying bit of kitchen alchemy.
We’re aiming for that glorious, chewy texture that makes a bubble tea truly sing, moving far beyond the dry, shelf stable packets that often disappoint. While traditional boba uses just tapioca flour and hot water, we’re adding a touch of brown sugar into the dough for depth and that signature caramel sweetness.
It’s straightforward, requiring patience more than expertise, and the result is miles better than anything you can buy off the shelf. Perfect for elevating your afternoon tea game!
This endeavor is rated as Medium difficulty; while the ingredients are few, the process requires careful management of the dough's temperature and consistent rolling technique to ensure uniform size.
Overall, this takes about 1 hour and 15 minutes, yielding approximately 2 cups of cooked pearls enough for 6 to 8 standard drinks.
Why Traditional Shelf Stable Boba Simply Doesn't Compare
Most commercially available boba pearls have been pre-cooked and preserved in heavy syrups, often containing stabilizers and preservatives that fundamentally change their texture. They are designed for a long shelf life, not for immediate, perfect springiness.
When you embark on creating Homemade Boba Balls , you control every variable, from the hydration level to the final sweetness, guaranteeing a fresh, vibrant chew.
Unlocking Authentic Springiness: A Kitchen Alchemy Secret
The magic behind that satisfying "QQ" texture the desired bounce lies in the initial interaction between the starch and the liquid. This recipe hinges on scalding the tapioca starch. We must use freshly boiling water to pour over the starch.
This step is non-negotiable; it gelatinizes the starch partially before kneading begins, locking in the elasticity necessary for authentic Tapioca Balls Recipe success.
Beyond the Basics: Incorporating Caramel Sweetness into Your Dough
To push the flavour profile beyond plain starch, this Easy Boba Recipe incorporates dark brown sugar directly into the hot liquid. When this sweetened liquid hits the starch, it doesn't just hydrate the mixture; it begins infusing the dough with a deep, molasses like caramel note.
This means even before your DIY Boba Balls hit the syrup bath, they already possess a nuanced flavour foundation.
Setting the Stage: What Makes These Homemade Boba Balls Superior
The superiority of these Homemade Tapioca Balls comes down to freshness and immediate preparation. Because we are mixing, rolling, and boiling on the same day, we capture the starch at its most reactive state.
You’ll find that freshly cooked pearls retain their softness far longer than preserved versions, making your Bubble Tea Boba Recipe truly exceptional.
Assembling Your Tapioca Treasure Trove: Essential Components
Gathering your supplies is the first step toward mastering How to Make Boba Balls at Home . We require only a handful of pantry staples, but precision in measurement, particularly with the starch and the boiling water, dictates success.
For the dough, you will need 1 cup plus 2 tablespoons (150g) of high-quality tapioca starch and 1/4 cup (50g) of packed dark brown sugar. The crucial liquid component is 1/2 cup (120ml) of water, which must be boiling hot when added.
For the finishing touch, a simple syrup made from 1/2 cup granulated sugar and 1/2 cup water will perfectly coat the cooked spheres.
Related Recipes Worth Trying
- The Best Homemade Brown Sugar Milk Boba Tiger Stripes — Stop queuing for expensive bubble tea Learn to make the perfect Brown Sugar Boba Milk Recipe with chewy pearls and rich caramelized tiger stripes at home
- Mastering Chewy Brown Sugar Boba Pearls at Home — Stop buying packets Learn how to make genuinely chewy homemade boba pearls from scratch with this foolproof brown sugar recipe Effortless texture awaits
- Best Homemade Apple Pie Recipe Flaky AllButter Crust — Learn how to make a truly classic Apple Pie with a flaky allbutter crust and a deeply spiced filling This stepbystep recipe guarantees perfection
Measuring Precision: Tools for Flawless Dough Formation
Creating beautiful Boba Pearls Recipe spheres demands attention to detail. While a simple heatproof bowl and a sturdy wooden spoon are sufficient for mixing, the consistency of the final product depends heavily on ingredient quality and precise handling.
The Flour Foundation: Selecting the Right Tapioca Starch
Always use pure tapioca starch (sometimes labeled as tapioca flour). Do not substitute this with cornstarch or potato starch; these will yield a texture that is gummy or brittle, not springy.
A high-quality starch ensures that when we activate it with heat, we achieve the desired structure for the final Homemade Boba Balls .
Sweetener Secrets: Why Brown Sugar Elevates the Base Flavor
Using dark brown sugar in the dough is a flavour choice that sets this recipe apart. It dissolves easily into the hot water, creating a rich syrup that colours the pearls beautifully black and adds that distinct, slightly smoky caramel note that complements robust black teas perfectly.
Hydration Control: Achieving the Ideal Water Temperature
Remember the key step: the water must be freshly boiling ( 212° F or 100° C) when it hits the starch. This high temperature is what initiates the gelatinization process, thickening the starch instantly and forming the base structure required for kneading the perfect dough.
The step-by-step Alchemy: From Powder to Perfectly Rolled Spheres
The active creation phase transforms dry ingredients into a pliable dough. Start by combining your 1/4 cup of brown sugar with the 1/2 cup of boiling water in a small saucepan, heating gently until the sugar is fully dissolved into a syrup, then immediately remove from heat.
Next, place your 1 cup plus 2 tablespoons of tapioca starch into your heatproof mixing bowl. Pour the hot sugar syrup directly into the starch and immediately begin stirring vigorously with your wooden spoon. The mixture will look shaggy and clumpy this is completely normal.
Allow this to cool for about five minutes until it’s warm enough to handle.
Kneading Technique: Developing the Dough's Signature Elasticity
Turn the warm, shaggy mass out onto a surface lightly dusted with extra tapioca starch. Now comes the kneading. Work the mixture firmly until it comes together into a smooth, uniformly dark, pliable ball. This kneading action is vital for developing the dough's signature elasticity.
If it feels too sticky, add a tiny sprinkle more starch; if it feels stiff, incorporate a single drop of hot water to bring it back together. Once smooth, wrap the dough tightly in plastic wrap and let it rest at room temperature for 30 minutes to allow the starch to fully hydrate.
Shaping Mastery: Creating Uniformly Sized Homemade Boba Balls
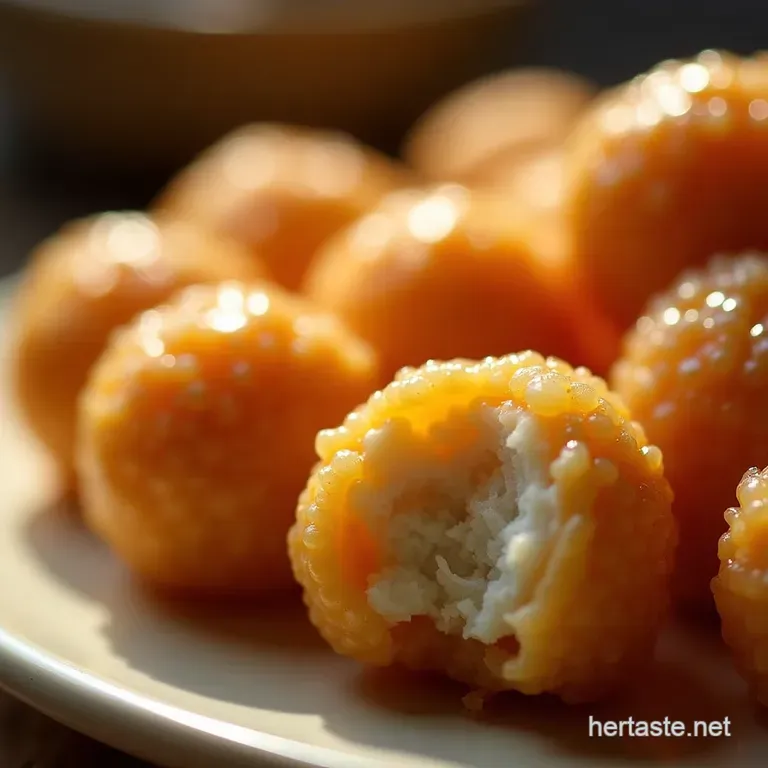
After resting, divide the dough into four equal portions. Take one portion and roll it between your palms or on a lightly floured surface to create a long, even rope, aiming for about 1/2 inch in thickness. Slice this rope into small, uniform pieces, roughly 1/4 inch wide.
Gently cup each small piece between your palms and roll it into a perfect sphere. Consistency in size is crucial for even cooking, so take your time here. Place the finished DIY Boba Balls onto a parchment lined baking sheet, ensuring none are touching, and dust them lightly with extra starch to prevent them from adhering to each other or the tray.
Boiling and Bathing: Achieving Maximum Tenderness
This final stage ensures your Homemade Boba Balls Recipe delivers maximum chewiness.
The Cooking Crucible: Timing Your Boil for Peak Chewiness
Bring a large pot of water to a fierce, rolling boil. Gently drop the uncooked pearls into the water all at once, stirring immediately to prevent them from sinking and sticking to the bottom. They will initially sink, but after a few minutes, they should float to the surface.
Do not assume they are done when they float! Continue to boil them for 20 to 25 minutes after they rise. For an extra chewy texture, aim for the higher end of that timing, or let them simmer for five extra minutes once they have all floated.
Sweet Syrup Immersion: Infusing Flavor Post Boil
The immediate step after cooking is crucial: quickly drain the cooked pearls and plunge them directly into a bowl of cold water. This "cold shock" immediately halts the cooking process, preventing them from turning soft and mushy.
While they are cooling in the water, prepare your simple syrup by simmering 1/2 cup granulated sugar with 1/2 cup water until clear. Once the pearls have cooled slightly, drain the cold water thoroughly and toss the warm pearls directly into the prepared simple syrup.
This soaking process infuses them with sweetness and keeps them perfectly slick. If you are wondering How to Make Boba Balls Easy , this final sweet coating is what ties the whole experience together.
Troubleshooting and Texture Tuning: Mastering the Next Batch
Even expert cooks encounter hiccups when learning How to Make Boba Balls Easy . The most common issue is uneven texture. If some pearls are hard in the centre while others are soft, it almost always means they were not uniform in size when you rolled them.
Ensure your rope thickness and cuts are consistent before rolling. If your dough was too crumbly during kneading, it lacked sufficient moisture, meaning your water wasn't hot enough or you needed an extra teaspoon of liquid. Conversely, if the dough was too sticky to handle, you added too much liquid initially.
Adapting for Different Textures: Soft vs. Extra Chewy Pearls
For a softer, more tender experience closer to the texture you might find in some commercial shops reduce the final boiling time by about five minutes. For that intense, deeply satisfying, extra chewy bite, allow the pearls to simmer for the full 30 minutes after they float.
Flavor Variations: Introducing Matcha or Coconut Infusions
To experiment with flavouring your Homemade Boba Balls , try incorporating dry flavourings into the starch before adding the hot syrup. Whisking 1 teaspoon of culinary grade matcha powder into the dry tapioca starch yields beautiful green, earthy pearls.
Alternatively, when making the soaking syrup, adding 1/2 teaspoon of pandan extract will give your Easy Boba Recipe a lovely tropical twist.
Maximizing Freshness: How Long Do Homemade Boba Balls Last?
Homemade boba are best enjoyed immediately, ideally within four hours of cooking. While they remain safe to eat for a couple of days stored in their syrup in the refrigerator, the chewiness diminishes rapidly; they tend to harden considerably overnight.
Always plan to boil just the amount you need for immediate enjoyment.
Pairing Perfection: Best Teas for Your Freshly Made Spheres
These rich, brown sugar infused pearls pair wonderfully with robust beverages. A strong, cold brewed Assam or an Earl Grey tea forms the perfect counterpoint to the slight sweetness of the pearls.
For a lighter option, try them in an iced jasmine green tea with a splash of fresh lemon, allowing the flavour of your fresh Homemade Tapioca Balls to shine through.
Recipe FAQs
Why are my Homemade Boba Balls ending up hard or too chewy?
This usually comes down to two things: either the cooking time was too short, or the dough wasn't kneaded enough. Remember, the pearls are done when they sink and you cook them for an extra 5 minutes.
Also, ensure you used freshly boiling water to scald the starch that initial heat is key to achieving the perfect, glossy chewiness!
How long do these Homemade Boba Balls actually last once I've cooked them?
Sadly, these fresh pearls are a bit like a day-old scone; they are best eaten within 4 hours of cooking for peak texture. If you have leftovers, store them in their soaking syrup in the fridge for up to 2 days, but be warned: they will definitely firm up quite a bit upon chilling.
It's best to make only what you plan to use on the day!
Can I skip the brown sugar in the dough? I only have white sugar.
You absolutely can use only white sugar, but you'll lose that signature depth of flavour and darker colour that the brown sugar provides. The brown sugar dissolves beautifully and adds a lovely, subtle caramel note that really elevates the whole experience.
If you must swap, use it cup-for-cup, but consider adding a tiny splash of molasses to your soaking syrup to compensate.
My dough is too sticky to handle what's the secret to rolling them without them turning into a mess?
Ah, the classic kitchen conundrum! Tapioca starch is famously sticky when hydrated. Make sure your hands and work surface are generously dusted with extra dry tapioca starch before you start rolling.
If the dough is still wrestling you, let it rest for another 10 minutes; sometimes, just chilling slightly helps bind it together before you get your hands dirty again.
Do I need to make the soaking syrup, or can I just put the cooked boba in milk?
While you could skip the dedicated syrup, it’s really the finishing touch that makes all the difference don't chuck it! The hot pearls need the cold shock of water, and then they need to sit in the sugar syrup to absorb sweetness and moisture.
This stops them from drying out and gives them that glossy, ready-to-serve texture. Think of it as the final polish on a good bit of silverware!
Chewy Homemade Boba Balls

