Barbecue Pulled Chicken Sliders: Sticky, Smoky, and Utterly Crowd-Pleasing
- Sticky & Smoky BBQ Pulled Chicken Sliders: A Proper Crowd-Pleaser
- Getting Started: Why Barbecue Pulled Chicken Sliders Are the Ultimate Party Food
- The Science of Sticky & Smoky: Deconstructing the Flavour Profile
- Kitchen Checklist: Essential Ingredients and Smart Substitutions
- Method: Mastering the Low and Slow Pulled Process
- Assembling the Ultimate Barbecue Pulled Chicken Sliders
- Troubleshooting Your Sliders: Chef's Tips for Perfect Results
- Preparation & Planning: Storage, Freezing, and Making Ahead
- Perfect Pairings: What to Serve Alongside Your Barbecue Pulled Chicken Sliders
- Recipe FAQs
- 📝 Recipe Card
Sticky & Smoky BBQ Pulled Chicken Sliders: A Proper Crowd Pleaser
Getting Started: Why Barbecue Pulled Chicken Sliders Are the Ultimate Party Food
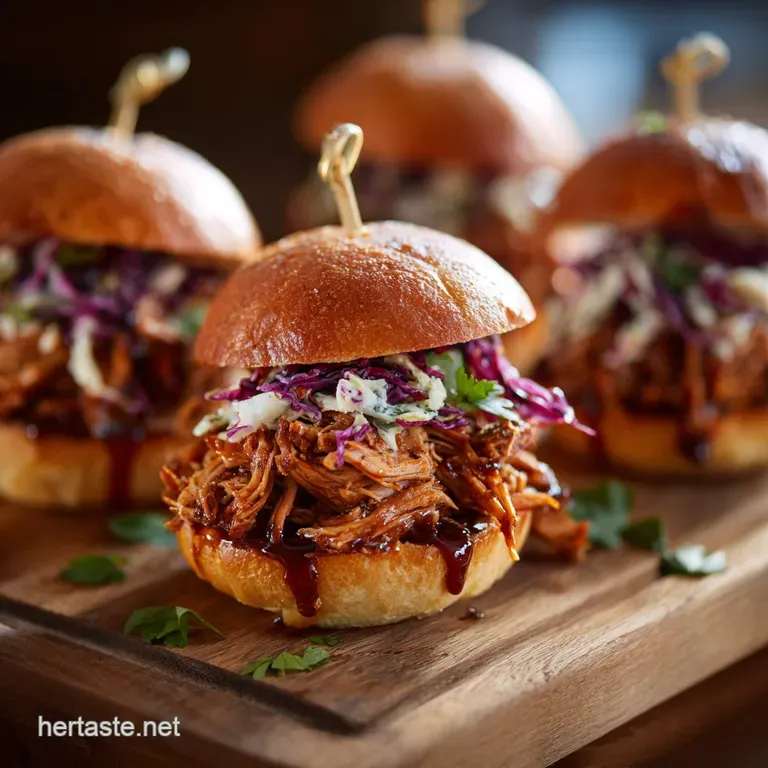
The moment that smoky, sweet aroma hits the kitchen, you know you’ve made the right choice. These sliders are pure comfort food magic, sticky on the outside and unbelievably tender inside. Honestly, they smell like a summer evening even when it's snowing outside.
What I love most is that this recipe is the ultimate lifesaver for feeding a crowd without breaking the bank or spending all day hovering over a grill. It requires minimal active time, leveraging the low and slow method to turn simple ingredients into something spectacular.
It’s cheap, cheerful, and everyone goes wild for the miniature size.
We are skipping the dry, rushed, weeknight shredded stuff and focusing on proper depth of flavour here. Grab your apron, friend; we are about to make the stickiest, smokiest, most satisfying barbecue shredded chicken sliders you’ve ever tasted.
The Science of Sticky & Smoky: Deconstructing the Flavour Profile
This recipe isn't complicated, but we are using intentional techniques to maximize the flavour punch. We’re building layers, starting with the dry rub, moving to the braise, and finishing with a over high heat sauce reduction. That’s how we get that signature sticky finish and deep, savoury undertone.
A Brief History of the Barbecue Slider
Sliders are just fun, right? They’re the polite way to eat three sandwiches without admitting you ate three sandwiches. While the history of true barbecue is long and complex, the slider format is brilliant because it perfectly manages the sweet, rich filling by keeping portion size small and allowing for crunchy toppings like slaw and pickles to cut through the richness.
Why Low and Slow Wins Every Time
Cooking the poultry low and slow, submerged in just enough liquid, breaks down the connective tissues beautifully. This process, often called braising or poaching, ensures the meat stays incredibly moist while absorbing all the aromatic spices.
This is the only way to guarantee truly melt-in-your mouth pulled barbecue chicken sandwiches crockpot style (even if we're using the oven or stovetop today).
Equipment Check: Tools Needed for Success
You really don't need fancy tools for this, but a heavy bottomed pot like a Dutch oven is ideal for maintaining consistent, low heat. You'll also need two sturdy forks for shredding or, if you’re lazy like me, the stand mixer paddle attachment is a revolutionary game changer for speed.
The Role of the Rub vs. the Brine
We are focusing on a dry rub here, not a brine. A brine focuses primarily on deep salting and moisture retention, which isn't entirely necessary when we are braising the meat in liquid anyway.
The rub, however, creates a lovely crust when we sear it, injecting paprika, garlic, and onion powder right into the surface before the slow cook begins.
Achieving Maximum Tenderness: The Break Down
Tenderness is all about temperature and time. Cooking the poultry gently until it hits an internal temp of about 195 200°F (90 93°C) allows the collagen to convert into gelatin.
Even though the FDA says 165°F (74°C) is safe, going a bit higher here is the secret to pull apart, juicy shredding.
Reducing the Sauce: Getting That Signature Sticky Finish
When you return the shredded meat to the sauce, you absolutely must simmer it uncovered. We need to boil off excess water, especially from the residual cooking liquid we added, which concentrates the sugars and thickens the sauce beautifully.
This is the step that turns watery shredded meat into sticky, glossy, perfect pulled barbecue.
Kitchen Checklist: Essential Ingredients and Smart Substitutions
We are starting with a few basics and building up massive flavour from there. If you don't have exactly what the recipe calls for, don't panic.
The Backbone: Choosing the Right Cut for Pulling
I swear by boneless, skinless thighs for pulled applications. They have more fat marbled throughout, which means they practically guarantee juicy results and stand up better to the long cook time than drier cuts.
Customising Your Sauce Base: Sweet, Tangy, or Spicy?
I recommend starting with a good quality, smoky store-bought BBQ sauce, but don't stop there. We add acidity (vinegar), umami (Worcestershire), and optional heat (hot sauce) to make it taste completely homemade. Think of the store-bought sauce as your foundation you're the architect of the final flavour!
Slider Buns & Toppings: The Perfect Vehicle
Potato or brioche rolls are the only way to go for this particular dish. They have enough structure to hold up the heavy filling but remain soft. Don't cheap out on the buns, or you risk a soggy disaster.
| Ingredient | My Preferred Choice | Viable Substitute |
|---|---|---|
| Poultry Cut | Boneless Thighs | Boneless Breasts (cook 15 mins less) |
| Smoked Paprika | Smoked Paprika | Standard Paprika + 1/4 tsp Liquid Smoke |
| Apple Cider Vinegar | ACV | White Wine Vinegar or Lemon Juice |
| Brioche Rolls | Potato Slider Rolls | Hawaiian Sweet Rolls (will be sweeter) |
| Coleslaw | Vinegar based Slaw | Fresh, crunchy raw cabbage and carrot mix |
Method: Mastering the Low and Slow Pulled Process

Ready to make some truly incredible Barbecue Pulled Chicken Sliders? Let's crack on.
Chef's Note: Patting the meat bone dry before applying the rub is non-negotiable. Excess moisture prevents the rub from adhering, and stops the crucial searing process from working properly.
Assembling the Ultimate Barbecue Pulled Chicken Sliders
Stage 1: Building the Flavour Foundation (Brine/Rub)
- Rub It Down: Whisk together all the rub spices (paprika, powders, sugar, salt, pepper). Pat the thighs dry, then coat them generously. Allow them to sit for 10 minutes while you get the pot hot.
- Sear for Flavour: Heat 1 tbsp of oil in your Dutch oven over medium high. Sear the seasoned thighs quickly, about 2 minutes per side, just until you see a lovely golden brown crust forming. This step locks in flavour do not skip it! Remove the seared meat.
Stage 2: The Slow Cooker or Oven Method
- Set the Stage: Deglaze the pot with a splash of stock, scraping up those brown bits. Return the thighs to the pot and add the remaining stock, ensuring the meat is mostly submerged.
- Braise: Bring the liquid to a gentle simmer, then cover tightly. Reduce the heat to low and cook for 45– 60 minutes. The chicken should be shreddable with zero resistance. If you’re short on time, this is also excellent prepared in an Instant Pot or, for a slower pace, check out my tips for making delicious [Instant Pot Chicken Noodle Soup The 50Minute Classic Comfort Meal].
Stage 3: The Perfect Pull and Sauce Reduction
- Shred: Remove the cooked thighs, saving the liquid. Place the meat in a large bowl. Using two forks, shred it finely, or if you have a stand mixer, let the paddle attachment run on low speed for 30 seconds until fluffy.
- Sauté Aromatics: Wipe out the pot. Add the remaining oil and sauté the diced onion until soft and translucent, about 5 minutes. Add the garlic and cook until fragrant (about 60 seconds).
- Create the Sauce: Pour in the store-bought BBQ sauce, vinegar, Worcestershire, and optional extra sugar or hot sauce. Stir thoroughly. Add about 1/2 cup of the reserved braising liquid; this thins the sauce just slightly and brings the flavour complexity of the braise back in.
- Reduce: Bring the sauce to a rapid simmer over medium high heat, stirring occasionally. Cook uncovered for 5– 10 minutes until it has visibly thickened and coats the back of a spoon.
Toasting the Buns and Finishing the Filling
- Combine & Heat: Return the shredded meat to the thickened sauce. Stir until fully coated and sticky. Simmer for 5 minutes, ensuring the meat is piping hot. Taste now does it need more salt? More tang? Adjust accordingly.
- Toast: Brush the insides of the slider buns with melted butter. Toast them face-up on a baking sheet at 350°F (175°C) or briefly on a grill until golden and lightly crunchy.
Layering for Texture and Maximum Enjoyment
Spoon a generous, sticky mound of the pulled meat onto the bottom bun. Top with a spoonful of crunchy coleslaw that cold, tangy crunch is so essential for contrast. Cap it off and serve immediately.
Troubleshooting Your Sliders: Chef's Tips for Perfect Results
Preventing Dryness: The Moisture Trap
The biggest mistake people make when shredding is not cooking it long enough or forgetting to use a fatty cut. If your meat feels dry after shredding, don't panic. Simply stir in a couple of tablespoons of the reserved braising liquid (or stock) until the desired moisture level is reached before adding the thick BBQ sauce.
Fixing Over Sauced or Under Sauced Pull
If the mixture looks too wet, keep simmering uncovered for a few extra minutes to reduce the liquid. If you added too much sauce, you can try mixing in a small amount of extra plain shredded poultry or a tiny bit of cornstarch mixed with water (a slurry) to thicken it quickly.
How to Hold Warm Sliders for a Crowd
If you’re making these for a party, you can keep the sauced, pulled meat warm in a slow cooker set to the "Keep Warm" setting for up to 2 hours. Assemble the sliders just before serving to prevent the buns from getting soggy.
Preparation & Planning: Storage, Freezing, and Making Ahead
These Barbecue Pulled Chicken Sliders are truly easy comfort food that lends itself beautifully to make-ahead strategies.
Freezing Pulled Chicken: Best Practices
Pulled meat freezes brilliantly! Once fully cooked and coated in sauce, let it cool completely. Store it in a heavy duty, airtight freezer bag or container, pressing out all the air. It will keep well for up to 3 months. I recommend freezing it in smaller, single meal portions for easy defrosting.
Reheating for Freshness
Never microwave this if you can avoid it! Microwave reheating ruins the texture and turns the sauce rubbery. The best method is to thaw it overnight and reheat it gently on the stovetop over low heat, adding a splash of stock or cider vinegar if it seems too thick.
Keeping the Buns Crisp (Avoiding the Sog)
The key to preventing sogginess is separating the hot, wet filling from the cold, crisp slaw, and the toasted bun for as long as possible. If you are serving a buffet style, keep the toasted buns separate and let guests build their own immediately before eating.
Perfect Pairings: What to Serve Alongside Your Barbecue Pulled Chicken Sliders
These sticky sliders are rich and robust, so they need sides that offer coolness, crispness, and acidity.
- Cool & Crisp: A sharp, tangy coleslaw is mandatory, but if you want something lighter, a simple green salad with a tart vinaigrette works well. For a protein salad twist, consider something like this [Cranberry Pecan Chicken Salad Easy Creamy and Light Recipe].
- Starches: Classic French fries are a must. Or maybe some sweet potato fries, or even a creamy mac and cheese to double down on the comfort factor.
- Green Stuff: A quick side of tangy pickled green beans or a simple chopped veggie platter adds necessary freshness. For another easy crowd pleaser involving hearty sides, sometimes a sheet pan approach is best, like the techniques I use in the [Chicken with Carrots and Potatoes: Crispy Lemon Herb Sheet Pan Supper].

Recipe FAQs
Why is my pulled chicken dry or tough?
Dryness usually results from overcooking the chicken without enough liquid or starting with too lean a cut. Ensure you use bone-in, skin-on thighs for maximum inherent moisture, as the fat content keeps the meat tender during the low-and-slow cook.
Always allow the chicken to rest in some of the rendered cooking liquid before shredding to help the meat reabsorb those essential juices.
Can I use chicken breasts instead of thighs for this recipe?
While you can substitute breasts, they are much leaner and inherently prone to drying out when cooked for an extended period, which is necessary for pulling. If you must use breasts, reduce the cooking time slightly and ensure they are fully submerged in the braising liquid or sauce to maintain moisture.
The flavour payoff and tenderness from using thighs are generally superior for pulled meat dishes.
How far in advance can I make the pulled chicken?
Pulled chicken is an excellent make-ahead dish, as the flavours continue to meld overnight. Store the fully prepared chicken, mixed generously with its sauce, in an airtight container in the refrigerator for up to 4 days.
When ready to serve, reheat gently on the stovetop over low heat, adding a splash of chicken stock if it seems too thick.
How can I make the smoky flavour more intense without using a smoker?
To boost the smoky profile, ensure you use a good quality smoked paprika in your initial spice rub before cooking the chicken. You can also incorporate a few drops of liquid smoke directly into the BBQ sauce mixture, but use this sparingly as its flavour is highly concentrated.
If grilling the chicken first to get a char, use wood chips (like hickory) wrapped in foil to generate quick, concentrated smoke.
What is the most efficient way to shred large batches of chicken?
For large quantities, the easiest method is to use a stand mixer fitted with the paddle attachment; simply place the bone free hot chicken into the bowl and mix on low speed for 30-60 seconds.
Alternatively, two sturdy forks will work just fine for smaller batches, pulling the meat apart while it is still steaming hot and tender. Ensure you use heat resistant gloves if shredding by hand.
Can this recipe be adapted to be gluten-free?
Yes, this recipe is easily adaptable by making two key substitutions. Firstly, many commercial BBQ sauces contain gluten as a thickener, so you must select a certified gluten-free sauce or make your own from scratch. Secondly, ensure the slider buns or rolls you use for serving are explicitly labeled as gluten-free.
What is the best way to freeze leftover pulled chicken?
Freezing leftovers is simple: ensure the chicken is completely cooled, then pack it tightly into heavy duty freezer bags or airtight plastic containers, ensuring it is submerged in the sauce to prevent freezer burn.
It will maintain optimal quality for up to three months; thaw overnight in the refrigerator before reheating thoroughly on the stove or in the oven.
Bbq Pulled Chicken Sliders Recipe

Ingredients:
Instructions:
Nutrition Facts:
| Calories | 198 kcal |
|---|---|
| Protein | 10.6 g |
| Fat | 9.7 g |
| Carbs | 11.1 g |
