Old Fashioned Peanut Butter Pie: the Ultimate Creamy, No-Bake Cloud
- Mastering the Old Fashioned Peanut Butter Pie: A Creamy Cloud of Nostalgia
- Why This Southern-Style Pie is Rich, Yet Remarkably Light
- Essential Ingredients for the Perfect Peanut Butter Filling and Crust
- Making Your Old Fashioned Peanut Butter Pie: The Step-by-Step Method
- Expert Techniques and Troubleshooting Common Pie Mistakes
- How to Store and Preserve Your Creamy Peanut Butter Pie
- The Final Flourish: Perfect Toppings and Pairing Suggestions
- Recipe FAQs
- 📝 Recipe Card
Mastering the Old Fashioned Peanut Butter Pie: A Creamy Cloud of Nostalgia
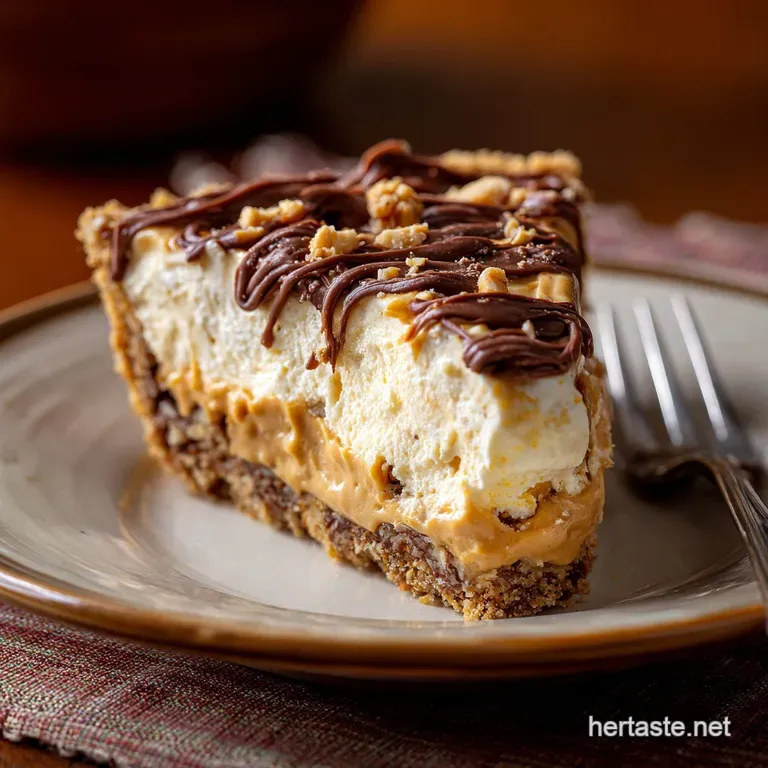
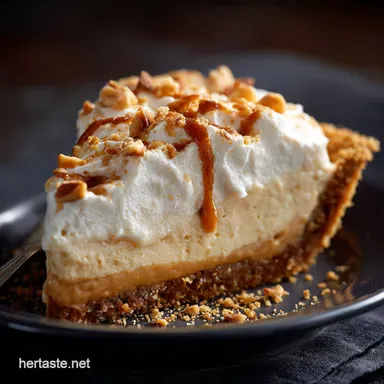
The moment this pie comes out of the fridge, you just know you've nailed dessert. That rich, toasted aroma from the graham cracker crust is the perfect foil for the cool, salty sweet filling inside.
It slices like a dream, holding its shape beautifully, yet the texture when it hits your tongue is pure, ethereal creaminess.
Honestly, this Old Fashioned Peanut Butter Pie is a serious lifesaver when you need a fantastic dessert with minimal fuss. No complicated baking, no tricky custards, and it uses ingredients you probably already have stashed in your pantry.
It’s cheap, incredibly impressive, and requires zero drama.
If you love the flavor of peanut butter and crave that nostalgic, rich Southern texture, then this is the recipe you need in your rotation. We are going beyond the basic fluff and creating a properly stabilized, airy filling that sets up perfectly every single time. Let’s crack on with the details.
Why This Southern Style Pie is Rich, Yet Remarkably Light
The Proper Tea Party Dessert: Why This Classic Recipe Endures
This pie is a true throwback, the kind of dish you’d find cooling on the counter after Sunday dinner or served at a proper tea party. It hits that sweet spot of comfort food that feels sophisticated enough for guests.
The key to its enduring popularity is the perfect contrast between the crunchy base and the impossibly smooth filling.
Quick Recipe Stats: Difficulty, Prep Time, and Crucial Chill Time
This pie is fundamentally an easy project, but you must respect the chill time or face a heartbreaking puddle. Active prep is a quick 25 minutes, meaning you can whip this up after work with no problem.
Remember: chilling for at least 4 hours is absolutely non-negotiable.
The Science of Salty Sweet: Balancing the Peanut Butter Filling
The brilliance here lies in the perfect salty sweet balance. We are using conventional peanut butter which has a solid salt base, enhancing the sugar content and preventing the pie from tasting flat or overly sweet.
Always taste your filling before folding in the cream; a tiny pinch of extra salt can intensify the peanut flavor dramatically.
Leveraging Cream Cheese for Ultimate No-Bake Stabilization
Many easy no-bake pies just use Cool Whip and powdered sugar, which leads to a wobbly, quick-to-melt mess. We use softened full fat cream cheese as the anchor for this recipe, creating a stable, luxurious structure that guarantees a clean slice.
The cream cheese ensures that this Old Fashioned Peanut Butter Pie holds up even when served outside on a warm afternoon.
Why We Insist on a Proper, Baked Graham Cracker Crust
I know, I know, it’s easier to buy a pre-made crust, but please hear me out. Baking the graham cracker crust for just 8 minutes sets the butter and crumbs, protecting it from the moisture of the no-bake filling.
This prevents the dreaded "soggy bottom" and adds a lovely nutty depth you just don’t get otherwise. If you skip this step, don't be shocked when your crust turns mushy.
From Bowl to Plate: Minimal Effort, Maximum Creaminess
The active time is short, mostly involving whisking, mixing, and gentle folding. The hardest part is truly waiting for the chill time to finish. If you’ve ever made my famous Peanut Butter Pie: The Utterly Decadent No-Bake Recipe , you know that no-bake means no stress.
Essential Ingredients for the Perfect Peanut Butter Filling and Crust
Selecting the Right Peanut Butter: Creamy vs. Natural Oil Separation
For this specific recipe, where stability is key, you must use conventional, smooth, shelf stable peanut butter (like Jif or Skippy). Natural peanut butter tends to separate and carries too much oil, resulting in a filling that sometimes refuses to set firmly.
This pie demands that classic, homogenous flavor profile.
The Crucial Role of Heavy Cream and Soft Cream Cheese in Texture
Please, let your cream cheese and peanut butter sit on the counter until they are truly, deeply softened. If your cream cheese is even slightly cold, you will end up with horrible, unincorporated lumps in your otherwise smooth filling.
The heavy cream must be ice cold to whip up into stiff, voluminous peaks, which is what gives this pie its "cloud" texture.
Graham Cracker Base: Enhancing Flavor with Brown Sugar and Butter
We combine the finely crushed graham crumbs with melted butter, sure, but the secret ingredient for the deepest flavor is a small amount of brown sugar. The molasses notes in the brown sugar pair beautifully with the salty peanuts and create a richer, almost caramel like crust.
Easy Swaps: dairy-free Alternatives and Crust Substitutions
If you're dealing with allergies or preferences, this recipe is surprisingly adaptable. You have options!
| Ingredient | Viable Substitute | Notes |
|---|---|---|
| Cream Cheese | Vegan Cream Cheese (Tofutti or similar) | Ensure it’s full fat and softened. |
| Heavy Cream | Chilled Full Fat Coconut Cream | Chill a can of coconut milk overnight and scoop the solids off the top. |
| Peanut Butter | Sunflower Seed Butter (Sunbutter) | Check for sweetness, as you may need to adjust the powdered sugar slightly. |
| Graham Crackers | Vanilla Wafers, Oreo/Chocolate Wafers, or gluten-free Crackers | Use the same weight and butter ratio. |
Making Your Old Fashioned Peanut Butter Pie: The step-by-step Method

Baking the Graham Crust: Pressing, Setting, and Cooling Fully
- Preheat your oven to 350°F (175°C) and combine your crumbs, brown sugar, and melted butter until they resemble wet sand. Don't leave any dry patches!
- Press the mixture firmly into your 9 inch pie plate, paying extra attention to the corners and sides. I use the bottom of a flat glass measuring cup to get a tight, even pack.
- Bake for exactly 8 minutes. Let the crust cool completely on a wire rack you cannot add the filling to a warm crust, or it will melt instantly.
Whipping the Cloud: Creating the Airy Peanut Butter Base
- Start by making the homemade whipped cream: whisk the very cold heavy cream and powdered sugar until glorious, stiff peaks form. Set this aside in the fridge.
- In a separate bowl, beat the softened cream cheese until it is totally smooth and fluffy. This step is critical; scrape the bowl frequently.
- Add the room temperature peanut butter, vanilla, and sifted powdered sugar. Beat again until the whole mixture is lightened and creamy.
Chef’s Note: Sifting the powdered sugar is a small extra step, but it guarantees that fluffy texture we are chasing. Don't skip it unless you want annoying, hard sugar lumps in your final pie.
Folding and Pouring: Ensuring a Smooth, Uniform Filling
- This is the defining moment for your pie's structure. Gently take one-third of the stiff whipped cream and fold it into the peanut butter mixture using a rubber spatula. This "sacrificial" addition lightens the base.
- Add the remaining whipped cream and fold gently until just combined , using a figure eight motion. Stop immediately when no white streaks remain. Over folding will destroy the airiness we worked so hard to achieve.
The Crucial Chill Time for Sliceable Perfection
Spoon the light, fluffy filling into the cooled graham crust and smooth the top. Cover it loosely with plastic wrap don't let the wrap touch the surface! Transfer the pie to the refrigerator for a minimum of 4 hours, or ideally, overnight.
Seriously, don't rush this step if you want that stunning, clean slice.
Expert Techniques and Troubleshooting Common Pie Mistakes
My Filling is Too Soft: Quick Fixes for Stabilization
If you pulled your pie out after four hours and it’s still jiggly, you likely over mixed the whipped cream when folding it in, or your peanut butter was too oily. To salvage it, you can try refrigerating it overnight. If that fails, consider the nuclear option: quickly melt 1 tablespoon of unflavored gelatin mixed with 3 tablespoons of hot water, then gently fold that into the existing mixture before chilling again. For future pies, ensure all dairy is super cold when whipping! If you prefer a simpler, lighter texture, you might love the NoBake Peanut Butter Pie: The Ultra Fluffy, 30 Minute Prep Cloud .
The Secret to Getting Clean Slices Every Time
You want that gorgeous, photogenic slice, right? Simple. Before cutting, dip a sharp knife into very hot water, then wipe it completely dry. Cut the slice, repeat the hot water dip, and wipe for the next slice. This ensures the clean, creamy filling doesn't stick or drag the crumbs.
Flavor Boost: Adding Salt or Vanilla to Intensify the Peanut Notes
Vanilla extract is mandatory, but try doubling the vanilla (up to 2 teaspoons) if you feel the peanut flavor is getting lost. A pinch of flaky sea salt sprinkled directly on top of the finished pie just before serving is also a game changer; it hits your palate first and heightens the overall sweet experience.
How to Store and Preserve Your Creamy Peanut Butter Pie
Shelf Life: How Long Does Homemade Pie Last in the Refrigerator?
Because this recipe uses a substantial amount of fresh cream and cream cheese, it maintains its perfect texture for about 3 to 4 days when stored tightly covered in the refrigerator.
After day four, the graham crust starts to lose the battle against moisture and becomes softer, though still perfectly edible.
Best Practices for Freezing the Pie Whole or as Slices
Does this freeze well? You bet it does! This is one of the best parts of using a cream cheese stabilizer. Freeze the pie before adding the final whipped cream topping. Wrap the fully set pie tightly in plastic wrap, followed by a layer of aluminum foil. It keeps beautifully for up to 2 months.
Bringing the Pie Back to Perfect Serving Temperature
To thaw a frozen pie, unwrap it and place it back in the refrigerator overnight (about 8– 12 hours). Never thaw this pie at room temperature, as the rapid temperature change will break the emulsion. Once thawed, you can add fresh whipped cream and toppings before serving.
The Final Flourish: Perfect Toppings and Pairing Suggestions
This pie is already a stunner, but a few quick additions can really make it shine.
For a final gorgeous topping:
- A heavy layer of freshly whipped cream, piped elegantly.
- A light dusting of cocoa powder or mini chocolate chips.
- Melted peanut butter drizzled quickly across the top for a professional look.
I love serving this Old Fashioned Peanut Butter Pie Recipe Easy alongside a strong, slightly bitter coffee to cut through the richness. Or, if I’m serving a full Southern spread maybe after making a great batch of Southern Thanksgiving Menu: The Gold Standard Cornbread Dressing Recipe — I sometimes offer a small, tart berry compote on the side. The bright fruitiness is a wonderful counterpoint to the creamy peanut butter and reminds me of the classic Amish Peanut Butter Cream Pie: Classic Easy No-Bake Recipe my grandmother used to make. Enjoy!

Recipe FAQs
Why is my peanut butter filling runny or failing to set properly?
The stability of this pie relies heavily on the proper emulsification of the cream cheese, peanut butter, and fat from the whipped cream. Ensure that the cream cheese is fully softened before mixing and that the heavy cream is whipped to stiff peaks before folding into the mixture.
Most importantly, allow a minimum chilling time of 6 hours, as the fats need ample time in the cold to completely set the structure.
Can I use natural, separated peanut butter in this recipe?
It is strongly recommended that you use a standard, commercially stabilized peanut butter (such as Jif or Skippy) for the best texture. Natural, oil-separated peanut butters can be too loose and may break the emulsion of the filling, often resulting in a grainy or liquid final product.
If you must use natural, ensure it is stirred rigorously until perfectly uniform before measuring.
How far in advance can I prepare this Old Fashioned Peanut Butter Pie?
This pie is an excellent make-ahead dessert and can be prepared up to three days in advance of serving. Keep the pie tightly covered with plastic wrap or a pie dome in the refrigerator to prevent the filling from drying out or absorbing foreign odors.
For best presentation, wait until just before serving to add any delicate garnishes like whipped cream dollops or chopped peanuts.
I find the pie slightly too sweet. How can I balance the flavors?
To cut through the richness and sweetness, incorporate an extra pinch of sea salt into the cream cheese mixture; salt is vital for enhancing the peanut butter flavor profile. Alternatively, you can add 1 teaspoon of vanilla extract and 1/2 teaspoon of lemon juice to the filling mixture, as the slight acidity helps balance the heavy fats and sugar.
Can I substitute the graham cracker crust for a different type?
Absolutely; a chocolate wafer crust provides a lovely contrast to the creamy filling, while a vanilla wafer crust offers a true taste of old Southern comfort food. If you are substituting, ensure that the chosen crust is fully cooled before pouring in the no-bake filling, as residual heat can prevent the filling from setting correctly.
Does this peanut butter pie freeze well?
Yes, due to its high fat content, this pie freezes exceptionally well. Wrap the completely chilled pie (or individual slices) tightly in plastic wrap, followed by a layer of heavy duty aluminum foil, and store in the freezer for up to one month.
Thaw the pie slowly overnight in the refrigerator to ensure the creamiest texture upon serving.
Can this recipe be adapted to be dairy-free or vegan?
Converting this recipe requires careful attention to the stabilizers, as it relies on dairy fat for structure. You can use full fat, solid coconut cream (chilled overnight) whipped stiffly in place of heavy cream, and substitute plant based cream cheese alternatives.
Be aware that the texture may be slightly softer than the traditional version.
Old Fashioned Peanut Butter Pie Recipe Easy
Ingredients:
Instructions:
Nutrition Facts:
| Calories | 550 kcal |
|---|---|
| Protein | 11.0 g |
| Fat | 43.0 g |
| Carbs | 35.0 g |
