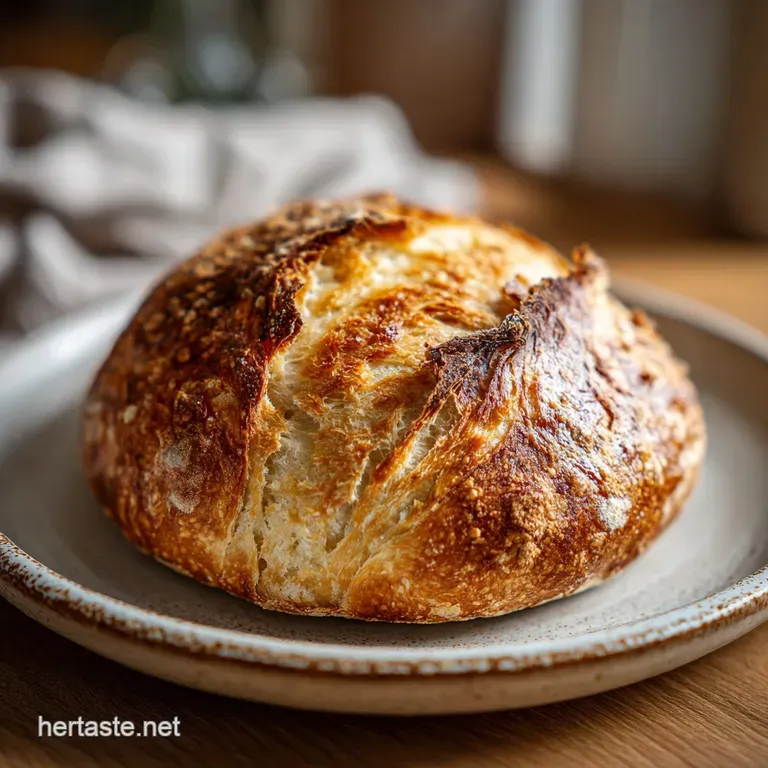
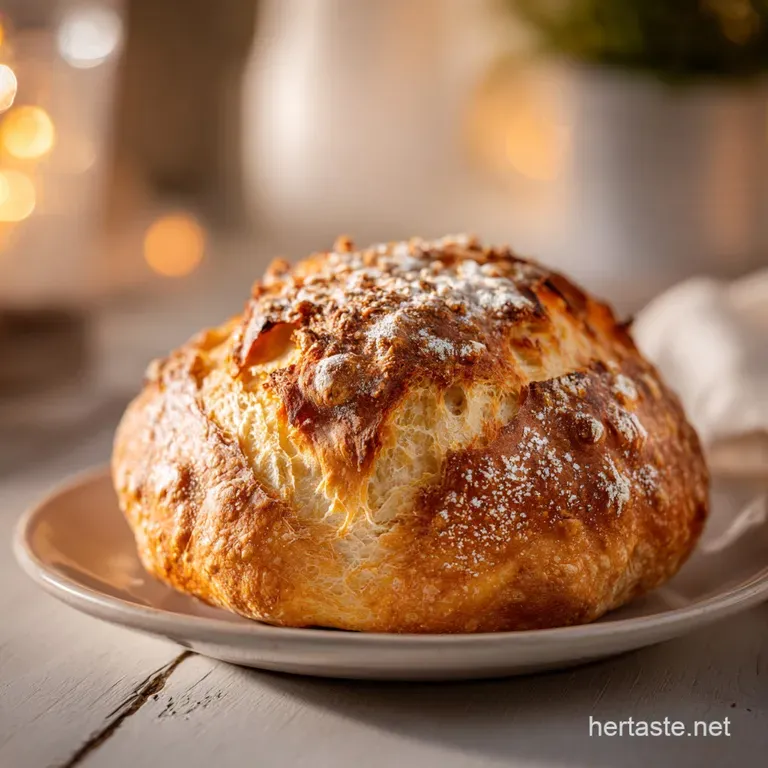
No Knead Dutch Oven Bread: Crackling Artisan Loaf
- Time: Active 15 minutes, Passive 12 to 18 hours, Total 60 minutes bake time
- Flavor/Texture Hook: Shatter crisp rustic crust with a bubbly, chewy center
- Perfect for: Weekend slow mornings, soup nights, or beginner bakers
- Why the Crust Stays Shatter Crispy
- Bread Component Deep Dive
- Essential Components and Substitutes
- Required Tools for Success
- Step-by-Step Baking Process
- Fixing Common Baking Hurdles
- Adjusting the Dough for Needs
- Baking Misconceptions vs Reality
- Keeping Your Bread Fresh
- Best Ways to Serve
- Recipe FAQs
- 📝 Recipe Card
Imagine waking up to the gentle, yeasty scent of fermenting dough that has been quietly working all night on your counter. There is nothing quite like the sound of a fresh loaf "singing" as it comes out of the oven. If you listen closely, you can hear the crust crackle and pop as it hits the cool air.
It is a moment of pure culinary joy that makes your entire kitchen feel like a cozy village bakery.
I remember the first time I tried this. I was so skeptical that such a messy, shaggy mass of dough could turn into something beautiful. I used to think you needed giant muscles or a fancy stand mixer to get real bread. But then I pulled that lid off the Dutch oven and saw the golden, craggy top for the first time.
I was hooked. It is the ultimate low effort, high reward kitchen win that feels like a magic trick every single time.
We are going for a rustic, artisan vibe here. You don't need to be a pro. You just need a little patience and a hot pot. This bread is the definition of comfort, perfect for tearing off big chunks to swipe through salted butter or a bowl of thick stew.
Let's get into why this simple routine works so well without you having to break a sweat.
Why the Crust Stays Shatter Crispy
- Time Induced Gluten: Long fermentation allows flour proteins to link up naturally, creating strength without any physical kneading or handling.
- Steam Trapping: The heavy Dutch oven lid holds in the moisture escaping the dough, which keeps the surface soft longer so the bread can expand fully.
- High Hydration: Using 355ml of water for 400g of flour creates a wet environment where large, airy bubbles can thrive during the bake.
- Starch Gelatinization: The intense heat of the preheated pot turns the surface starches into a thin, glassy layer that eventually hardens into that signature crackle.
| Feature | No Knead Method | Traditional Kneaded Bread |
|---|---|---|
| Effort Level | Minimal stirring only | 10-15 mins active kneading |
| Crumb Texture | Large, irregular "open" holes | Tight, uniform sandwich crumb |
| Flavor Profile | Deep, complex, slightly tangy | Mild and yeasty |
Choosing the right approach depends on your schedule. The no knead method is perfect if you can plan a day ahead, as it builds flavor and texture while you sleep. If you need a faster option for tonight, you might prefer a rustic unleavened bread that skips the yeast entirely. However, for that classic artisan look, the long rest is absolutely worth the wait.
Bread Component Deep Dive
| Ingredient | Science Role | Pro Secret |
|---|---|---|
| Bread Flour | High protein for structure | Use a scale for 400g to ensure the perfect hydration. |
| Instant Yeast | Biological leavening agent | A tiny 1g amount is all you need for a long, slow rise. |
| Fine Sea Salt | Regulates yeast and adds flavor | Don't skip this, or your bread will taste flat and bland. |
| Warm Water | Activates yeast and hydrates starch | Aim for "baby bath" temperature (about 38°C) for the best start. |
Essential Components and Substitutes
To make this easy dutch oven no knead bread, you only need four staples. I always recommend using bread flour if you can find it. It has more protein than all purpose flour, which helps the bread stand tall instead of spreading out flat.
- 3 cups bread flour (approx. 400g): This provides the "backbone" of your loaf. Why this? Higher protein creates a much chewier, more professional texture than standard all purpose flour.
- Substitute: All purpose flour. It works, but the loaf will be slightly softer and less airy.
- 1.5 teaspoons fine sea salt (8g): Essential for controlling the yeast. Why this? Salt strengthens gluten and prevents the yeast from working too quickly.
- Substitute: Kosher salt. Use 2 teaspoons as the grains are larger.
- 0.25 teaspoon instant yeast (1g): The engine of the rise. Why this? Instant yeast dissolves faster in the shaggy dough than active dry varieties.
- Substitute: Active dry yeast. Just dissolve it in the warm water for 5 minutes first.
- 1.5 cups warm water (355ml): The hydration source. Why this? Warm water wakes up the yeast immediately without killing it.
- Substitute: Room temperature beer. It adds a lovely malty depth to the finished crust.
Required Tools for Success
You don't need a bakery full of gear, but a heavy pot is non negotiable. A 6 quart cast iron Dutch oven is the gold standard because it holds heat like a beast. If you don't have one, a heavy ceramic pot with a tight lid can work, though the crust might not be quite as thick.
I also swear by parchment paper. Trying to drop wet dough into a 230°C pot without it is a recipe for burnt fingers and a misshapen loaf. A sharp knife or a razor blade (called a lame) is also handy for scoring the top, which tells the bread exactly where to expand so it doesn't burst at the bottom.
step-by-step Baking Process
- Whisk the dry. Combine 400g bread flour, 8g sea salt, and 1g instant yeast in a large glass bowl. Note: Mixing them while dry ensures the yeast is evenly distributed before moisture hits.
- Hydrate the mass. Pour in 355ml warm water and stir until no dry flour streaks remain. Note: It will look like a messy, shaggy lump, but don't panic; that is exactly what we want.
- The long rest. Cover the bowl tightly with plastic wrap and leave it on your counter for 12 to 18 hours until bubbly and doubled.
- Heat the stage. Place your empty Dutch oven and lid inside the oven and preheat to 230°C for at least 30 minutes. Note: A screaming hot pot is the secret to preventing the dough from sticking.
- Shape the loaf. Turn the jiggly dough onto a floured surface and gently fold the edges toward the center.
- Prep the paper. Place the dough ball onto a sheet of parchment paper and score a deep "X" or line across the top.
- The first bake. Carefully lower the paper and dough into the hot pot, cover with the lid, and bake for 30 minutes.
- The final crisp. Remove the lid and continue baking for 15 minutes until the crust is deep chestnut brown.
- The cooling rest. Lift the bread out and let it sit on a wire rack for at least 1 hour. Note: Slicing too early lets the steam escape, which can make the inside feel gummy.
Fixing Common Baking Hurdles
Why Your Bread Is Flat
If your loaf looks more like a pancake than a boule, it usually comes down to the yeast or the flour strength. If the dough sat for too long (over 20 hours) in a very warm room, the yeast might have run out of "food," causing the structure to collapse.
Alternatively, using low protein flour can't always support the weight of the water.
Why the Crust Is Burnt
The bottom of the loaf can sometimes get too dark before the top is finished. This usually happens because the bottom of the Dutch oven is too close to the heating element. You can fix this by placing a cookie sheet on the rack directly below the Dutch oven to act as a heat shield.
| Problem | Root Cause | Solution |
|---|---|---|
| Gummy Interior | Sliced while still hot | Let it cool completely for 1 hour so the starch sets. |
| Stuck to Pot | Pot wasn't hot enough | Always preheat the Dutch oven for a full 30 minutes. |
| Dense Crumb | Yeast was expired | Test your yeast in warm water to see if it bubbles first. |
Common Mistakes Checklist
- ✓ Never skip the preheat - a cold pot leads to a pale, soft, and stuck loaf.
- ✓ Don't add too much extra flour when shaping - it makes the bread heavy.
- ✓ Avoid using boiling water - anything over 55°C will kill your yeast instantly.
- ✓ Keep the lid on for the first 30 minutes - the steam is what creates the airy interior.
- ✓ Resist the urge to peek - every time you open the oven, you lose precious heat.
Adjusting the Dough for Needs
If you want to make a smaller loaf, you can easily cut the ingredients in half. Use a smaller 2 quart or 3 quart pot if you have one, and reduce the uncovered baking time by about 5 minutes.
For larger families, doubling the recipe works well, but I suggest baking two separate loaves rather than one giant one. Large loaves often struggle to cook through in the center before the outside burns.
When you start feeling confident with this base, you might want to explore other styles. If you love the tangy depth of long fermented doughs, you could eventually move on to a chewy sourdough loaf as your next kitchen project. It uses a similar Dutch oven technique but relies on a wild starter for lift.
| Servings | Flour Amount | Water Amount | Pot Size |
|---|---|---|---|
| 5 People | 200g (1.5 cups) | 177ml (0.75 cups) | 3 Quart |
| 10 People | 400g (3 cups) | 355ml (1.5 cups) | 6 Quart |
| 20 People | 800g (6 cups) | 710ml (3 cups) | Bake in 2 batches |
Baking Misconceptions vs Reality
Many people believe you must use bottled water for bread. The truth is, if your tap water is safe to drink and doesn't smell strongly of chlorine, it is perfectly fine for baking. If you are worried, just let the water sit out for an hour before mixing to let any chlorine evaporate.
Another myth is that you need a humid room for the dough to rise. Because we cover the bowl tightly with plastic wrap, the dough creates its own little micro climate. As long as your kitchen isn't freezing cold (below 18°C), the yeast will do its job beautifully over those 12 to 18 hours.
Keeping Your Bread Fresh
Store your cooled loaf in a brown paper bag at room temperature for up to 2 days. The paper allows the bread to breathe, which helps maintain the crust's texture. Avoid plastic bags, as they trap moisture and turn the crust soft and rubbery within hours.
If you have leftovers past day two, they make the best toast or croutons you have ever tasted.
To freeze, slice the loaf completely and place the slices in a freezer safe bag for up to 3 months. You can pop a frozen slice directly into the toaster whenever you need a quick snack. For zero waste, save any hard ends or "heel" pieces.
Grind them up in a food processor for rustic breadcrumbs that blow the store-bought stuff out of the water.
Best Ways to Serve
This bread is a masterpiece on its own, but it really shines when paired with seasonal flavors. I love serving it warm with a swirl of honey and a sprinkle of flaky salt. During the colder months, it is the perfect vessel for dipping into a roasted tomato soup or a creamy garlic pasta sauce.
For a rustic appetizer, rub a halved garlic clove over a toasted slice and top it with smashed avocado or fresh ricotta. The contrast between the crunchy exterior and the soft, velvety toppings is pure joy.
No matter how you serve it, this bread brings a sense of accomplishment and comfort to the table that very few other recipes can match.

Recipe FAQs
Do I need to knead the dough at any point?
No, kneading is unnecessary. The long 12 to 18-hour fermentation process develops the gluten structure for you, so you only need to mix the ingredients until a shaggy mass forms.
How to ensure the crust gets perfectly crispy?
Bake with the Dutch oven lid on for the first 30 minutes, then uncover for the final 15 minutes. This traps steam to allow the loaf to rise before the lid removal exposes the crust to dry heat for browning.
How to prevent the bread from sticking to the pot?
Use a sheet of parchment paper as a sling to lower the dough into your hot Dutch oven. If you enjoyed mastering this non-stick transfer technique, see how we apply similar precision in our garlic butter breadsticks to ensure a clean release from the baking surface.
Is it true I can speed up the rising process by using hot water?
No, this is a common misconception. Using water over 55°C will kill the yeast instantly, preventing the bread from rising entirely.
How to know if my dough is ready for the oven?
Check that the dough has doubled in size and appears bubbly on the surface after the 12 to 18-hour rest. If it looks flat or hasn't bubbled, give it more time in your room temperature environment.
Can I use all-purpose flour instead of bread flour?
Yes, but the texture will be slightly less chewy. Bread flour provides higher protein content, which is essential for the structured, airy crumb characteristic of this style of bread.
How to handle the dough if it feels too sticky to shape?
Dust your hands and the work surface with a light coating of bread flour. Avoid adding too much flour, as excessive amounts will make the final loaf heavy and dense rather than light.
No Knead Dutch Oven Bread

Ingredients:
Instructions:
Nutrition Facts:
| Calories | 146 calories |
|---|---|
| Protein | 4.8 g |
| Fat | 0.6 g |
| Carbs | 29.2 g |
| Fiber | 1.1 g |
| Sugar | 0.1 g |
| Sodium | 314 mg |
