Homemade Breadsticks Better Than the Restaurant
- Unlocking Restaurant-Quality Flavor: Your Ultimate Homemade Breadsticks Guide
- Why These Garlicky Twists Redefine Snack Time
- Gathering the Essentials for Flawless Breadsticks From Scratch
- The Essential Toolkit: Equipment Needed for Perfection
- Step-by-Step Mastery: Crafting Perfect Homemade Breadsticks
- The Art of Shaping and Baking for Golden Excellence
- Elevating Your Breadsticks: Serving Suggestions and Creative Twists
- Ensuring Long-Lasting Freshness: Storage and Reheating Tips
- Recipe FAQs
- 📝 Recipe Card
Unlocking Restaurant Quality Flavor: Your Ultimate Homemade Breadsticks Guide
There’s nothing quite like that first bite of a warm, pillowy breadstick, slathered in aromatic garlic butter and dusted generously with Parmesan cheese. These treats have the power to transform any weeknight meal into a cozy Italian feast.
Forget relying on frozen options or pale imitations; learning how to create truly exceptional Homemade Breadsticks is surprisingly accessible, yet yields results that taste miles beyond anything store-bought.
We are embarking on a journey to recreate that quintessential soft interior and savory exterior the kind that beckons you back for just one more.
Why These Garlicky Twists Redefine Snack Time
These particular twists capture that essential comfort food magic we crave. Starting with a straightforward yeast dough, they are baked until perfectly golden and then immediately subjected to an intoxicating mixture of melted butter, potent fresh garlic, and fragrant herbs.
They are the ideal companion to hearty pasta dishes, robust soups, or simply devoured on their own with a vibrant marinara dip. While the complexity lies in technique, these are genuinely Easy Homemade Breadsticks that deliver maximum flavour payoff for your effort.
The Secret to That Irresistible Soft Interior Texture
The hallmark of a superior breadstick is its plush, slightly chewy crumb juxtaposed against a crisp exterior. This textural duality is achieved through two main factors: proper gluten development during kneading and allowing adequate time for proofing.
A well kneaded dough creates the necessary elasticity to trap gases released by the yeast, leading to that coveted airy interior. We aim for a dough that is pliable and smooth, not stiff or overly dry.
Setting the Stage: What Makes Our Recipe Superior
What sets this Best Breadsticks Recipe apart is the finishing flourish. Many recipes call for brushing the dough with butter before baking, resulting in a drier crust.
Our method involves tossing the breadsticks in a rich, freshly melted garlic butter mixture immediately after they exit the oven. This hot-to-butter shock ensures the butter permeates the surface, locking in moisture and delivering an intense burst of flavour reminiscent of the famous Homemade Olive Garden Breadsticks .
A Quick Look at the Magic Ingredients We're Using
Our ingredient list balances simple pantry staples with a few flavour amplifiers. For the base, we rely on standard Active Dry Yeast, activated with warm water and a touch of sugar to feed it. The dough structure is built with all-purpose flour and a little heart healthy olive oil for richness.
The real stars, however, are in the topping: four cloves of deeply minced garlic mixed into six tablespoons of unsalted butter, brightened with fresh parsley and dried oregano, and finished with fine grated Parmesan cheese.
Gathering the Essentials for Flawless Breadsticks From Scratch
To successfully execute this Homemade Breadsticks Recipe , you need to pay close attention to the quality and handling of your ingredients, particularly the yeast.
If you are seeking Homemade Breadsticks without Yeast , know that you would require a chemical leavener like baking powder, resulting in a denser, biscuit like texture rather than these soft twists patience with yeast is rewarded here!
The Essential Toolkit: Equipment Needed for Perfection
You don't need a professional kitchen setup, but having the right tools streamlines the process considerably. A large mixing bowl, or ideally a stand mixer fitted with a dough hook attachment, makes the 5-7 minute kneading process much easier.
You will also need a rolling pin to achieve the necessary thinness for your strips, and two large baking sheets lined with parchment paper to ensure easy release and even baking. Finally, a small pastry brush is excellent for distributing the topping evenly.
Yeast Activation: The Foundation of Fluffy Dough
The very first step is ensuring your yeast is active. Combine 2 ¼ teaspoons of Active Dry Yeast with 1 cup of warm water the temperature must be precisely between 105° F and 115° F ( 40° C– 46° C).
If the water is too cool, the yeast will sleep; too hot, and it will perish. After dissolving 1 tablespoon of sugar into this mixture, let it stand for about 5 to 10 minutes. When it becomes visibly frothy and foamy, your foundation is set, promising a beautiful rise.
Building the Ultimate Savory Coating: Butter, Herbs, and Cheese
While the dough is rising, prepare the flavour bomb. Melt 6 tablespoons of unsalted butter until liquid. Into this, whisk 4 finely minced cloves of garlic, 2 tablespoons of fresh parsley, and 1 teaspoon of dried oregano.
This mixture is what elevates these beyond basic bread into glorious Garlic Breadsticks Recipe territory. Have your ¼ cup of finely grated Parmesan ready to sprinkle on right after they come out of the oven.
Metric vs. Imperial: Precise Measurements for Success
While we use common measurements here, consistency is key for any Quick Homemade Breadsticks attempt. If you prefer working with grams, aim for 420g of All-Purpose Flour.
Using a digital scale ensures that your flour measurements are accurate, preventing the common pitfall of adding too much flour, which results in a dense final product instead of the light, airy texture we desire for these Crunchy Homemade Breadsticks (which are actually soft inside, but have that perfect outer chew!).
Related Recipes Worth Trying
- Easy Homemade Garlic Butter Breadsticks Recipe Fluffy Chewy — Stop ordering in These Homemade Garlic Butter Breadsticks are unbelievably soft and packed with flavour Perfect for dipping in soup or as easy appetizers...
- The Proper Job Best Homemade Chicken and Dumplings Recipe — This is the Best Chicken and Dumplings Recipe youll ever tryfeaturing tender chicken and unbelievably fluffy drop biscuits A truly comforting classic
- Easy Homemade Drop Dumplings Recipe Soft Fluffy — Tired of tough dumplings This foolproof recipe for soft fluffy Drop Dumplings uses selfraising flour for an incredibly quick result Perfect for your next...
step-by-step Mastery: Crafting Perfect Homemade Breadsticks
Once your yeast is blooming beautifully, whisk together 3 ½ cups of flour and 1 teaspoon of kosher salt in your mixing bowl. Pour in the activated yeast mixture and 2 tablespoons of extra virgin olive oil. Mix until a shaggy dough forms, then begin the kneading process.
After kneading for 5 to 7 minutes, the dough should transform into a smooth, elastic ball that springs back gently when poked.
The Art of Shaping and Baking for Golden Excellence
The second major waiting period involves proofing. Place the dough in a lightly oiled bowl, cover it, and allow it to rise in a warm, draft free area for 60 to 90 minutes, or until it has doubled in size. This slow fermentation is vital for flavour development.
Kneading Techniques for an Elastic, Pliable Dough
When kneading, whether by hand or machine, your goal is to develop the gluten network. If you are kneading by hand, push the dough away from you with the heel of your hand, fold it over, give it a quarter turn, and repeat.
This mechanical action aligns the gluten strands, creating the structure necessary to hold the air bubbles that make the interior soft.
The Crucial First and Second Rise: Patience Pays Off
After the initial bulk fermentation, gently punch down the dough to release trapped gases. Divide the dough into two equal portions. On a lightly floured surface, roll each portion into a large rectangle, aiming for about a quarter inch thickness.
Using a sharp knife or pizza cutter, slice these rectangles into long, even strips, approximately ¾ of an inch wide. These raw strips then rest for a second, shorter proofing period about 20 to 30 minutes while the oven preheats.
Achieving Even Browning: Oven Temperature Secrets
Preheat your oven to a moderately high 400° F ( 200° C) and line your baking sheets. Placing the sticks on parchment paper is key for easy handling and even heat distribution from the bottom.
Bake for 12 to 15 minutes, rotating the sheets halfway through the cooking time to ensure uniform golden colour across all your Homemade Breadsticks .
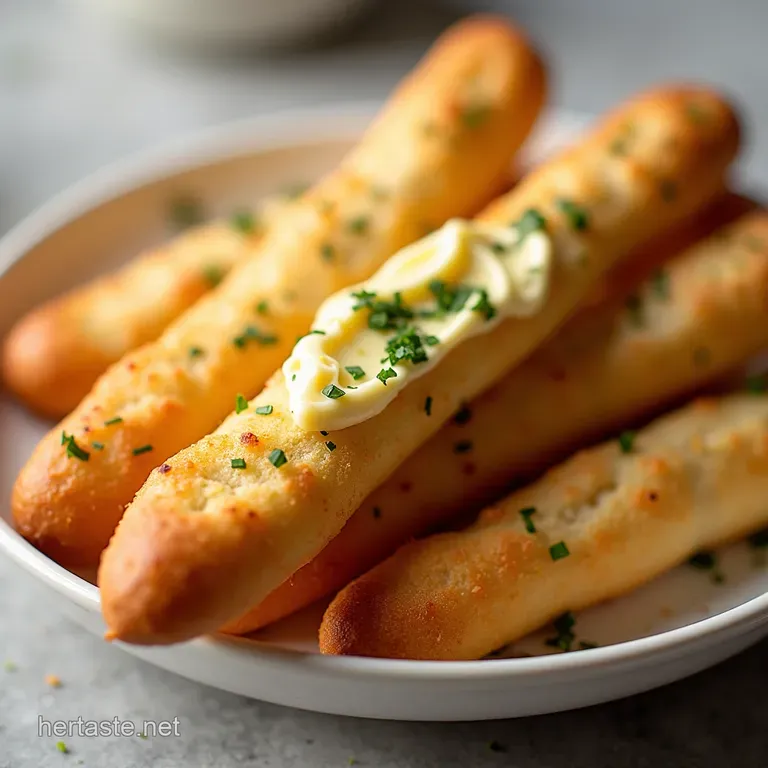
The Final Flavor Bomb: Applying the Garlic Butter Glaze Post Bake
This is the moment of truth! As soon as the breadsticks emerge from the oven they should be light golden immediately transfer them to a large, clean bowl. Drizzle the prepared, fragrant garlic butter mixture generously over the hot sticks. Toss gently but thoroughly until every surface is glistening.
While the butter is still wet, sprinkle generously with the grated Parmesan and a final flourish of flaky sea salt.
Elevating Your Breadsticks: Serving Suggestions and Creative Twists
These savoury sticks are rarely eaten alone. They deserve worthy companions to soak up that glorious garlic butter runoff.
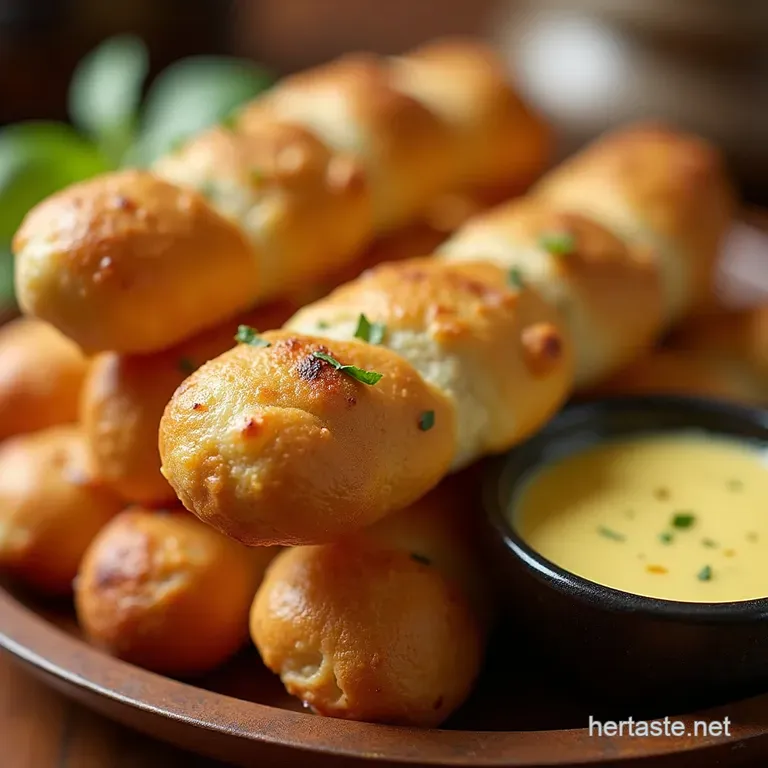
Pairing Perfection: The Best Dips for Your Homemade Breadsticks
A classic, robust Marinara Sauce, kept warm, is the undisputed champion for dipping. For something creamier, try a homemade whipped ricotta dip seasoned simply with lemon zest and black pepper, or perhaps an unexpected but delicious creamy pesto dip.
Flavor Variations: Beyond Classic Garlic and Parmesan
To introduce variety, consider transforming these into Homemade Breadsticks with Cheese . Before slicing the dough strips, sprinkle one half with shredded mozzarella and Italian herbs, leaving the other half plain for a dual texture experience.
For a spicy variation, incorporate a half teaspoon of red pepper flakes directly into the melted butter topping.
Troubleshooting Common Dough Dilemmas
If your dough refuses to rise, the water temperature was likely the culprit; try gently warming the bowl over a pan of hot water to encourage it along. If your finished sticks are tough, you likely overworked the dough during the kneading stage, or added too much flour during rolling.
Remember, when aiming for Quick Homemade Breadsticks , skipping the full rising time will sacrifice tenderness.
Nutritional Snapshot of These Delicious Sticks
While undeniably indulgent due to the butter and cheese topping, these homemade versions allow you to control the sodium and fat content far better than commercial versions. Each serving typically clocks in around 120 calories, offering a satisfying carbohydrate base to any meal.
Ensuring Long Lasting Freshness: Storage and Reheating Tips
These are undeniably best eaten the day they are made, but they store well. Cool completely before storing in an airtight container at room temperature for up to three days. To revive that fresh baked softness, place them on a baking sheet and warm them in a 300° F ( 150° C) oven for about 5 to 7 minutes.
For an extra crunch, finish the reheat under the broiler for one minute.

Recipe FAQs
Can I make the dough for these Homemade Breadsticks ahead of time?
Absolutely! You can prepare the dough up to the end of Step 4 (the first rise), then wrap the bowl tightly and pop it in the fridge for up to 24 hours. This slow, cold fermentation actually develops a deeper flavour, much like a good sourdough.
Just remember to let it sit out on the counter for about 30-45 minutes before punching down and shaping, as cold dough is a right pain to roll out!
My breadsticks came out a bit tough, what did I do wrong?
That’s usually down to one of two things: either you added too much flour during the kneading or shaping stage, or you over baked them. Remember, only use enough flour to stop the dough sticking it should still feel a tad sticky when you start.
Also, keep a close eye on them in the oven; 12 minutes is often plenty, and you want them pale golden, not deep brown.
How long will these Homemade Breadsticks last, and can they be frozen?
Honestly, they are best eaten on the day they are made nothing beats that fresh from-the-oven quality! Stored in an airtight container at room temperature, they'll keep okay for 2-3 days, though they might lose some of their pillowy texture.
For longer storage, you can freeze baked breadsticks (un-topped) for up to three months, then reheat them in a 350°F oven until crisp.
I don't have fresh garlic; can I use garlic powder for the topping?
Yes, you certainly can sometimes life throws us a curveball when we're mid-bake! If substituting fresh garlic, use about ½ teaspoon of garlic powder for every 4 cloves of fresh garlic called for.
Since powder is more concentrated, mix it into the melted butter and let it infuse for a few minutes before brushing on; this helps prevent any overly sharp or bitter flavour.
How do I get the sticks perfectly uniform in size for even baking?
Achieving uniformity is key to avoiding some being burnt while others are still doughy! After rolling the dough into a rectangle, try using a pizza cutter or a long, sharp knife to score the strips before you cut them all the way through.
Better yet, use a ruler if you have one handy to ensure every strip is roughly the same width it makes a big difference when they're baking side-by-side.
Garlic Butter Homemade Breadsticks

Ingredients:
Instructions:
Nutrition Facts:
| Calories | 406 kcal |
|---|---|
| Protein | 6.1 g |
| Fat | 8.6 g |
| Carbs | 26.0 g |
| Fiber | 6.7 g |
| Sodium | 2221 mg |
