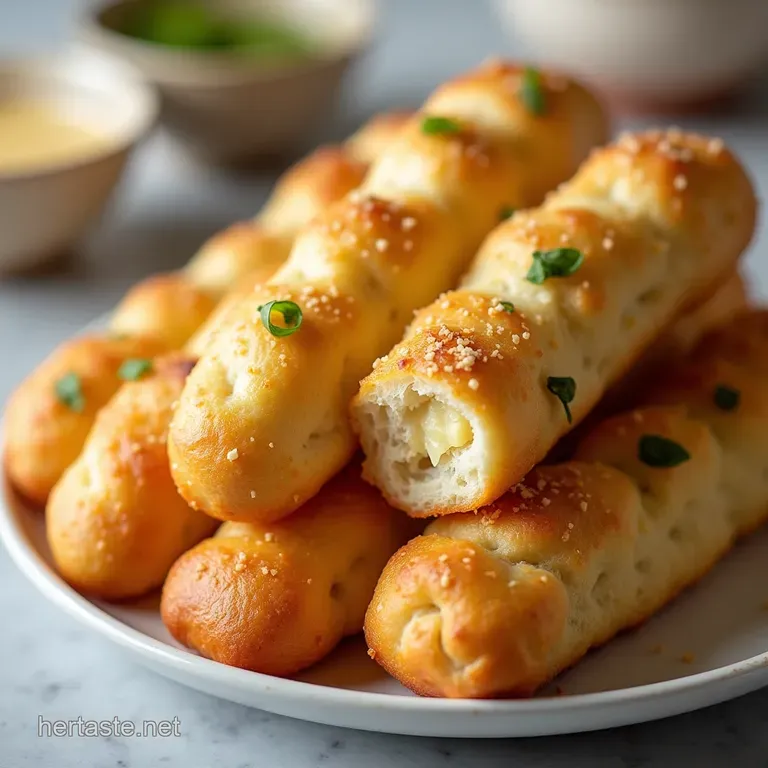
The Ultimate Chewy Garlicky Pullapart Breadsticks
- Why These Are The Definitive Homemade Garlic Butter Breadsticks
- The Joy of Kneading: Setting the Stage for Fluffy Results
- Mastering the Shopping List: Essential Provisions for Flavor Saturation
- Tools of the Trade: Necessary Kitchen Gear for Optimal Baking
- Step-by-Step Assembly: From Dough to Golden Brown Perfection
- The Crucial Baking Phase: Achieving That Irresistible Chew
- Creative Twists & Flavor Enhancements for Your Breadsticks
- Storing and Reheating for Next-Day Deliciousness
- Recipe FAQs
- 📝 Recipe Card
Why These Are The Definitive Homemade Garlic Butter Breadsticks
There is a distinct difference between store-bought breadsticks that promise garlicky goodness and the genuine article you pull hot from your own oven. Our Garlic Butter Breadsticks Recipe delivers on every promise: they are impossibly soft, perfectly chewy, and saturated with a glorious, aromatic coating.
Forget those dry, cardboard things you get from the takeaway; these are a triumph of soft yeast dough smothered in the most luxurious, rich garlic butter imaginable. They start tender, bake up beautifully golden, and finish smelling like heaven.
If you've ever thought making yeast dough was too much work, prepare to be converted. This is perhaps the easiest recipe for achieving such a magnificent result, making them perfect for casual weeknight meals or as stellar Appetizers For Party .
The Joy of Kneading: Setting the Stage for Fluffy Results
Crafting exceptional Homemade Garlic Butter Breadsticks begins with understanding the dough. We aren't aiming for a tough pizza base; we are aiming for something tender, which requires gentle handling and proper rest.
The time invested in mixing and kneading directly translates to the pillowy texture that defines truly superior sticks.
Beyond Takeout: Unlocking Supreme Softness
The key to that signature soft texture is twofold: the right hydration level and adequate kneading time. We use 1 cup of warm water (maintained between 105– 115° F) to wake up the yeast, supplemented by a touch of sugar to feed it, ensuring a robust rise.
When you mix the 3 cups of all-purpose flour with the liquids and a small addition of olive oil, the dough should feel slightly tacky but manageable. Kneading for 5 to 7 minutes develops the gluten just enough to create structure, allowing those heavenly air pockets to form during proofing, leading to genuinely Fluffy Garlic Butter Breadsticks .
Your New Favorite Side Dish for Soup Night
These breadsticks are more than just a tasty snack; they are the ultimate culinary tool. They are sturdy enough to scoop up the last remnants of a thick stew or the creamy base of a roasted tomato soup.
When you consider what to serve alongside your favorite hearty meal, stop thinking about plain rolls and remember the sheer dipping power of these sticks. They elevate simple meals into something truly special, providing the perfect vehicle for soaking up flavourful broths.
The Essential Components for Tasty Breadstick Perfection
Our blueprint for success relies on simplicity and quality. For the dough, you need standard components: active dry yeast, granulated sugar to kickstart fermentation, fine sea salt for flavour balance, all-purpose flour, and a touch of olive oil for richness. The magic, however, truly happens in the finish.
The butter bath requires a generous ½ cup of unsalted butter, 4 to 5 cloves of freshly minced garlic, chopped fresh parsley, a hint of dried oregano, and a sprinkle of salt. Notice the emphasis on fresh garlic this is non-negotiable for the authentic, vibrant taste we are chasing.
Mastering the Shopping List: Essential Provisions for Flavor Saturation
When assembling your provisions, focus on the quality of your aromatics. If you are using Garlic Butter Breadsticks With Pizza Dough as a starting point, you’ll still need excellent toppings. For the butter finish, aim for real, high fat butter; the flavour will thank you for it.
For the garlic, resist the urge to use jarred minced varieties; the fresh cloves, pressed or microplaned until nearly a paste, release their oils beautifully when gently heated in the butter.
Tools of the Trade: Necessary Kitchen Gear for Optimal Baking
Thankfully, this recipe doesn't demand esoteric gadgets. You will need a large mixing bowl, or better yet, a stand mixer equipped with a dough hook if you prefer less elbow grease. Measuring cups and spoons are crucial for the initial dough components.
For baking, have your baking sheets ready, lined with parchment paper to prevent sticking. A sharp knife or pizza cutter is vital for achieving uniform strips, and a small saucepan or microwave safe bowl will be needed for preparing the flavour packed topping.
Yeast Activation: Selecting The Freshest Leavening Agents
The first crucial step in How To Cook Garlic Bread Sticks that rise beautifully is confirming your yeast is alive. Take your 2 ¼ teaspoons of active dry yeast and sprinkle it over 1 cup of warm water (around 110° F) along with 1 teaspoon of sugar.
Let this sit undisturbed for 5 to 10 minutes. If it blooms into a foamy, fragrant layer on top, your yeast is ready to work its magic. If nothing happens, discard it and start again with a fresh packet; flat breadsticks are usually the first sign of dead yeast.
The Secret Ratio of Butter to Freshly Minced Garlic
The ratio here is all about robust flavour without bitterness. We use ½ cup of melted butter paired with 4 to 5 finely minced cloves of garlic. This ensures that every surface of the cooked breadstick is coated in a rich, saturated layer of garlic essence.
Simmering this mixture briefly (just 1- 2 minutes) allows the garlic to infuse the fat without actually browning, which is the critical difference between fragrant and acrid.
high-quality Flour Matters: A Discussion on Dough Structure
While this is an Easy Garlic Butter Breadsticks recipe, the choice of flour impacts chewiness. Standard all-purpose flour works perfectly well, absorbing liquid consistently and yielding a soft interior.
If you desire a slightly more artisanal, chewy structure, you can substitute up to ¼ cup of the AP flour with bread flour, which has a higher protein content, enhancing the gluten network further.
Related Recipes Worth Trying
- Best Baked Southern Candied Yams with Brown Butter Glaze — Forget boiling This ovenbaked Southern Candied Yams recipe features a rich brown butter glaze and pecan crunchperfect for Thanksgiving Easy instructions inside
- Best Buttery Soft Pretzel Bites Recipe Beer Garden Style — Forget dry snacks Bake these pillowsoft pretzel bites with an authentic chew courtesy of a quick baking soda bath A perfect homemade snack recipe
- The Ultimate Weeknight Siren CrazyGood Garlic Butter Noodles — Ditch the takeaway These simple Garlic Butter Noodles are restaurantquality ready in 25 mins and feature perfectly slowsautéed garlic A comforting classic
step-by-step Assembly: From Dough to Golden Brown Perfection
Once your yeast is actively bubbling, the mixing begins. Combine the flour and salt in your main bowl. Introduce the activated yeast liquid and 2 tablespoons of olive oil. Mix until a shaggy mass forms, then turn it out.
If hand kneading, work the dough for 5– 7 minutes until smooth and elastic. Place it in a lightly oiled bowl, cover it, and let it double in size this takes roughly 60 to 75 minutes in a warm kitchen.
After the dough has proven, gently deflate it and divide it into two equal portions. Roll each half into a rough ½-inch thick rectangle. Now, using a pizza cutter, slice these rectangles into 6 to 8 strips, yielding a total of 12 to 16 sticks.
Gently twist each strip once or twice before laying them out on parchment lined sheets, giving them just a little breathing room.
The Crucial Baking Phase: Achieving That Irresistible Chew
The moment of truth arrives after the dough has done its work rising. Preheat your oven precisely to 400° F ( 200° C).
Proofing Protocol: Allowing Your Dough To Double In Size
Do not rush the proofing stage, which should take approximately 60 to 75 minutes. This long, slow rise is what creates the internal lightness. If the dough is warm, the process speeds up; if it is cool, allow closer to 90 minutes.
The goal is volume the dough must visibly double.
Shaping Techniques for Uniformly Cooked Breadsticks
When shaping, remember that the twists are primarily for aesthetics and textural interest. Ensure your strips are roughly the same thickness so they bake evenly. If one section is significantly thinner than another, it will burn before the thicker parts are fully cooked.
A gentle, single twist is usually sufficient to give them that classic pull apart look.
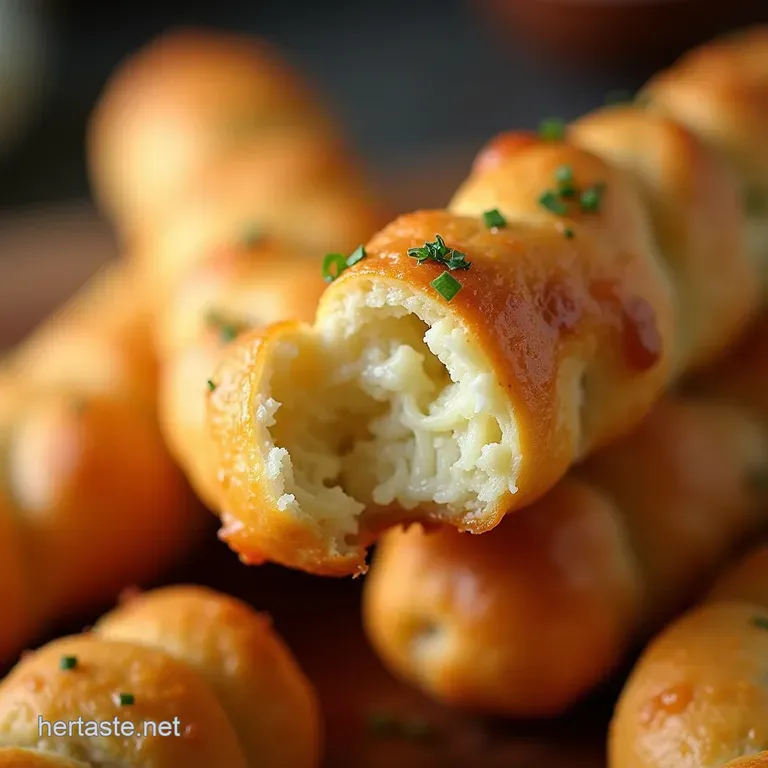
The Grand Finale: Drenching In Aromatic Garlic Butter Sauce
This is the step where we transform baked dough into irresistible Garlic Butter Parmesan Breadsticks (if adding cheese) or simply phenomenal classic sticks. While the breadsticks bake, gently heat your melted butter with the minced garlic, parsley, oregano, and salt.
As soon as the sticks emerge from the oven hot, golden, and ready brush them lavishly with this pungent mixture. The residual heat will immediately absorb the butter, driving the flavour deep into the crust.
Oven Temperature Settings for Maximum Rise
A moderate high heat of 400° F ( 200° C) is ideal for these breadsticks. This temperature is high enough to give the exterior a beautiful golden brown crust and a satisfying chew, while simultaneously allowing the interior steam to expand rapidly, maximizing the fluffy rise achieved during proofing.
Bake for 12 to 15 minutes, ensuring you rotate the tray halfway through for even coloration.
Creative Twists & Flavor Enhancements for Your Breadsticks
While the classic version is hard to beat, experimentation is encouraged! For an extra dimension, consider adding fine Parmesan cheese to the butter mixture right before brushing this creates a salty, slightly crisp exterior crust.
If you are serving these as robust Garlic Breadsticks Side Dishes alongside spicy chili, incorporating a half teaspoon of red pepper flakes into the melted butter introduces a welcome warmth that contrasts nicely with the rich garlic.
Alternatively, swapping parsley for fresh rosemary adds an earthy, piney note that pairs beautifully with roasted meats.
Storing and Reheating for Next Day Deliciousness
These Garlic Butter Breadsticks are best enjoyed immediately, but leftovers are inevitable. Store them in an airtight container at room temperature for up to two days. Reheating is key to restoring that fresh from-the-oven softness.
The best method is a quick blast in a 300° F oven for about 5 minutes. Avoid the microwave if possible, as it tends to make the bread tough after its initial cooling.
Expert Tricks for Infusing Extra Heat or Herb Notes
To maximize herb infusion, allow the garlic butter mixture to steep off the heat for 5 minutes before brushing. This extra time lets the volatile oils from the herbs fully permeate the butter.
For a smoky heat, consider adding a pinch of smoked paprika alongside the oregano for a deeper background note that complements the garlic beautifully.
Nutritional Snapshot: Understanding What You’re Dipping Into
While these are undeniably indulgent, understanding the composition helps balance your meal. Expect around 140 to 160 calories per stick, with the fat content primarily coming from the generous butter finish.
They provide satisfying complex carbohydrates for energy but are relatively low in protein or significant fibre, positioning them firmly in the realm of a decadent side or appetizer.
Troubleshooting Common Dough Issues (When Things Go Flat)
If your dough fails to double during proofing, don't panic. The most common culprit is water that was too hot (killing the yeast) or too cold (stunning the yeast). If you suspect this, try gently warming the covered bowl near a preheating oven for 15 minutes to see if it perks up.
If the dough is simply too sticky during kneading, add flour one tablespoon at a time until it stops clinging aggressively to your hands.
Best Dipping Companions to Complement Your Garlic Butter Breadsticks
These sticks are excellent dippers! Beyond the obvious, warm marinara sauce, try a creamy, homemade ranch dressing for a cool contrast. For a sophisticated option, a smooth, warm artichoke dip or even a simple pesto thinned slightly with olive oil makes for an incredible pairing.
They truly shine when they have something rich and flavourful to mop up.

Recipe FAQs
My dough hasn't risen, what's gone wrong with my Garlic Butter Breadsticks?
Don't panic, it happens to the best of us! Most likely, your water was either too hot (killing the yeast) or too cold (making it sluggish), or your yeast packet was past its prime. Make sure the water feels like a warm bath (around 110°F) and give it another hour in a truly warm spot, perhaps near a radiator.
How can I make these breadsticks ahead of time, or store leftovers?
You can prepare the dough, knead it, and then place it in an oiled bowl, cover it tightly, and refrigerate for up to 24 hours this actually deepens the flavour nicely! For leftovers, store them in an airtight container at room temperature for up to three days.
Reheat quickly in the oven for 5 minutes at 350°F to bring back that fluffy texture.
Can I skip the kneading? I’m after something quick for movie night!
While true kneading develops the gluten which gives you that satisfying chew, you can shorten the process significantly. If using a stand mixer, knead for just 3 minutes instead of 5, or if mixing by hand, knead for only 4 minutes until it just comes together.
They will be slightly softer and less structured, but still delicious!
What’s the secret to ensuring the garlic butter is flavourful and not burnt?
The trick is to infuse the butter gently, never to fry the garlic hard. Melt the butter on very low heat, add the minced garlic, and only cook for a minute or two until you can really smell it it should be aromatic, not brown or crispy.
Brush this immediately onto the piping hot breadsticks when they come out of the oven for maximum absorption.
I want to use cheese what kind works best with this recipe?
For maximum gooey factor, use low-moisture shredded mozzarella mixed with a hard, salty cheese like Parmesan or Pecorino Romano. Sprinkle the cheese liberally over the twisted dough strips about 5 minutes before the breadsticks are due to finish baking. Keep an eye on them, as the cheese can brown quickly!
Fluffy Garlic Butter Breadsticks

Ingredients:
Instructions:
Nutrition Facts:
| Calories | 397 kcal |
|---|---|
| Protein | 5.9 g |
| Fat | 17.0 g |
| Carbs | 31.2 g |
| Fiber | 6.2 g |
| Sodium | 6714 mg |
