Peanut Butter Pie: the Utterly Decadent, Quick No-Bake Dessert
- The Ultimate No-Bake Peanut Butter Pie Recipe: Rich, Creamy, and Effortless
- Mastering the Texture: Why This Peanut Butter Pie Is So Light
- Essential Ingredients for the Perfect Peanut Butter Pie
- Step-by-Step Guide: Crafting Your Decadent No-Bake Pie
- Troubleshooting and Expert Tips for the Fluffiest Pie
- Storing Your Peanut Butter Pie for Maximum Freshness
- Pairing and Presentation: Elevating Your Dessert Experience
- Recipe FAQs
- 📝 Recipe Card
The Ultimate No-Bake Peanut Butter Pie Recipe: Rich, Creamy, and Effortless
You know that quiet, satisfied sigh you make after the first spoonful of something truly decadent? That’s exactly what this NoBake Peanut Butter Pie: The Ultra Fluffy, 30 Minute Prep Cloud delivers. We’re talking about a ridiculously smooth, impossibly fluffy filling resting on a perfectly crisp, salty graham cracker crust. The texture contrast alone is addictive.
This recipe is my absolute weeknight lifesaver. You barely turn on the oven, the active prep time is under 20 minutes, and the ingredients are all pantry staples you likely already have on hand. It screams "effortless elegance" and costs next to nothing to whip up for a huge crowd.
Seriously, keep this one in your back pocket for unexpected gatherings.
If you’ve struggled with runny fillings or grainy cream cheese in the past, trust me, we’re going to fix that right now. We are optimizing every step to ensure your pie is stable, towering, and absolutely cloud like when you cut into it.
Let's crack on and make the best homemade peanut butter pie you've ever tasted.
Mastering the Texture: Why This Peanut Butter Pie Is So Light
Why Southerners Swear By This Decadent Pie
Southern baking traditions truly understand the power of contrasting textures and the salty sweet dynamic. This pie isn't just sweet; it relies heavily on the full fat foundation of cream cheese and heavy cream to stabilize the rich peanut butter. It creates a dessert that hits every pleasure center.
That creamy richness cut by the crispness of the graham cracker crust is pure magic.
The History and Resurgence of This Classic American Dessert
Peanut butter pie really gained traction in the mid-20th century when home cooks were looking for quick, high impact desserts using shelf stable ingredients. The "no-bake" element became hugely popular, especially when whipped toppings and cream cheese became ubiquitous. It’s an iconic piece of Americana, right up there with a good slice of Pecan Pie: The Classic Southern Recipe That Sets Perfectly .
Quick Glance: Understanding Prep Time vs. Crucial Chill Time
The fast prep time is misleading because the chilling time is the real backbone of this recipe. You spend 20 minutes making the filling and 4+ hours waiting.
That long chill time allows the fat molecules in the cream cheese and heavy cream to completely solidify around the sugars and peanut butter. Do not skip the 4 hour minimum chill time.
The Perfect Ratio of Salt to Sweetness
I am a salt fiend, especially when baking. Peanut butter needs salt to stop the richness from becoming cloying. We use salt in the crust and a generous half teaspoon in the filling to truly make the peanut butter flavor sing.
This isn't just about making it taste salty; it’s about balancing the sweetness of the powdered sugar.
Achieving the Cloud Like Filling Aeration
The key to that signature "cloud" texture is twofold: the thorough whipping of the cream cheese base and the stiff peaks of the heavy cream. We whip the cream separately to incorporate maximum air, then gently fold it into the peanut butter mixture.
This is how we get height without relying on gelatine or complicated stabilizers.
The Crucial Structural Role of the Graham Cracker Crust
We briefly bake the graham cracker crust here, unlike many no-bake versions, and trust me, it makes a huge difference. Baking the crust for just 10 minutes binds the butter and crumbs, ensuring a firm structure that can easily hold the heavy, rich filling.
This step prevents the crust from turning soggy and collapsing when sliced.
Essential Ingredients for the Perfect Peanut Butter Pie
Choosing the Right Peanut Butter (Smooth vs. Natural)
You absolutely must use commercial, processed creamy peanut butter (think Skippy or Jif) for this no-bake recipe. Natural peanut butter, which separates oil and requires stirring, contains too much excess liquid fat. This excess oil will destabilize the entire filling, making it loose and sloppy.
Smooth texture is mandatory for that silky finish.
The Best Dairy Fats for Filling Structure and Flavor
This is where quality matters. Use full fat brick cream cheese, not the spreadable stuff in a tub, and use heavy cream (double cream). The higher fat content is what allows the filling to set so beautifully and hold its shape after chilling. Anything labelled "light" or "low-fat" risks a weeping, runny disaster.
Expert Notes on Ingredient Substitutions (E.g., Cream Cheese Alternatives)
| Ingredient | Substitute Suggestion | Why it Works |
|---|---|---|
| Heavy Cream | Thawed Whipped Topping (Cool Whip) | Offers immediate volume and excellent stability for a classic Amish Peanut Butter Cream Pie: Classic Easy No-Bake Recipe . |
| Cream Cheese | Full Fat Mascarpone | Creates a slightly richer, milder flavor but might set a little softer. |
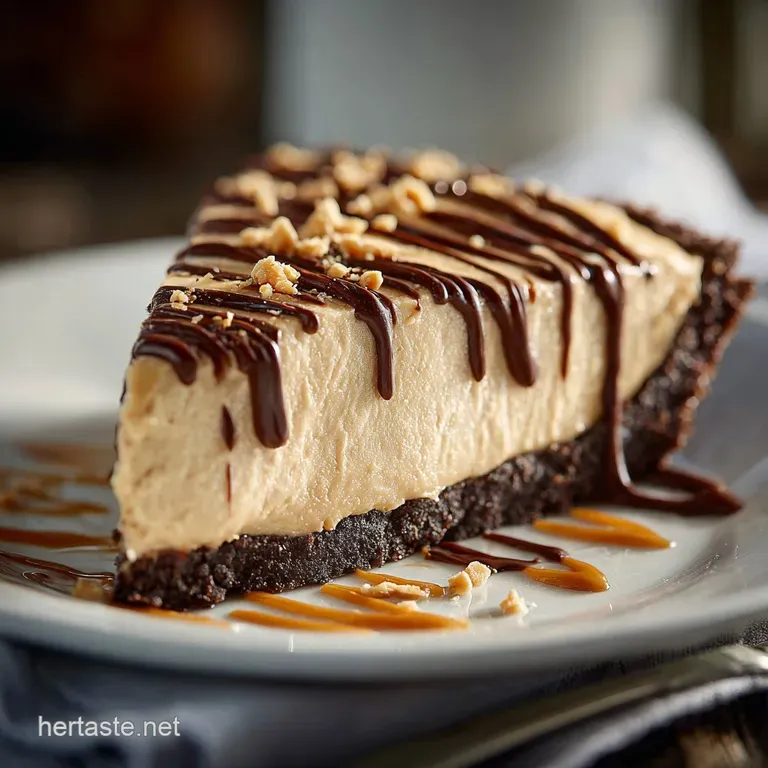
| Graham Crackers | Vanilla Wafers or Chocolate Sandwich Cookies (Oreos) | Provides a totally different, but equally delicious, crust base. |
| Powdered Sugar | Granulated sugar (not recommended) | Granulated sugar can leave a grainy texture; if you must use it, dissolve it in a tiny bit of vanilla extract first. |
Must Have Tools for No-Bake Pie Success
You need a good electric mixer for this. Trying to cream 8 ounces of cold cream cheese and thick peanut butter by hand is a workout nobody needs. A stand mixer or a powerful hand mixer ensures both the cream cheese and the heavy cream reach their necessary textures for aeration and structure.
Chef’s Note: Before whipping your heavy cream, toss the mixing bowl and the whisk attachment into the freezer for 10 minutes. Cold tools + cold cream = perfectly stiff peaks every time.
step-by-step Guide: Crafting Your Decadent No-Bake Pie
Phase 1: Preparing the Salty Sweet Crust Base
Preheat your oven to 350°F (175°C) and grab your 9 inch pie dish. Combine the finely crushed graham crackers with the sugar and salt first mixing dry components ensures even seasoning. Pour the melted butter over the crumbs and mix until every crumb is coated, resembling wet sand.
Now, press that mixture firmly into the base and sides of the dish using the flat bottom of a measuring cup. Bake for 10 minutes until it smells nutty, then cool it completely on a rack.
Phase 2: Whipping the Silky Peanut Butter Filling
The cream cheese needs to be perfectly soft; this is the hill I will die on. Beat the room temperature cream cheese until it is smooth and lump free, maybe two full minutes. Add the peanut butter and mix well. Once the base is creamy, gradually incorporate the sifted powdered sugar and vanilla.
Sifting prevents those awful little sugar lumps. Finally, using a rubber spatula, gently fold in about a third of your stiff peaked heavy cream to lighten the base, then fold in the rest until just combined. Stop immediately when no white streaks remain.
Phase 3: Setting the Pie (The Critical Chill Period)
Spoon the glorious filling into the completely cooled crust. Smooth the top with a spatula or the back of a spoon, creating little peaks if you like the look. Cover the pie loosely with plastic wrap don't let the plastic touch the filling, or you’ll leave marks.
Place it in the fridge for a minimum of four hours, but overnight chilling is really the gold standard for clean slicing.
Phase 4: The Final Flourish (Garnishing and Presentation)
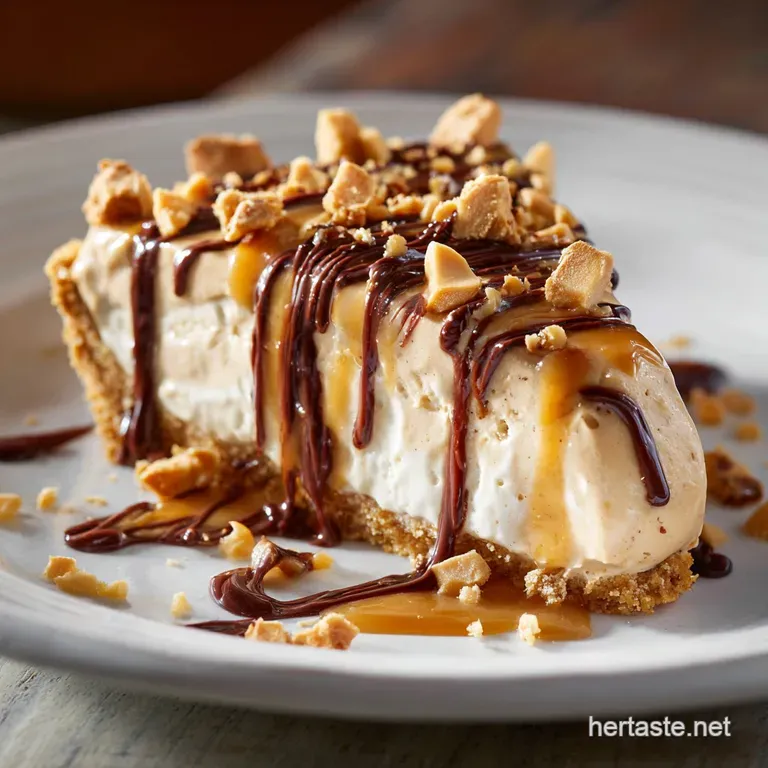
Garnishing happens right before serving. Sprinkle some roughly chopped, lightly salted roasted peanuts over the top for crunch. Alternatively, you could drizzle it with melted chocolate or dust it lightly with cocoa powder. This little bit of effort truly elevates the whole dessert experience.
Troubleshooting and Expert Tips for the Fluffiest Pie
Why Your Filling Might Be Too Runny (And How to Fix It)
If your filling isn't setting, there are three common culprits: your heavy cream wasn't whipped to stiff peaks, you used natural peanut butter, or you didn't chill it long enough. If it seems too soft before chilling, you can sometimes add a small, half cup measure of stabilized whipped topping (Cool Whip) and gently fold it in.
This acts as a stabilizer and helps lock in the structure.
The Importance of Properly Softened Cream Cheese
If you beat cold cream cheese, it breaks up into tiny little pebbles that never truly dissolve, leaving your pie gritty. If you forget to take it out early, microwave the 8oz block for 15 seconds, flip it, and microwave for another 10 seconds. You want it soft but not melted.
Preventing a Soggy Crust: Liners and Pressing Techniques
A soggy crust happens when the warm filling or too much moisture seeps into the crumbs. Two fixes: first, ensure the crust is completely cold before filling. Second, when pressing the crust, make sure you press the base very firmly this creates a dense, butter bound barrier against moisture.
Storing Your Peanut Butter Pie for Maximum Freshness
Refrigerator Storage Guidelines
This peanut butter pie stores beautifully in the refrigerator. Keep it covered tightly (a pie carrier is best, or cover the plate with foil once set). It will remain fresh and structurally sound for up to 5 days. After day five, the crust may begin to soften, though the filling will still taste great.
Can You Freeze Peanut Butter Pie? (Rules for Success)
But does it freeze well? You bet it does. Peanut butter cream pies are fantastic candidates for freezing due to their high fat content. Once the pie is fully set, wrap it tightly in a layer of plastic wrap, then cover it again in aluminum foil. Label and freeze for up to 3 months.
Optimal Thawing Techniques for Texture Preservation
To thaw, remove the pie from the freezer and place it directly into the refrigerator (still wrapped) overnight. Thawing slowly prevents large ice crystals from forming, which can ruin the texture of the whipped cream and cream cheese. Do not attempt to thaw it at room temperature.
Pairing and Presentation: Elevating Your Dessert Experience
This pie is rich, so pair it with beverages that cut through the sweetness. A strong espresso or a bitter coffee is excellent. If you want a fun, contrasting dessert lineup, serving this alongside a slice of rich, gooey Maple Pecan Pie: The Ultimate Sticky, Sweet Holiday Dessert gives guests a perfect choice of textures.
Try slicing the pie with a knife dipped in hot water for ultra clean edges. It makes a huge difference in presentation! Wipe the knife clean between each slice, too. Trust me, nobody wants a messy wedge.

Recipe FAQs
Why is my no-bake pie filling runny or failing to set?
This is usually due to insufficient chilling time or incorporating warm ingredients. Ensure your cream cheese is softened but still cool, and that the heavy cream is extremely cold before whipping to stiff peaks.
Allow the pie the full recommended chilling time of at least six hours, or ideally, overnight, for the most stable structure.
Can I freeze this peanut butter pie? How long will it last?
Yes, this pie freezes beautifully due to the cream cheese and whipped cream base. Once fully set, wrap the pie tightly in plastic wrap and a layer of foil; it will keep well for up to one month. To serve, thaw it overnight in the refrigerator, or let it sit on the counter for 30 minutes for easier slicing.
I only have natural, oily peanut butter. Will that work in the filling?
While possible, conventional, stabilized peanut butter (like Jif or Skippy) is highly recommended for the best texture and structure. Natural peanut butter tends to separate its oil, which can lead to a greasy, inconsistent filling that struggles to set firmly.
If you must use natural, stir it extremely well before measuring and consider reducing the added sugar slightly.
Can I substitute the graham cracker crust with a different flavor?
Absolutely; a crushed Oreo or chocolate wafer crust is a highly popular and decadent substitution that pairs perfectly with peanut butter. Alternatively, a vanilla wafer crust offers a sweeter, less complex flavor profile. Ensure the crust ingredients are fully pressed and chilled before adding the filling.
How can I adapt this recipe to be vegan or dairy-free?
You can adapt this recipe by substituting the dairy ingredients with vegan alternatives. Use a plant based block cream cheese alternative, and substitute the heavy whipping cream with full fat, chilled coconut cream or a commercial vegan whipping product.
Note that the final structure and setting time may vary slightly depending on the specific products used.
What is the secret to getting a perfectly clean slice when serving?
The key to a clean slice is temperature management and the right tool. Ensure the pie is fully chilled, then use a large, sharp knife that has been briefly run under hot water and wiped completely dry. Reheat and wipe the knife clean between every single slice to prevent the creamy filling from dragging.
My filling tastes too sweet. How can I adjust the flavor balance next time?
The sweetness can be balanced by increasing the salty element. Ensure you are using a slightly salted peanut butter, and consider adding a very small pinch of fine sea salt directly into the cream cheese mixture. For a professional touch, sprinkle a few flakes of coarse sea salt over the pie just before serving.
Decadent No Bake Peanut Butter Pie Recipe

Ingredients:
Instructions:
Nutrition Facts:
| Calories | 456 kcal |
|---|---|
| Protein | 9.0 g |
| Fat | 31.0 g |
| Carbs | 37.0 g |
