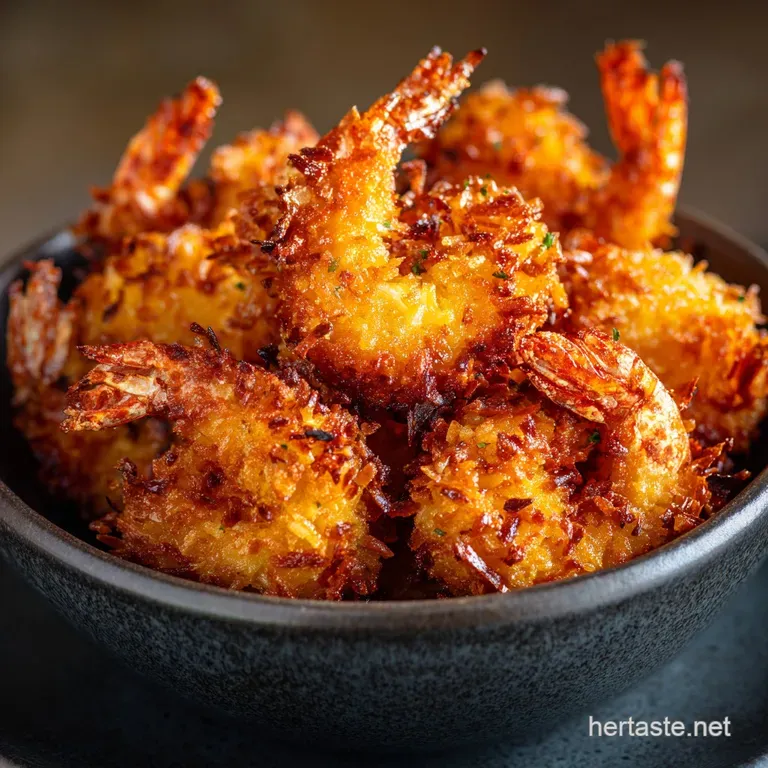
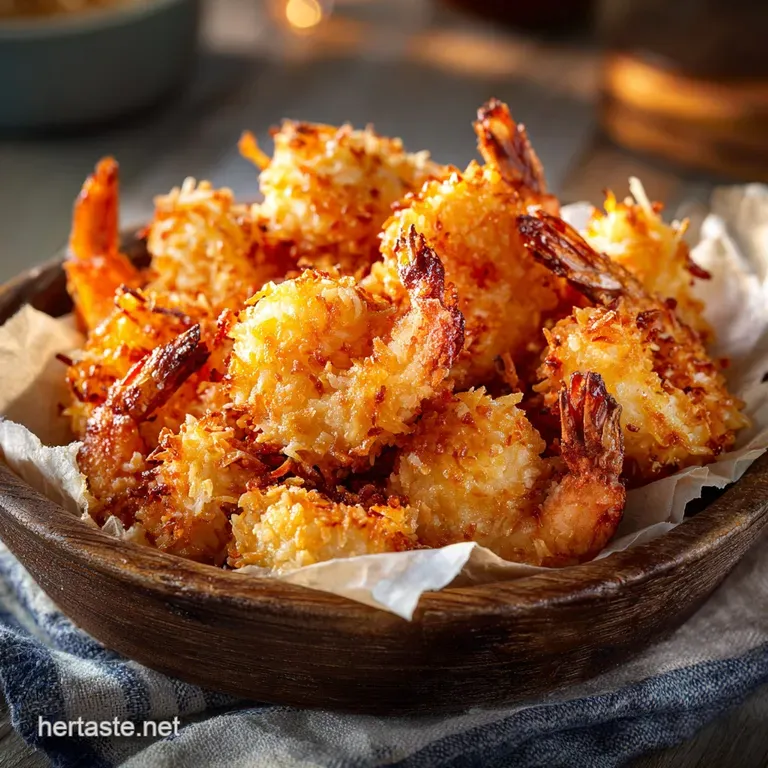
Air Fried Coconut Shrimp: the Golden Crunch with Zingy Pineapple Dip
- Achieving the Ultimate Crunch: Why Air Fried Coconut Shrimp Wins
- The Science of the Shattering Shell: Chef's Secrets to Texture
- Preparing Your Mise en Place: Essential Components & Quality Check
- Mastering the Technique: Step-by-Step Air Fryer Coconut Shrimp Recipe
- Professional Touch: Troubleshooting and Ensuring Coating Success
- Practical Kitchen Guide: Storing, Reheating, and Freezing
- Perfect Pairings: What to Serve Alongside Your Golden Shrimp
- Recipe FAQs
- 📝 Recipe Card
Achieving the Ultimate Crunch: Why air-fried Coconut Shrimp Wins
Picture this: that instant, sugary sweet tropical smell of toasted coconut hitting you the second the air fryer stops. Then, the satisfying shatter as you bite into the perfectly golden shell. Honestly, deep fried coconut shrimp is iconic, but the mess?
I don't have time for a vat of hot oil on a Tuesday.
This recipe is my absolute weeknight lifesaver, delivering genuine restaurant quality in under an hour, including the mandatory chill time. It’s dramatically cleaner and lighter than the deep fried version, but trust me, we lose zero percent of the crunch.
Seriously, you can make this healthier version faster than waiting for takeout.
I’ve perfected the breading process and made some serious mistakes along the way, like trying to skip the chilling step (don't do it!). I'm sharing all my tricks, especially how to get that loud, golden crackle using the air fryer instead of oil.
Let's crack on and make the best air-fried coconut shrimp you’ve ever tasted.
The Science of the Shattering Shell: Chef's Secrets to Texture
Beyond the Deep Fryer: Healthier Crunch Factor
People often think you need gallons of fat to achieve that coveted golden brown crispness, but that's just not true. The air fryer mimics the physics of deep frying by using extreme convection heat and, critically, a light mist of oil. This technique allows the dry breading to flash cook and brown rapidly.
If you love using this machine, you should absolutely check out my tricks for getting perfectly crispy results when making AirFried Chimichanga: Crispy Perfection in the Air Fryer too.
Anatomy of a Perfect Golden Coating
The biggest rookie error is relying only on shredded coconut, which burns quickly and doesn't always provide structure. Our coating works because it’s a strategic blend of three key components: flour (adhesion), egg wash (glue), and the Panko/coconut mix (texture).
It needs structural integrity to survive the high velocity air in the basket.
Introducing the Zingy Pineapple Dip (The Essential Companion)
Every stellar appetizer needs a stellar sauce, right? You absolutely need a bright, acidic counterbalance to the rich, sweet coconut flavour. The zingy pineapple dip cuts through the richness beautifully, making the whole dish feel fresh and tropical.
It’s so simple, you just whisk it, and it makes all the difference.
The Panko Advantage: Doubling Down on Crispy Texture
Panko breadcrumbs are non-negotiable here. They are larger, flakier, and absorb less moisture than traditional breadcrumbs, which is why they are the key to maximizing crispness in any air fryer recipe.
Mixing the Panko directly into the shredded coconut ensures maximum surface area for crunch, rather than just a soggy, sweet crust.
Mandatory Chilling: The Coating Adhesion Technique
If you try to skip that 30 minute nap, the coating will inevitably fall off and stick miserably to the air fryer basket. Chilling the breaded shrimp allows the starches in the flour and the proteins in the egg wash to set and hydrate fully.
This acts like cement, locking the coconut coating onto the shrimp, so it stays put while it cooks.
Optimal Air Fryer Temperature for Browning (The Maillard Reaction)
We need high heat, but not too high. I find 380°F (195°C) is the sweet spot for air-fried coconut shrimp. This temperature ensures the shrimp cooks through quickly (preventing toughness) while giving the coconut enough time to achieve the Maillard reaction that lovely, complex browning that creates a nutty, caramelized flavour without incinerating the delicate coconut flakes.
Preparing Your Mise en Place: Essential Components & Quality Check
Selecting the Best Shrimp: Size, Prep, and Sustainability
I always opt for large or jumbo shrimp (16/20 count) because they stand up well to the heavy breading and don't dry out immediately. Always choose tail-on shrimp. It gives you a handy little handle for dipping and eating, plus it looks far fancier.
Ensure they are peeled, de-veined, and, most importantly, pat them bone dry before starting the breading process.
Sweet vs. Unsweetened Flakes: Dialing in the Coconut Flavor Profile
I personally prefer the traditional, very sweet profile, so I use sweetened shredded coconut. However, if you want to cut back on sugar, unsweetened flakes work perfectly well. If you go the unsweetened route, I suggest adding half a teaspoon of fine granulated sugar to the egg wash.
This helps the coating achieve better caramelization and browning during air frying.
Dipping Station Dynamics: Flour, Egg Wash, and Panko Ratios
The breading station requires three separate shallow dishes. I maintain a strict "wet hand/dry hand" policy use one hand only for flour and coconut, and the other only for the egg wash.
This prevents you from ending up with giant, sticky clumps of dough on your fingers, which is honestly the worst.
Ingredient Swaps for Dietary Needs (gluten-free Coating Options)
Chef’s Note: Don’t be afraid to customize! The structure of the three stage breading is key, but the ingredients themselves are flexible.
| Ingredient | Viable Substitute | Notes |
|---|---|---|
| All-Purpose Flour | gluten-free All-Purpose Blend | Ensures a GF final product. |
| Panko Breadcrumbs | Certified gluten-free Panko | Necessary if maintaining GF diet. |
| Eggs | Flax Egg or Aquafaba (Chickpea liquid) | Will affect adhesion slightly, but works for an egg-free wash. |
| Sweet Chili Sauce | Duck Sauce or Apricot Preserves + Sriracha | For the dipping sauce complexity. |
Mastering the Technique: step-by-step Air Fryer Coconut Shrimp Recipe
Phase 1: Cleaning and Preparing the Shrimp
First, ensure your shrimp are fully thawed and prepped, tails still attached. Give them a serious pat down with paper towels. Any residual moisture will turn the coating gummy, and we definitely want that crisp shell. Season the shrimp lightly with salt and pepper right after drying.
Phase 2: Building the Triple Breading Station
Set up your assembly line: Flour mix (Dish 1), Egg Wash (Dish 2), and Coconut/Panko mix (Dish 3). Dredge the dry shrimp in the flour first, shaking off the excess, then dunk them fully in the egg wash. Immediately transfer them to the coconut/Panko blend, pressing the coating firmly onto every surface of the shrimp.
Phase 3: The Crucial Chilling Period
Place all the coated shrimp on a baking sheet lined with parchment paper. Keep them spaced out! Transfer the tray to the fridge and chill for a minimum of 30 minutes, or up to 2 hours.
This period allows the starch and protein to bond, guaranteeing a beautiful, intact crust when it hits the heat.
Phase 4: Air Frying for Maximum Crispness
Preheat your air fryer to 380°F (195°C). Lightly spray the basket to prevent sticking, a lesson I learned the hard way when I tried to cook some quick pan-fried Tilapia with Lemon Butter Sauce: Crispy and Ready in 20 Minutes without enough oil.
Arrange the chilled shrimp in a single layer— they cannot touch —and mist the tops generously with neutral oil spray. Cook for 4 minutes, flip, mist the other side, and cook for another 4– 6 minutes until deeply golden brown.
Professional Touch: Troubleshooting and Ensuring Coating Success
Preventing the Dreaded Sticking: Basket Preparation
If your coconut shrimp sticks to the basket, your breading fails, and you're left with naked shrimp and crusty basket liners. Always preheat the air fryer. Always spray the basket base and the top of the food with oil spray.
If your basket is particularly prone to sticking, you can use perforated parchment paper liners designed for air fryers.
Dealing with Overcrowding: The Batch Cooking Rule
You must cook in batches! This isn't negotiable. Overcrowding dramatically drops the internal temperature of the air fryer and prevents the crucial flow of hot air around the food. If you stuff the basket, you will get steamed shrimp, not crispy air-fried coconut shrimp.
When is the air-fried Coconut Shrimp Truly Done? Internal Temperature Check
The shrimp is finished cooking when the flesh is opaque and slightly curled, and the internal temperature reaches 145°F (63°C). Visually, the coconut coating should look richly golden brown, almost nutty.
If it looks pale, cook for another minute or two, ensuring the temperature remains at 380°F (195°C).
Practical Kitchen Guide: Storing, Reheating, and Freezing
Reheating Cooked Shrimp Without Losing the Crunch
You can absolutely reheat leftovers, but never use the microwave that's a recipe for sadness. Simply preheat your air fryer to 350°F (175°C) and reheat the shrimp for 3– 5 minutes.
They’ll be nearly as good as fresh, crisping right back up without drying out the interior.
Flash Freezing Uncooked Coconut Shrimp for Later
air-fried coconut shrimp freezes brilliantly! After breading, place the chilled shrimp on a lined baking sheet and flash freeze them for 1- 2 hours until they are solid. Transfer them to a freezer safe bag or airtight container, removing as much air as possible.
They keep well for up to three months. To cook, simply air fry them straight from frozen, adding 4– 6 minutes to the cooking time.
Creating the Zingy Pineapple Dip (Quick Recipe Inclusion)
This sauce comes together in 30 seconds. In a small bowl, whisk together 1/2 cup good sweet chilli sauce, 2 Tbsp of pineapple jam (or preserves), and 1 tsp of fresh lime juice. The lime juice is key; it adds necessary brightness. If you like a little more heat, add a dash of sriracha!
Perfect Pairings: What to Serve Alongside Your Golden Shrimp
You need something light to balance the richness. These coconut beauties pair beautifully with fresh, vibrant sides.
- Jasmine Rice: Simple, sticky rice is always a winner.
- Coleslaw: A crunchy, vinegary coleslaw provides excellent textural contrast.
- Tropical Salad: Think mixed greens with mango, avocado, and a light vinaigrette.
If you’re planning a seafood feast, serve this as an appetizer before a richer main course, like my hearty Cajun Shrimp Alfredo Pasta UltraCreamy Spicy in 40 Minutes . It’s a great way to showcase the versatility of shrimp!

Recipe FAQs
Why is my coconut coating falling off during cooking?
The primary reason is insufficient chilling time, which is a mandatory step in this recipe. Chilling allows the flour dredge and egg wash to properly adhere to the shrimp before they hit the heat. Ensure they chill for at least 30 minutes before air frying to "set" the crust and prevent loss of coating.
My shrimp are golden, but they aren't achieving that shatteringly crispy texture. What went wrong?
This usually happens when the air fryer basket is overcrowded, which traps steam and prevents proper air circulation. Always cook the shrimp in a single layer, working in batches, and make sure your air fryer is fully preheated to ensure immediate heat transfer and optimal crispness.
Can I prepare a large batch of these coconut shrimp and freeze them for later?
Absolutely. After coating the shrimp but before cooking, place them on a parchment lined tray and flash freeze until solid, typically about two hours. Once frozen, transfer them to a freezer safe bag, and when ready to cook, air fry them straight from frozen, adding 3 5 minutes to the usual cooking time.
Can I use pre-cooked shrimp for this recipe, or must they be raw?
Using raw, peeled, and deveined shrimp is highly recommended for the best results. Pre-cooked shrimp will inevitably become tough and rubbery when cooked a second time in the air fryer. Starting with raw shrimp ensures a juicy, tender texture upon completion.
How do I know when the coconut shrimp are fully and safely cooked?
The shrimp should be completely opaque pink all the way through, and the internal temperature should register 145°F (63°C). Visually, the coconut crust should possess a deep golden brown hue, usually achieved within 8 10 minutes depending on the size of the prawns.
I don't have an air fryer. Can I bake these coconut shrimp in a traditional oven?
Yes, you can achieve a satisfying result by baking them, although the crunch won't be quite as pronounced as the air-fried method. Preheat your oven to 400°F (200°C) and bake the shrimp on a wire rack over a baking sheet for 15 20 minutes, ensuring to flip them halfway through.
What are some alternative dipping sauces if I don't want the pineapple dip?
Coconut shrimp pairs well with both sweet and savory dips that offer a slight tang. Excellent alternatives include a classic sweet chili sauce, a tangy orange marmalade mixed with a dash of soy sauce, or a spicy lime cilantro aioli for a creamy counterpoint.
Crispy air-fried Coconut Shrimp Recipe
Ingredients:
Instructions:
Nutrition Facts:
| Calories | 304 kcal |
|---|---|
| Protein | 28.0 g |
| Fat | 15.0 g |
| Carbs | 13.0 g |
