Classic Onigiri Perfectly Shaped Rice Balls
Craving a Taste of Japan? Let's Make Onigiri !
Ever find yourself staring into the fridge, wondering what to make? Fancy something quick, tasty, and a bit different? Then onigiri are your new best friend.
This easy onigiri recipe is about to seriously upgrade your snack game. And, oh my gosh, they're so much fun to make!
What's the Deal with Onigiri , Anyway?
Onigiri , or Japanese rice balls , are basically the sushi sandwich. Seriously! They're a staple in Japanese cuisine , often found in a bento box , perfect for a portable lunch .
Think of them as Japanese comfort food . They've been around for ages, offering a delish and handy meal that is usually completed with nori seaweed .
This recipe is totally doable, even if you're not a whiz in the kitchen. It will take you about 45 minutes to make 6 yummy rice balls . Easy peasy!
Why You'll Love These Little Guys
Onigiri aren't just tasty; they're pretty good for you too! The Japanese rice is packed with energy, especially important for those long workdays.
Plus, they are a fantastic way to use up leftover ingredients. Perfect for reducing food waste!
These little triangles of joy are brilliant for picnics, lunchboxes or even just a quick snack. Honestly, they are perfect for any occasion.
They will always be a winner. What makes this onigiri so special? They're totally customisable. Fill them with anything you fancy!
Let's get down to the onigiri ingredients you'll need!
Let's Talk Onigiri Ingredients & Equipment

So you wanna make onigiri , eh? These delightful little rice balls are proper Japanese comfort food . Honestly, they're easier than you think! Getting the right onigiri ingredients and gear is key.
Let’s dive right in.
Main Onigiri Ingredients Breakdown
Okay, first up is the Japanese rice . You'll need 2 cups (400g) of the short grain stuff. Rinse it really well.
Like, until the water runs clear. This gets rid of excess starch. Otherwise, you'll end up with a sticky mess.
Trust me, I've been there. You will also need 2 1/4 cups (530ml) water , 2 tablespoons rice vinegar , 1 tablespoon sugar and 1/2 teaspoon salt to flavor the sushi rice.
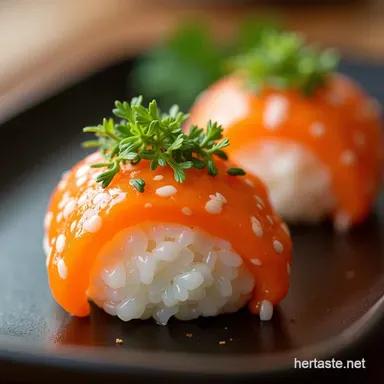
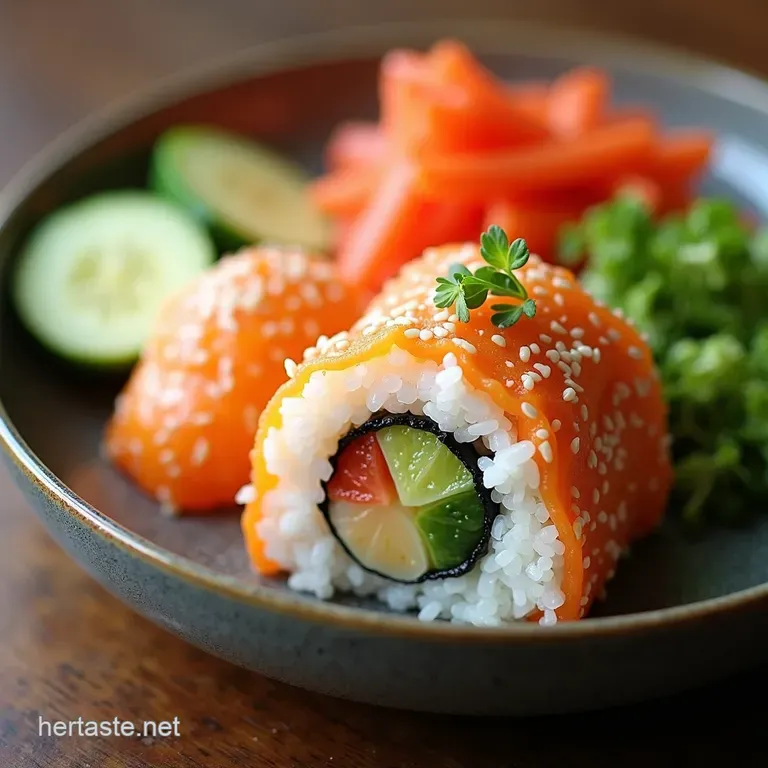
For the onigiri fillings , let's get creative! A tin of tuna mayo is my personal fave. You'll need 1 can (5 oz / 140g) .
Drain it, then mix with 2 tablespoons of mayo, salt, and pepper. Sorted! Or how about some salmon onigiri ? Mix 4 oz (115g) cooked salmon with 1 tablespoon of sriracha mayo and 1/2 teaspoon of soy sauce.
For a more traditional umeboshi onigiri , you'll need 6 of the pickled plums.
Finally, for assembly you'll need 6 sheets nori seaweed . I just buy it from the asian supermarket.
Seasoning Notes for your Easy Onigiri Recipe
Don’t skip the rice vinegar mixture. It’s essential for that tangy sushi flavor in your Japanese rice . If you're feeling fancy, a dash of sesame oil in the rice is lovely.
For fillings, go wild! A little bit of chili oil in the tuna mayo gives it a kick. Furikake is also awesome.
It's a Japanese rice seasoning. Just sprinkle it into the rice. Easy peasy! The possibilities for onigiri fillings are endless.
Equipment Needed to make the Rice Balls
Right, let’s talk tools. You'll need a rice cooker . It's not strictly necessary, but it makes life so much easier.
I use mine all the time. Otherwise, a regular pot will do. You also need a large bowl, mixing spoons, and some plastic wrap.
This is optional, but it helps with shaping. I also keep a small plate of water nearby. Damp hands are a must to stop the Japanese rice from sticking everywhere .
And there you have it! With these onigiri ingredients and your gear at the ready, you're well on your way to making some cracking rice balls .
Next up is the actual recipe ... Get ready to roll!
Let's Make Some Onigiri: Japanese Rice Balls Made Easy!
Fancy a taste of Japan? Let's whip up some onigiri , also known as Japanese rice balls ! Honestly, these are so simple, even I can't mess them up.
Perfect for a quick lunch or a cute addition to your bento box . Think of them as the Japanese equivalent of a perfectly made sandwich!
Prep Like a Pro: Mise en Place for Onigiri Success
First things first, let's get our ducks in a row. This is where that fancy french term, mise en place , comes in.
Grab your Japanese rice , nori seaweed , and whatever onigiri fillings you're craving. Tuna mayo is my go-to, but salmon is fab too.
Measure out your rice vinegar , sugar, and salt. Having everything ready makes the whole process so much smoother.
Onigiri step-by-step: Shaping Perfection!
Okay, here's the lowdown on making these tasty rice balls :
- Cook 2 cups of Japanese rice with 2 1/4 cups of water. In the rice cooker for around 25 minutes , or until fluffy.
- Mix 2 tablespoons of rice vinegar , 1 tablespoon of sugar, and 1/2 teaspoon of salt.
- Gently mix the seasoned vinegar into the rice and let it cool slightly.
- Prepare your onigiri fillings .
- Wet your hands with water. Grab about 1/3 cup of rice. Make a small well in the center. Add your filling, I usually go with tuna mayo .
- Gently shape the rice around the filling into a triangle or ball.
- Wrap with a strip of nori seaweed .
- Serve immediately or wrap for a portable lunch .
Pro Tips for Onigiri Perfection
Here are a couple of tricks I've learned the hard way. Use high-quality Japanese rice for the best texture. Seriously, it makes a difference.
Another tip: Don't overmix the rice when you add the vinegar. You want it fluffy, not mushy.
Recipe Notes: Onigiri Edition!
So, you're ready to make some awesome onigiri ? Fantastic! Honestly, these little rice balls are way easier than you think.
Just think of them as a super cute, hand held sushi , perfect for popping into a bento box !
Serving Suggestions: Level Up Your Onigiri Game
Right, let's talk about presentation. I reckon you should go all out! Think colourful and fun. Arrange your onigiri on a plate with a side of edamame for that proper Japanese cuisine vibe.
You could even try some tsukemono , those lovely Japanese pickles, they are fantastic. For a bevvy, a classic miso soup is spot on.
Or how about a nice glass of iced green tea? Lush.
Storage Tips: Keepin' It Fresh
Okay, so you've made a batch. Great stuff! But how do you keep these onigiri tasting fab?
- Refrigeration Guidelines: If you are not eating them straight away, pop them in the fridge. They're good for up to 24 hours.
- Freezing Options: Freezing is totally doable! Wrap each rice ball tightly in cling film. Then into a freezer bag. They'll last for about a month.
- Reheating Instructions: To reheat, either microwave for a short time. Or let them defrost naturally. Microwaving can make the nori seaweed a bit soggy. Just a heads-up!
Variations: Get Creative with Your Fillings
Fancy mixing it up a bit? Course you do!
- Dietary Adaptations: For a vegetarian onigiri , ditch the tuna mayo or salmon onigiri . Instead, pack 'em with cooked edamame, sweetcorn, and a drizzle of sesame oil. Yum!
- Seasonal Ingredient Swaps: In summer, think fresh cucumber and shiso leaves. In winter, try roasted pumpkin or sweet potato. The sky's the limit! Honestly, once you've got the hang of this easy onigiri recipe , the fillings are all up to you.
Nutrition Basics: Goodness in Every Bite
So, what are you actually getting from Japanese rice balls ? Well, aside from a massive dose of deliciousness, you are getting some decent carbs for energy. Plus, protein from the filling.
Just remember, the nutrition depends on what onigiri fillings you choose. Using Japanese rice and adding fillings from our recommendation will give you a delicious but healthy meal.
So there you have it! Your guide to onigiri mastery. Now go forth, get creative, and enjoy your little portable lunch treats.
Honestly, you will love it! Happy cooking, and don't forget to share your creations with me!
Frequently Asked Questions
What exactly is onigiri, anyway? Is it just a fancy rice ball?
Onigiri, also known as Japanese rice ball, is indeed a rice ball but so much more! It's steamed rice, typically seasoned, shaped into triangles or cylinders, and often wrapped in nori (seaweed). Think of it as Japan's answer to the sandwich portable, customizable, and utterly delicious.
It's a staple in lunchboxes and a popular snack, like a savoury cupcake!
Help! My onigiri falls apart every time. What am I doing wrong?
Ah, the dreaded collapsing onigiri! The key is the rice. Ensure you're using Japanese short grain rice, which has the right stickiness. Also, make sure the rice is slightly cooled but still warm when you shape it. Wetting your hands with water before shaping helps prevent the rice from sticking to your hands.
If you have some Japanese cooking experience, consider using a onigiri mold.
Can I use regular rice for onigiri, or do I have to find Japanese short grain rice?
While you can use other types of rice, Japanese short grain rice is really the bee's knees for onigiri. Its higher starch content gives it the perfect sticky texture that holds the shape well. Other rices, like long grain or brown rice, might be too dry and won't bind together as effectively.
It's like trying to make a Yorkshire pudding with plain flour technically possible, but not ideal!
What are some good fillings for onigiri besides tuna mayo? I'm feeling a bit adventurous!
Oh, you're speaking my language! The filling possibilities for onigiri are endless! Some popular choices include cooked salmon with a bit of sriracha mayo, pickled plums (umeboshi), seasoned ground beef, or even leftover grilled chicken.
For a vegetarian option, try edamame with corn and a drizzle of sesame oil or some finely chopped pickled radish. Just have a rummage in the fridge for some inspiration.
How long will onigiri last, and what's the best way to store them? I want to make them ahead of time.
Onigiri are best enjoyed fresh, but they can be stored for a day or two. Wrap them individually in plastic wrap to prevent the rice from drying out. Store them in the refrigerator and bring them to room temperature before eating. For optimal flavor and texture, it's best to make them the day you plan to eat them.
You can also freeze onigiri, but the texture of the rice and nori might change slightly upon thawing.
Are onigiri healthy? What's the nutritional lowdown?
Onigiri can definitely be part of a balanced diet! They provide carbohydrates for energy and can be packed with protein depending on the filling. Tuna, salmon, or chicken onigiri will give you a good protein boost. Keep an eye on the sodium content, especially if using salty fillings like umeboshi.
It all comes down to what you put in them! Just like any other dish.
Classic Onigiri Perfectly Shaped Rice Balls