Amish Peanut Butter Cream Pie: Classic No-Bake Recipe
- Discovering the Amish Peanut Butter Cream Pie Tradition
- The Anatomy of Perfection: Why This Pie is Irresistible
- Gathering Your Provisions: Essential Ingredients for Your Cream Pie
- Flavor Adjustments and Ingredient Swaps
- Recipe Walkthrough: Assembling the Ultimate No-Bake Dessert
- Troubleshooting Your Amish Peanut Butter Cream Pie Success
- Preserving the Perfection: Storage and Freezing Guide
- Elevating the Experience: Serving Suggestions and Pairings
- Recipe FAQs
- 📝 Recipe Card
Discovering the Amish Peanut Butter Cream Pie Tradition
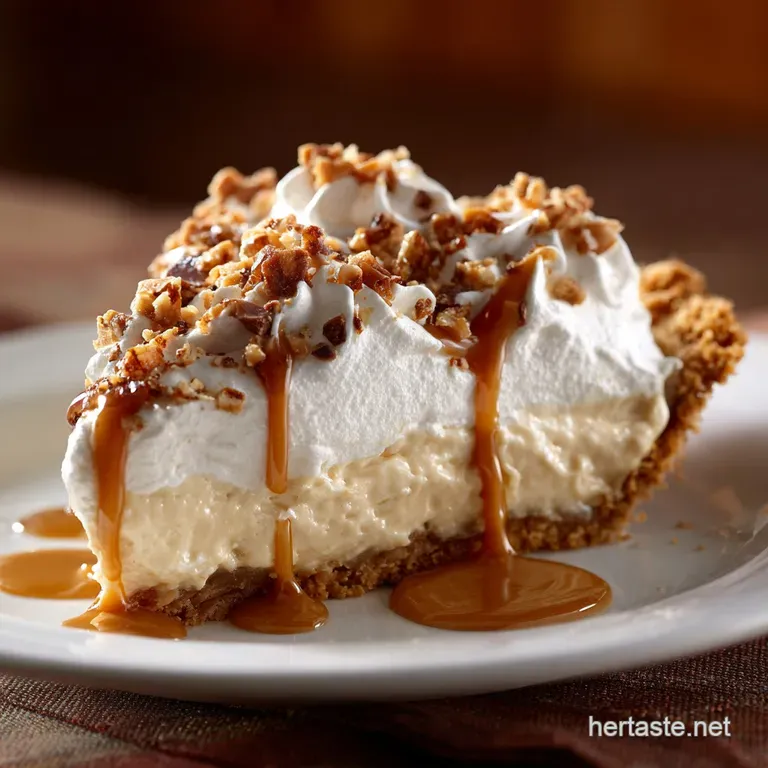
I’m telling you, the first time you sink your fork into a perfect slice of Amish Peanut Butter Cream Pie, you’ll understand the obsession. That crunchy, slightly salty Pecan Pie: The Classic Southern Recipe That Sets Perfectly texture of the graham cracker crust is the perfect foil for the filling.
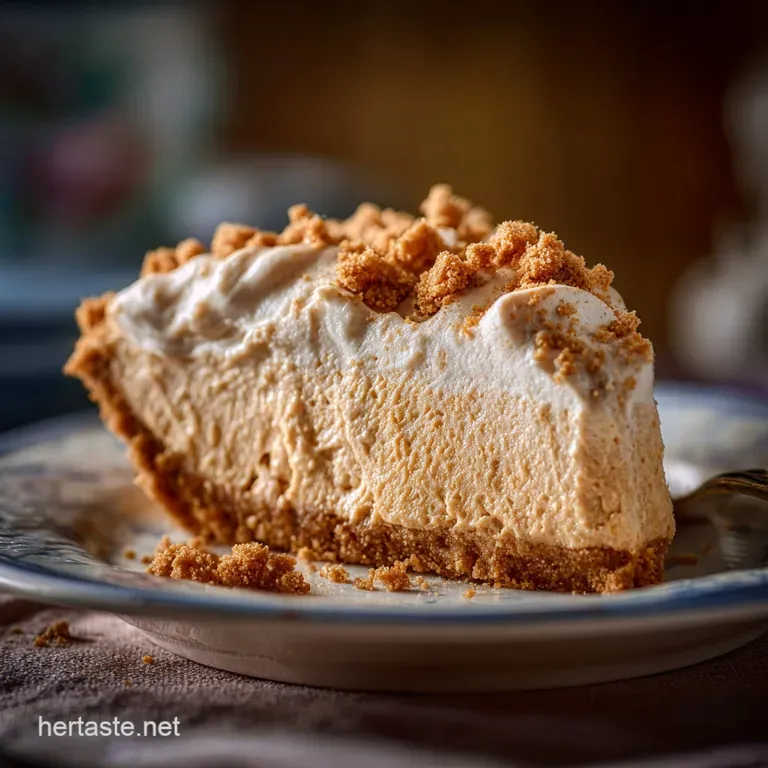
It’s an impossibly tall, velvety cloud of peanut butter goodness that just melts in your mouth without being greasy.
This isn't just a dessert; it’s a total lifesaver when you need a showstopper fast. This no-bake filling is ridiculously easy, using ingredients you probably already have lurking in your pantry right now.
Seriously, the whole thing comes together quicker than you can decide what movie to watch, making it the ultimate low-effort, high reward champion for any gathering.
We’re not making those dense, heavy versions that feel like a brick in your stomach; we’re going for light, fluffy, and absolutely unforgettable. I’ve refined this classic Amish Peanut Butter Cream Pie Recipe Easy over years, finally perfecting the technique to keep that peanut butter cream filling high, airy, and stable enough to slice cleanly. Let’s dive into how to make this absolute dream pie a reality.
The Anatomy of Perfection: Why This Pie is Irresistible
The No-Bake Secret to Velvety Filling
The brilliance of this recipe lies in its structure; we aren't relying on eggs or baking to set the filling. Instead, we use the magic of emulsified fats and sugar. By vigorously creaming the butter and peanut butter first, you force tiny air pockets into the mixture.
This is critical for achieving a light texture instead of a dense fudge.
A Sweet History: Why This Pie Became Famous
The Amish tradition values simplicity and using accessible, local ingredients. Peanut butter was both cheap and highly shelf stable, making it a natural choice for hearty, comforting desserts. This pie became a staple because it delivered massive flavour payoff using minimum fuss.
It’s the kind of recipe passed down through generations for a reason.
Flavor Profile Breakdown: Sweet, Salty, and Nutty
What makes this pie truly addictive is the perfect push and pull between flavors. We load up on powdered sugar for sweetness, but the robust, slightly salty punch of the peanut butter cuts through that richness beautifully.
Then, the crisp, sweet graham cracker crust provides a textural grounding that rounds out the entire experience.
Mastering the Fluffy Yet-Stable Cream Filling
The secret sauce here is the ratio of fat (butter/peanut butter) to the powdered sugar. We use powdered sugar, not granulated, because it dissolves instantly and contains cornstarch, which is a stabilizer. When chilled, this high fat, high sugar mixture firms up beautifully, resulting in that clean slice we all crave.
The Perfect Crunch-to-Cream Ratio (Crust vs. Filling)
A great pie needs balance, right? If your crust is too thick, it overpowers the cream; if it’s too thin, it sogs out instantly. Our precise crust measurements ensure a sturdy base that holds up to the filling's weight, giving you a satisfying crunch in every single forkful.
Don't skimp on pressing those crumbs down firmly!
Balancing the Sweetness with Salty Peanut Butter Notes
I always recommend using a conventional, slightly salty, creamy peanut butter for this recipe. If you use unsalted butter and a low-sodium peanut butter, the pie can taste overwhelmingly sweet.
That little bit of extra salt in the peanut butter is essential; it stops the dessert from tasting flat and sugary.
Gathering Your Provisions: Essential Ingredients for Your Cream Pie
This recipe relies on some core staples, but I've learned a few tricks about what works and what absolutely doesn't.
Defining "Peanut Butter": Creamy vs. Crunchy vs. Natural
Creamy, shelf stable peanut butter (like Jif or Skippy) is non-negotiable. Natural peanut butter, which separates oil, simply lacks the emulsifiers and stabilisers needed to create a firm, non-weeping filling. I once tried it with natural PB, and let me tell you, it was a sad, oily mess.
Whipping Cream Wisdom: Achieving Max Volume
Use heavy whipping cream (minimum 35% fat content) and ensure both the cream and your mixing bowl are icy cold . This helps the cream trap air faster and hold its stiff peaks longer. It makes all the difference when you're aiming for a cloud like topping.
The Secret to the Perfect Graham Cracker Crust Base
A great crust needs plenty of butter to bind the crumbs. Melting the butter fully ensures it coats every single crumb, resulting in a cohesive base that won't crumble apart when sliced. You need that slightly sweet, slightly spiced backbone only a graham cracker crust can provide.
Pantry Staples: Sweeteners and Stabilizers (Powdered Sugar & Milk)
We use powdered sugar because it makes the filling smooth and, critically, because it contains cornstarch, which helps the whole structure set. The touch of whole milk just helps hydrate the mixture slightly, preventing it from turning into a dry brick of peanut butter.
Flavor Adjustments and Ingredient Swaps
If you’re running low on something, don't panic! Here are the reliable swaps I use in my own kitchen.
| Ingredient | Viable Substitute | Notes |
|---|---|---|
| Graham Crackers | Vanilla Wafers or Oreo Crumbs | Oreo crumbs make a richer, chocolatey crust. Adjust sugar down slightly. |
| Heavy Whipping Cream | Full Fat Canned Coconut Cream | Chill a can overnight, scoop out the solid cream layer, and whip. |
| Whole Milk | Evaporated Milk or Creamer | Must be room temperature. Evaporated milk adds richness. |
| Creamy Peanut Butter | Almond Butter (use Jars with stabilizers) | The texture will be different, but the salty sweet profile works. |
| Unsalted Butter | Salted Butter (adjusting salt) | Reduce or eliminate the tiny pinch of salt I sometimes add to the filling. |
dairy-free Adaptations for the Cream Filling
For the filling, you can use high-quality vegan butter sticks instead of dairy butter. The texture will be marginally softer, so ensure you give it a very long chill time, preferably 8 hours or more. Don't skip the refrigeration; it's everything!
Alternate Crust Options (Oreo, Vanilla Wafer)
If you crave chocolate, go for a simple Oreo crust. Crush 18 Oreos (filling included) and mix with about 4 tablespoons of melted butter. For something milder, vanilla wafer crumbs create a delicious, melt-in-your mouth base that tastes incredibly luxurious.
Recipe Walkthrough: Assembling the Ultimate No-Bake Dessert
Phase 1: Preparing and Chilling the Foundation (The Crust)
- Crumb Creation: Pulse your graham crackers with sugar in a food processor until fine. Drizzle in the melted butter and pulse until it looks like wet sand. It should hold its shape when you pinch it.
- Pressing Power: Dump the mixture into your 9 inch pie dish. Use the bottom of a flat glass or measuring cup to press the crumbs firmly into the bottom and up the sides. The denser the crust, the less likely it is to be soggy later.
- Bake and Cool: Bake this beauty for 10 minutes at 350°F (175°C). This crucial step sets the butter. Remove it, and cool it completely on a rack. Do not rush this, or your warm crust will melt your filling.
Phase 2: Whipping the Peanut Butter Cream Base (Achieving Peak Fluffiness)
- Creaming is Key: Get your room temperature butter and peanut butter into the stand mixer. Beat them on medium high for 2– 3 minutes. We are aiming for light, pale, and fluffy don't stop until it looks noticeably aerated.
- The Sugar Cloud: Reduce the speed to low. Gradually add the sifted powdered sugar. Trust me, do this slowly unless you want your kitchen covered in a sugar fog. Once incorporated, crank the speed back up to medium and beat for another 2 minutes until it looks ridiculously smooth.
- Final Smoothness: With the mixer on low, drizzle in the milk and vanilla just until everything comes together into a cohesive, lump free filling. Stop the mixer immediately once smooth.
Chef's Note: If your filling feels dry or crumbly after adding the sugar, your butter wasn't soft enough! A spoonful or two of extra room temperature milk usually fixes this, but aim for truly soft butter next time.
Phase 3: Layering, Setting, and Resting (The Crucial Chill Time)
- Fill and Smooth: Spoon the peanut butter filling into the cooled graham cracker crust. Use an offset spatula to smooth the top beautifully.
- The Wait: Cover loosely (I stick a few toothpicks in the filling before applying plastic wrap so the wrap doesn’t touch the top). Now, stick it in the fridge. You must chill this pie for a minimum of 4 hours, but overnight is honestly best. That lengthy rest ensures the fats firm up completely, giving you a pie that holds its shape like a dream.
Troubleshooting Your Amish Peanut Butter Cream Pie Success
Why Won’t My Whipped Cream Hold Its Shape?
The answer is almost always temperature. Your cream must be straight from the fridge the colder, the better. If you try to whip slightly warmer cream, the fat molecules won’t stiffen properly, resulting in a soft, weeping mess.
Also, ensure your mixing bowl and whisk attachment are thoroughly clean and free of any residual grease or soap.
Preventing a Soggy Crust: A Pre-Chill Technique
Soggy crusts are the bane of any no-bake pie maker. The solution is two-fold: First, bake the crust for that 10 minutes to set the butter. Second, and equally important, ensure the crust is totally cooled before adding the filling.
If there is any residual warmth, it will start to melt the filling, releasing moisture that the crust then absorbs.
Mixing Techniques for a Lump Free Filling
Lumps are usually unsifted powdered sugar. Sift the sugar, please! If you missed that step, ensure you beat the peanut butter and butter long enough (3– 5 minutes) to break down any granular texture before the milk goes in. The extended creaming time is your insurance policy against lumps.
Preserving the Perfection: Storage and Freezing Guide
Optimal Chilling Time for Clean Slices
You simply cannot slice this pie effectively until it has achieved peak firmness. I promise you, cutting it at 2 hours will lead to a gooey, messy disappointment.
Give it 4 hours minimum, but honestly, planning to make it the day before is the ultimate move for perfect presentation.
Refrigerator Life: How Long Does the Pie Last?
Because this is a dairy and fat-heavy cream pie, it stays fresh beautifully. Covered tightly, the pie will last 5 to 6 days in the refrigerator. After the third day, the graham cracker crust might begin to soften slightly, but the filling remains magnificent.
Best Practices for Freezing the Pie (and Thawing Tips)
Does it freeze well? You bet.
- Freeze Unadorned: Freeze the pie without the whipped cream topping.
- Wrap Tightly: Place the entire chilled pie (in the dish) into a large freezer bag, or wrap it tightly in two layers of plastic wrap followed by aluminum foil.
- Shelf Life: It will last well for up to 2 months.
- Thaw: To serve, transfer the pie to the refrigerator and let it thaw slowly overnight (8– 12 hours). Once thawed, add the freshly whipped cream and serve. Trying to thaw it quickly on the counter leads to condensation and a watery filling.
Elevating the Experience: Serving Suggestions and Pairings
This pie is divine on its own, but a few little tweaks can make it absolutely heavenly.
I love drizzling a tiny bit of dark chocolate ganache over the top of each slice right before serving. The rich bitterness of the chocolate contrasts brilliantly with the sweet peanut butter. If you’re already making a batch of sticky syrup for my famous Maple Pecan Pie: The Ultimate Sticky, Sweet Holiday Dessert , a small spoonful of warmed maple syrup is equally fantastic.
For a crunch factor, sprinkle chopped salted peanuts right over the whipped cream, or shave a little high-quality milk chocolate over the top. A simple glass of cold milk is the traditional pairing, of course, but a strong, black coffee will balance the sweetness beautifully. Enjoy this easy, amazing Amish classic!

Recipe FAQs
Why is my peanut butter filling too runny or soft?
This is usually due to insufficient chilling time or not whipping the cream properly. The heavy cream (or stabilized whipped topping) must reach stiff peaks before folding into the peanut butter mixture to provide the necessary structure.
Ensure the filling chills for at least 6 hours, or ideally overnight, before serving; also, avoid over mixing the final folded mixture, which can deflate the air.
Can I use natural peanut butter instead of commercial processed peanut butter?
It is strongly recommended to use standard, processed, shelf stable peanut butter (like Jif or Skippy) for this recipe. Natural peanut butter tends to separate and is much oilier, which can destabilize the filling and make the pie gritty or excessively oily.
How far in advance can I make this Amish Peanut Butter Pie?
This pie holds up beautifully in the refrigerator for 3 to 4 days when loosely covered. For the best texture and appearance, we recommend preparing it one full day ahead of serving, allowing adequate time for the filling to firm up completely.
Can I freeze the Amish Peanut Butter Pie?
Yes, this pie freezes well, although the texture of the whipped cream base may soften slightly upon thawing. To freeze, place the pie uncovered in the freezer until solid, then wrap it tightly in plastic wrap followed by aluminum foil to prevent freezer burn.
Thaw the pie overnight in the refrigerator before serving, and enjoy it within one month of freezing for optimal flavour.
My filling tastes too sweet. How can I balance the flavour?
If the pie is overly sweet, you can often balance this out by increasing the salt content. Ensure you are using slightly salted peanut butter, or consider adding an extra pinch of kosher salt directly into the filling mixture while preparing it next time.
A simple fix for an already finished pie is to top it with flaky sea salt just before serving to provide a sharp counterpoint to the sugar.
Can I make this recipe dairy-free or vegan?
Yes, with a few crucial substitutions. Replace the cream cheese with a vegan cream cheese alternative and use coconut cream (the thick top layer from a refrigerated can) or a quality commercial vegan whipped topping for the dairy elements.
Ensure your crust is made with vegan butter or margarine instead of dairy butter, and verify that the powdered sugar does not contain bone char if strict vegan standards are required.
What is the best way to slice this no-bake pie cleanly?
The key to clean slices is temperature and technique. Ensure the pie is thoroughly chilled and use a long, thin knife dipped in hot water and wiped dry before each cut.
Cut straight down through the pie, avoiding any sawing motion, and gently lift the slices out using a pie server, cleaning the knife between servings.
Amish Peanut Butter Cream Pie No Bake

Ingredients:
Instructions:
Nutrition Facts:
| Calories | 575 kcal |
|---|---|
| Protein | 8.0 g |
| Fat | 47.0 g |
| Carbs | 34.0 g |
