Frosting: Velveteen Vanilla Buttercream Mastered
- The Velveteen Buttercream: Stable & Silky Vanilla Frosting
- Mastering the Ultimate American Buttercream
- Essential Components: Detailed Ingredient Breakdown
- The Method: Achieving Perfect Velveteen Texture
- Troubleshooting Common Buttercream Errors
- Keeping Your Creation Fresh: Shelf Life and Preservation
- Creative Pairings: What Goes Best with Vanilla Buttercream?
- Recipe FAQs
- 📝 Recipe Card
The Velveteen Buttercream: Stable & Silky Vanilla Frosting
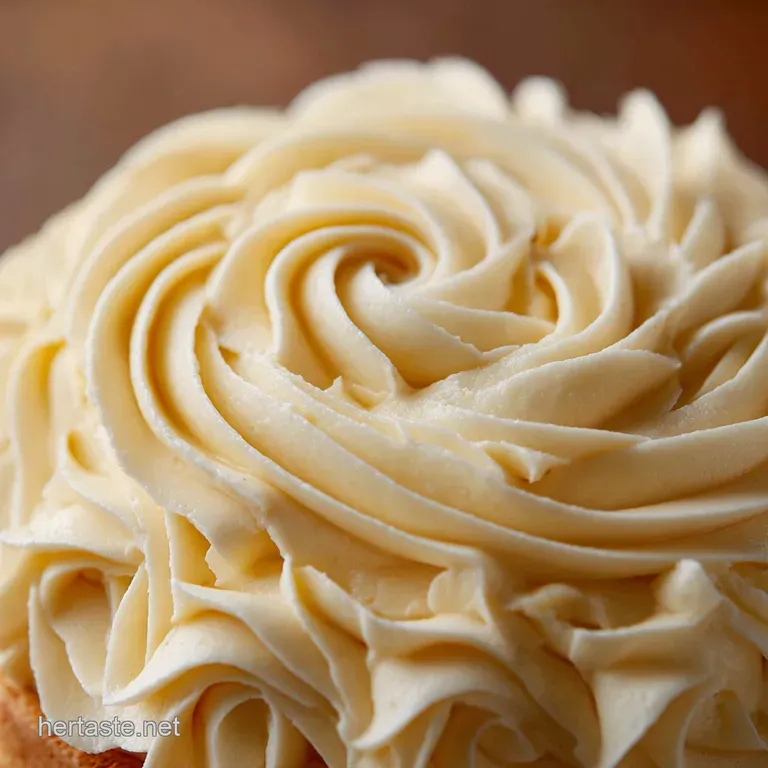
There is nothing quite like dipping a spoon into a freshly whipped bowl of vanilla buttercream. That glossy sheen, the smell of real vanilla, the way it holds a perfect peak it’s pure magic. This isn't just sugar paste; this is the ultimate, velvety Frosting .
Forget those overly complicated meringue versions or the expensive store-bought tubs full of shortening. This American Buttercream Frosting Recipe is a lifesaver because it’s fast, uses ingredients you already have, and guarantees stable results every single time.
It truly turns a rushed weeknight cake into an elegant, showstopping dessert.
I’ve failed countless times trying to achieve that bakery style finish, ending up with grainy textures or soupy messes, so trust me when I say I have hammered out the specific steps that banish graininess forever.
We are going to learn how to make the best vanilla Frosting you’ve ever tasted, designed specifically to be silky and strong enough for piping.
Mastering the Ultimate American Buttercream
American buttercream often gets a bad reputation for being cloyingly sweet and gritty, but that’s because most recipes rush the process or use improper ingredient ratios. The secret to transforming that simple mix of butter and sugar into a stable, Silky Buttercream Frosting lies in proper hydration and aeration.
We are not just mixing things together; we are forcing the sugar crystals to dissolve fully into the fat and liquid, which gives us that luxurious, smooth texture.
Ditching the Grittiness: Why Traditional Recipes Fail
Traditional recipes often tell you to just "mix until combined." This is where everything goes sideways, my friend. If you don't allow enough mixing time, those tiny granules of powdered sugar won’t dissolve, leaving you with that unpleasant, sandy bite.
We fix this by creaming the butter first until it’s super light and fluffy, then adding the sifted sugar gradually and following up with a long, robust whip after the liquid is added. This ensures a truly smooth Homemade Fluffy Icing.
The Stability Factor: When to Choose This Over Meringue
Look, I love Swiss meringue, but who has time for heating egg whites and precise temperature readings on a Tuesday? Not me. This specific Frosting recipe relies on the high fat content of the butter and heavy cream for stability, meaning it holds its shape beautifully even in moderate heat.
It’s perfect for summer picnics or multilayered celebration cakes that need to travel. This Simple Cake Frosting delivers structural integrity without the fussy extra steps.
Overview of the Process and Equipment
The path to perfect vanilla Frosting requires two specific stages: first, incorporating the fat and sugar using the paddle attachment, which ensures the sugar is mixed in without immediately incorporating too much air.
Second, switching to the whisk and whipping the mixture hard and fast with the cold cream, forcing maximum volume and lightness. Don't skip the equipment swap it makes a huge difference to the final texture.
The Role of Cold Fat in Stabilization
The addition of cold heavy cream at the very end is the magic trick. Cold fat, when whipped vigorously, strengthens the emulsion we’ve created between the butter and the sugar.
When that cream hits the mixture, it cools things down slightly and provides just enough extra fat and liquid to create a robust, stable lattice. This structural boost is what allows this Best Vanilla Buttercream Recipe to hold sharp edges when piping.
Achieving Maximum Volume Without Whipping Too Long
You need to whip for about 8 to 10 minutes after all the ingredients are combined. However, if you whip warm butter for too long, the friction can actually start to melt the butter, causing the emulsion to break.
The goal is medium high speed (not the highest setting) to keep the butter cool while incorporating sufficient air. This prevents the Frosting from collapsing when you stack a cake.
Controlling Temperature for Optimal Consistency
Temperature is critical. If your kitchen is hot (above 75°F or 24°C), the initial butter creaming stage will be too fast, leading to a soupy Frosting base. If your butter is too cold, the final product will be lumpy.
Aim for butter that has been sitting out for about 60– 90 minutes; it should yield slightly when pressed, but not look greasy.
Essential Components: Detailed Ingredient Breakdown
Every ingredient in this Easy Frosting Recipe for Cake plays a specific role, and quality really does count, especially when dealing with something as simple as this creamy Frosting .
| Ingredient Group | Ingredient | Substitute (if needed) |
|---|---|---|
| Fat & Foundation | Unsalted Butter (Room Temp.) | Plant based butter block (80%+ fat content) |
| Sweeteners | Icing Sugar (Sifted) | Maple syrup (for Frosting without Powdered Sugar, see notes) |
| Whipping Agents | Heavy Cream (Cold) | Whole Milk (use less volume, as it's thinner) |
| Flavor | Vanilla Bean Paste | 1/4 tsp Almond Extract + Vanilla Extract |
Choosing the Right Butter (Salted vs. Unsalted Debate)
Always, always use unsalted butter for this Frosting . Why? Because it gives you total control over the salt level. Too much salt makes the frosting taste unbalanced against the sweetness.
I use unsalted butter and then add a measured pinch of fine sea salt, which is essential for cutting the sugar and giving the vanilla flavor depth.
Sweeteners: Powdered Sugar Quality Matters
Icing sugar (or confectioners’ sugar) must be sifted. If you ignore this advice, you will end up with a grainy texture, guaranteed. Powdered sugar often contains cornstarch, which prevents caking, but that starch needs to be dispersed evenly.
Sifting achieves maximum lightness for your White Vanilla Frosting Recipe.
Vanilla Extract Versus Vanilla Bean Paste
For the deepest, most authentic vanilla flavor, use vanilla bean paste. It provides those beautiful black specks that make the Frosting look high end, and the flavor is far superior to standard extract.
If you only have extract, ensure it’s pure vanilla extract, not imitation the final 1 Tbsp measurement must be flavourful to shine through the richness of the butter.
Dairy Swaps: Using Milk Instead of Heavy Cream
Heavy cream (minimum 35% fat) is the gold standard because its fat content stabilizes the buttercream incredibly well. If you have to swap it out for milk (whole milk is best), use slightly less. Since milk contains more water, using the full 1/4 cup might make the final Frosting too loose.
Start with half the volume and add more only if absolutely necessary to achieve perfect pipeability.
The Method: Achieving Perfect Velveteen Texture
This American Buttercream Frosting Recipe relies entirely on the proper execution of the steps. Don’t rush the early stages!
Creaming the Butter Foundation
Place your cubed, room temperature butter into the stand mixer fitted with the paddle attachment. Beat this butter on medium speed for a full five to seven minutes. The goal is to incorporate air and fluff the butter until it is nearly white. This foundation is crucial for light Frosting .
Scrape the bowl down, ensuring no sticky patches remain at the base.
Gradual Incorporation of Dry Ingredients
Turn the mixer down to the lowest possible setting the "stir" setting if you have one. Slowly add the sifted icing sugar, one cup at a time. If you dump it all in at once, you’ll end up in a cloud of sugar dust, and the mixture won't emulsify properly. Mix until the mixture looks sandy and thick.
Stop the machine, scrape everything down, then mix for two more minutes on medium low speed to help the sugar start dissolving.
The Final Whip: Adding the Cold Liquid
This is where the magic happens for this Silky Buttercream Frosting. Pour in the cold heavy cream, vanilla paste, and salt all at once. Mix briefly on low speed until the liquid is incorporated, then stop the machine and swap the paddle attachment for the balloon whisk .
Now, crank the speed up to medium high (around setting 6 or 8). Whip hard for 8 to 10 minutes.
Chef's Note: The long whip step is non-negotiable for a truly light texture. It’s what transforms this from heavy icing into a fluffy, voluminous Frosting perfect for cake layers.
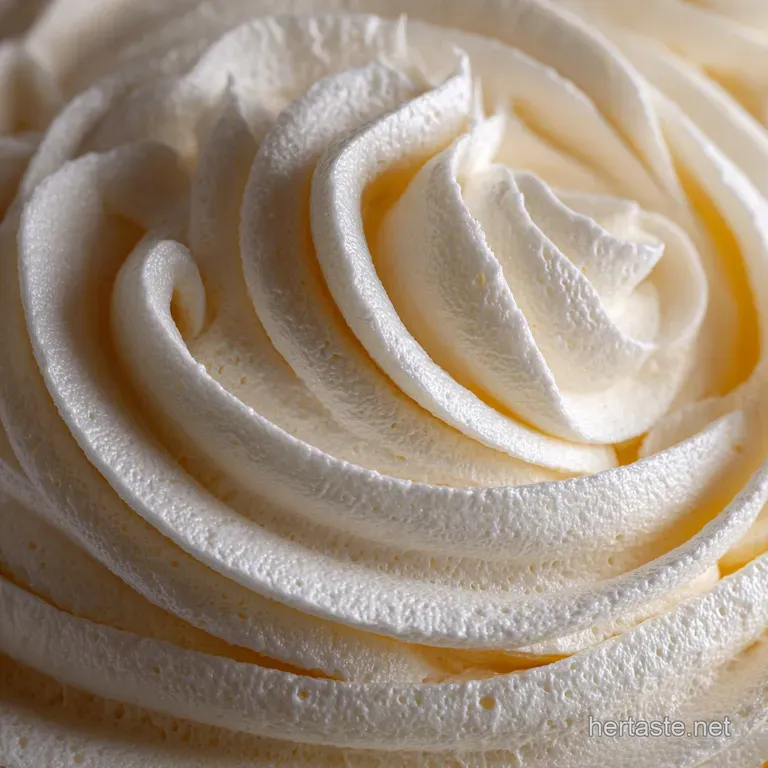
Consistency Check: Readiness for Piping or Spreading
After the 10 minute whip, the volume should have increased significantly, and the Frosting should look bright white or pale yellow. It should be light, airy, and yet structured enough to hold a stiff peak when you lift the whisk.
If you need it firm for detailed piping (like Vanilla Buttercream For Cake Pops), give it a 15 minute chill in the fridge first. If it's too firm for spreading, you can add 1 teaspoon of warm milk while mixing on low speed to loosen it up.
Troubleshooting Common Buttercream Errors
I’ve had my share of kitchen catastrophes, and I promise you, almost every Frosting fail is fixable.
Fixing Curdled or Separated Mixtures (The "Broken" Look)
If your Frosting looks curdled, wet, or separated, it means the butter was too warm, or the fat and water haven’t emulsified properly. Do not panic. Put the entire mixing bowl in the fridge for 15 minutes. The butter needs to harden slightly.
Once chilled, return it to the mixer and whip vigorously on high speed for 5 minutes. The cooler fat will re-emulsify with the sugar and liquid, bringing the mixture back together flawlessly.
Eliminating a Grainy or Sticky Texture
A grainy texture is almost always undissolved sugar. This usually happens because the initial mixing stage wasn't long enough. To fix a grainy Frosting , add one teaspoon of very hot (but not boiling) water or cream to the mixture while mixing on low.
The heat helps dissolve the sugar crystals rapidly. Mix for 5 minutes, scrape, and then whip again for 3 minutes.
How to Lighten Up Overly Dense Buttercream
If your final result is dense, heavy, and lacking volume, it means you stopped whipping too early, or your butter was too cold at the start. To lighten this dense Frosting , fit the whisk attachment and beat the mixture on medium high speed for another 5 minutes, adding a splash of cold heavy cream during the process.
You are basically forcing more air into the mixture.
Keeping Your Creation Fresh: Shelf Life and Preservation
Knowing how to store this Frosting properly is key, especially when you are making large batches for a wedding or party.
Does Vanilla Frosting Require Refrigeration?
Yes, because this is an all-butter Frosting , it must be refrigerated if stored longer than two days. Due to the high sugar and fat content, it’s stable at cool room temperature (below 70°F) for up to 48 hours.
After that, keep it sealed in an airtight container in the fridge for up to two weeks.
Best Practices for Freezing Finished Buttercream
This Simple Cake Frosting freezes beautifully! Spoon it into a freezer safe, airtight container, pressing plastic wrap directly onto the surface of the Frosting before sealing the lid. Label it with the date. It will last in the freezer for up to three months.
Thawing and Re-Whipping Stored Batches
When ready to use frozen Frosting , thaw it overnight in the refrigerator, then bring it to cool room temperature (this might take 2– 3 hours). The mixture will look separated or curdled that’s totally normal!
Place it back in the stand mixer with the paddle attachment and beat on medium speed until smooth. If needed, add a tablespoon of cold heavy cream to revive the light texture.
Creative Pairings: What Goes Best with Vanilla Buttercream?
This versatile vanilla Frosting goes with everything, but here are my absolute favorite pairings.
This Best Vanilla Buttercream Recipe is the ultimate canvas for flavor. It pairs beautifully with rich, dark cakes. If you want something truly decadent, use this as the base layer for filling, and then top the cake with my Chocolate Frosting Recipe: Ultimate Double Fudge Buttercream . The contrast between the light vanilla and the intense dark chocolate is unreal.
For lighter fare, try this White Vanilla Frosting Recipe slathered thick on lemon or coconut cakes. The subtle tartness of the cake perfectly balances the richness of the buttercream.
And of course, if you are looking for a completely different kind of Frosting , something tangy and complex, you must check out my technique for making perfect cream cheese frosting it’s the key to my famous The Bakers Best Perfectly Moist Carrot Cake with Cream Cheese Frosting . No matter what you choose, this base vanilla Frosting is a kitchen staple you’ll rely on forever. Happy baking, and enjoy the smooth, silky texture of your new favorite Frosting !

Recipe FAQs
Why does my buttercream look grainy or gritty?
Graininess usually means the powdered sugar hasn't fully dissolved into the fat and liquid mixture. The simplest solution is to keep beating the frosting for several minutes longer on medium speed, or ensure you are sifting the sugar before adding it to eliminate clumps.
If necessary, add a tiny splash of heavy cream and whip on high speed until the texture is ultra smooth.
My frosting looks curdled or split; how do I fix it?
Your emulsion has broken, likely because the butter was too cold or too warm when combined with the cream. To rescue it, remove about 1/4 cup of the frosting and microwave it for 5-10 seconds until partially melted.
Pour this melted portion back into the main batch and beat vigorously on high speed for 3-5 minutes until the frosting re-emulsifies into a smooth texture.
Can I use milk instead of heavy cream for thinning the frosting?
Yes, you can use milk, but heavy cream is highly recommended as it contributes significantly to the stability and rich mouthfeel of this particular recipe. If substituting, use whole milk and incorporate it sparingly, as it contains more water than cream and might slightly compromise the frosting's firmness.
How do I create a chocolate variation of this frosting?
To achieve a rich chocolate flavour, sift in 1/2 cup of high-quality unsweetened cocoa powder along with the final addition of powdered sugar. If the resulting mixture is too stiff for piping, thin it out gradually using an extra teaspoon or two of heavy cream until the desired consistency is achieved.
How far in advance can I make this buttercream, and how should I store it?
This stable buttercream can be made up to two weeks in advance and stored in an airtight container in the refrigerator. Before use, let the frosting come fully to room temperature (about 2-3 hours), then beat it thoroughly on medium high speed for several minutes to restore its lightness and velvety texture.
Can I freeze the Velveteen Buttercream?
Yes, this frosting freezes exceptionally well, lasting up to three months when stored in a deep, airtight container. To thaw, move it to the refrigerator overnight, then leave it on the counter until it reaches room temperature. A final vigorous whip is necessary to make it fluffy and pipeable again.
My frosting is too soft and won't hold its shape when piping. What is the fix?
The frosting is likely too warm or needs more structure. Try refrigerating the batch for 15-20 minutes, then re-whip it. If that doesn't work, slowly mix in 1/4 cup of additional sifted powdered sugar until the consistency firms up enough to hold sharp edges when piped.
Silky Vanilla Buttercream Frosting

Ingredients:
Instructions:
Nutrition Facts:
| Calories | 886 kcal |
|---|---|
| Protein | 0.3 g |
| Fat | 49.8 g |
| Carbs | 113.2 g |
