Proper Chicken Cobbler with Buttermilk Biscuits for Sunday Dinner

- The Ultimate Comfort Bake: A Proper Sunday Chicken Cobbler
- The Science of Southern Comfort: Why This Recipe Works
- Gathering Your Supplies: Essential Ingredients and Substitutions
- Detailed Method: Baking the Perfect Chicken Cobbler
- Mastering the Technique: Chef's Tips and Troubleshooting
- Practical Guide: Storing, Freezing, and Reheating
- Completing the Meal: Classic Serving Suggestions
- Recipe FAQs
- 📝 Recipe Card
The Ultimate Comfort Bake: A Proper Sunday Chicken Cobbler
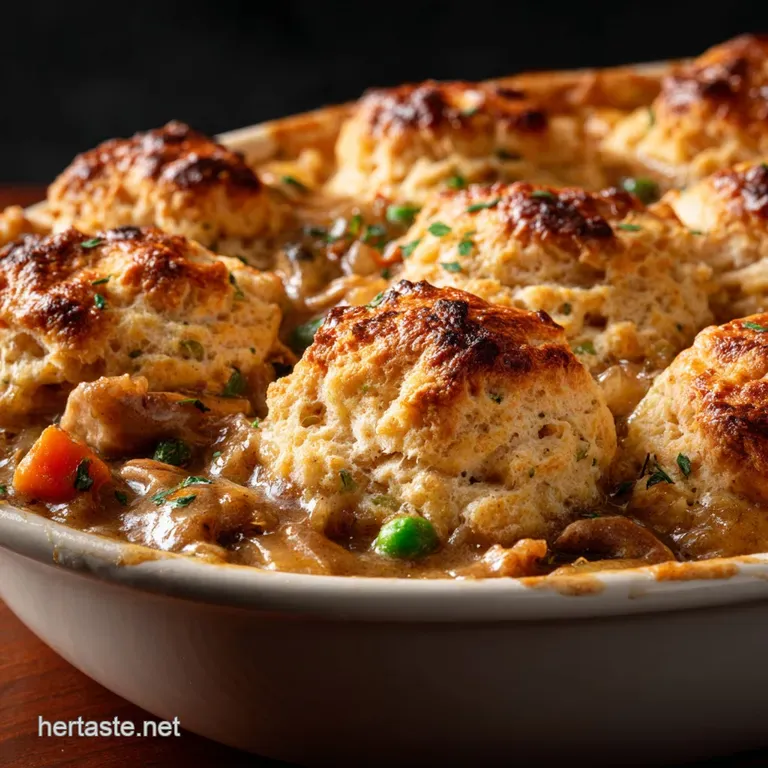
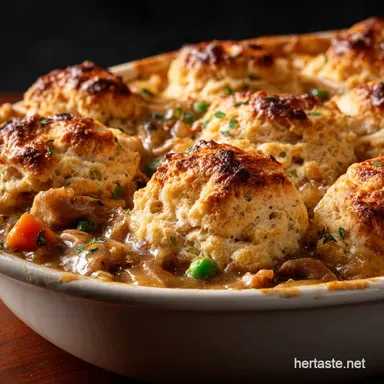
Okay, stop what you are doing. The aroma that fills the kitchen when this Chicken Cobbler bakes is pure magic, honestly. It smells intensely like Sunday dinner, butter, and all the savory goodness of a creamy, herbed filling.
Then you look down and see those golden, fluffy buttermilk biscuits crowning the top it’s just the best thing to ever happen to a 9x13 dish.
This Chicken Cobbler Casserole is my absolute weeknight lifesaver, especially if I've snagged a rotisserie chicken the day before. It feels incredibly fancy but comes together faster than most decent stews, making it an easy casserole recipe solution for busy evenings.
It’s hearty, affordable, and requires minimal babysitting once it hits that hot oven.
We are completely skipping the sadness of the soggy bottom that ruins many traditional pot pies and going straight for that tender, light, fluffy biscuit crust. This is the ultimate comfort bake, and I'm going to walk you through exactly how we achieve that perfect creamy filling and those mile high herb biscuits, even if you’re a complete novice.
Let's crack on with this amazing Chicken Cobbler Recipe Easy style!
The Science of Southern Comfort: Why This Recipe Works
Cobbler vs. Pot Pie: Understanding the Crust Difference
A traditional pot pie completely seals the filling inside a pastry shell, which means the bottom often steams and turns gluey. The cobbler technique is fundamentally different and much less stressful for the home cook.
We are creating a very thick, rich base and topping it with fluffy drop biscuits that steam and bake right into the filling, maintaining their crisp, buttery edge while absorbing the savory steam.
An Old-Fashioned Recipe Elevated: The Buttermilk Biscuit Topping
The secret to this Chicken Cobbler with Biscuits lies entirely in the dough handling. We use buttermilk for the tang and the acid, which reacts powerfully with the baking powder, giving us maximum lift.
Keeping the butter frozen cold is non-negotiable, because cold butter creates those crucial layers of steam inside the oven, resulting in that incredible tenderness we all crave.
Achieving the Perfect Creamy Filling Consistency (The Roux)
The filling has to be thick before it goes into the oven, otherwise the liquid will simply soak the biscuits. We achieve this essential thickness by using a proper roux a mixture of butter and flour cooked together briefly.
This cooks the raw flavor out of the flour while binding the fats and liquids, ensuring the sauce is velvety and stable, even after baking.
Infusing Depth: Layering Herbs for Maximum Flavor
We are using a two-step herb approach here, maximizing the complexity of the flavor profile. Thyme and bay leaf go into the filling early, simmering deeply into the sauce, providing an earthy background.
Then, fresh chives are folded directly into the cold biscuit dough, providing a bright, sharp contrast and a fresh punch of flavor right on top of the richness.
Gathering Your Supplies: Essential Ingredients and Substitutions
Trust me, gathering all your ingredients before you start is the single best way to avoid disaster. This recipe works beautifully with pre-cooked chicken (hello, Rotisserie Chicken Recipes!), making the whole process even quicker.
The Filling Base: Building Flavor from the Ground Up
| Ingredient | Why it's Essential | Viable Substitute |
|---|---|---|
| Cooked Shredded Chicken | Bulk and protein. | Leftover cooked turkey (especially dark meat) or diced cooked ham. |
| Heavy Cream | Richness and velvety texture. | Evaporated milk or whole milk (the sauce will be slightly thinner). |
| Chicken Stock | Flavor base and liquid content. | Vegetable stock or bone broth, though adjust salt level accordingly. |
| Onion, Carrots, Celery | The classic aromatic base (mirepoix). | Substitute with 1 cup of frozen mixed vegetable blend (added later). |
Buttermilk Biscuit Preparation: Dry and Wet Components
The temperature of your biscuit ingredients is critical. Do not eyeball these measurements!
| Ingredient | Why it's Essential | Viable Substitute |
|---|---|---|
| Cold Buttermilk | Provides lift and necessary acid. | Regular milk + 1 tsp white vinegar or lemon juice (let stand 5 minutes). |
| All-Purpose Flour | Structure for both filling and biscuits. | For GF needs, use a high-quality 1:1 gluten-free baking blend. |
| Cold Butter | Creates steam for flakiness. | Cold, solid vegetable shortening (results in a tender but less flavorful crust). |
Achieving Proper Thickness: Flour vs. Cornstarch Notes
We use flour for the roux because it handles the long bake time without breaking down or becoming glossy, which is what cornstarch does. If you need a gluten-free option for thickening the sauce, avoid cornstarch initially.
Use potato or arrowroot starch mixed with cold water to form a slurry, adding it after the stock has simmered for 5 minutes, just before the cream.
Detailed Method: Baking the Perfect Chicken Cobbler
Phase 1: Prepare the Biscuit Dough (The Topping)
- Get Icy: Whisk together your flour, baking powder, and salt. Now, cut the cold from the fridge butter into small cubes and toss them immediately into the dry mix. Use a pastry blender or your fingers, working fast, until the mixture resembles coarse crumbs, like small peas. Warm hands are the enemy.
- Mix Gently: Fold in your fresh chives. Pour in the cold buttermilk and mix everything using a fork or rubber spatula until the dough is just cohesive. It should look shaggy and slightly sticky; resist the urge to knead it into submission.
- Rest Time: Cover the bowl tightly and pop it straight into the fridge for at least 20 minutes. This allows the gluten to relax and keeps the butter rock hard.
Phase 2: Create the Rich Chicken Filling
- Sauté the Base: Preheat your oven to 400°F (200°C). Melt 3 Tbsp of butter in a large, heavy bottomed pot over medium heat. Add the diced onion, carrots, and celery. Cook this mixture for about 5 to 7 minutes until the onions are translucent and the veggies are slightly softened.
- Build the Roux: Sprinkle the 1/4 cup of flour over the vegetables and stir constantly for 1 minute; this eliminates that raw, chalky flour taste. Slowly whisk in the 4 cups of chicken stock until everything is lump free.
- Simmer and Thicken: Add the bay leaf and thyme. Bring the liquid to a gentle simmer and cook for 5 to 10 minutes until the sauce visibly thickens and can coat the back of a spoon.
- Finish the Filling: Remove the pot from the heat completely. Stir in the heavy cream, the shredded chicken, and the frozen peas. Crucial step: Season aggressively with kosher salt and pepper, remembering that the biscuits are mostly unsalted. Pour this delicious filling into your 9x13 inch baking dish.
Phase 3: Assemble and Bake the Cobbler
- Shape the Dough: Retrieve your chilled dough. Turn it out onto a lightly floured surface. You can either roll it or gently pat it out to about 3/4 inch thickness. Cut the dough into 9 to 12 rustic squares, or use a round cutter if you’re feeling fancy.
- Assemble: Arrange the biscuits evenly over the hot filling. They should be kissing their neighbors but not completely overlapping; this allows the steam to escape properly.
- Bake to Golden Perfection: If you want a deep, glossy crust, brush the tops with a simple egg wash (one egg whisked with a splash of milk). Bake for 25 to 30 minutes. The biscuits should be deep golden brown, and the filling should be furiously bubbling around the edges.
- Cool Down: Let the cobbler rest on a wire rack for 10 to 15 minutes before diving in. This resting time lets the filling set up properly, turning it from soup to sauce.
Mastering the Technique: Chef's Tips and Troubleshooting
Preventing a Soggy Bottom: Filling-to-Topping Ratio Best Practices
The amount of filling you use must not drown the biscuits. Use a standard 9x13 pan and ensure the biscuits are placed on the filling, not semi submerged in it. If your filling seems slightly thin, reduce it on the stovetop for a few extra minutes before adding the cream and chicken.
Chef’s Note: The biscuits should be 3/4 inch thick before baking. A thinner biscuit absorbs too much liquid and collapses; a thicker one stays loftier and retains its texture.
The Browning Problem: How to Get Golden Biscuits Without Overbaking
If your biscuits are reaching peak golden brown color around the 15 minute mark but the filling isn't fully bubbling, don't panic. Simply grab a sheet of aluminum foil and loosely tent the casserole dish.
This reflects the direct heat away from the surface, allowing the center to heat through without incinerating the crust.
Temperature Control: Ensuring the Center Filling is Piping Hot
Since the chicken is already cooked, we are really just warming and setting the sauce. When the cobbler comes out, the internal temperature of the filling needs to be at least 165°F (74°C).
If the center of the filling is barely warm, put it back in the oven (tent it!) for another 5– 10 minutes.
Practical Guide: Storing, Freezing, and Reheating
Refrigerating Leftovers and Maintaining Biscuit Integrity
It’s important to let the cobbler cool completely on the counter before you try to store it. Rushing this step traps steam, which quickly turns those gorgeous biscuits to mush. Cover the dish tightly with plastic wrap and then foil. It keeps beautifully for three to four days in the fridge.
Freezing Unbaked Chicken Cobbler for Later Use
This Chicken Cobbler Casserole freezes like a dream if you assemble it but do not bake it . Prepare the filling and pour it into a foil baking dish. Prepare the biscuit dough, cut the biscuits, and place them on top.
Freeze the entire dish, wrapped extremely well in two layers of foil. When ready to bake, remove the foil, preheat your oven to 400°F (200°C), and bake straight from the freezer for about 45– 60 minutes (until piping hot and golden).
The Best Way to Reheat a Fully Baked Casserole
Microwaving works, but those biscuits will be sad. The best method is the oven: preheat to 300°F (150°C). Place the portion you want to reheat in an oven safe dish, cover it loosely with foil, and bake for 20 minutes.
Remove the foil for the last 5 minutes to crisp up the topping slightly.
Completing the Meal: Classic Serving Suggestions
Suggested Sides That Complement the Rich Flavor Profile
Because this dish is inherently rich and creamy, you need something bright and slightly acidic to cut through that fat. I always serve it with a fresh, crisp salad dressed with a sharp Dijon vinaigrette. Roasted asparagus tossed with lemon zest or simple steamed green beans are also fantastic choices. If I'm feeling extra cozy, I'll pair it with something lighter, maybe a quick side salad similar to what I’d serve alongside my Healthy Chicken Recipes: Pan-Seared Lemon Oregano Skillet Dinner .
Beverage Pairings: What to Drink with a Hearty Comfort Dish
For wine drinkers, look for something unoaked and medium bodied, like a crisp Chardonnay or a dry Pinot Blanc. If you’re a beer enthusiast, a traditional English Pale Ale or a medium bodied Amber Ale provides a wonderful, slightly bitter contrast that balances the creamy filling perfectly.
Taking It Beyond the Classic: Topping Variations
If you want to play around with the biscuit topping, try adding 1/2 cup of grated sharp cheddar cheese or a few slices of crispy, crumbled bacon into the dough before adding the buttermilk. For a fun, smoky twist on comfort food, you could even try topping the filling with a barbecue seasoned biscuit, though that’s a whole different vibe, closer to making Barbecue Pulled Chicken Sliders: Sticky, Smoky Comfort Food Recipe . Enjoy!

Recipe FAQs
Why is my chicken filling too runny or watery?
A runny filling usually means the roux (butter and flour base) was not cooked long enough or that the filling wasn't allowed to simmer sufficiently to thicken. Ensure you whisk the mixture constantly as you add the liquid, and allow it to gently bubble for 5-7 minutes before assembling the cobbler.
Can I prepare the chicken filling ahead of time?
Yes, the creamy filling can be prepared entirely up to 24 hours in advance and stored covered in the refrigerator. Allow the chilled filling to warm slightly or reheat it gently before pouring it into the baking dish.
My buttermilk biscuits came out hard and dry. What went wrong?
The most common mistake for dense biscuits is overworking the dough, which develops the gluten too much. Handle the dough minimally until it just comes together, and make sure your butter is very cold and cut into pea-sized pieces to ensure a light and flaky texture.
Can I use raw chicken instead of pre-cooked roast chicken?
It is highly recommended to use pre-cooked (roasted) chicken, as the baking time is optimized for heating the filling and cooking the biscuits only. If you must use raw chicken, dice it very small and sauté it until nearly cooked through before incorporating it into the creamy mixture.
What is a good substitution for buttermilk in the biscuit recipe?
If you do not have buttermilk, you can easily create a substitute by adding 1 tablespoon of white vinegar or lemon juice to 1 cup of whole milk. Let the mixture sit undisturbed for about 5 minutes until it thickens and curdles slightly before using it in the biscuit recipe.
Is it possible to freeze Chicken Cobbler?
You can freeze the fully cooked cobbler, but the texture of the biscuits may soften or become slightly mealy upon thawing and reheating. For the best quality, freeze the creamy chicken filling separately, and then prepare and bake the fresh biscuit topping right before serving the dish.
Proper Chicken Cobbler With Biscuits
Ingredients:
Instructions:
Nutrition Facts:
| Calories | 675 kcal |
|---|---|
| Fat | 37.5 g |
| Fiber | 4 g |
