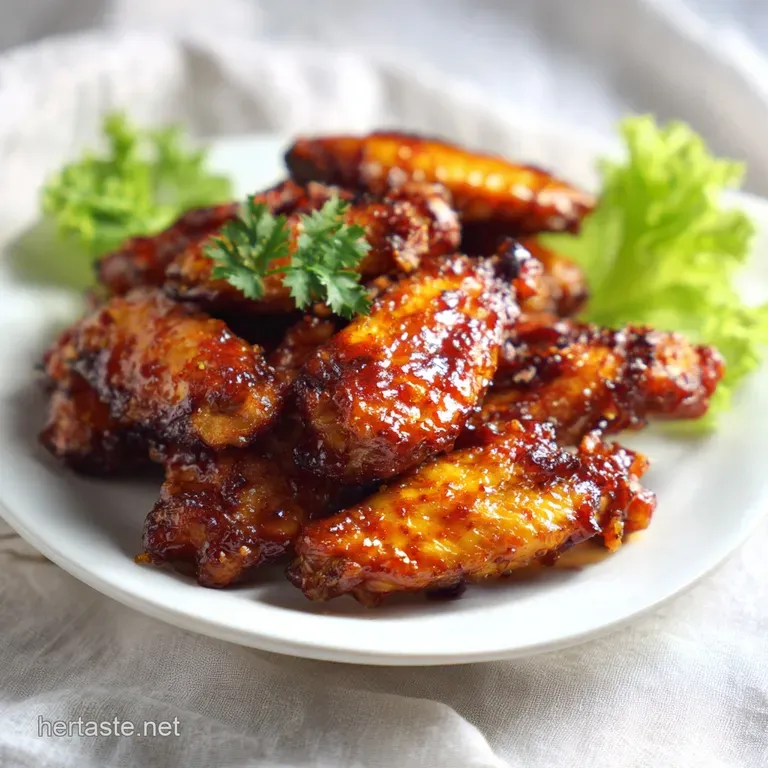
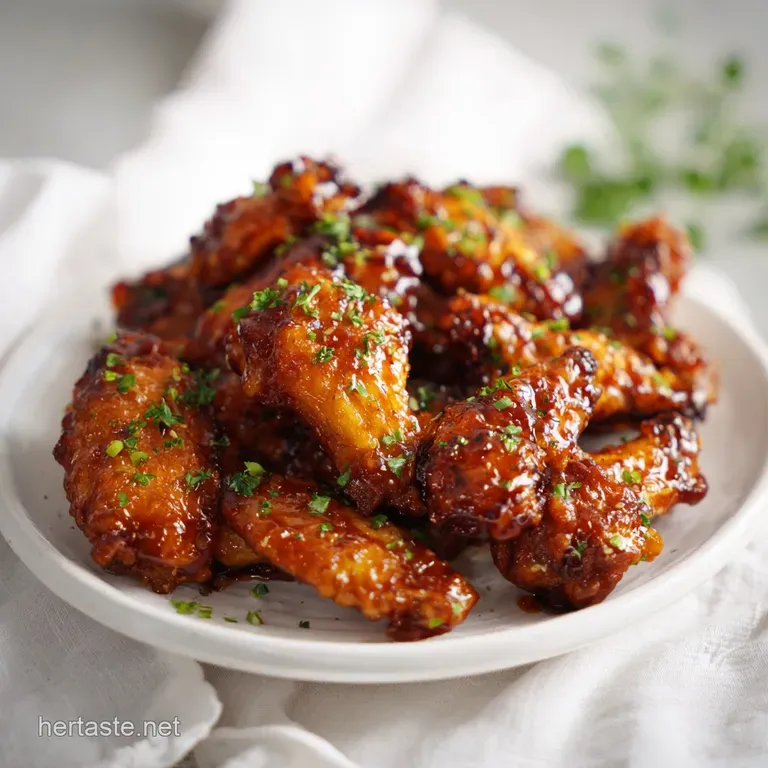
Shatter-Crisp Oven Baked Bbq Chicken Wings with Honey Glaze
- Time:15 minutes prep + 50 minutes cook = 65 minutes total
- Flavor/Texture Hook: Shatter crisp skin with a tacky, mahogany honey glaze
- Perfect for: High end game day hosting or a bold weeknight dinner
- Essential Techniques for Achieving Superior Crispness
- Component Breakdown for the Ultimate Flavor Profile
- Required Tools for This Professional Wing Technique
- Executing the Perfect Honey Glaze Wing Batch
- Resolving Texture Issues and Flavor Imbalances
- Customizing Your Wings for Maximum Visual Impact
- Maintaining Freshness and Repurposing Your Leftovers
- Curating the Ideal Accompaniments for Your Platter
- Understanding the Physics of the Dish
- Recipe FAQs
- 📝 Recipe Card
Essential Techniques for Achieving Superior Crispness
Surface Dehydration: Moisture is the enemy of the crunch. By patting the wings bone dry and using baking powder, we break down the protein peptide bonds in the skin, allowing it to crisp up faster and more intensely.
The Alkaline Shift: Aluminum free baking powder raises the pH level on the chicken's surface. This chemical shift accelerates the browning process, creating a textured, blistered surface that provides the perfect "nooks and crannies" for our glaze to grab onto.
Conductive Airflow: Placing wings on a wire rack is non negotiable. It allows hot air to circulate under the meat, rendering the fat from all sides simultaneously and preventing the bottom from sitting in its own juices.
| Method | Time | Texture | Best For |
|---|---|---|---|
| Oven Baked (This Recipe) | 50 minutes | Shatter crisp shell | Large batches & easy cleanup |
| Deep Fried | 12 minutes | Traditional, oily crunch | Small batches & instant craving |
| Air Fryer | 25 minutes | Very crispy but dry | 1-2 servings only |
The beauty of this specific process is the balance between the intense heat and the honey heavy glaze. While many recipes suggest saucing the wings halfway through, we wait until the very end. This ensures the skin has reached maximum dehydration before we introduce moisture back into the equation.
It's a calculated move that preserves the hard earned crunch while allowing the sugars in the honey to caramelize into a tacky, glass like finish in the final five minutes of cooking.
Component Breakdown for the Ultimate Flavor Profile
| Ingredient | Science Role | Pro Secret |
|---|---|---|
| Baking Powder | pH Regulator | Use aluminum free to avoid a bitter, metallic aftertaste |
| Honey | Hygroscopic Glaze | Creates the "tacky" texture that clings to the ridges |
| Apple Cider Vinegar | Acid Balance | Cuts through the heavy fat and sugar for a clean finish |
| Smoked Paprika | Flavor Depth | Provides a "char grilled" aroma without the actual grill |
Shopping List Breakdown
- 4 lbs chicken wings: Ensure flats and drumettes are separated. Why this? Uniform pieces cook evenly and look more professional on the plate. (Substitute: Chicken thighs cut into strips for "boneless" style)
- 1 tbsp aluminum free baking powder: Why this? The key to the chemical "blistering" of the skin. (Substitute: Don't use baking soda; it tastes soapy)
- 1 tsp kosher salt: Why this? Larger grains draw out moisture more effectively than table salt. (Substitute: Sea salt)
- 1 tsp cracked black pepper: Provides a sharp bite against the sweet honey. (Substitute: White pepper for a more floral heat)
- 1 tsp smoked paprika: Adds that urban, smoky flair. (Substitute: Chipotle powder for extra spice)
- 1 tsp garlic powder: Infuses the skin with savory depth. (Substitute: Onion powder)
- 1 cup smoky BBQ sauce: Choose a thick, molasses based sauce. (Substitute: Spicy Buffalo sauce for a "Honey Hot" variation)
- 1/4 cup honey: Why this? Provides the shine and the stickiness. (Substitute: Maple syrup for an earthy sweetness)
- 1 tbsp apple cider vinegar: Thins the glaze just enough to brush easily. (Substitute: Lemon juice)
- 0.5 tsp cayenne pepper: Just enough to wake up the palate. (Substitute: Red pepper flakes)
If you are looking to expand your poultry repertoire after mastering these wings, you might enjoy the bright, acidic notes of my Lemon Herb Roasted Chicken. It uses a similar over high heat approach but focuses on fresh aromatics.
Required Tools for This Professional Wing Technique
To achieve the bold flavors and stunning visuals we are aiming for, your equipment matters. You need a large, rimmed baking sheet the kind that won't warp under high heat. More importantly, you need an oven safe wire cooling rack that fits perfectly inside that sheet.
This is the difference between a "good" wing and a "restaurant quality" wing.
I also highly recommend using a pastry brush (silicone or natural bristle) for the glazing stage. Dishing the sauce over the wings with a spoon leads to uneven coating and can actually soften the skin if you use too much.
A brush allows you to "paint" the mahogany honey glaze onto the wings, ensuring every crevice is filled while keeping the application light and precise. Finally, a large stainless steel mixing bowl is essential for tossing the raw wings with the baking powder mixture; you need enough space to ensure every single wing is completely and evenly coated in that white dust.
Executing the Perfect Honey Glaze Wing Batch
- Dry the protein. Pat the chicken wings completely dry with paper towels to remove all surface moisture. Note: Any lingering water will create steam, which prevents the skin from crisping.
- Apply the coating. In a large mixing bowl, toss the wings with 1 tbsp baking powder, 1 tsp kosher salt, 1 tsp black pepper, 1 tsp smoked paprika, and 1 tsp garlic powder until evenly coated.
- Set the stage. Preheat oven to 425°F (220°C). Place an oven safe wire cooling rack inside a large rimmed baking sheet.
- Arrange with precision. Arrange the wings in a single layer on the rack, ensuring they do not touch. Note: Crowding the pan creates "cold spots" where air cannot circulate.
- The first roast. Bake for 40–45 minutes until the skin is golden brown and exceptionally crisp.
- The flip. Halfway through (around the 22 minute mark), use tongs to flip each wing. This ensures both sides shatter when bitten.
- Whisk the glaze. While wings are baking, whisk together 1 cup BBQ sauce, 1/4 cup honey, 1 tbsp apple cider vinegar, and 0.5 tsp cayenne pepper in a small bowl.
- The lacquer. Remove wings from the oven and use a pastry brush to coat each wing generously with the honey BBQ glaze.
- The final set. Return to the oven for an additional 5 minutes until the sauce is tacky and caramelized.
- Rest briefly. Let the wings sit for 2 minutes before serving. This allows the glaze to tighten and "grip" the skin.
For those who enjoy a different profile of sticky sweet poultry, my Char Siu Chicken offers a traditional Cantonese twist on this glazed technique that is absolutely addictive.
Resolving Texture Issues and Flavor Imbalances
Why Your Wings Lack Crunch
If your wings come out soft, the most common culprit is surface moisture. If the wings weren't patted dry, or if you used "enhanced" chicken that has been injected with a saline solution (check the USDA label!), they will release too much liquid during the bake.
Another cause is skipping the wire rack; the bottom of the wing must be exposed to air to dehydrate effectively.
Why the Glaze Is Running Off
A glaze that slides right off the wing is usually too thin or was applied too early. Ensure you are using a thick BBQ sauce as your base. If you find the sauce is still too liquid, simmer it in a small saucepan for 5 minutes before brushing it onto the wings to reduce the water content and concentrate the sugars.
| Problem | Root Cause | Solution |
|---|---|---|
| Metallic Taste | Aluminum in baking powder | Always buy "Aluminum Free" powder |
| Burnt Sauce | Glazed too early | Apply sauce only in the last 5 mins of baking |
| Soggy Bottoms | No rack used | Use a wire rack to allow 360 degree airflow |
Common Mistakes Checklist
- ✓ Pat wings dry until the paper towel comes away completely clean.
- ✓ Use exactly 1 tablespoon of baking powder; more can lead to a chalky texture.
- ✓ Preheat your oven for at least 15 minutes to ensure it's truly at 425°F.
- ✓ Space the wings at least half an inch apart on the wire rack.
- ✓ Wait for the "visual cue" of blistering skin before applying the glaze.
Customizing Your Wings for Maximum Visual Impact
To elevate your Oven Baked BBQ Chicken Wings from a simple snack to a restaurant level presentation, you need to consider the plating. Urban flair is all about bold colors and clean lines.
| Level | Tweak | Visual Vibe |
|---|---|---|
| Simple | Heap wings in a rustic wooden bowl | Casual, backyard comfort |
| Polished | Stack in a neat "log cabin" pyramid on a slate board | Modern, intentional, clean |
| Restaurant | Linear row on a long white plate with micro cilantro | High end, precise, artistic |
Make It Your Own Variations
- The Heat Seeker: Increase the cayenne to 1 tsp and add 2 tbsp of your favorite habanero hot sauce to the glaze. This creates a "lava" effect that is visually striking and palate cleansing.
- The Garlic Bomb: Add 1 tbsp of finely minced roasted garlic to the glaze. It adds a chunky, rustic texture and an aroma that will fill the entire house.
- Keto Friendly Version: Swap the honey for a monk fruit based maple syrup and use a sugar-free BBQ sauce. You will still get the mahogany color, though the "tackiness" will be slightly less intense.
Maintaining Freshness and Repurposing Your Leftovers
Storage Guidelines: These wings are best enjoyed fresh, but if you have leftovers, store them in an airtight container in the fridge for up to 3 days. Do not stack them if possible, as the weight will press the glaze into the skin and make it soggy.
Freezing: You can freeze the baked (un glazed) wings for up to 2 months. To serve, thaw them in the fridge overnight and then bake at 400°F for 10 minutes before applying the glaze and finishing for the final 5 minutes.
Zero Waste Tip: Don't throw away the wing tips if you bought whole wings and separated them yourself! Toss them into a pot with some veggie scraps and water to make a quick, collagen rich chicken stock. It's the ultimate urban cook's secret for better soups and pan sauces later in the week.
Curating the Ideal Accompaniments for Your Platter
When you are serving something as rich and bold as these BBQ Chicken Wings, you need a side dish that provides high contrast. Think bright, acidic, and crunchy. A classic celery and carrot stick platter is fine, but if you want to elevate the experience, try a shaved fennel and apple slaw with a lime vinaigrette.
The anise notes of the fennel cut through the smoky BBQ sauce beautifully.
If you are looking for a more substantial pairing, these wings go exceptionally well with a sharp cheddar mac and cheese or a tray of roasted root vegetables. The key is to keep the sides less "sticky" than the wings.
You want the wings to be the star of the show the visual centerpiece with that shimmering honey glaze. A cold, crisp lager or a spicy ginger beer is the perfect drink to wash down the heat and sweetness of this dish.
Understanding the Physics of the Dish
Searing vs. Dehydrating: Many people think high heat "sears" the juices in. In reality, according to USDA data, moisture loss happens regardless of temperature. Our goal with the 425°F oven isn't to trap juice, but to evaporate surface water so quickly that the skin fries in the rendering chicken fat.
Maillard Reaction vs. Caramelization: The first 45 minutes of baking are all about the Maillard reaction the browning of proteins. The final 5 minutes are about caramelization the browning of the sugars in the honey.
Keeping these two processes separate is what prevents the sauce from burning while ensuring the meat is fully cooked and the skin is crispy.
The Rest Factor: Letting the wings rest for 2 minutes isn't just about heat; it's about the glaze. As the honey cools slightly, it becomes more viscous, creating that iconic "tug" when you take a bite.
If you eat them the second they leave the oven, the sauce will be too fluid and messy. Patience results in a much better visual and textural experience.

Recipe FAQs
Why is it necessary to use a wire cooling rack inside the baking sheet?
The wire rack is non-negotiable for airflow. Elevating the wings allows hot air to circulate underneath, which renders the fat from all sides simultaneously so the skin doesn't sit in its own juices.
How to achieve the "shatter crisp" skin texture?
Pat the chicken wings completely dry with paper towels before seasoning. If you enjoyed mastering this surface dehydration technique for texture control, you can apply the same logic to other roasted proteins to ensure consistently crispy results.
Is it true I should sauce the wings at the beginning of the baking process?
No, this is a common misconception. You must wait until the final 5 minutes to brush on the glaze, otherwise the sugar in the honey BBQ sauce will burn before the skin becomes crisp.
How to prepare the wings ahead of time?
Toss the wings in the dry rub up to 8 hours before baking. Keeping them in the refrigerator uncovered during this time further dehydrates the skin, leading to an even crunchier final result.
Why is baking powder included in the dry rub?
Baking powder raises the pH level on the chicken skin. This alkaline shift accelerates browning and creates small bubbles on the surface, which gives the skin that signature blistered texture.
How to prevent the wings from steaming instead of crisping?
Arrange the wings in a single layer with space between each piece. If the wings touch, they will release steam and trap moisture, which ruins the crisp texture you are working to achieve.
How to tell when the wings are finished baking?
Look for skin that is golden brown and exceptionally crisp. The wings should feel firm to the touch and appear blistered before you apply the glaze for the final 5-minute caramelization step.
Oven Baked Bbq Chicken Wings

Ingredients:
Instructions:
Nutrition Facts:
| Calories | 323 kcal |
|---|---|
| Protein | 17.3 g |
| Fat | 17.3 g |
| Carbs | 20.3 g |
| Fiber | 0.8 g |
| Sugar | 16.0 g |
| Sodium | 758 mg |
