Teatime Tiddlers Perfectly Moist Mini Cakes from Scratch
- Why These Miniature Marvels Reign Supreme Over Layer Cakes
- Unpacking the Magic: The Secret to Truly Moist Mini Cakes
- The Pantry Lineup: Essential Components for Your Cakes
- Tool Talk: Essential Gear for Baking Smaller Treats
- The Step-by-Step Creation of Fluffy Mini Cakes
- Elevating Your Mini Cakes: Decoration and Flair Ideas
- Storage Secrets and Troubleshooting Common Baking Hiccups
- Recipe FAQs
- 📝 Recipe Card
Why These Miniature Marvels Reign Supreme Over Layer Cakes
There’s a certain joy in tackling a grand, towering layer cake the stacking, the crumb coating, the final, glorious flourish of frosting. However, sometimes you crave that rich, buttery cake experience without the commitment, the leftovers, or the inevitable slicing dilemma.
Enter the world of Mini Cakes . These aren't merely oversized cupcakes; they are perfectly scaled down versions of classic sponges, offering supreme flavour distribution in a single, self contained package. They bake faster, cool quicker, and satisfy that craving with unparalleled precision.
For those embracing small batch baking , mastering these individual cakes unlocks a new level of efficiency and elegance in your kitchen repertoire.
Unpacking the Magic: The Secret to Truly Moist Mini Cakes
The foundation of any successful cake, regardless of size, lies in moisture retention and texture. When dealing with smaller portions, it's even easier for them to dry out, but this Mini Cake Recipe is specifically engineered to combat that issue, ensuring a tender crumb every single time.
The Appeal of Perfectly Portioned Puddings
The beauty of these individual cakes lies in their immediate gratification factor. There’s no need to wait for a whole cake to cool before diving in. On top of that,, they are inherently portion controlled, making them perfect for entertaining where you want guests to feel pampered without overindulging.
When someone reaches for one of these "Teatime Tiddlers," they are receiving an entire, perfectly baked experience, which is far more satisfying than a slightly squashed slice from a larger creation.
A Cheeky Take on Classic Sponge: Recipe Philosophy
Our guiding philosophy here leans into a superb, foundational vanilla sponge, much like a simplified Victoria Sponge. We are aiming for simplicity because, with Mini Cakes , the texture speaks volumes.
We rely on the classic creaming method beating butter and sugar until airy which guarantees a light structure. The choice of whole milk and quality vanilla extract ensures the flavour profile remains pure, letting the technique shine through rather than relying on heavy flavourings or complex fillings.
This is the essence of basic cake methodology perfected for smaller formats.
What Makes This Mini Cake Recipe Foolproof
This recipe is firmly categorized as Easy for a reason. The major hurdle in cake making is often the incorporation of ingredients specifically, not overmixing.
Because we alternate adding the dry ingredients (flour, baking powder, salt) with the liquid (milk), we gently introduce structure without activating too much gluten. This meticulous balance, combined with ensuring all ingredients are at room temperature, removes the guesswork, making it an ideal candidate for anyone exploring single serve cake baking for the first time.
The Pantry Lineup: Essential Components for Your Cakes
To achieve the required tenderness, the ingredients aren't just measurements; they are structural components working in harmony. We aim for a yield of 12 standard muffin sized mini cakes .
For the cake batter itself, the precise measurements are crucial. You will require 1/2 cup (113g) of softened, room temperature unsalted butter, paired with 1/2 cup plus 2 tablespoons (125g) of granulated sugar.
Two large, room temperature eggs provide emulsification and lift, while 1 teaspoon of good quality vanilla extract offers aromatic depth. The dry elements call for 1 1/2 cups (180g) of all-purpose flour, balanced by 1 1/2 teaspoons of fresh baking powder and 1/4 teaspoon of fine sea salt.
Finally, 1/2 cup (120ml) of room temperature whole milk ties the batter together beautifully. For the simple finish, a dusting of powdered sugar is all that’s needed for the classic presentation.
Related Recipes Worth Trying
- Instant Rava Uttapam Recipe Suji Fluffy South Indian Savory Pancakes — Skip the fermentation This instant Rava Uttapam Recipe Suji uses semolina and yogurt batter for the fluffiest South Indian savory pancakes A brilliant quick...
- My GoTo OldFashioned Pancakes Fluffy Buttermilk Perfection Secrets — Ditch the mix This homemade buttermilk pancake recipe delivers the best thick fluffy OldFashioned Pancakes Get my easy secrets for Sunday morning perfection
- My Secret Fluffy Pancakes Recipe The Weekend Buttermilk Ritual Done Right — Craving that perfect weekend brunch This Fluffy Pancakes Recipe reveals the secret to fluffy buttermilk pancakes using the gentle Muffin Method for thick...
Tool Talk: Essential Gear for Baking Smaller Treats
While you certainly don't need an overly specialized arsenal, having the right equipment for small batch baking ensures consistency when working with mini cake pans .
Measuring Up: Precise Dry Ingredients Breakdown
Accuracy is paramount, especially when dealing with flour ratios in smaller quantities. Ensure you spoon the all-purpose flour into your measuring cup and then level it off, rather than scooping directly from the bag. This prevents compaction, which can lead to overly dense cakes.
The leavening agent, 1 1/2 teaspoons of baking powder, must be fresh stale powder is the number one culprit for flat cakes.
Achieving Moisture: Key Wet Components Explained
The difference between a good cake and a great one often boils down to temperature. Your 1/2 cup of whole milk, 1/2 cup of butter, and 2 eggs must be at room temperature. When these ingredients are the same temperature, they blend smoothly into a stable emulsion during the creaming process.
If they are cold, the batter will curdle, resulting in tiny pockets of butter that can lead to a greasy or uneven texture in your finished individual cakes .
Do I Really Need a Specific Sized Tin for These Mini Cakes?
While the recipe is designed around a standard 12-cup muffin tin the most accessible form of mini cake pans —you absolutely can adapt. If you have smaller specialty mini cakes tins, you may get more than 12, and if you use larger Texas muffin tins, you’ll get fewer.
The key thing to remember is to only fill the cups about two-thirds full to allow for a beautiful, rounded dome upon baking.
The step-by-step Creation of Fluffy Mini Cakes
Crafting these delightful treats takes just under an hour from start to finish, making them an excellent choice for an impromptu bake. The process relies on methodical building of texture.
Prepping the Batter: Mixing Techniques for Tenderness
Begin by preheating your oven to 350° F ( 175° C) and lining your 12-cup tin with paper cases. In a medium bowl, swiftly whisk together the flour, baking powder, and salt and set this dry mixture aside. Now, turn your attention to the butter and sugar.
Using an electric mixer on medium speed, beat these together vigorously for a solid 3– 4 minutes until the mixture is visibly paler and wonderfully fluffy this aeration stage is non-negotiable for a light crumb.
Next, incorporate the two room temperature eggs one at a time, mixing well after each addition, followed by the vanilla extract.
Filling the Molds: Ensuring Uniformity Across All Portions
This is where the alternating addition comes into play, the critical technique for achieving that perfect texture. Add one-third of the dry ingredients to the butter mixture and gently fold until just combined. Then, gently fold in half of the milk. Repeat this process, ending with the final third of the dry mixture.
The instruction here is gently fold using a rubber spatula, just until the last white streak disappears. Overmixing at this stage develops tough gluten. Once mixed, divide the batter evenly among the 12 prepared liners, ensuring they are filled no more than two-thirds high to encourage a perfect rise.
The Oven Test: Knowing Exactly When They’re Done
Place your tins into the preheated oven and plan for 18 to 22 minutes of baking time. Because these are Mini Cakes , they cook significantly faster than a full cake.
The visual cues are important: the edges should look set, and the tops should spring back lightly when you touch them gently. The ultimate test for any single serve cake is inserting a skewer or toothpick into the centre; if it emerges clean, they are done.
Cooling Strategy: Preventing Sogginess Post Bake
Resist the urge to tip them out immediately! Allow the cakes to cool in the tin for about 5 minutes. This brief rest allows the delicate structure to firm up slightly. After those 5 minutes, carefully transfer the cakes, still in their liners, onto a wire rack.
Air circulation underneath is vital; placing them directly on a solid surface traps steam, which can cause the bottoms to become damp and slightly soggy ruining that lovely, moist crumb we worked so hard to achieve.
Elevating Your Mini Cakes: Decoration and Flair Ideas
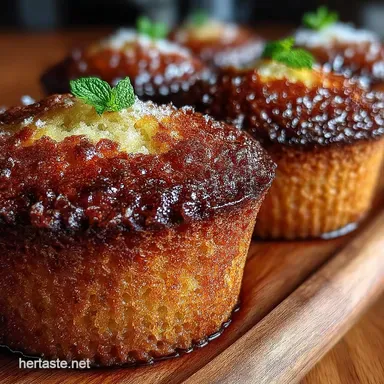
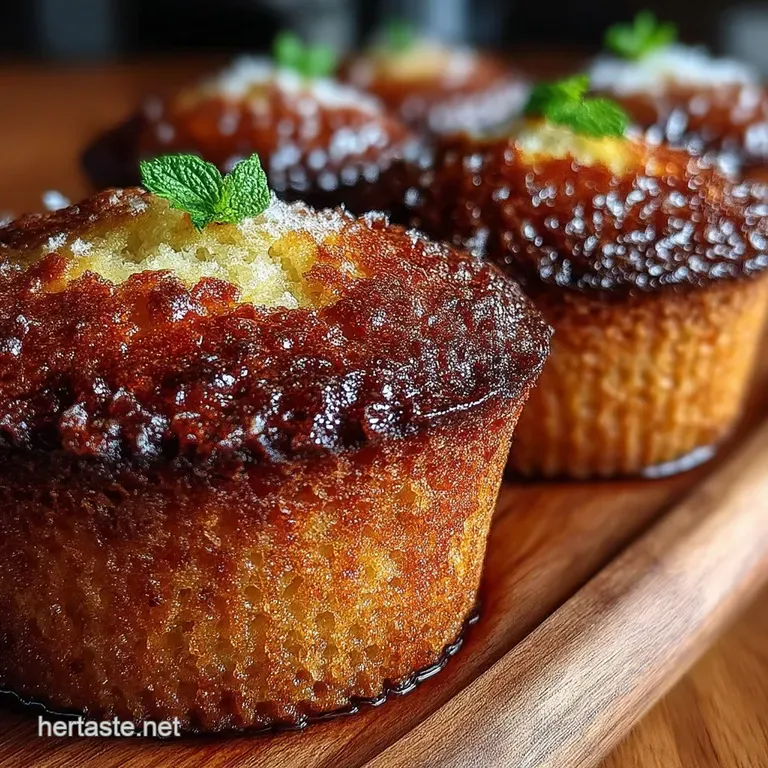
Once completely cooled, these little sponges are ready for dressing up. The simplest, most classic way to finish these Mini Cakes Ideas is a generous, light dusting of powdered sugar. It hints at the quality sponge beneath without obscuring its perfect dome.
Storage Secrets and Troubleshooting Common Baking Hiccups
Mastering small batch baking means knowing how to preserve your success. These cakes are best enjoyed within 24 hours, but smart storage extends their life.
Simple Glazes vs. Rich Buttercream Toppings
For a quick, shiny finish that locks in moisture, a simple lemon drizzle is fantastic. Mix powdered sugar with a splash of lemon juice until you achieve a slightly thick but pourable consistency, and drizzle over the cooled cakes.
For a richer experience, a small swirl of vanilla or cream cheese buttercream transforms them into luxurious treats ready for any celebration. If you wish to see tutorials on these finishing touches, searching for Mini Cakes YouTube channels can provide excellent visual guidance.
Flavor Twists: Introducing Zests, Spices, or Chocolate Swirls
To move beyond the basic vanilla, consider folding in 1/2 cup of mini chocolate chips during the final mixing stage. Alternatively, adding the zest of one lemon to the butter and sugar, and substituting two tablespoons of milk with fresh lemon juice, creates a bright, zesty profile.
For autumn baking, a teaspoon of cinnamon mixed in with your dry ingredients works wonders.
Shelf Life: How Long Do Homemade Mini Cakes Last?
Stored correctly in an airtight container at cool room temperature, these Mini Cakes will maintain excellent quality for two to three days. If you frosted them with a dairy based buttercream, refrigeration is recommended, though you should allow them to come to room temperature for 30 minutes before serving to regain optimal texture.
Troubleshooting: Why Are My Cakes Sticking to the Liners?
This is a common frustration when moving from larger cakes to individual cakes . If your cakes are sticking severely, it’s usually one of two reasons: either the paper liners weren't high quality, or you didn't allow them that crucial 5-minute rest period in the hot tin before transferring them to the cooling rack.
The residual heat helps release the cake slightly from the paper before the structure sets completely. Ensure you are using good quality, thicker paper cases for the best release.
Recipe FAQs
Why did my Mini Cakes sink in the middle after baking?
This is usually down to the oven door being opened too soon, which causes a sudden temperature drop and the structure to collapse. It can also mean the baking powder wasn't fresh, or you might have under creamed the butter and sugar initially, meaning there wasn't enough air locked in.
Give the creaming step a proper 3-4 minutes next time!
Can I make these Mini Cakes ahead of time, and how should I store them?
Absolutely, they keep rather well! Store them in an airtight container at room temperature for up to three days; they are actually often better the day after baking. If you plan to keep them longer than that, they freeze beautifully just wrap them tightly in cling film first, and defrost on the counter before serving.
What's the secret to getting these Mini Cakes really moist, like you mentioned?
The moisture comes down to two key things: ensuring all your cold ingredients (butter, eggs, milk) are at room temperature so they mix seamlessly, and crucially avoiding overmixing the final batter.
As soon as you add the flour, fold gently until just combined; overmixing develops tough gluten, which sucks the moisture right out.
I don't have a muffin tin; what are the best alternatives for baking these Mini Cakes?
If you lack a standard muffin tin, you could use a small loaf tin, though the baking time will increase significantly check at 30 minutes. Alternatively, you could use a silicone baking tray if you have one, or even bake them as a single, thicker cake in an 8 inch round pan and cut it into small squares once cooled.
Can I swap the vanilla for another flavour, perhaps lemon or almond, in these Mini Cakes?
Go right ahead; these vanilla bases are fantastic for customising! If you switch to almond extract, use it sparingly as it’s quite potent maybe 1/2 teaspoon instead of the vanilla.
For lemon, adding the zest of one lemon along with the juice of half the lemon instead of some of the milk makes a cracking substitution.
Moist Mini Cakes Recipe