Irresistible Butterfinger Balls Recipe
- Recipe Overview
- Key Benefits
- Essential Ingredients Guide: A Sweet Foundation for Homemade Candy
- Get Ready to Cook Like a Pro: The Professional Cooking Method
- Pro Tips & Secrets for Perfect Butterfinger Balls
- Perfect Presentation to Wow Your Guests
- Storage & Make-Ahead Magic
- Creative Variations That Delight
- Complete Nutrition Guide: What You Need to Know
- Expert FAQ Solutions
- 📝 Recipe Card
Have you ever had one of those days where all you want is a little comfort food? i remember one rainy afternoon, sitting on my couch with my favorite blanket draped over my legs, craving something sweet and satisfying.
That’s when i decided to whip up my butterfinger balls recipe . oh my gosh, you guys, it's like making your dreams come true in the form of a no-bake treat! if you’ve got a sweet tooth craving or if you just want a quick dessert idea to impress your friends these bite sized delights are the way to go.
These butterfinger dessert balls are nostalgic. they take me back to my childhood, munching on candy bars while watching saturday morning cartoons.
Honestly, who doesn't love that crunchy, sweet, and salty combo? plus, they’re just so easy to whip up. no complicated baking techniques required! pop them in the fridge for a quick chill while you kick back with your favorite show.
Recipe Overview
So, where did these delicious balls come from? the origin of these sweet treats is pretty straightforward. they’re inspired by the classic butterfinger candy bar that’s been a staple in american candy shops since the 1920s.
With their nostalgic roots and modern day appeal, it's no wonder they’ve become a hit at parties and gatherings!
When it comes to time, you'll need about 45 minutes total 15 minutes of prep time and 30 for chilling.
And folks, i promise it's worth it. this recipe falls on a scale of easy , making it perfect for cooks of all skill levels, even if you're still figuring out how to boil water without burning it!
Cost wise, you’re looking at a budget friendly option. most of the ingredients like peanut butter, graham cracker crumbs, and chocolate chips are staples found in many american kitchens.
You can easily make about 20 balls with this recipe, and trust me, they won’t last long!
Key Benefits
These butterfinger balls are not just cute and crunchy; they come with some solid perks too. first off, the health benefits are pretty nifty if you're careful with your portions! they provide a decent kick of protein from the peanut butter and have a nice balance of sweet and salty flavors to satisfy your cravings.
Plus, they’re loaded with flavor without being overly rich. perfect for a healthy snack idea , if you can just manage to eat one.
.. or two... or three!
These treats are also fantastic for special occasions . whether it’s a birthday party, holiday gathering, or potluck, they make for an impressive dessert that everyone will love.
They’re easily customizable and can be dressed up or down depending on the event. leave them simple for casual get-togethers or drizzle with some extra melted chocolate for gourmet flair.
Talk about delicious party food !
When comparing these to similar recipes, it’s clear they stand out. while there are plenty of peanut butter balls recipes floating around, few can match the nostalgic flavor bite for bite.
Plus, they come together super quickly, taking away the stress of elaborate baking for dessert.
So, are you ready to dive into creating your own batch of these scrumptious balls? you don’t need to be a pro in the kitchen just a little read through, and you’ll be rolling those bites soon.
Let's see what ingredients you'll need to make these heavenly treats!
Essential Ingredients Guide: A Sweet Foundation for Homemade Candy
Cooking is all about the good stuff you put in, right? when you're whipping up treats like butterfinger balls , having the right premium core components can make all the difference.
Whether it’s a festive party or just a cozy night in, you want your sweets to hit the mark every time.
So let's break it down!
Premium Core Components
Starting with the essentials, let's talk about measurements. for our butterfinger dessert , you’ll need 1 cup (250g) of creamy peanut butter , 1 cup (120g) of powdered sugar , and 1 cup (100g) of graham cracker crumbs .
If you’re a metric fan, don’t sweat it! just keep those numbers in mind.
Now, how do you know you’re getting the good stuff? for the peanut butter, look for a smooth consistency without any weird additives.
That means no “natural” stuff that separates in the jar. same goes for your chocolate chips; they should be silky and glossy .
Storage? Always pop those bad boys in an airtight container in the fridge. They can last for about 2-3 weeks , but let’s be real, they’re probably gonna be gone in a few days!
Signature Seasoning Blend
Let’s not forget about the seasonings. for this recipe, you don’t really need a spice rack browsing session. the beauty of the butterfinger balls is in their straightforwardness.
But hey, if you wanna fancy it up, consider adding some sea salt to enhance the sweet and salty flavor.
It’s simple, yet a game changer!
Smart Substitutions
Oh, but sometimes life doesn’t go as planned, does it? if you find yourself out of graham crackers, don’t panic! you can swap them for crushed shortbread cookies or even oat flour .
And for a vegan version? just get some plant based peanut butter, and you're golden!
For those moments when you just don’t have time or sugar, for that matter substitute agave syrup for powdered sugar. Voila! You’ve got a healthy snack idea ready to roll!
Kitchen Equipment Essentials
Moving on to equipment, it’s pretty basic for these no-bake treats . you’ll need a mixing bowl, parchment paper, and a cookie sheet.
Honestly, these are must haves for anyone who wants to dive into easy dessert recipes . a microwave safe bowl for melting chocolate is also key.
Pro tip: if you don’t have a double boiler, just pop it in the microwave for short 30-second bursts. give it a stir every time.
As for storage, keep your finished products in a cool, dry place if you’re not eating them right away. Trust me, they’ll be the star of any dessert table!
The Joy of Homemade
Getting into the kitchen and whipping up something delicious like truffle like snacks filled with peanut butter can be a total mood booster.
Just the act of measuring ingredients and mixing them together feels so grounding, doesn’t it? plus, who wouldn't love to impress friends with homemade candy recipes?
So there you have it! knowing what to grab from your pantry can save the day when you’re craving some indulgent snacks .
These butterfinger balls are not just treats; they are the ultimate comfort food desserts .
And if you think I’m hyping it too much, wait till you try them! Up next, we’re getting our hands dirty with the actual instructions! So, grab your aprons, and let’s make these chocolate coated snacks that will satisfy your sweet tooth like nothing else can!
Each bite packs a punch of flavor and nostalgia perfect for all kinds of gatherings!
Ready, set, let’s dive into how to make your very own Butterfinger balls!
Get Ready to Cook Like a Pro: The Professional Cooking Method
So, you want to elevate your cooking game? whether you’re prepping for a cozy dinner or whipping up cupcakes for a party, mastering the professional cooking method can be a total game changer.
I’ll break it down into bite sized pieces, just like those delicious butterfinger balls !
Essential Preparation Steps
First off, let’s talk about mise en place . sounds fancy, right? but it’s just a fancy way of saying “everything in its place.
” gather all your ingredients before you start cooking. this will save you from running around like a headless chicken when you’re halfway through the recipe! trust me, it's a lifesaver.
Now, onto time management . always have a plan. if you know you need 15 minutes to prep and 30 minutes to chill your butterfinger balls, write it down! also, try to multitask when possible.
While your chocolate chips are melting, why not roll those balls? it makes everything flow much smoother.
Speaking of flow, let’s chat about organization strategies . use bowls for different ingredients. keep your counters tidy. you'll be less stressed and can focus on making those sweet and salty snacks .
Don't forget about safety considerations ! when you’re melting chocolate, keep your temperature around 110° f too hot, and it’ll seize up! always use oven mitts when handling anything hot.
Safety first, folks!
Step-by-step Process
Alright, let’s move on to the fun part cooking! Here’s a simple, clear way to go about it.
- Prepare your workspace : Line a cookie sheet with parchment paper. Easy peasy.
- Make that filling : Combine 1 cup of peanut butter, 1 cup powdered sugar, and 1 cup graham cracker crumbs. Ensure it’s mixed well until you get that lovely dough consistency.
- Roll them up : Scoop out about 1 tablespoon of the mixture and roll them into balls. Aim for about an inch in diameter, and place them on your prepared sheet.
- Chill, baby, chill! : Let those balls chill for about 30 minutes . It’s crucial for them to firm up before the big dip!
- Melt chocolate : For the coating, melt 1.5 cups chocolate chips in a microwave safe bowl. Watch it closely about 30 seconds at a time, stirring in between until it’s nice and smooth.
- Dip those beauties : Time to coat! Use a fork to dip each ball in chocolate. Let the excess drip off before placing them back on the sheet.
- Set it and forget it : Chill again for about 15 minutes until the chocolate is set.
And boom! You’ve got sweet, truffle like delights that everyone will love.
Expert Techniques
Now, here’s where the pros come in. Always look for quality checkpoints . When you're rolling the peanut butter balls, make sure they’re consistent in size so they cook evenly.
If you find your chocolate is too thick to cover the balls, don’t panic! Just add a tablespoon of vegetable oil while it melts. This thinly coats and gives a lovely sheen.
Occasionally you might hit a snag. if your ball is falling apart? maybe your mixture was too dry. just add a drizzle of water or more peanut butter.
Seriously, don’t be afraid to troubleshoot!
Success Strategies
Avoid the common pitfalls. over melting your chocolate? yep, i’ve been there! always keep an eye on it. also, don’t skimp on the chilling time.
It’s essential for keeping your balls from going all ooey gooey during the dipping phase.
Want them to look just right? make sure to let the chocolate set completely. this ensures that your treats won’t be melty when served.
Keep them in a cool area to maintain that perfect texture.
And if you’re eyeing a group of hungry kids, these are great make-ahead options . They can even be frozen for those emergency kids' treats situations!
So, now you’re armed with the secrets of professional cooking and ready to tackle your next masterpiece be it a butterfinger dessert or your favorite no-bake confectionery .
But wait! if you're curious about more tasty adventures in the kitchen, just hang tight for some additional information coming right up!
Pro Tips & Secrets for Perfect Butterfinger Balls
Oh my gosh, you guys! if you’re as obsessed with butterfinger balls as i am, you know there are a few little tricks that can take these no-bake treats from good to downright legendary.
First up, let’s talk about timing . i can’t stress enough how important chilling is. don’t skip that 30-minute wait trust me, it helps the mixture firm up perfectly, making it way easier to roll into balls.
When it comes to flavor, mix it up ! add a sprinkle of sea salt to your peanut butter mix for that sweet and-salty kick.
This tiny twist seriously elevates the taste and keeps everyone coming back for more! and if you’re feeling adventurous, try adding a bit of vanilla extract to the filling.
It's like a flavor explosion in your mouth!
Perfect Presentation to Wow Your Guests
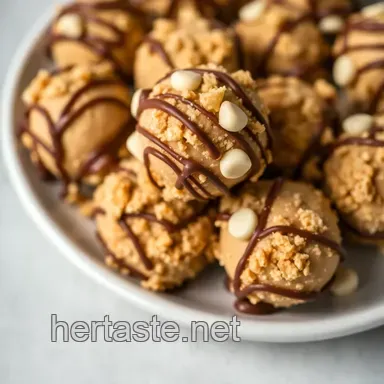
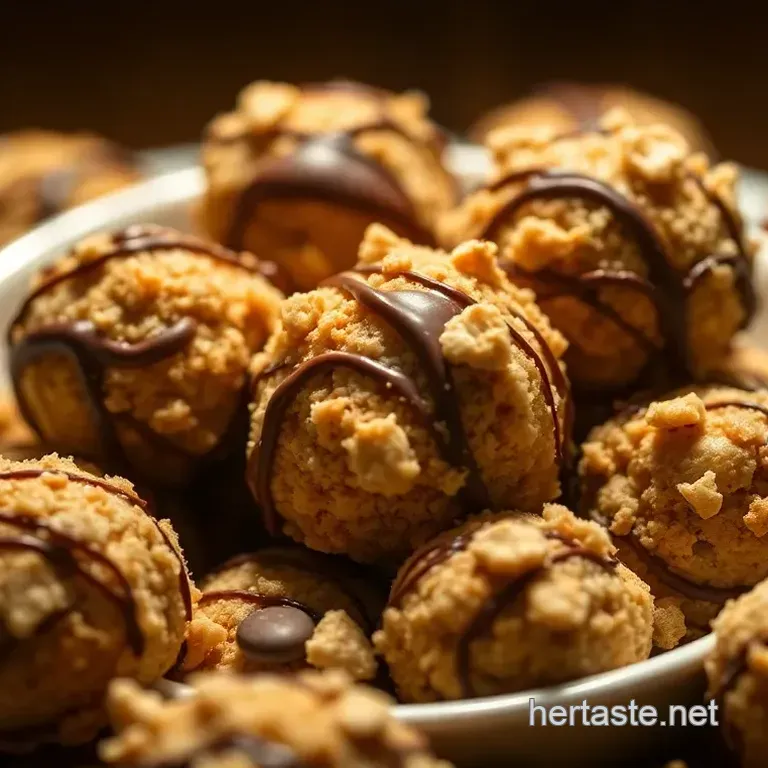
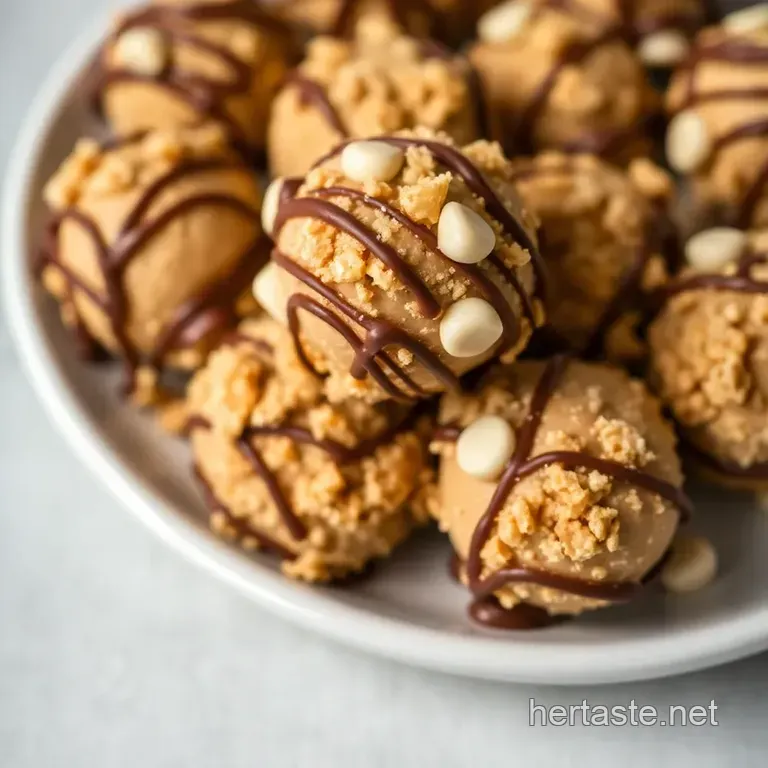
So, you’ve got your chocolate coated snacks ready to go, but how do we make those babies pop on the plate? presentation is key, my friends! for a fun look, arrange the butterfinger balls in a circular pattern on a colorful plate.
Drizzle some melted chocolate on top for that artistic vibe; just pretend like you know what you’re doing.
And don’t forget your garnish ! a sprinkle of crushed graham crackers or some chopped peanuts on top can add texture and visual appeal.
Noticed that big bowl of fresh fruit sitting next to the treats? just throw those in the shot too they make the dessert look even sweeter.
Storage & make-ahead Magic
Now, let’s be real life gets busy. so, can you make these butterfinger balls ahead of time? absolutely! just pop them in an airtight container and store ‘em in the fridge.
They’ll usually stay fresh for about a week.
If you really wanna get ahead of the game, you can prep the filling and freeze it. just remember to wrap it well nobody likes freezer burn ruining their homemade candy recipes! to reheat, simply thaw in the fridge.
And when you are ready to coat them in chocolate, just bring ‘em to room temperature first. that helps with a smooth coating!
Creative Variations That Delight
Honestly, what’s the fun in sticking to one recipe? mix things up with creative variations! for a fun twist, try making coconut butterfinger balls by incorporating coconut butter into your mix.
If you're into healthier snacks, switch out the graham cracker crumbs for almond flour. your waistline will thank you!
And hey, if you’re vegan, you can totally join in on the fun with plant based chocolate and nut butters. feeling seasonal? imagine a pumpkin spice version for fall just toss in pumpkin puree and a hint of cinnamon.
Wow, right?
Complete Nutrition Guide: What You Need to Know
Okay, here’s the lowdown on the nutritional info for each delicious bite sized treat. the butterfinger balls recipe yields around 20 pieces, with each ball containing roughly 120 calories.
Some protein and healthy fats from that peanut butter give you a bit of energy perfect for a quick snack break! but let's be honest, moderation is key.
They’re definitely on the indulgent side, so balance them out with some fresh fruits or veggies!
Expert FAQ Solutions
Here are a few common questions that pop up when making these treats.
Q: What if my mixture is too sticky? A: No worries! Just add a little more graham cracker crumbs until you can roll it into balls easily.
Q: Can I use natural peanut butter? A: You can, but it might change the texture a bit. Regular creamy peanut butter works best for that classic, smooth taste.
Q: How do I keep my chocolate coating from cracking? A: Make sure your balls are cold before dipping them. A solid chill makes it way easier!
Encouraging Conclusion
So there you have it! look into into making these irresistible butterfinger balls and let your creativity run wild. whether you’re whipping them up for a party snack or just indulging your sweet tooth on a cozy night, these treats are sure to impress and satisfy.
Remember, cooking should be fun, so don’t stress! enjoy the process, and who knows, you might just come up with your own twist that becomes a family favorite.
Happy snacking, friends!
Irresistible Butterfinger Balls Recipe