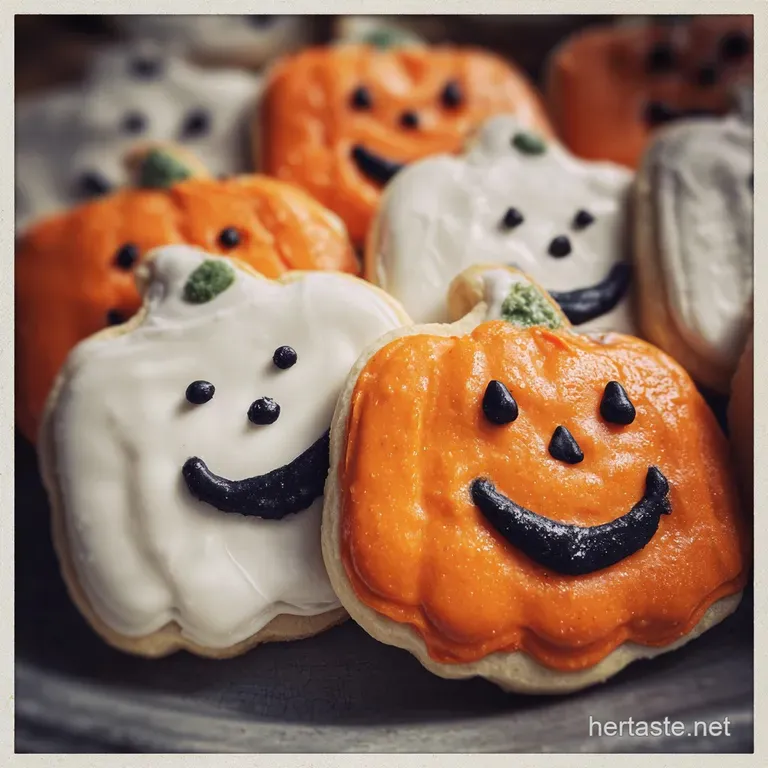
Trunk or Treat Idea with Halloween Sugar Cookies
- Time: Active 20 minutes, Passive 10 minutes, Total 30 minutes
- Flavor/Texture Hook: Buttery rich with a velvety crumb and shatter crisp glaze
- Perfect for: Outdoor community events, school parties, or festive gifting
- Why This Tangy Yogurt Dough Maintains its Shape
- Component Analysis of the Perfect Halloween Batch
- Gathering Your Elements for a Whimsical Halloween Spread
- Essential Tools for a Professional Decorating Finish
- Step-by-Step Guide to Mastering Your Festive Treats
- Solving Common Dough and Decorating Mishaps Fast
- Customizing Your Cookies for the Ultimate Halloween Display
- Crucial Benchmarks for the Perfect Spooky Cookie Batch
- Preserving That Fresh Snap and Preventing Stale Edges
- Creating the Ultimate Coordinated Halloween Beverage Station
- Debunking Common Cookie Myths
- Recipe FAQs
- 📝 Recipe Card
Why This Tangy Yogurt Dough Maintains its Shape
The secret to a cookie that doesn't spread into a blob lies in the chemistry of your fats and acids. By swapping some butter for Greek yogurt, we introduce a protein rich binder that helps the flour maintain its structure in the heat of the oven. This is why these cookies keep their spooky shapes so much better than a Basic Sugar Cookies Recipe that relies solely on creamed butter.
- Gluten Control: The acidity in the Greek yogurt gently tenderizes the flour proteins, ensuring the cookie is soft rather than "bread like" without needing extra leavening.
- Moisture Retention: Yogurt contains water trapped in a protein matrix, which slowly releases during baking to keep the center moist while the edges get a nice snap.
- Inversion Stability: Adding corn syrup to the glaze prevents sugar crystals from reforming, which is what gives the icing that professional, glass like sheen.
- Fat Balance: Using 2% fat yogurt provides enough richness to satisfy the palate while keeping the dough easy to handle and less prone to "greasy spread."
| Servings | Ingredient Adjustments | Pan Size | Cook Time |
|---|---|---|---|
| 12 Cookies | Halve all quantities; use 1 egg yolk | 1 half sheet pan | 9 minutes |
| 24 Cookies | Use exact Schema quantities | 2 half sheet pans | 10 minutes |
| 48 Cookies | Double all quantities; use 2 large eggs | 4 half sheet pans | 12 minutes (rotate) |
Adjusting your batch size is vital for a big event like a Trunk or Treat. If you are feeding a whole neighborhood, doubling the recipe is straightforward, but remember that the sheer volume of dough will require a longer chilling time to ensure the butter stays cold before it hits the oven.
Component Analysis of the Perfect Halloween Batch
Every ingredient in this recipe serves a structural or sensory purpose beyond just tasting good. I've spent years tweaking these ratios to find the "Goldilocks" zone of sugar cookies not too hard, not too soft.
| Ingredient | Science Role | Pro Secret |
|---|---|---|
| All purpose flour | Provides the structural framework | Spoon and level the flour; packing it makes cookies dry and tough. |
| Plain Greek yogurt | Acts as a tenderizer and binder | Use 2% fat for the best balance of moisture and structural support. |
| Vanilla bean paste | Provides concentrated flavor and visual "specks" | The tiny seeds make the cookies look like "fossils" under the glaze. |
| Light corn syrup | Prevents sugar crystallization in glaze | This is the key to a glaze that shatters like thin ice when bitten. |
Gathering Your Elements for a Whimsical Halloween Spread
To make these cookies truly stand out, quality matters. I always reach for vanilla bean paste instead of extract because those little black specks add a "gourmet" feel that people notice immediately.
- 3 cups All purpose flour: The backbone of our shape. Why this? Provides the ideal protein content for a sturdy yet tender cut out. (Substitute: 1:1 gluten-free baking flour)
- 0.5 cup Unsalted butter: Softened to room temperature. Why this? Allows for better aeration when creaming with sugar. (Substitute: Salted butter, but omit the extra sea salt)
- 0.5 cup Plain Greek yogurt (2% fat): Our "secret" moisture weapon. Why this? Adds tang and prevents the cookie from becoming overly sweet. (Substitute: Full fat sour cream)
- 0.75 cup Granulated sugar: For sweetness and edge crisping. Why this? Creates those classic sandy edges we love. (Substitute: Caster sugar for a finer crumb)
- 1 Large egg: The primary emulsifier. Why this? Holds the fat and water components together. (Substitute: 1/4 cup unsweetened applesauce)
- 1.5 tsp Vanilla bean paste: For deep flavor. Why this? Offers a more intense aroma than standard liquid extract. (Substitute: 2 tsp Vanilla extract)
- 0.5 tsp Fine sea salt: To balance the sugar. Why this? Sharpens the other flavors on the tongue. (Substitute: Table salt, but use slightly less)
- 2 cups Powdered sugar: The base of our glossy glaze. Why this? Dissolves instantly for a smooth finish. (Substitute: Xylitol powdered sugar for low carb options)
- 2 tbsp Skim milk: For glaze consistency. Why this? Keeps the glaze light and translucent. (Substitute: Oat milk or heavy cream for a richer white)
- 1 tbsp Light corn syrup: For that signature shine. Why this? It's the only way to get a hard drying, glossy finish. (Substitute: Agave nectar, though it won't dry quite as hard)
| Feature | Fresh Homemade Dough | store-bought Shortcut |
|---|---|---|
| Texture | Complex, buttery, and soft centered | Often overly crunchy or chemically soft |
| Edge Retention | Sharp, distinct shapes | Tends to puff and round out during baking |
| Flavor | Bright vanilla and tangy yogurt | Flat, artificial vanilla notes |
Essential Tools for a Professional Decorating Finish
You don't need a pantry full of gadgets, but a few specific items make the difference between a "home baked" look and something that looks like it came from a boutique bakery. I finally invested in a set of heavy duty baking sheets, and it changed my life no more warped pans or burnt bottoms.
- Stand mixer (like a KitchenAid): This is vital for properly creaming the butter and sugar. You want to see the mixture turn pale and fluffy.
- A fine mesh sieve: Always sift your powdered sugar. Even the smallest lump can ruin a perfectly smooth glaze application.
- Rolling pin with thickness rings: If you want your cookies to bake evenly, they must all be the exact same thickness. I recommend 1/4 inch.
- Piping bags or squeeze bottles: For the glaze, I actually prefer small squeeze bottles. They give you way more control for "flooding" the cookies than a spoon does.
step-by-step Guide to Mastering Your Festive Treats
- Cream the butter and sugar. Beat the 0.5 cup butter and 0.75 cup sugar until the mixture is pale and light. Note: This incorporates air for a better texture.
- Incorporate the wet elements. Add the 1 large egg, 0.5 cup Greek yogurt, and 1.5 tsp vanilla bean paste. Mix until completely smooth and velvety.
- Whisk the dry ingredients. In a separate bowl, combine 3 cups flour and 0.5 tsp salt.
- Combine the mixtures. Gradually add the flour to the wet ingredients. Mix only until no white streaks remain. Note: Overmixing creates tough, rubbery cookies.
- Chill the dough. Wrap the dough and refrigerate for 30 minutes. Wait until the dough feels firm to the touch.
- Roll and cut. Roll the dough to 1/4 inch thickness on a floured surface. Cut into spooky shapes like ghosts or bats.
- Flash freeze. Place cut shapes in the freezer for 5 minutes before baking. Note: This is the ultimate trick for sharp edges.
- Bake the cookies. Bake at 350°F for 10 minutes until the edges are just barely golden.
- Prepare the glaze. Whisk 2 cups powdered sugar, 2 tbsp milk, and 1 tbsp corn syrup until it flows like thick honey.
- Decorate and set. Dip the cooled cookies into the glaze or use a squeeze bottle. Let them sit for 2 hours until the surface is hard.
Chef's Tip: To get a "fossilized" look, don't over sift your vanilla bean paste. The little seeds look amazing against a white glaze, almost like ancient specks of dust or "ghost debris."
Solving Common Dough and Decorating Mishaps Fast
Even the most seasoned bakers run into trouble. One year, my dough was so sticky I thought I'd have to scrap the whole batch. It turns out, I just hadn't let the yogurt come to the right temperature before mixing.
Why Your Dough Is Tearing
If the dough is falling apart as you roll it, it is likely too cold or has too much flour. When dough gets too cold, the butter hardens into brittle chunks rather than a cohesive film. Let it sit at room temperature for 5 minutes, then try again.
If it still tears, you might have over floured your surface; try rolling between two sheets of parchment paper instead.
If the Cookies Are Too Hard
Overbaking is the main culprit here. Sugar cookies continue to firm up as they cool on the baking sheet. You should pull them out when the centers still look slightly "underdone" and matte. If they are already golden brown in the oven, they will be crunchy rather than soft.
| Problem | Root Cause | Solution |
|---|---|---|
| Glaze is too runny | Excess milk added | Add powdered sugar 1 tablespoon at a time. |
| Shapes are distorted | Dough was too warm | Freeze cut outs for 5-10 minutes before baking. |
| Surface is grainy | Sugar didn't dissolve | Whisk the glaze more vigorously or use a whisk attachment. |
Common Mistakes Checklist
- ✓ Soften butter to "pliable" but not "melted" (melting ruins the air pockets).
- ✓ Use room temperature eggs to prevent the butter from curdling.
- ✓ Don't skip the corn syrup if you want that glossy "professional" shine.
- ✓ Ensure cookies are stone cold before glazing, or the icing will melt off.
- ✓ Store in a single layer until the glaze is completely "shatter proof."
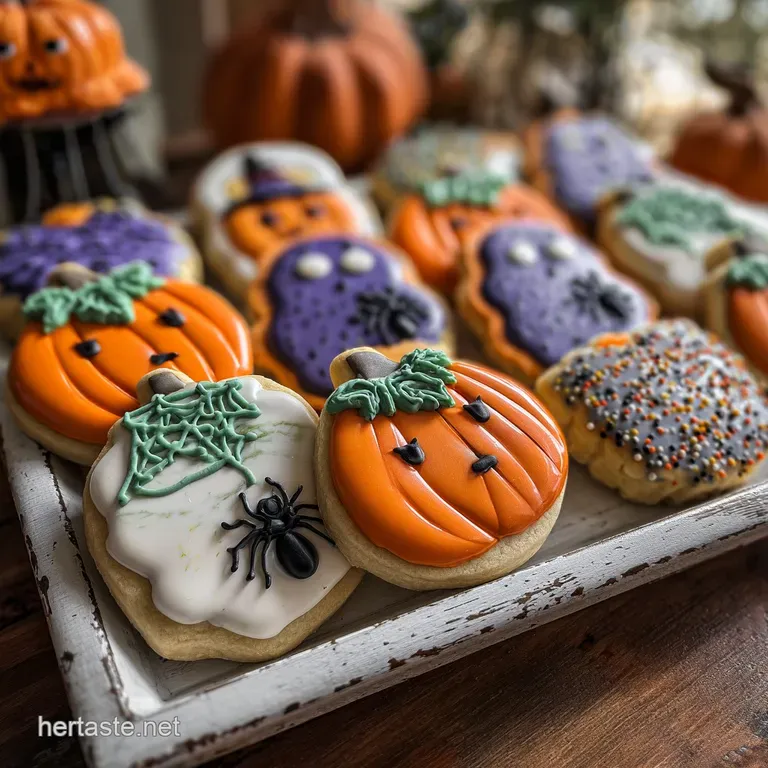
Customizing Your Cookies for the Ultimate Halloween Display
Scaling this recipe for a massive Trunk or Treat event is easier than you think. If you need to make 100 cookies, don't just quadruple the recipe in one bowl your mixer won't be able to aerate the butter properly. Work in two double batches for the best results.
For a gluten-free Boneyard
You can easily swap the all purpose flour for a high-quality 1:1 gluten-free blend. Because gluten-free flour absorbs moisture differently, I recommend letting the dough rest in the fridge for an hour instead of 30 minutes. This allows the starches to fully hydrate, preventing a gritty texture.
For a Dark Chocolate Earth Base
If you want a "dirt" or "graveyard" look, replace 1/2 cup of the flour with dark cocoa powder. This creates a deep black cookie that looks incredible with white bone shaped icing. For more inspiration on shaped treats, check out this Tombstone Cookies recipe which uses a similar theme.
| Method | Time | Texture | Best For |
|---|---|---|---|
| Standard Oven | 10 minutes | Even bake, soft center | Large batches/Parties |
| Toaster Oven | 8 minutes | Crispier bottoms | Small "test" batches |
| Air Fryer | 6 minutes | Very crunchy edges | Quick cravings |
Crucial Benchmarks for the Perfect Spooky Cookie Batch
- 1. Thickness
- Exactly 1/4 inch. Any thinner and they burn; any thicker and they won't dry out enough to hold the glaze.
- 2. Temperature
- Pull them when the internal temperature hits about 175°F if you have a probe, or visually when the "shine" disappears from the dough surface.
- 3. Glaze Consistency
- The "10 second rule." When you drizzle glaze back into the bowl, it should take exactly 10 seconds to disappear into the surface.
Preserving That Fresh Snap and Preventing Stale Edges
Storage: These cookies stay fresh in an airtight container for up to 5 days at room temperature. The glaze actually acts as a seal, keeping the moisture inside the cookie.
If you live in a humid climate, add a piece of white bread to the container it will absorb the moisture so your cookies don't get soft.
Freezing: You can freeze the baked, unglazed cookies for up to 3 months. Wrap them in plastic wrap and then foil. When you're ready for your event, thaw them at room temperature and apply the fresh glaze.
I don't recommend freezing glazed cookies, as the icing can "sweat" and become sticky during the thaw.
Zero Waste: If you have broken cookies (it happens!), crush them up and use them as a "dirt" topping for chocolate pudding or fold them into vanilla ice cream. Never throw away a butter cookie!
Creating the Ultimate Coordinated Halloween Beverage Station
When setting up your car for a Trunk or Treat, presentation is everything. I like to plate these cookies on a bed of "edible moss" made from green tinted coconut or crushed chocolate sandwich cookies. It creates a scene rather than just a snack.
Pairing these treats with the right drink can make your car the star of the lot. A warm apple cider is the classic choice, but if you want something more unique, try a "poisoned" purple grape punch with dry ice for a smoky effect. The acidity of a cold fruit punch cuts through the buttery richness of the sugar cookie beautifully. For a different texture profile, you might also enjoy serving these alongside an Edible Chocolate Chip recipe shaped like tiny pumpkins!
Debunking Common Cookie Myths
Chilling the dough is optional. Actually, chilling is mandatory for this specific recipe. Because we use Greek yogurt, the dough is slightly more hydrated than a standard butter cookie. If you don't chill it, the fat will melt faster than the structure can set, leading to "puddle" cookies.
30 minutes is the minimum; overnight is even better.
All sugars are created equal. Using powdered sugar in the dough instead of granulated sugar would result in a "melt in-your mouth" texture, but the cookies would be too fragile for a Trunk or Treat.
Granulated sugar provides the necessary "snap" and structural support to withstand being handled by excited trick or-treaters.
You must use high fat milk for glaze. Actually, skim milk works better for this specific high gloss glaze. The lower fat content allows the sugar to dry harder and faster.
If you use heavy cream, the glaze stays slightly soft, which makes stacking the cookies for transport nearly impossible without ruining the design.

Recipe FAQs
Is using Greek yogurt necessary for these sturdy Halloween cookies?
Yes, it is essential for structure. The acidity in the Greek yogurt gently tenderizes the flour while providing a protein rich binder that prevents the cookies from spreading in the heat.
How long must the dough be chilled before rolling out for best edge retention?
Chill the dough for a minimum of 30 minutes. Chilling ensures the fat re-solidifies, which is crucial for maintaining sharp cut-out shapes when the cookies hit the hot baking sheet.
How do I achieve that high shine, hard setting finish on the icing?
Add one tablespoon of light corn syrup to your glaze base. This ingredient is the key to preventing sugar crystallization, ensuring the surface dries to a professional, glass like sheen.
Can I substitute granulated sugar for powdered sugar in the dough?
No, do not substitute the dough sugars. Granulated sugar provides the necessary "snap" and structure; using powdered sugar in the dough would result in cookies that are too fragile for transport and handling.
What is the best way to freeze these decorated cookies for later use?
Freeze only the baked, unglazed cookies. Wrap them tightly in plastic wrap, then foil, and store them for up to three months; applying glaze after thawing ensures the icing doesn't sweat or become sticky.
How do I prevent the cookies from puffing up and losing their sharp Halloween shapes during baking?
Flash freeze the cut-out shapes for 5 to 10 minutes before baking. This rapid cooling of the exterior structure locks the shape in place, similar to how we control spread when making thin pastry doughs, like in our Dreamy Caramel Cake recipe.
Roll the dough to what specific thickness to ensure even baking?
Roll the dough consistently to 1/4 inch thickness. Using rolling pin rings helps achieve this uniformity; cookies baked at different thicknesses will result in uneven doneness and potential burning for the thinner pieces.
Halloween Sugar Cookies For Trunk
Ingredients:
Instructions:
Nutrition Facts:
| Calories | 164 kcal |
|---|---|
| Protein | 2.4 g |
| Fat | 4.3 g |
| Carbs | 29.1 g |
| Fiber | 0.4 g |
| Sugar | 17.2 g |
| Sodium | 52 mg |
