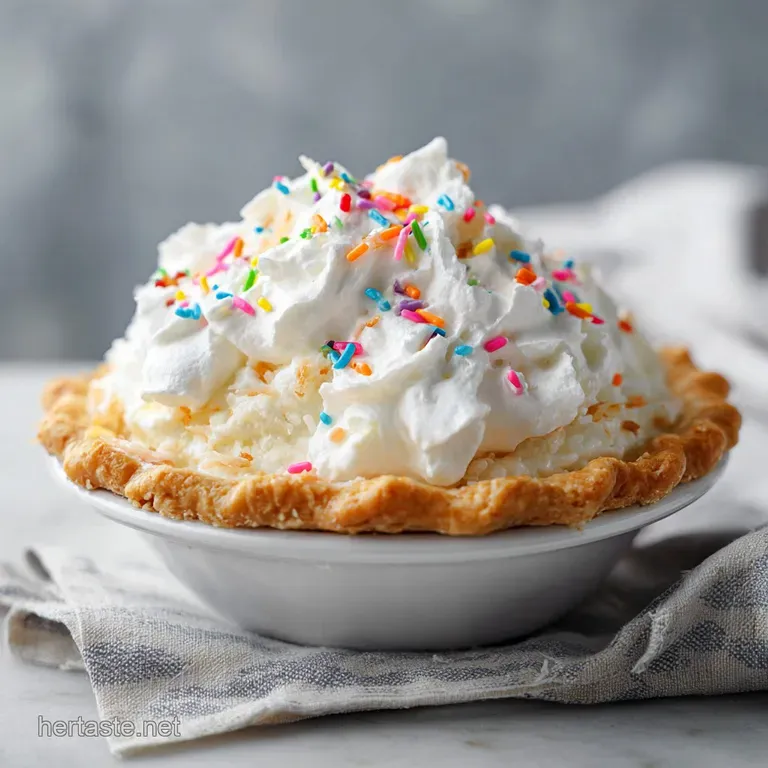
Grandmas Coconut Cream Pie: Silky and Classic
- Time: Active 25 minutes, Passive 20 minutes, Total 45 minutes
- Flavor/Texture Hook: Flaky, buttery crust paired with a silky, coconut infused custard and toasted topping
- Perfect for: Family gatherings, Sunday dinner, or a rustic seasonal celebration
- Why This Custard Setting Method Works
- Selecting the Right Custard Consistency
- Breaking Down the Component Analysis
- Detailed Shopping List for Success
- Tools of the Trade
- Mastering the Pie Making Process
- Fixing Common Pie Problems
- Adjusting the Recipe Size
- Debunking Common Baking Myths
- Storage Guidelines and Zero Waste Tips
- Creative Serving Ideas
- Recipe FAQs
- 📝 Recipe Card
The house always smelled different on Sundays when the oven was working overtime. There was this specific, heady scent of toasted coconut that would drift from the kitchen, signaling that the most prized dessert in our family history was finally coming together.
I remember watching those tiny white flakes turn a rustic golden brown under the broiler, a sight that still brings me so much joy. This isn't just a dessert; it’s a piece of my childhood served on a chilled plate, representing the kind of comfort that only a recipe passed down through generations can provide.
We often talk about food as fuel, but this pie is pure emotion. The first time I tried to make it on my own, I rushed the custard and ended up with something more like a soup than a sliceable treat.
It was a messy, runny disaster, but it taught me the most valuable lesson in baking: patience is an ingredient just like flour or sugar. You can't force a custard to thicken before it's ready, and you certainly can't rush the cooling process if you want that clean, beautiful edge on your slice.
This version of grandmas coconut cream pie focuses on that incredible contrast between the crisp, salty crust and the rich, sweet filling. We’re using whole milk and heavy cream for a mouthfeel that’s incredibly velvety, and we aren't skimping on the extracts.
If you’ve ever felt like homemade pies were too much work, let this be the one that changes your mind. It’s rustic, it’s seasonal, and it’s designed to be shared with people you love.
Why This Custard Setting Method Works
The success of this recipe lies in how we handle the starches and the proteins. Most people fail because they stop cooking the custard as soon as it looks thick, but there is a specific temperature where the magic happens.
- Starch Gelatinization: The cornstarch needs to reach a specific heat to fully hydrate and create a stable structure that won't weep later.
- Protein Tempering: Gradually adding hot liquid to the egg yolks prevents them from scrambling, ensuring a silky texture rather than a lumpy one.
- Enzyme Deactivation: Cooking the mixture to exactly 203°F (95°C) neutralizes amylase in the yolks, which would otherwise break down the starch and turn your pie into liquid overnight.
| Feature | Fresh Custard | Shortcut Pudding | The Impact |
|---|---|---|---|
| Texture | Silky and dense | Light and airy | Fresh custard feels more luxurious and holds up better when sliced. |
| Flavor | Deep toasted coconut | Artificial vanilla | Real yolks and cream provide a richer, more authentic profile. |
| Stability | Stays firm for days | Becomes watery | Hand cooked starch creates a permanent bond that resists "weeping." |
If you find yourself craving another classic after mastering this, you might enjoy the texture of Grandmas Rice Pudding which uses a similar stovetop thickening technique.
Selecting the Right Custard Consistency
Before you even pull your saucepan out of the cupboard, you need to know what you are aiming for. The thickness of your custard and how you treat the meringue determines whether you have a masterpiece or a puddle.
| Pie Component | Visual Cue | Internal Temp | Action Required |
|---|---|---|---|
| Pie Crust | Golden brown and dry | 400°F (204°C) | Cool completely before filling to keep it crisp. |
| Coconut Custard | Heavy ribbons from whisk | 203°F (95°C) | Add butter and extracts immediately after removing from heat. |
| Meringue Top | Stiff, glossy peaks | Room Temp | Spread over hot custard to "anchor" the layers together. |
When the custard hits that 203°F mark, it’s not just thick it’s transformed. You’ll see the bubbles slow down and the whisk will leave tracks in the pan that don't disappear instantly. This is the moment you know your pie will be stable.
Breaking Down the Component Analysis
Every single item in this list has a job to do. We aren't just throwing things in a bowl; we are building a structure that has to support its own weight while remaining tender.
| Ingredient | Science Role | Pro Secret |
|---|---|---|
| Cornstarch | Primary thickener | Whisk it into the sugar first to prevent any dry clumps from forming. |
| Egg Yolks | Emulsifier and fat source | Use large, room temperature yolks for the smoothest integration into the hot milk. |
| Heavy Cream | Fat content for mouthfeel | The extra fat in the cream prevents the custard from feeling "rubbery" once chilled. |
| Cream of Tartar | Protein stabilizer | This acid helps the egg whites hold air, preventing the meringue from collapsing. |
The way these ingredients interact is what makes the grandmas coconut cream pie recipe so reliable. The cornstarch provides the "bones," while the egg yolks and heavy cream provide the "soul."
Detailed Shopping List for Success
To get that rustic, homemade feel, you need high-quality basics. Don't reach for the low-fat options here; we want the full fat experience for the best results.
- 1.5 cups all purpose flour (190g): Why this? Provides the perfect gluten structure for a flaky, sturdy pie crust.
- 0.5 cup cold unsalted butter, cubed (113g): Why this? Cold butter creates steam pockets for a shattering texture.
- 0.25 tsp salt: Enhances the sweetness of the coconut.
- 4 tbsp ice water: Just enough to bind the dough without overworking it.
- 0.75 cup granulated sugar (150g): Sweetens the filling and helps with the thickening process.
- 0.33 cup cornstarch (40g): The essential stabilizer for a sliceable pie.
- 2 cups whole milk (475ml): Provides the liquid base for our rich custard.
- 0.5 cup heavy cream (120ml): Adds a luxurious, velvety finish.
- 4 large egg yolks: Gives the filling its classic golden hue and richness.
- 1 cup sweetened shredded coconut (95g): The star of the show for flavor and texture.
- 1 tbsp unsalted butter (14g): Stirred in at the end for extra shine.
- 1 tsp pure vanilla extract: Rounds out the tropical notes.
- 0.5 tsp coconut extract: Boosts the coconut profile without being overwhelming.
- 4 large egg whites: The foundation for our towering meringue.
- 0.5 tsp cream of tartar: Keeps the egg whites stable and bright.
- 0.5 cup granulated sugar (100g): For the meringue's sweetness and structure.
- 0.5 cup toasted shredded coconut (45g): The final, rustic garnish.
Tools of the Trade
You don't need a professional kitchen, but having the right tools makes the process much more joyous. A heavy bottomed saucepan is your best friend here because it distributes heat evenly, preventing the milk from scorching on the bottom of the pan.
- 9 inch pie plate: Glass or ceramic works best for even browning.
- Whisk: A sturdy balloon whisk is essential for the custard and tempering.
- Pastry cutter or fork: To work that cold butter into the flour.
- Pie weights: You can use dried beans or ceramic weights to prevent the crust from bubbling up.
- KitchenAid stand mixer: This makes whipping the egg whites into stiff peaks so much easier.
- Digital thermometer: To hit that critical 203°F (95°C) mark.
Chef's Tip: If you don't have pie weights, use a bag of dried chickpeas. They can be reused for years specifically for blind baking!
Mastering the Pie Making Process
This is where the magic happens. Take your time with these steps, especially the custard. If you feel like it's getting too hot too fast, just lift the pan off the heat for a few seconds while you keep whisking.
- Prepare the crust: Mix the 190g flour and 0.25 tsp salt in a bowl. Work in the 113g of cubed cold butter until the mixture looks like coarse crumbs. Add the 4 tbsp ice water one spoonful at a time until the dough just holds together. Roll it out on a floured surface and fit it into your 9 inch pie plate.
- Blind bake the base: Preheat your oven to 400°F (204°C). Line the crust with parchment and fill with weights. Bake for 15 minutes, then remove the weights and bake for 5 more minutes until the edges are golden and the bottom looks dry. Let it cool completely on a wire rack.
- Start the custard: In a heavy saucepan, whisk together the 150g sugar and 40g cornstarch. This prevents clumps later. Gradually pour in the 475ml whole milk and 120ml heavy cream, whisking until the mixture is perfectly smooth.
- Thicken the mixture: Cook over medium heat. You must whisk constantly. Continue until the mixture thickens significantly and bubbles begin to pop slowly like lava. Use your thermometer to ensure it hits 203°F (95°C).
- Temper the yolks: Place your 4 egg yolks in a medium bowl. Slowly drizzle about one cup of the hot milk mixture into the yolks while whisking vigorously. This warms the eggs without cooking them into solid bits.
- Combine and finish: Pour the egg mixture back into the saucepan. Cook for another 1-2 minutes while whisking. Remove from the heat and stir in the 14g butter, vanilla, coconut extract, and 1 cup of shredded coconut until the butter is melted and glossy.
- Fill the shell: Pour that hot, steaming custard into your pre baked and cooled pie crust. Smooth the top with a spatula.
- Whip the meringue: In a clean bowl, beat the 4 egg whites with 0.5 tsp cream of tartar. Once they are frothy, slowly add the 100g of sugar. Continue beating until the peaks stand straight up when you lift the whisk.
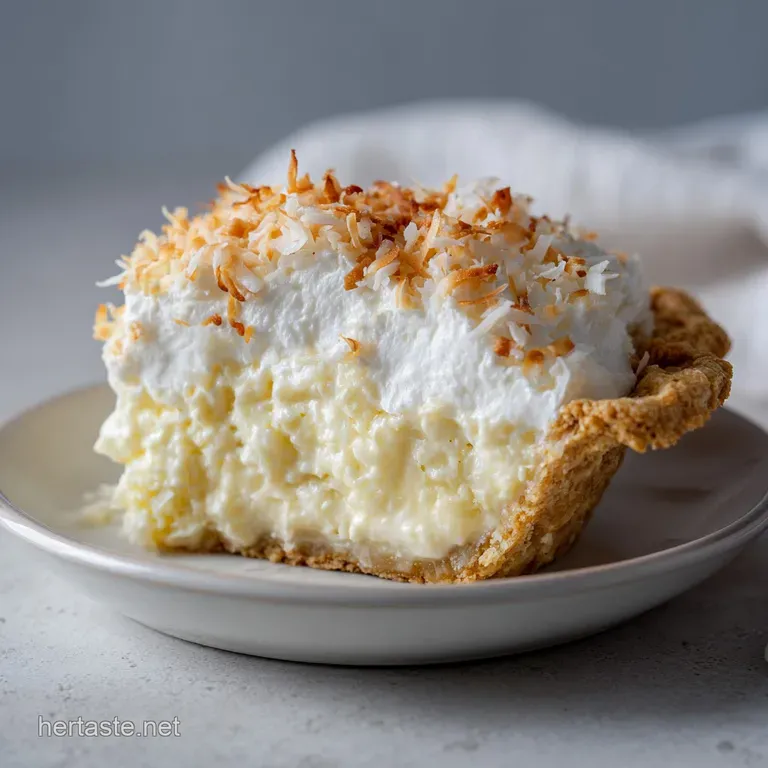
- Seal and brown: Spread the meringue over the hot custard, making sure to push it all the way to the edges of the crust to "seal" it. Use a kitchen torch or the oven broiler for about 1-2 minutes until the peaks turn a deep, toasted amber.
- Chill and garnish: Sprinkle with the 45g of toasted coconut. Let the pie sit on the counter for 30 minutes, then move it to the fridge for at least 4 hours. This step is mandatory for a clean slice!
Fixing Common Pie Problems
Even the best bakers run into trouble sometimes. The most common issue with a coconut cream pie is the texture of the filling or the behavior of the meringue.
Fixing a Runny Filling
If you cut into your pie and it spreads across the plate, the cornstarch didn't reach a high enough temperature. The starch molecules must "burst" to create a mesh that holds the liquid.
If this happens, you can't really fix it once it's cold, but you can serve it in bowls as a "deconstructed" pie it will still taste amazing!
Preventing a Soggy Crust
The "soggy bottom" is every baker's nightmare. This usually happens if the crust isn't baked long enough during the blind bake phase or if the custard is too watery. Always make sure the crust looks matte and dry before you add the filling.
Stopping the Meringue from Weeping
Weeping is that little layer of sugar water that forms between the custard and the meringue. To prevent this, always spread your meringue onto the custard while the custard is still piping hot. This essentially "cooks" the bottom of the meringue, creating a bond that holds tight.
| Problem | Root Cause | Solution |
|---|---|---|
| Shrinking Crust | Dough was stretched too thin | Let the dough rest in the fridge for 30 mins before baking. |
| Lumpy Custard | Whisking wasn't constant | Strain the warm custard through a fine mesh sieve before adding coconut. |
| Beaded Meringue | Sugar didn't dissolve | Add sugar one tablespoon at a time while whipping the whites. |
Common Mistakes Checklist
- ✓ Never use room temperature butter for the crust; it must be ice cold to create those flaky layers.
- ✓ Don't skip the tempering step, or you'll end up with scrambled eggs in your coconut milk.
- ✓ Make sure your whisk hits the "corners" of the saucepan to prevent the milk from burning.
- ✓ Avoid whipping the egg whites in a plastic bowl, as any residual fat will prevent them from rising.
- ✓ Let the pie chill for the full 4 hours trying to cut it early is a recipe for a mess.
Adjusting the Recipe Size
Whether you are baking for a crowd or just for two, you can easily scale this recipe. However, keep in mind that custard can be finicky when you change the volume.
- To make a half pie: Use a smaller 6 inch dish. Use 2 yolks and 2 whites. Reduce the stovetop cooking time by about 5 minutes, as a smaller volume heats up much faster.
- To double the recipe: Make two separate pies rather than one giant one. Doubling the custard in one pan often leads to uneven cooking or scorching on the bottom.
- Baking adjustments: If you are making mini tarts, reduce the blind bake time to 10 minutes total, as the smaller crusts will brown much quicker.
For those who want a similar flavor profile but in a more "scoopable" format, my No Churn Mango Ice Cream offers that same tropical sweetness without the need for a crust.
Debunking Common Baking Myths
There are so many "old wives' tales" about pie making that just aren't true. Let's clear up a few so you can bake with confidence.
Myth: You must use coconut milk for the best flavor. Actually, using whole milk and heavy cream with coconut extract and shredded coconut provides a much more stable and creamy structure. Coconut milk can sometimes be too oily, which interferes with the cornstarch's ability to set firmly.
Myth: Adding more cornstarch makes a "better" pie. Too much cornstarch will give your pie a "rubbery" or "gelatinous" texture that feels artificial. The secret is the combination of cornstarch AND egg yolks. The yolks provide a creamy fat content that breaks up the starch mesh, keeping it tender.
Storage Guidelines and Zero Waste Tips
Once you've enjoyed your first slice, you need to keep the rest of the pie safe. Because this contains dairy and eggs, it cannot sit on the counter for long.
- Storage: Store the pie in the refrigerator, uncovered or loosely tented with foil. It will stay fresh for up to 3 days. After that, the meringue may start to break down and become sticky.
- Freezing: I do not recommend freezing a fully assembled coconut cream pie. The custard will lose its silky texture and become grainy when thawed, and the meringue will completely collapse.
- Zero Waste: If you have leftover egg whites (if you didn't make the meringue), use them for an egg white omelet the next morning. Leftover toasted coconut is a fantastic topping for yogurt or morning oatmeal!
Creative Serving Ideas
A pie this beautiful deserves a grand entrance. While a simple slice on a white plate is classic, you can add a few rustic touches to make it even more special.
- The Tropical Garnish: Add a few thin slices of fresh mango or a zest of lime over the meringue for a bright, seasonal pop of color.
- Warm vs Cold: While the pie must be chilled to set, let your slice sit on the counter for 10 minutes before eating. It allows the butter in the crust to soften slightly, enhancing the flavor.
- Decision Shortcut:
- If you want a classic look, use the broiler to brown the meringue for a rustic, uneven finish.
- If you want maximum coconut flavor, toast the shredded coconut for the filling in a dry pan before adding it to the custard.
- If you want a sturdier slice, increase the chill time to 8 hours (overnight) for the most stable results.
Making grandmas coconut cream pie is about more than just following steps; it's about the sizzle of the butter in the crust and the way the velvety custard coats the back of your spoon. It's a labor of love that pays off in every shattering, creamy bite. If you're in the mood for something with a bit more zing after this, you have to try my Lemon Meringue Pie, which uses a very similar meringue technique but with a bright, citrusy twist. Happy baking!

Recipe FAQs
How to bake the pie crust for the perfect base?
Blind bake the crust at 400°F (204°C) with pie weights for 15 minutes. Remove the weights and continue baking for 5 more minutes until the crust is dry and golden, then allow it to cool completely before filling.
Is it true I can freeze the assembled pie for later?
No, this is a common misconception. Freezing a fully assembled coconut cream pie ruins the texture, as the custard becomes grainy upon thawing and the meringue collapses entirely.
How to thicken the custard properly?
Whisk constantly over medium heat until the mixture reaches 203°F (95°C). Reaching this temperature is vital to fully hydrate the cornstarch, ensuring your filling sets with a silky, stable texture. If you enjoyed achieving this precise thickness, you can apply the same starch thickening logic to our creamy potato soup for perfect results.
How to prevent the meringue from sliding off the pie?
Spread the meringue over the hot custard while it is still steaming. This anchors the meringue to the filling and prevents it from weeping or slipping during the chilling process.
How long does the pie stay fresh in the refrigerator?
Store for up to 3 days in the refrigerator. Keep the pie uncovered or loosely tented with foil, as the meringue can become sticky if trapped in an airtight container for too long.
Is it necessary to temper the egg yolks?
Yes, tempering is essential to avoid scrambled eggs in your custard. Gradually whisking one cup of the hot milk mixture into the yolks slowly raises their temperature before you combine them with the rest of the saucepan ingredients.
How to achieve the best flavor in the custard?
Stir in the butter, vanilla, coconut extract, and shredded coconut only after removing the pan from the heat. Adding these ingredients at the end preserves their aromatic qualities and prevents the volatile flavors from cooking out.
Grandmas Coconut Cream Pie

Ingredients:
Instructions:
Nutrition Facts:
| Calories | 548 kcal |
|---|---|
| Protein | 8.6g |
| Fat | 28.6g |
| Carbs | 65.5g |
| Fiber | 1.9g |
| Sugar | 44.8g |
| Sodium | 124mg |
