Keto Dinner Recipe with Garlic Butter Chicken: Skillet
- Time: Active 10 minutes, Passive 10 minutes, Total 20 minutes
- Flavor/Texture Hook: Shatter crisp exterior with a silky, lemon bright finish
- Perfect for: Busy weeknight dinners or low carb meal prep
- Perfect Keto Dinner Recipe with Garlic Butter Chicken
- Science of the Cold Finish
- Component Analysis for Better Bites
- The Essential Elements
- Strategic Searing and Finishing
- Solving Common Texture Issues
- Precise Scaling for Any Group
- Myths About Skillet Chicken
- Preservation and Waste Reduction
- Best Sides for Butter Chicken
- Recipe FAQs
- 📝 Recipe Card
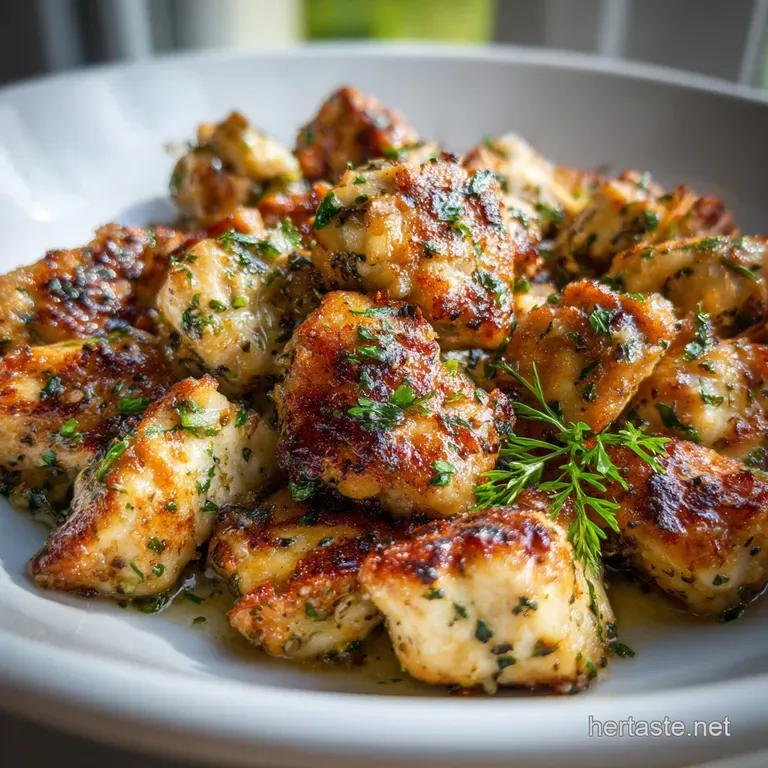
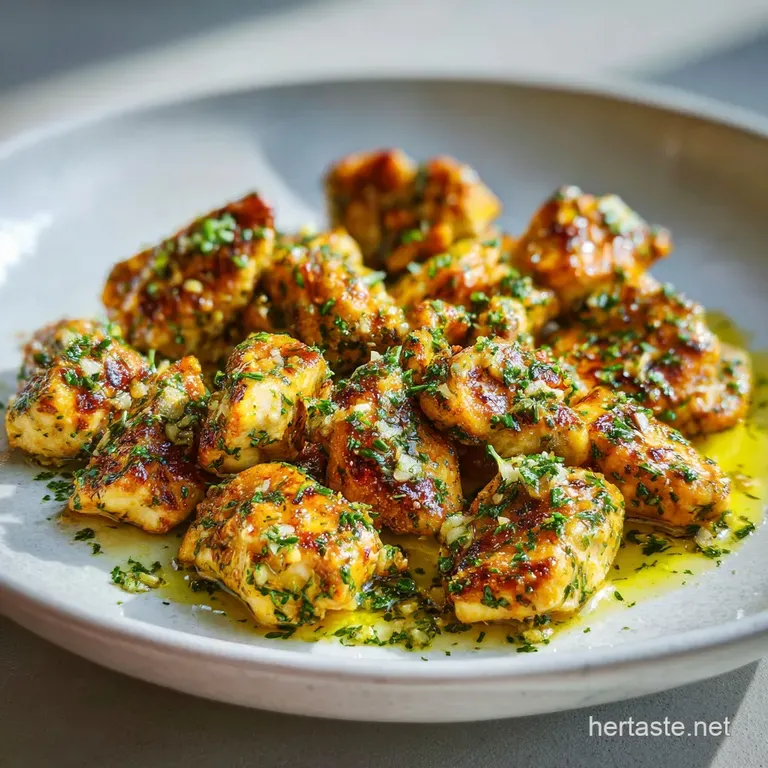
Perfect Keto Dinner Recipe with Garlic Butter Chicken
Picture this. It is a Tuesday night, you are exhausted, and the fridge looks depressing. I remember one specific evening when I almost gave up and ordered takeout, but I had exactly 1.5 lbs of chicken breast sitting there.
I threw them into a screaming hot pan, and that first aggressive sizzle changed my entire mood. The aroma of garlic hitting melting butter is basically therapy in a skillet.
This simple recipe shows you how to make a delicious Keto Dinner Recipe with Garlic Butter Chicken that tastes like a restaurant meal but takes less time than a delivery driver takes to find your house.
We are going for a massive contrast here. I want that outer crust to almost shatter when you bite into it, giving way to a tender, steaming center. Most people mess this up by crowding the pan and basically boiling their chicken in its own juices. We are not doing that today.
We are going to treat these chicken bites like tiny steaks, giving them the respect they deserve with high heat and a finishing sauce that feels like a warm hug.
By the end of this, you will have a pan full of golden nuggets swimming in a pool of liquid gold. It is rich, it is bright from the lemon, and it has just enough kick from the red pepper flakes to keep things interesting. You don't need fancy skills, just a heavy pan and a bit of patience while the crust forms.
Let's get into why this method actually beats out the soggy versions you've probably had before.
Science of the Cold Finish
The secret to that glossy, restaurant style sauce is something called emulsification through temperature control. When we toss cold butter into a hot pan at the very end, the milk solids and fats don't just melt and separate into a greasy mess.
Instead, the rapid whisking and the temperature drop create a stable, velvety coating that clings to every 1 inch cube of meat.
Maillard Reaction: High heat transforms surface proteins and sugars into a complex, savory crust that provides the structural contrast against the soft butter.
Thermal Emulsification: Adding cold butter to a warm environment prevents the fat from "breaking," ensuring a thick, opaque sauce rather than a transparent oil slick.
Aromatic Infusion: Mincing garlic right before use releases allicin, which provides that sharp, pungent bite that cuts through the heavy fats of the butter.
| Method | Time | Texture | Best For |
|---|---|---|---|
| Cast Iron Skillet | 10 minutes | Maximum crust, deep sear | Authentic flavor seekers |
| Stainless Steel | 12 minutes | Good fond (brown bits) | Saucy variations |
| Air Fryer | 15 minutes | Uniformly crispy | Hands off meal prep |
Choosing the right vessel changes the outcome of your meal. While a cast iron skillet offers the best heat retention for a hard sear, the air fryer is brilliant if you want to set a timer and walk away, though you'll miss out on that beautiful pan sauce created by the butter and garlic.
Component Analysis for Better Bites
To get this right, you need to understand what each player does in the pan. We aren't just throwing things in a heap; we are building layers of flavor.
| Ingredient | Science Role | Pro Secret |
|---|---|---|
| Chicken Breast (1.5 lbs) | Lean protein base | Pat dry with paper towels to ensure a sear, not a steam. |
| Cold Salted Butter (4 tbsp) | Emulsifier and fat | Use cold butter to create a thicker, more stable sauce at the end. |
| Garlic (4 cloves) | Aromatic foundation | Hand mince rather than using a press to prevent the garlic from burning too fast. |
The avocado oil is also a non negotiable for me here. It has a high smoke point, which means you can get the pan ripping hot without the oil breaking down and tasting like a burnt tire.
The Essential Elements
- 1.5 lbs chicken breast: Cut these into uniform 1 inch cubes so they all finish at the exact same moment.
- 1 tsp sea salt: Provides the essential seasoning to draw out the meat's natural flavors.
- 0.5 tsp coarse black pepper: Adds a subtle, woody heat that lingers.
- 1 tbsp avocado oil: This is our over high heat hero for the initial sear.
- 4 tbsp salted butter, cold: This must stay in the fridge until the very last second.
- 4 cloves garlic, minced: Fresh is always better than the stuff in a jar, trust me.
- 0.25 tsp red pepper flakes: Just enough to wake up your taste buds without overpowering the garlic.
- 1 tbsp fresh parsley, chopped: Adds a necessary pop of green and a grassy freshness.
- 1 tsp lemon juice: The acidity is the "reset button" for your palate, cutting through the rich butter.
If you don't have avocado oil, you can use light olive oil or even ghee. Just avoid extra virgin olive oil for the initial over high heat sear, as it will smoke and turn bitter. For the butter, if you only have unsalted, just add an extra pinch of salt to the final sauce.
Strategic Searing and Finishing
- Dry the meat. Take your 1.5 lbs of cubed chicken and pat it aggressively with paper towels. Any surface moisture will turn to steam and ruin your chances of a golden crust.
- Season well. Toss the cubes with the 1 tsp sea salt and 0.5 tsp black pepper. Note: Seasoning right before cooking prevents the salt from drawing out too much moisture prematurely.
- Heat the pan. Place your skillet over medium high heat and add the 1 tbsp avocado oil. Wait until it shimmers and you see a tiny wisp of smoke.
- The initial sear. Add the chicken in a single layer. Don't touch it for at least 3 minutes until the bottom is deeply browned and releases easily.
- Flip and repeat. Turn the pieces and cook for another 3 to 4 minutes. You are looking for an internal temp of about 160°F here because carryover cooking will do the rest.
- Clear a spot. Push the chicken to the edges of the pan, creating a small "well" in the center.
- Sizzle the aromatics. Drop in the 4 cloves of minced garlic and the 0.25 tsp red pepper flakes. Note: This only takes about 30 seconds to become fragrant don't let it turn brown.
- The butter finish. Toss in the 4 tbsp of cold butter. Stir constantly as it melts, swirling the chicken into the emerging sauce.
- Brightness check. Turn off the heat. Squeeze in the 1 tsp lemon juice and sprinkle the 1 tbsp fresh parsley over the top.
- Rest and serve. Let the pan sit for 2 minutes. The sauce will thicken slightly as it cools, coating the chicken in a velvety sheen.
Chef's Tip: If you have a cast iron skillet, use it. The heat retention is far superior for getting that "shatter" texture on the chicken skin without overcooking the inside.
Solving Common Texture Issues
Even the best of us have bad days in the kitchen. If things aren't looking quite like the pictures, don't panic. It's usually a simple fix involving heat or moisture.
Why is my chicken tough?
This usually happens because the heat was too low, and you cooked the chicken for too long trying to get a brown color. The moisture evaporated, leaving you with dry fibers. Next time, turn the heat up and trust the sear. It's also why I love the richness in my Keto Beef Stroganoff recipe — the sauce helps hide any overcooking.
Why did the sauce break?
If your sauce looks like yellow oil with clumps of white milk solids, the pan was too hot when you added the butter, or the butter wasn't cold enough. The emulsion failed. You can usually save it by adding a teaspoon of water and whisking like crazy off the heat.
| Problem | Root Cause | Solution |
|---|---|---|
| Rubbery Chicken | Crowding the pan | Cook in two batches to allow steam to escape. |
| Bitter Flavor | Burnt garlic | Add garlic only in the last 60 seconds of cooking. |
| Gray Meat | Surface moisture | Pat chicken completely dry before it hits the oil. |
Common Mistakes Checklist ✓ Never use "wet" chicken; the drier the surface, the better the sear. ✓ Avoid the urge to stir the chicken constantly; let it sit to build a crust. ✓ Keep the butter in the fridge until the moment you need it.
✓ Use a heavy bottomed pan to prevent "hot spots" that burn the garlic. ✓ Don't skip the lemon juice; the acid is vital for flavor balance.
Precise Scaling for Any Group
When you need to feed a crowd or just yourself, a few things change. For a half batch (0.75 lbs chicken), use a smaller skillet to prevent the butter from burning on the exposed surface of the pan. You won't need to reduce the cook time much, but keep an eye on the garlic.
If you are doubling this to 3 lbs of chicken, do not put it all in the pan at once. Work in two separate batches for the searing phase. If you crowd the pan, the temperature will drop, the chicken will release its juices, and you will end up with gray, boiled meat.
Only combine everything at the very end when you are adding the butter and garlic.
| Premium Ingredient | Budget Alternative | Flavor Impact | Savings |
|---|---|---|---|
| Grass Fed Butter | Standard Salted Butter | Slightly less creamy, still delicious | $2-3 |
| Avocado Oil | Light Olive Oil | No noticeable difference | $1-2 |
| Fresh Parsley | Dried Parsley | Less "bright" finish, more muted | $1 |
Myths About Skillet Chicken
One of the biggest lies in cooking is that you should bring your chicken to room temperature before searing. For small 1 inch cubes, this actually makes it easier to overcook the center before the outside gets crispy.
Keeping the chicken slightly chilled helps you achieve that deep brown crust while the inside stays succulent.
Another myth is that you can't use butter for searing. While true for long cooks, our "cold finish" technique bypasses the low smoke point of butter. We use avocado oil for the heavy lifting and butter only at the end for flavor and texture.
This gives you the best of both worlds: over high heat crunch and rich, buttery finish.
Preservation and Waste Reduction
This chicken keeps beautifully in the fridge for up to 4 days. Store it in an airtight glass container to keep the butter sauce from picking up "fridge smells." When reheating, avoid the microwave if possible. It will turn the chicken into rubber.
Instead, pop it back in a skillet over low heat with a splash of water or chicken broth to loosen the sauce.
For zero waste, don't toss those parsley stems! Chop them finely and sauté them right along with the garlic for extra flavor. If you have leftover sauce in the pan, toss in some leftover zucchini noodles or cauliflower rice to soak up every drop of that garlic butter.
You can also freeze the cooked chicken for up to 2 months, though the texture of the sauce will be slightly less creamy upon thawing.
Best Sides for Butter Chicken
Since this is a keto focused meal, I usually serve this over a bed of cauliflower mash or with a side of roasted asparagus. The sauce is so good you'll want something to soak it up. It is very similar to the sauce in my Creamy Garlic Chicken recipe, so anything that works there will work here.
- For a crunch
- Serve with a crisp Caesar salad (no croutons).
- For comfort
- Place the chicken over zoodles (zucchini noodles) with extra parmesan.
- For a feast
- Pair with roasted radishes, which take on a potato like texture when baked.
Whatever you choose, make sure it's ready to go before you start the chicken. This recipe moves fast, and you want to eat it while the butter is still in that perfect, velvety state. Trust me, once you master this sear and swirl technique, it will become your absolute favorite way to handle chicken.
Enjoy that first sizzle it's the sound of a great dinner starting.

Recipe FAQs
Can you eat butter chicken on keto?
No, traditional butter chicken is generally not keto friendly. It relies heavily on ingredients like tomatoes, cream, and often sugar for its rich sauce, which can be too high in carbohydrates.
However, you can create a keto adapted version by using heavy cream, full fat yogurt, and sugar substitutes, focusing on the garlic butter chicken approach for a similar savory profile.
What goes with garlic butter chicken for dinner?
Low-carb vegetables are excellent pairings. Try roasted asparagus, sautéed spinach, garlic butter mushrooms, or a fresh green salad with a vinaigrette. For a heartier keto option, cauliflower rice or zucchini noodles also soak up the delicious garlic butter sauce beautifully, much like the sauce in my Creamy Garlic Chicken recipe.
What Indian dish is keto friendly?
Tandoori chicken or lamb tikka are good keto options. These dishes focus on marinated and grilled meats, minimizing carb heavy ingredients like rice or naan. You can also prepare many vegetable curries using coconut milk and low-carb vegetables, ensuring no added sugars or starches are used.
What is the perfect keto dinner?
The perfect keto dinner balances healthy fats, moderate protein, and minimal carbs. Focus on dishes like grilled salmon with avocado, steak with broccoli and butter, or a creamy chicken skillet like this garlic butter chicken recipe.
It should be satisfying and nutrient dense, making you feel full without excess carbohydrates.
Why is my garlic butter chicken sauce broken?
The sauce likely broke because the pan was too hot when the butter was added, or the butter wasn't cold enough. When cold butter is added to a warm, not scalding, pan, it creates a stable emulsion. If the heat is too high, the butter solids separate from the fat, resulting in an oily, broken sauce.
How do I get a crispy sear on my keto chicken?
Pat your chicken completely dry and use a hot pan with a high smoke point oil like avocado oil. Ensure the chicken pieces are not crowded in the pan; cook in batches if necessary. This allows steam to escape and the Maillard reaction to create a beautiful, crispy crust. If you enjoyed mastering this searing technique, see how the same high heat principle applies to achieving a perfect crust in our Mouthwatering Garlic Chicken Breast Recipe.
Is it okay to use pre-minced garlic in my garlic butter chicken?
No, fresh minced garlic is significantly better for this recipe. Pre-minced garlic often contains preservatives and can have a duller, less pungent flavor. Mincing garlic just before adding it to the hot pan releases its potent allicin, providing that sharp, aromatic bite crucial to the dish's success.
Garlic Butter Chicken Keto

Ingredients:
Instructions:
Nutrition Facts:
| Calories | 338 kcal |
|---|---|
| Protein | 38 g |
| Fat | 19 g |
| Carbs | 1.5 g |
| Fiber | 0.2 g |
| Sugar | 0.1 g |
| Sodium | 685 mg |
