The Unbeatable Ovenbaked Beef Ribs Tender Sticky and Ridiculously Easy
- Why the Oven Reigns Supreme for Fall-Off-The-Bone Beef Ribs
- Unlock Backyard Flavor Without the Smoke Alarm
- Assembling Your Flavor Arsenal for Maximum Impact
- The Anatomy of a Perfect Rib Rub and Glaze
- The Low and Slow Journey: Mastering the Cooking Timeline
- Achieving Peak Tenderness: The Final Glazing Stage
- Troubleshooting and Advanced Techniques for Stellar Oven Beef Ribs
- From Prep to Plate: Storage and Serving Suggestions
- Frequently Asked Questions
- 📝 Recipe Card
Why the Oven Reigns Supreme for Fall Off-The-Bone Beef Ribs
There is a deeply ingrained mystique around barbecue that demands smoking pits and hours spent wrestling with charcoal drafts. While a traditional smoker certainly yields phenomenal results, the humble kitchen oven offers an incredibly reliable, hands off route to achieving that highly coveted, meltingly tender result.
When aiming for Fall Off The Bone Beef Ribs , the oven provides consistent, gentle heat that is perfect for breaking down the tough connective tissues in beef ribs over many hours.
This recipe harnesses that low-and-slow environment to create deeply flavourful Oven Beef Ribs that require minimal intervention from you, the cook.
Unlock Backyard Flavor Without the Smoke Alarm
The beauty of this Oven Beef Ribs Recipe lies in its simplicity and accessibility. We are creating an intensely flavourful, moist environment inside the oven that mimics the steaming action of a smoker water pan, all while relying on a straightforward rub and glaze combination.
This method ensures you get maximum flavour penetration without sacrificing the meat’s succulence, making it ideal for weeknight dinners or when you simply don't want the commitment of outdoor cooking.
The Secret to Tender, Hands Off Rib Perfection
The key to transforming tough cuts of beef into yielding perfection is time coupled with moisture management. By setting the Oven Beef Ribs Temperature surprisingly low around 275° F ( 135° C) we allow the collagen within the meat to slowly render into gelatin.
This process is lengthy but critical for developing texture, which is why the total Beef Ribs Cook Time Oven needs to stretch towards the five hour mark for a typical rack. This passive cooking stage is what builds the foundation for truly Tender Beef Ribs Oven .
Setting Expectations: What Makes These Oven Beef Ribs Different
While these are Oven BBQ Beef Ribs , they achieve their tenderness through two distinct phases. The first is a deeply buried, moist roast wrapped tightly to retain every drop of rendered beef fat and steam.
The second phase is the final glaze application under higher heat, which mimics the sticky, slightly charred exterior achieved on a grill. We use your favourite store-bought sauce here, focusing the effort on creating an incredible internal texture first.
A Weeknight Shortcut to Barbecue Bliss
For those seeking a Paleo Beef Ribs Recipe or simply an easier alternative, this method avoids the complexity of managing an offset smoker or pellet grill. Prep time is minimal about 20 minutes dedicated to rubbing and wrapping and after that, the oven does the heavy lifting.
It’s the ultimate "set it and forget it" method for achieving impressive barbecue results with minimal stress.
Assembling Your Flavor Arsenal for Maximum Impact
Great ribs are defined by what you put on them before they hit the heat and what you coat them with after . Our approach layers flavour profiles, starting with a robust seasoning blend and finishing with a sweet and-tangy coat.
The Anatomy of a Perfect Rib Rub and Glaze

To ensure the best results from your Low and Slow Beef Ribs Oven session, selecting the right cut and preparing a balanced seasoning profile are non-negotiable steps.
Primary Rib Cut Selection and Prep
We generally recommend utilizing three to four pounds of either beef short ribs (English cut) or a smaller rack of beef back ribs. Whichever you choose, thoroughly pat the meat dry with paper towels. This is vital; moisture on the surface prevents the rub from adhering properly.
If using back ribs, take a moment to gently score or remove the tough silver skin membrane found on the bone side; this allows the seasoning to penetrate deeper into the muscle tissue.
Crafting the Signature Dry Rub Blend
The heart of the exterior flavour comes from our Beef Ribs Dry Rub Oven mixture. We combine 1/4 cup of packed brown sugar to aid in caramelization later, balancing it with 2 tablespoons of smoked paprika for that crucial smoky undertone, 1 tablespoon each of coarse kosher salt and freshly ground black pepper, and supporting notes from garlic powder, onion powder, and a touch of cayenne for warmth.
Generously massage this blend into every available surface of the ribs.
Components for the Tangy Finishing Sauce
For the final sticky coating, you will need about 1 1/2 cups of your preferred sweet and smoky BBQ sauce. To enhance its depth and gloss, whisk in 1 tablespoon of Worcestershire sauce and, optionally, 1 tablespoon of honey or maple syrup to boost the stickiness during the final caramelization stage.
Essential Equipment for Low-and-Slow Success
To manage the two-stage cooking process effectively, you need a sturdy roasting pan topped with a wire rack. This rack elevates the ribs out of any liquid that accumulates, allowing the dry rub to form a proper bark rather than stewing.
Heavy duty aluminum foil is also essential; you must achieve a tight seal during the initial phase to lock in the moisture necessary for achieving true tenderness.
Related Recipes Worth Trying
- FallOfftheBone Beef Ribs with Smoky Bourbon Glaze — Learn the secrets to unbelievably tender Beef Ribs using a low and slow oven braise This Easy Beef Ribs Recipe finishes with a sticky glaze that will wow...
- The Best Dry Rub Ribs Recipe Oven Grill Ready — Learn how to make falloffthebone Dry Rub Ribs with a killer flavourful crust This easy recipe is perfect for the oven or smoker
- The Best AllPurpose Dry Rub for Ribs Recipe 10 Mins Prep — Forget watery meatthis is the ultimate crowdpleasing Dry Rub for Ribs recipe It creates a perfect smoky bark whether you are cooking on the grill or in the...
The Low and Slow Journey: Mastering the Cooking Timeline
The entire cooking process clocks in around 4.5 to 5. 5 hours, dominated by the initial low-temperature roast. The success here is entirely predicated on maintaining a steady, gentle heat environment.
Achieving Peak Tenderness: The Final Glazing Stage
Once the meat has softened significantly during the initial steam bath, we transition to applying the glaze and finishing the cook under slightly increased heat, which hardens the sauce into that perfect sticky shell.
Step 1: Prepping the Rack and Initial Seasoning Blast
After thoroughly rubbing your ribs, place them bone side down onto the wire rack situated inside your roasting pan. Pour about 1/2 cup of apple cider vinegar (or water) into the bottom of the pan this liquid will convert to steam, acting as a humidifying agent for the long cook ahead.
Step 2: The Initial Low-Temperature Roast Phase
Set your oven to 275° F ( 135° C). Once the oven is up to temperature, carefully place the entire assembly inside. This phase lasts approximately 3.5 to 4. 5 hours.
During this time, the connective tissue breaks down, resulting in the soft texture we associate with Tender Beef Ribs Oven .
Step 3: Introducing Moisture The Crucial Wrapping Technique
The ribs must be tightly wrapped in heavy duty foil before going into the oven. This wrapping creates a self contained, steamy cooking chamber, which is the single most important factor for achieving Fall Off The Bone Beef Ribs without drying them out.
Keep them sealed and allow the low heat to work its magic.
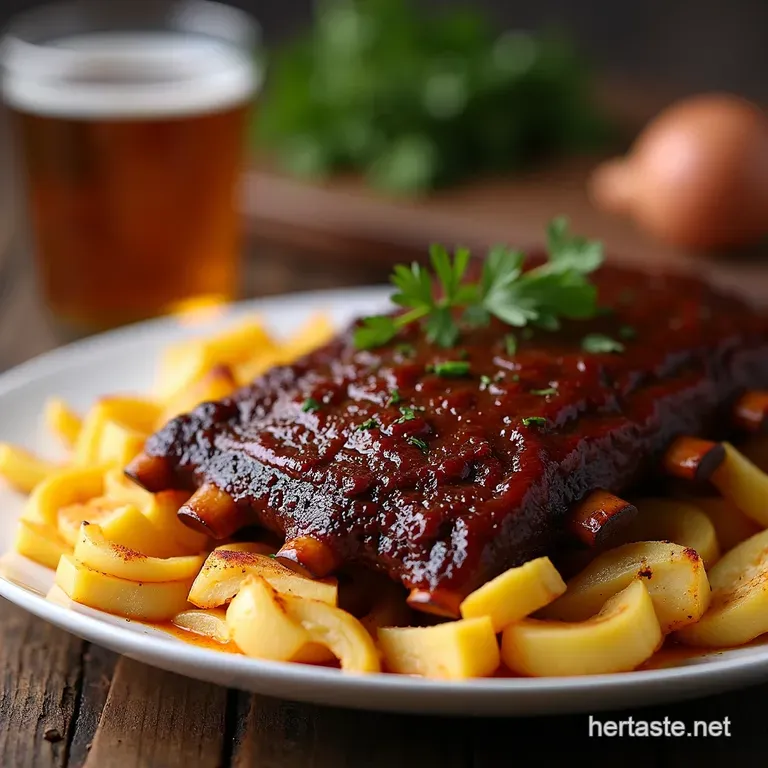
Step 4: Applying the Sticky Glaze Under High Heat
Once a fork slides in easily, remove the foil (carefully, as steam will escape!). Increase the oven temperature to 375° F ( 190° C). Brush a generous layer of your prepared BBQ glaze over the top surface.
Return the uncovered ribs to the oven for about 15 to 20 minutes, brushing with a second layer halfway through. This final blast caramelizes the sugars, delivering that signature tacky finish we love in Oven BBQ Beef Ribs .
Troubleshooting and Advanced Techniques for Stellar Oven Beef Ribs
If your ribs aren't feeling quite ready after the initial cooking period, resist the urge to dramatically increase the heat, which will only dry out the exterior. Instead, tightly re-wrap them in foil and return them to the 275° F ( 135° C) oven for another 30 to 60 minutes until you achieve the desired softness.
For those keen on pushing the boundaries of a Paleo Beef Ribs Recipe , simply omit the brown sugar from the rub and use a sugar-free, vinegar based sauce for the glaze.
From Prep to Plate: Storage and Serving Suggestions
Once these perfect Oven Beef Ribs are glazed and rested for about 10 minutes post oven, they are ready for carving.
How to Check for 'Bend Test' Doneness
Before moving to the glazing stage, you can perform a gentle "bend test." Pick up the rack with tongs; if the meat is sufficiently tender, the entire rack should visibly bend and start to crack slightly at the surface without falling apart completely. If the meat resists bending, it needs more time in the foil wrap.
Creative Flavor Variations Beyond the Basic Rub
To drastically change the profile of your Oven Beef Ribs , consider a bold flavour swap in the final glaze. Instead of classic BBQ, whisk together ingredients like tamarind paste, ginger, lime juice, and a touch of brown sugar for an Asian inspired finish.
Alternatively, a dry rub featuring ground coffee and dark cocoa powder offers a complex, deeply savoury crust.
Storing Leftovers and Revitalizing Day-Old Ribs
If you happen to have any of these succulent ribs remaining, they store beautifully. Wrap tightly in plastic wrap and foil and refrigerate for up to four days. To reheat, the best method is low and slow: place them in a baking dish with a small splash of water or broth, cover tightly with foil, and heat at 300° F ( 150° C) for 20- 30 minutes until warmed through.
This revives the moisture beautifully.

Frequently Asked Questions
How do I ensure my Oven Beef Ribs don't end up dry after such a long cook?
The secret weapon here is steam! We wrap them up super tightly in heavy duty foil with a splash of liquid, usually apple cider vinegar, which creates a steamy environment. This low-and-slow bath keeps the meat moist while the connective tissue breaks down, making them meltingly tender.
Can I make these Oven Beef Ribs ahead of time, or should I only cook them fresh?
Absolutely, they handle make-ahead cooking brilliantly! You can complete the entire low-and-slow cooking stage (up to step 7), let them cool completely, and refrigerate them wrapped overnight. When ready to serve, simply unwrap, apply the glaze, and finish them at 375°F (190°C) until the sauce is sticky.
My ribs aren't falling off the bone; how much longer should I cook them?
If they aren't tender after the initial 4-4.5 hours, resist the urge to crank the heat up that will just dry them out! Instead, keep them wrapped and put them back in the oven for another 30 to 60 minutes at the same low temperature. True "fall off-the-bone" tenderness is about time, not brute force.
What's the difference between using beef back ribs versus short ribs for this recipe?
Short ribs (English cut) are thicker, boast more meat on top of the bone, and usually need an extra 30-45 minutes of cooking time to become tender. Back ribs have less meat overall but are often flatter and cook a bit quicker. Both are delicious, but check your temperature/fork resistance!
Is it really necessary to use a wire rack when cooking Oven Beef Ribs?
Yes, it is highly recommended! Placing the ribs on a rack ensures that air circulates underneath them, preventing the bottom from stewing in the rendered fat and juices. This helps build a better 'bark' (crust) all the way around before you even start glazing.
I don't like sweet BBQ sauce; can I use a different rub/glaze combination?
You certainly can! Since this method is so versatile, swap the sugary BBQ sauce for a simple mop sauce made from beef broth, Worcestershire, and vinegar, or go for a spicy Korean style glaze using Gochujang. Just ensure whatever you use is brushed on during the final 15-20 minutes to avoid burning the sugars.
Easy Oven Beef Ribs

Ingredients:
Instructions:
Nutrition Facts:
| Calories | 3181 kcal |
|---|---|
| Protein | 31.1 g |
| Fat | 50.0 g |
| Carbs | 187.6 g |
| Fiber | 38.3 g |
| Sodium | 987 mg |
