Pumpkin Muffins the Ultimate Bakerystyle Spiced Recipe
- Elevating the Classic Autumn Treat: Why These Muffins Stand Apart
- The Secret Technique for Achieving That Perfect 'Bakery Dome' Rise
- Essential Supplies for Spiced Pumpkin Muffins Success
- Gathering Your Baking Arsenal and Smart Ingredient Substitutions
- Step and by-Step Guide to Assembling the Batter Without Overmixing
- Baking for That Signature Crumb and Tender Texture
- Frequently Asked Baking Questions About Pumpkin Muffins
- Storing, Freezing, and Advanced Serving Suggestions
- Recipe FAQs
- 📝 Recipe Card
Elevating the Classic Autumn Treat: Why These Muffins Stand Apart
Okay, let’s talk pumpkin. Every autumn, my social feeds explode with pumpkin muffins recipes, and honestly? Most of them are glorified, slightly dry spice cakes masquerading as a muffin. We are not doing that today. We are aiming for bakery and style .
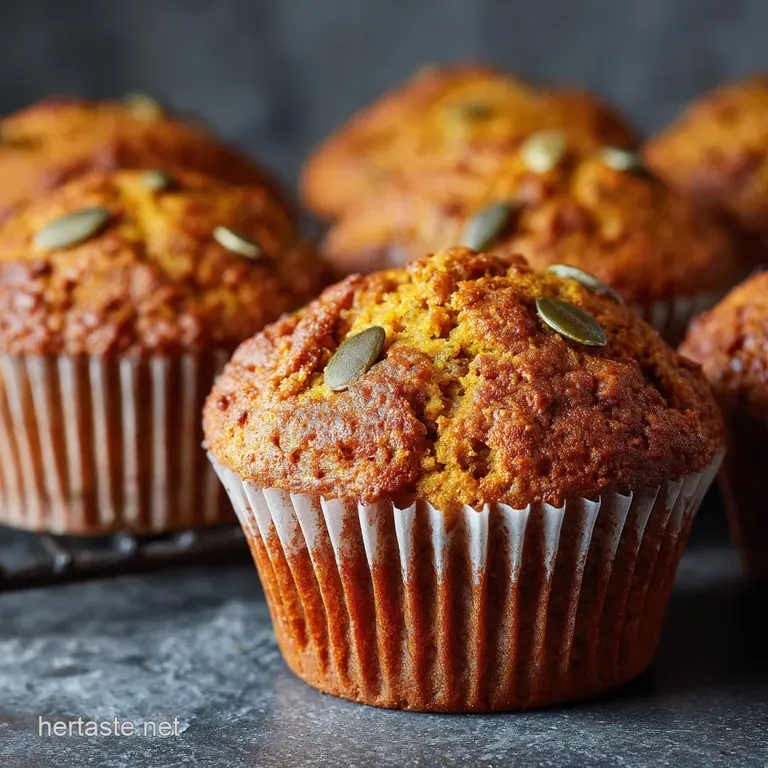
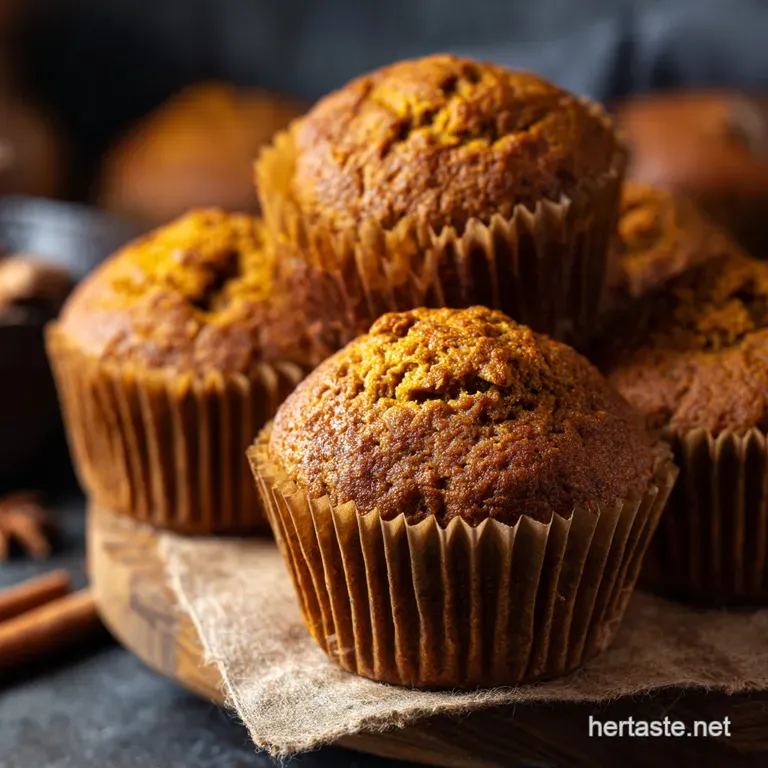
That means a ridiculously moist interior, an intense, warming spice profile, and (the most important part) that gorgeous, high, proud dome.
For years, my homemade pumpkin muffins would sag in the middle, or they’d taste predominantly of flour instead of ginger. Annoying. This recipe is the culmination of me testing way too many ratios, and trust me, it works.
We’re using a very specific blend of fats and sugars, and we’re deploying one critical temperature trick that changes everything. It’s brilliant. If you’ve ever found yourself saying, “My muffins never rise like the ones at the shop,” then this section is exactly for you.
The Secret Technique for Achieving That Perfect 'Bakery Dome' Rise
This isn't hard, but it’s non and negotiable if you want sky and high pumpkin muffins. The magic is in the oven temperature manipulation.
We start the oven blazing hot at 425°F (220°C). When that cold batter hits the superheated environment, it causes a rapid, massive production of steam and a massive jolt to the leavening agents (baking powder and soda).
This intense heat sets the outer crust immediately and forces the batter upward before it has a chance to spread too much. That first five minutes is critical. Then, without opening the door (please, don’t peek!), you drop the heat down to 375°F (190°C) to allow the centre to cook through gently.
It’s like giving the muffin batter a quick adrenaline shot followed by a gentle warm hug. It works every time.
Why We Use Both Brown Sugar and Granulated for Texture
If you only use granulated sugar, your muffins can taste a bit sharp, and they tend to dry out faster. If you only use brown sugar, the muffin can become too heavy and dense, almost chewy. We need both.
Granulated sugar provides structure and helps create that crispy, slightly cracked top we love. Brown sugar (specifically the light variety) is key for the chewiness and moisture. Why? Because brown sugar has molasses in it, which is liquid. That liquid doesn’t evaporate the way plain granulated sugar would.
It keeps the crumb tender and ensures that these pumpkin muffins are ridiculously moist even days later. It’s a texture balancing act, and these two are the stars.
A Deep Dive Into Our Signature Spiced Blend Ratios
If you’re going to bake spiced pumpkin muffins, you need to commit. Don’t be shy with the seasonings. My biggest mistake early on was only using one teaspoon of cinnamon and calling it a day. That’s just sad. We need warmth and depth, not just a whisper of spice.
We start with two full teaspoons of cinnamon for the bulk flavor, but we layer it with punchy ginger (for that deep, warm, autumnal throat hit) and ground nutmeg and cloves (for complexity). The cloves, even just a quarter teaspoon, add a sophisticated undertone that keeps the flavor from being one and dimensional.
This isn’t just 'spice,' it’s a fully orchestrated autumnal flavor bomb. Your kitchen is going to smell incredible, guaranteed.
What Makes These the Best Pumpkin Muffins You'll Bake This Season
The combination of the high and rise dome technique and the dual and sugar approach gives us incredible results. But the real unsung hero here is the oil. I know some of you love butter, and yes, butter is flavor gold.
But when you want supreme, long and lasting moisture in a quick bread like a pumpkin muffin, oil simply can’t be beaten. It coats the flour molecules better, preventing excessive gluten development, and that translates directly into a fluffy, tender crumb that holds up perfectly when drenched in pumpkin purée.
Plus, we've loaded them up with enough pumpkin to actually taste the pumpkin, not just the spice.
Essential Supplies for Spiced Pumpkin Muffins Success
You don't need a stand mixer here. In fact, a stand mixer is probably your enemy because it makes overmixing too easy. You need simple tools, but make sure they're right for the job.
I strongly advocate for using an ice cream scoop (the kind with the trigger release) for portioning the batter. Why?
- It ensures every muffin is exactly the same size.
- It prevents drips and mess when transferring the thick batter into the small liners.
- Even sizes mean even baking no guessing games about which one is done first.
Also, please use paper liners. If you grease the tin directly, the heat transference can be too aggressive on the sides, leading to a crusty, almost burnt bottom edge before the centre is cooked. We want soft sides and a crunchy top. Paper liners help achieve that gentle bake profile.
Gathering Your Baking Arsenal and Smart Ingredient Substitutions
If you're using fresh ingredients and measuring correctly, you’ve already won 80% of the battle.
Wet Ingredients: Achieving Optimal Moisture and Richness
- Pumpkin Purée: Please, please, please check the can. It must be 100% pure pumpkin purée, not pumpkin pie filling. The filling has added sugar, spices, and thickeners, and it will completely mess up our sugar ratios and overall wet and to-dry balance.
- The Oil: Use a neutral oil (like canola, vegetable, or grapeseed). Olive oil is too strong. The oil ensures the best moisture payoff.
- Eggs: Room temperature eggs are crucial. If your eggs are cold from the fridge, they will seize up the oil and cause the batter to look curdled and uneven. Set them out 30 minutes before starting, or drop them in a bowl of warm (not hot) water for 5 minutes.
Dry Ingredients: Ensuring Proper Flour Weight and Leavening Power
I know you want to scoop the flour directly out of the bag with your measuring cup. Stop! That compacts the flour, and you end up adding way too much, which makes your muffins heavy. Gently spoon the flour into the measuring cup, then level it off with a straight edge.
This is the difference between dry bricks and tender muffins. Also, check the date on your baking powder. If it's old, your muffins will simply refuse to rise.
Must and Have Kitchen Tools for Effortless Muffin Mixing
To keep things efficient and clean, here are the three tools I grab first:
- A sturdy wire whisk (for dry and wet mixing).
- A rubber spatula (for the final, gentle fold).
- A large ice cream scoop (for clean portioning).
A Crucial Note: Do not use an electric mixer when combining the wet and dry ingredients. The high speed will overdevelop the gluten faster than you can blink, ruining that tender texture we worked so hard for. Use your hands and a spatula only!
Related Recipes Worth Trying
- Paula Deens Pumpkin Bars The UltraMoist Recipe with Tangy Cream Cheese — This foolproof Paula Deens Pumpkin Bars recipe gives you the softest traybake imaginable Paired with our perfect cream cheese frosting its the ultimate...
- Easy Homemade Pumpkin Pie Butter Silky Rich Fall Spread — This luxurious Easy Pumpkin Butter Recipe locks in deep autumnal flavour Slowsimmered for a perfectly silky texturesmashing on crumpets or Sunday scones
- BakeryStyle Almond Poppy Seed Muffins with Zesty Lemon Drizzle — Forget dry storebought versions Get skyhigh intensely moist Almond Poppy Seed Muffins using buttermilk and butter Finished with a sharp lemon glaze A...
Step and by-Step Guide to Assembling the Batter Without Overmixing
Mixing is simple: two bowls meet, then stop.
First, mix all your dry ingredients (flour, sugars, spices, salt, leaveners) thoroughly in a large bowl. Use that whisk until you don't see any lumps of brown sugar. Getting the spices evenly distributed here is key.
Second, in the medium bowl, whisk together all the wet stuff (pumpkin, oil, eggs, vanilla). Whisk until it is smooth and uniform, like a thick, orange-y smoothie.
Third, pour the wet mixture straight into the centre of the dry mixture. Use a spatula not a whisk and start folding from the bottom up. Turn the bowl as you go. You are looking for about 10 15 folds max.
Baking for That Signature Crumb and Tender Texture
We’re past the measuring stage, now we execute the bake.
The Golden Rule of Mixing: Combining Wet and Dry Gently
When you're folding, stop the second you can’t see any significant dry streaks of flour anymore. I promise you, there will still be some little lumps. That’s fine. Those lumps are just pockets of flour and they will hydrate in the oven, leading to a softer texture.
If you keep mixing until it's perfectly smooth, you’ve overworked the gluten, and your muffins will have those weird, vertical tunnels when you slice them. We want crumb, not tunnels.
Filling the Tins and Prepping the Cinnamon Sugar Topping
Fill those liners almost to the top. I know this seems aggressive, but if you only fill them two and thirds full, you don't give the batter enough mass to achieve that gorgeous dome structure. We're aiming for full, generous bakery and sized muffins here. Use the scoop!
For the topping, gently sprinkle that coarse Turbinado sugar (sometimes called raw sugar) right on top of the batter. It doesn't dissolve much in the oven, and it creates a sparkly, crunchy cap that perfectly contrasts the soft muffin below.
Implementing the over High heat Oven Start Technique
Remember the secret! Get the oven to 425°F (220°C). Slide those full tins in. Set a timer for 5 minutes. As soon as the timer goes off, reduce the temperature to 375°F (190°C). Do not open the oven door during this transition.
The trapped heat and initial burst have done their job; now we relax the heat to cook the centre slowly. This second phase will take about 15– 17 minutes.
Checking Doneness and the Critical Cooling Stage
You know they're ready when they look beautifully golden brown and the tops spring back lightly when touched. The best way to check is the toothpick test. Insert a wooden toothpick into the centre of the tallest muffin. It should come out clean or with a few moist, sticky crumbs attached.
If you see wet batter, give it another 2 minutes.
When they come out, let them rest in the tin for five minutes. This helps the base firm up and ensures they don’t collapse when you move them. Then, transfer them immediately to a wire rack to finish cooling completely. If you leave them in the hot tin, the residual heat will steam the bottoms, making them soggy.
Nobody wants a soggy bottom.
Frequently Asked Baking Questions About Pumpkin Muffins
"Can I use fresh pumpkin instead of canned?" Sure, but you need to cook it, drain it very well (it holds tons of water), and then purée it until it’s perfectly smooth. Canned is much more consistent and usually drier, which is why I prefer it for baking density.
"Why is the batter so thick?" It's supposed to be! The higher ratio of dry ingredients and the heavy oil/pumpkin combination result in a very thick batter. This thickness is another factor that prevents spreading and encourages height. Don't be tempted to thin it out with milk.
Storing, Freezing, and Advanced Serving Suggestions
Once cooled, these homemade pumpkin muffins keep beautifully. But let's look at how to handle those inevitable little bumps along the way.
Troubleshooting Common Muffin Mistakes (Sinking or Dry Tops)
| Problem | Likely Cause | Solution |
|---|---|---|
| Sinking/Collapsing Centres | Too much leavener or old baking soda. | Check leavener freshness; measure precisely. |
| Dry Tops/Crusty Sides | Overbaked or oven runs hot. | Reduce baking time by 2- 3 minutes; check oven temp with a thermometer. |
The most common cause of sinking after cooling is removing them from the oven too early. If you see a wet indentation where the toothpick went in, it needs more time. The dome must be set all the way through before cooling.
Adapting the Recipe: Flavor Variations and Mix and In Ideas
This recipe is rock solid and takes additions really well. Just don’t add more than 3/4 cup of heavy mix and ins, or they might make the muffins sink.
- Pecan Crunch: Fold in 1/2 cup chopped pecans or walnuts into the batter.
- Chocolate Magic: Add 1/2 cup of white chocolate or mini semi and sweet chocolate chips. White chocolate is fantastic with pumpkin and spice, just saying.
- The Glaze Finish: Skip the Turbinado sugar and drizzle a thick maple glaze over the cooled muffins.
Nutritional Overview and Dietary Swaps (Dairy and Free/Gluten and Free Tips)
Since we use oil and no butter, these spiced pumpkin muffins are naturally dairy and free (perfect!). If you’re looking to go gluten and free, substitute the AP flour with a cup and for-cup gluten and free blend that already contains xanthan gum.
You might notice the batter seems slightly looser, but the structure holds up well due to the eggs and baking powder. Just be sure to really let them cool completely before handling them, as GF muffins are fragile when warm.
How Long Do Freshly Baked Pumpkin Muffins Last?
Stored correctly (in an airtight container at room temperature), these muffins will stay ridiculously moist for 3 to 4 days. If you need to keep them longer, they freeze like champions.
Just wrap each cooled muffin individually in plastic wrap, put them in a zip and top freezer bag, and they’ll last for up to 3 months. Thaw them overnight on the counter or give them a quick blast in the microwave for that fresh and baked warmth. Ready to make some magic? Go get baking!

Recipe FAQs
What's the trick to getting those proper bakery style tops on my pumpkin muffins?
It’s all down to the high low heat method; starting the bake at a cracking 425°F (220°C) for the initial five minutes creates a burst of steam, forcing the batter to rise rapidly and achieve that desirable dome before you lower the temperature to finish them off.
I've made a big batch of these pumpkin muffins how long do they keep and what's the best way to store them?
Store these splendid muffins at room temperature in an airtight container for 3 4 days to maintain their moisture; for longer storage, they freeze brilliantly for up to three months provided they are wrapped well in cling film or foil first.
Oh dear, my Pumpkin Muffins came out a bit tough and chewy. What went wrong?
Likely you overmixed the batter, which develops the gluten and makes the muffins tough and chewy with "tunnels" inside; the key is to only fold the wet and dry ingredients together until the last streaks of flour just disappear, then stop straight away.
I'm fresh out of canned purée; can I use fresh pumpkin or maybe courgette/zucchini instead?
While you can use homemade pumpkin purée, ensure it’s thoroughly drained of excess water, as too much moisture will result in a dense, rather than light, muffin; courgette (zucchini) works as a suitable substitute if pressed, provided you grate and squeeze out the water first.
I need a variation or perhaps a dairy-free option is this recipe easily adaptable?
This recipe is naturally dairy-free as it uses oil rather than butter, making the switch simple; for variations, try folding in a 1/2 cup of dark chocolate chips or swapping the Turbinado topping for a proper streusel crumb before baking.
Bakerystyle Spiced Pumpkin Muffins

Ingredients:
Instructions:
Nutrition Facts:
| Calories | 275 calories |
|---|---|
| Fat | 11 g |
| Fiber | 2 g |
