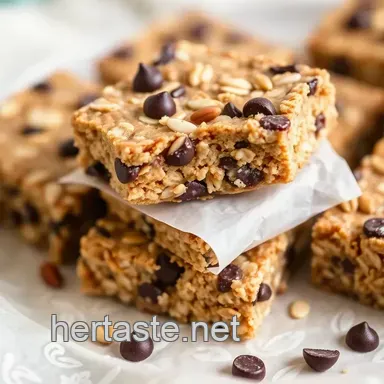
Bake Nut Bars with Oats, Seeds & Chocolate
- Essential Ingredients Guide for Creating Delicious Treats
- Professional Cooking Method: Mastering Nut Bars with Oats, Seeds & Chocolate
- Pro Tips & Secrets
- Perfect Presentation
- Storage & Make-Ahead
- Creative Variations
- Complete Nutrition Guide
- Expert FAQ Solutions
- Wrap Up with Encouragement
- 📝 Recipe Card
Have you ever needed a quick snack that hits the spot but also feels a bit wholesome? i sure have! i remember one hectic afternoon juggling work, errands, and a ravenous kiddo.
I needed something now , and if i’m being honest, those vending machine snacks just wouldn’t cut it. that’s when i started to experiment and realized i could bake nut bars with oats, seeds & chocolate , giving me the best of both worlds.
Crunchy, chewy, and, oh, the chocolate! seriously, it’s a game changer for busy days.
Let’s take a step back for a moment. nut bars have been around for ages. they originated as a way to combine nutritious ingredients while being easy to carry along on adventures.
I mean, who doesn’t want a healthy snack recipe that can double as an energy boost? fast forward to today, and these little nuggets of joy have become wildly popular, especially among health conscious folks.
But don’t worry; we’re still keeping flavor front and center!
Recipe Overview
When it comes to making your own nut bars, the beauty lies in how simple it truly is. you only need about 15 minutes of prep, plus 30 minutes for chilling, and a quick 25 minutes bake.
In total, you’re looking at an hour and 10 minutes for 12 bars of deliciousness. easy, right?
But what about costs? honestly, making homemade nut bars can save you some bucks compared to the store-bought ones. with a few basic ingredients like oats, nuts, and dark chocolate, you’ve got a nutrient dense recipe that’s wallet friendly.
And let’s not forget these bars can pack serious flavor and feel totally indulgent.
Key Benefits
Let’s chat about health for a sec. these baked nut bars are way more than just a tasty treat; they're actually loaded with nutrients.
Oats and seeds bring a hearty dose of fiber, making these snack bars not only satisfying but also good for digestion.
Plus, they’re pretty customizable whether you stick to classic nut combinations or get wild with some dried fruit, you can make them your own!
What about those special occasions? trust me, these bars are perfect for picnics, snacks for the kids, or even a healthy dessert alternative at a bbq.
They fit right in with kid-friendly snacks and can be enjoyed by just about anyone. and if you’re like me and sometimes need a boost, these energy bars with chocolate are every bit as satisfying as they sound.
Oh, and for those keeping an eye on sugar, these bars are easy to adjust. you can go for low-sugar dessert options or add in some nut butter alternatives if you want a creamy texture.
Homemade nut bars are an awesome way to treat yourself without diving headfirst into a sugar crash.
So, if you're ready to get your bake on and whip up these delicious and nutritious bars, let’s check out the ingredients you’ll need! from oat-based snack bars to the delightful crunch of nut and seed combinations , you’ll find these treats are a great addition to your meal prep snacks.
Get your apron on; it’s time for some kitchen fun!
Essential Ingredients Guide for Creating Delicious Treats
Oh my gosh, if you’re anything like me, having the right ingredients at your fingertips is a game changer. whether you’re whipping up healthy snack recipes or diving into some indulgent wholesome dessert recipes , knowing your essentials really makes a difference.
Let’s break down some of the key players in your pantry that you’ll want when you decide to bake nut bars with oats, seeds & chocolate .
Trust me, getting familiar with these goodies will make your kitchen adventures so much smoother!
Premium Core Components
First up, let's talk quality indicators . when you’re shopping, look for vibrant colors, fresh scents, and if we're talking nuts and seeds, make sure they’re crunchy, not stale.
Always check for expiration dates!
- Storage Guidelines : Keep your rolled oats in a cool, dark place. They can last up to 1 year if properly stored. Nuts? Stick 'em in the fridge for freshness that can last up to 6 months !
And when you’re picking stuff out? go for those that look fresh and feel right. if the oats feel dusty or the nuts smell rancid, put them back.
You want the freshest ingredients for your energy bars with chocolate!
Signature Seasoning Blend
Now, onto the fun part flavor! when you're making energy bars or any of those crunchy seed bars, spice combos can elevate your game.
Don't skip out on herbs and spices . thyme goes with nuts like peanut butter with jelly. just saying!
Think about what you enjoy. a sprinkle of cinnamon can do wonders, or a hint of vanilla extract can turn your nut bars into something heavenly.
And let’s not forget regional variations : you can always toss in some chili flakes for a kick if you're feeling adventurous!
Smart Substitutions
Let’s be real, sometimes life doesn’t go as planned. Maybe you’re out of almond butter or you realized you need a gluten-free snack option. No worries! Here are easy swaps :
- Nut butter alternatives : If you’ve got sunflower seed butter lying around, it’ll work just fine. Perfect for those nut allergies!
- Sweeteners : Maple syrup is a no-brainer, but what if you’re out? Honey or agave syrup can do the trick, too!
And if you're feeling lazy, keep a stash of ready-made energy bars in your pantry for those "I-don't-wanna cook" days.
Kitchen Equipment Essentials
You don’t need a fancy chef’s knife or a Michelin starred kitchen to whip these up. Here’s what I consider absolutely necessary:
- Mixing bowls : You'll need a couple of these to toss our goodies together.
- Baking pan : An 8x8 inch pan is perfect for those no-bake nut bars or when you’re cooking up something chewy.
Oh, and don’t forget about resealable storage for snacks . You’ll want to keep your homemade treats fresh, right? Accessorizing doesn’t stop in your closet! Use airtight containers your bars will thank you!
Let’s Get Cooking!
Alright, buddy, we’ve covered some essentials! with these guidelines in your pocket, you’re all set to create your very own nut bars that are just begging to be shared.
Don’t worry about being perfect cooking is all about experimenting and having fun! it’s an adventure, after all.
Now that your ingredients and tools are ready, let’s dive into the decadent recipe for Bake Nut Bars with Oats, Seeds & Dark Chocolate Delight ! Are you ready? Because I absolutely am!
Professional Cooking Method: Mastering Nut Bars with Oats, Seeds & Chocolate
So, you’re diving into the realm of professional cooking. awesome! whether you wanna impress friends at a party or pack something healthy for your kiddo’s lunch, making nut bars with oats, seeds & chocolate is a fantastic start.
Seriously, these bars are all the rage right now. who wouldn’t want to whip up a batch of healthy snack recipes that are simple and delicious?
Essential Preparation Steps
First things first let's talk about mise en place. this fancy french term just means “everything in its place.” before you even think about turning on the oven, gather all your ingredients.
Pre-measure those rolled oats , mixed nuts , and dark chocolate chips . it’ll save you time later.
Now onto time management. set a timer. i promise, once you start mixing those oats and seeds, you'll lose track of time.
I usually set a timer for 15 minutes to prep. then, while it’s chilling, i tackle the dishes. win-win, right?
When it comes to organizing, storing your ingredients in clear containers helps. you see what you have at a glance.
Safety comes next. always remember, ensure your workspace is clean to avoid any cross contamination especially when using nut butter alternatives .
Step-by-step Process
Okay, we're getting to the fun parts let’s dive in. Here’s how to do it, step by step:
Prepare the Baking Pan: Line an 8x8-inch baking pan with parchment paper. Leave some overhang for easy removal. Seriously this will save you from a sticky mess.
Combine dry ingredients: in a large bowl, toss in the 1 ½ cups of rolled oats, a ½ cup of mixed nuts, and those ¼ cups of seeds.
Your kitchen will smell amazing.
Melt Wet Ingredients: In a saucepan, heat ½ cup of nut butter and ¼ cup of maple syrup until combined. Stir in some vanilla extract too. This is where the magic begins!
Mix It Up: Pour that melty goodness over your dry ingredients. Mix until everything is coated. You’ll feel like a pro!
Incorporate Chocolate: Gently fold in your dark chocolate chips. Cue the taste test because honestly, who can resist?
Spread the Mixture: Transfer everything to your pan. Press down firm (like you’re giving it a hug), making sure it holds together.
Optional Toppings: Want some pizzazz? Sprinkle extra chocolate or nuts on top.
Bake: Pop it in the oven preheated to 350° F ( 175° C) for 20- 25 minutes until it’s lightly golden around the edges.
Cool and Cut: Give it a chance to cool completely before cutting it into bars. You don’t want a crumbling mess!
Expert Techniques
Let’s level up your cooking game. The key to success here is quality checkpoints. Remember to check your bars at the 25-minute mark. If they look golden and smell divine, you’re golden!
If you notice them browning too quickly, lower the temp to 325° F ( 163° C). Are they not holding together? Try pressing them just a bit firmer before baking next time.
Success Strategies
Now, what’s the difference between okay and “oh my gosh, these are amazing”? it’s in the details! avoid common mistakes like skimping on the pressing or rushing the cooling process.
Solid bars need a firm base.
Quality assurance? simple! taste test at every stage. and if you want to bake ahead, these nut bars are perfect make-ahead snacks.
Store them in a cool place. i like to keep mine in a resealable bag for easy access.
Additional Information
These decadent treats are not just tasty; they’re packed with nutrition. need a boost to your morning routine? try these nut bars as breakfast bars with oats.
They’re a great source of energy perfect post hike fuel for your next adventure!
So, whether you’re munching on these during a netflix binge or packing them up for a hiking trip, you’ll love knowing you made something wholesome.
And believe me, once you've mastered how to bake nut bars with oats, seeds & chocolate , you'll have a go-to recipe for snacking that checks all the boxes.
Who knew being a home cook could feel so rewarding? happy baking!
Pro Tips & Secrets
Let me tell you, baking your own nut bars with oats, seeds & chocolate isn’t just fun it’s downright rewarding. first off, when mixing your ingredients, take your time.
You want everything to blend perfectly. a few extra minutes might seem like a hassle, but trust me, it’ll pay off with super chewy, satisfying treats!
If you’re in a hurry (who isn’t sometimes?), try to chill the mixture while your oven preheats. it helps the flavors meld together beautifully, saving you time when you pop those bars into the oven.
Also, elevating flavor can be as simple as a sprinkle of sea salt on top after baking. it contrasts perfectly with the sweetness, giving it that wow factor.
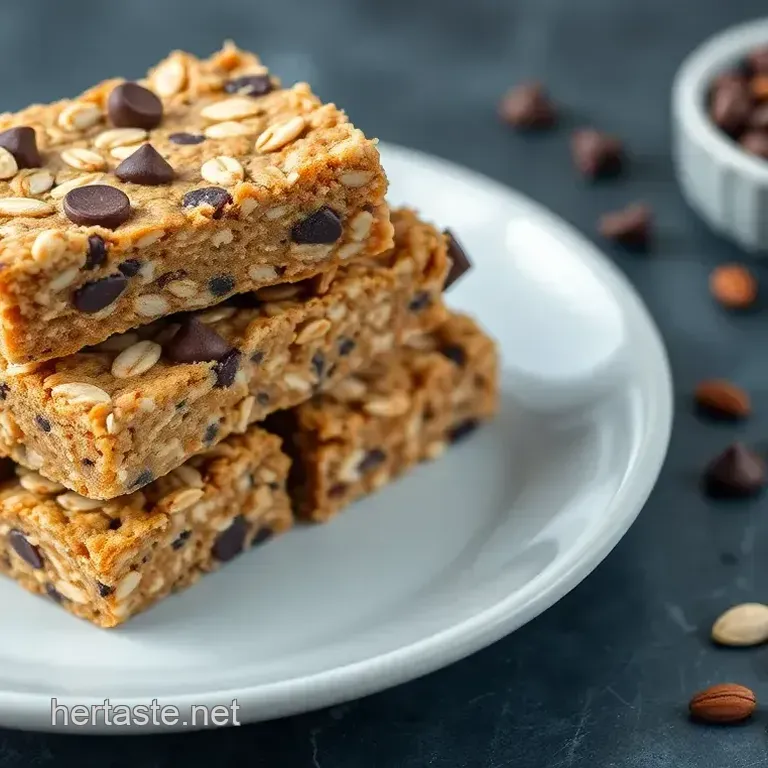
Speaking of presentation, think about how you'll serve these bars. Cut ‘em into funky shapes or stack them high on a platter. It's all about that visual appeal, baby!
Perfect Presentation

Let’s get real for a second: how your food looks matter a whole lot! when you're serving up your nut bars, remember to plate with flair.
Use a colorful dish something that pops against those golden brown bars. you want everyone to go, "oh my gosh, i need to try that!"
For garnishing, toss on some whole nuts or even a sprinkle of extra dark chocolate chips on top. you could even drizzle a bit of honey or maple syrup for that gourmet flair.
Use a mix of colors in your ingredients, too. think dark chocolate against the light golden oats; it looks beautiful and inviting!
Storage & make-ahead
Let’s talk practicality. if you’re like me, you often wish snacks could last longer. good news! these baked nut bars can be stored easily.
Just slide them into a resealable container and pop them in the fridge. they’ll stay fresh for about a week though honestly, they might not last that long if your friends and family find out about 'em!
Want to make them ahead? absolutely! prep these on a lazy sunday, and you've got meal prep snacks for the week.
Just reheat ‘em for a few seconds in the microwave if you prefer that soft, fresh out-of-the-oven vibe. no need to worry about freshness these bars are fiber rich snacks that keep their charm bite after bite.
Creative Variations
Now, how boring would life be if we didn’t switch things up occasionally? you can totally play around with this nut bar recipe .
Maybe swap in some dried fruits for a chewy bite or use different nut combinations. almonds, peanuts, hazelnuts it’s your playground!
Feeling adventurous? Try making vegan snack bars by using a nut butter without added sugar or dairy. You could even make a no-bake version by using dates and nut butter as the base hello, delicious energy bars with chocolate!
Use seasonal ingredients too! in the fall, toss in spiced pumpkin seeds ; come summer, juicy dried cherries could work wonders.
The options are endless, and your taste buds will thank you, believe me!
Complete Nutrition Guide
Now, let’s chat about why you should be excited about your nut bars. each bar is packed with nutrient dense ingredients .
With oats and seeds, they're rich in fiber and protein, making them an excellent choice for a healthy snack or pick-me-up during your busy day.
If you’re focusing on health, these bars can align perfectly with your diet. they offer the crunch you crave without the guilt of a processed snack.
Plus, pairing these with fresh fruit gives you a balanced boost hello, satisfying treats that don’t just taste good but are good for you too!
Expert FAQ Solutions
Had questions while whipping up your nut bars recipe ? no worries! a common one: “why are my bars too crumbly?” it’s usually because the mixture needs more moisture.
A few extra spoonfuls of nut butter can fix that, turning your mixture from meh to magnificent !
Another common conundrum: “how can i make these gluten-free?” simple! just ensure that your oats are certified gluten-free, and you're all set! whether you need high protein snacks or a fun energy boost, these bars are totally customizable to your lifestyle.
Wrap Up with Encouragement
Look, at the end of the day, baking your own nut bars with oats, seeds & chocolate doesn’t just make your kitchen smell like heaven it fills your belly with goodness too.
You’ve got the power to create homemade energy snacks that are perfect for breakfast, lunch, or an afternoon pick-me-up. i'm over here cheering you on to get your bake on! try it even if it’s just to enjoy some delicious nut snacks .
You’ve got this!
Bake Nut Bars With Oats Seeds Chocolate