Chocolate Ganache Cake: Ultimate Rich Velvety Recipe
- The Ultimate Rich & Velvety Chocolate Ganache Cake: A High Tea Indulgence
- Diving into Decadence: What Makes This Chocolate Ganache Recipe Superior?
- Essential Components for the Ultimate Chocolate Ganache Cake
- Layer by Layer: Comprehensive Directions for Baking and Assembly
- Expert Tips: Troubleshooting Your Chocolate Ganache Cake
- Practical Guide to Storing Your Decadent Creation
- Perfect Pairings: Elevating Your Chocolate Ganache Indulgence
- Recipe FAQs
- 📝 Recipe Card
The Ultimate Rich & Velvety Chocolate Ganache Cake: A High Tea Indulgence
The second this beautiful disaster starts baking, your entire kitchen shifts its atmosphere. Forget subtle sweetness; this is a heavy, dark, brooding scent of pure cocoa magic that promises sheer indulgence.
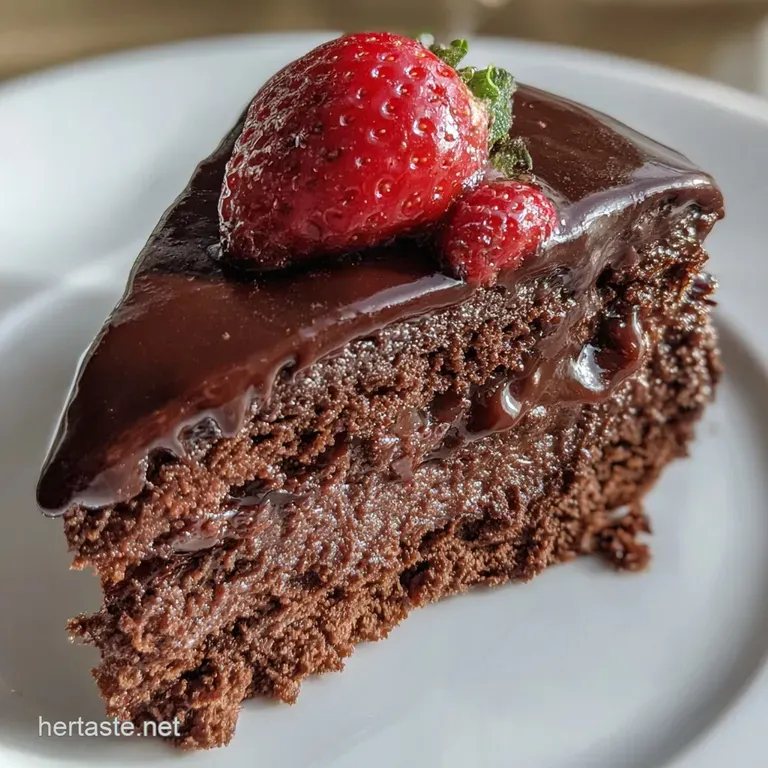
When you finally slice into the finished Chocolate Ganache Cake , the sound should be a dull thud, not a light, airy scrape, because this baby is fundamentally fudgy.
Everyone assumes this kind of dessert is a total nightmare to make, reserved only for professional bakeries and people who own fifteen different pastry tips. Wrong. This is an incredibly simple, oil-based cake that comes together faster than you think, and the entire luxurious effect is created by mastering just one ingredient: the chocolate ganache.
You can absolutely achieve that mirror glaze finish at home, I promise.
So, ditch the dry, crumbly recipes of the past and get ready for a deep dive. We’re going to build a stunning, velvety smooth Chocolate Ganache Cake that looks like it cost $80 but only requires standard pantry staples and high-quality chocolate. Let's crack on.
Diving into Decadence: What Makes This Chocolate Ganache Recipe Superior?
The difference between a nice chocolate cake and the Chocolate Ganache Cake everyone talks about relies entirely on moisture retention and temperature control. We aren't just making a cake, we’re creating a stable, high fat environment that keeps the crumb tender for days.
The magic starts with how we handle the cocoa.
The Science of Velvety: Unpacking the Perfect Cake Texture
This cake uses both oil and buttermilk, which are the power couple of moisture retention. Oil ensures the cake stays tender and avoids the toughness that melted butter can sometimes impart, while the acid in the buttermilk reacts perfectly with the baking soda, creating a light lift within that heavy cocoa structure. We want a dense, almost Chocolate Chip Brownie: The Ultimate Fudgy, Crinkly Top Recipe texture, not an airy sponge.
The Two-Part Ganache System Explained
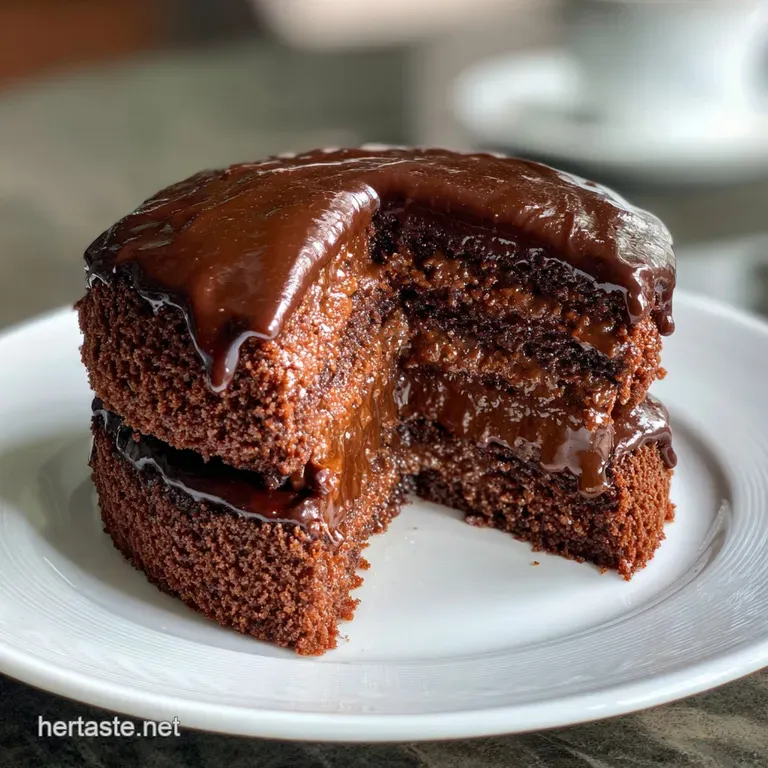
The secret to this intense ganache cake recipe is treating the frosting and the filling as two distinct entities. The interior filling needs to be firm and stable to hold the layers, which means chilling and then whipping the ganache until it's lightened and spreadable.
Meanwhile, the exterior glaze must remain smooth and liquid enough to pour, creating that shatteringly shiny coat.
High Tea Perfection: Balancing Richness and Intensity
The bitterness of high-quality dark chocolate (70% or more) is absolutely necessary here. When paired with the sweetness of the sponge, this contrast creates depth. If the whole thing is too sweet, it just tastes one-dimensional, heavy, and exhausting to eat.
This particular Chocolate Ganache Cake manages to be rich without being cloying.
Recipe Difficulty Level and Time Commitment
Don't be intimidated by the multiple steps; they are sequential and straightforward. The cake layers themselves are remarkably forgiving seriously, if you can stir, you can make them.
The medium difficulty rating comes purely from the need to manage the ganache temperatures precisely so you get that picture perfect, glossy sheen.
The Role of Hot Coffee in Enhancing Cocoa Flavor
You’re going to look at the instruction to add a cup of hot, strong coffee and think, "Is she trying to make a mocha?" Nope, zero coffee flavor here! The high acidity and heat of the coffee "blooms" the cocoa powder, releasing the full, rich depth of the chocolate flavor compounds. It also ensures all those little dry particles are fully dissolved, preventing a chalky texture later. This is my number one secret, and I even use this technique when making a Box Cake Moist: The Bakery Style Trick for Ultimate Tenderness .
Achieving the Ultra Moist, Brownie Like Crumb
We achieve that deeply fudgy crumb by using a specific ratio of wet to dry ingredients, making the batter super thin and runny. You might worry you’ve messed up when you pour it into the pans it looks like slightly thick chocolate milk!
Trust the process; this thin batter cooks into the moist, dense texture we want.
Stabilizing the Whipped Ganache for Filling
For the internal layer of this spectacular Chocolate Ganache Cake , we need stability. If you chill the ganache correctly (until it’s the texture of thick peanut butter) and then whip it, you incorporate air, making the filling lighter, easier to spread, and much more structural than just using plain, thick ganache.
This whipped chocolate ganache filling recipe prevents the layers from sliding.
Essential Components for the Ultimate Chocolate Ganache Cake
Every component here is designed to contribute to the final smooth, rich texture. Do not skimp on ingredient quality, especially the chocolate; it truly makes or breaks this elegant dessert.
Choosing the Right Percentage of Chocolate (The 60% vs. 72% Debate)
For a truly decadent, adult friendly flavor, 70 72% cacao is the sweet spot. It offers that beautiful bitterness that cuts through the cream and sugar. If you choose anything lower, like 60% bittersweet, your ganache cake will be sweeter, but you lose that intense, dark contrast.
I find milk chocolate is simply too rich and usually too soft for a stable ganache glaze.
Dry Ingredients: Sourcing high-quality Dutch Process Cocoa
Dutch process cocoa is non-negotiable for this particular Chocolate Ganache Cake recipe . It has been treated to reduce acidity, resulting in a darker color and a smoother, mellower chocolate flavor compared to natural cocoa.
Since we are already adding acid via the buttermilk, the Dutch process works perfectly with our leavening agents.
Dairy Decisions: Heavy Cream vs. Whipping Cream for the Glaze
Use heavy cream, which must contain at least 35% milk fat. Do not use half and half or light cream. The high fat content is what holds the emulsion together, giving you that beautiful, glossy sheen and ensuring the glaze sets firm enough to hold its shape on the finished Rich Chocolate Ganache Cake .
Smart Swaps: Adapting the Recipe for Dietary Needs
Need a substitution? No problem. Baking is about resourcefulness.
| Original Ingredient | Viable Substitute | Notes |
|---|---|---|
| Buttermilk | Whole Milk + 1 tsp White Vinegar | Measure the milk first, add the acid, and let it curdle for 5 minutes. |
| All-Purpose Flour | high-quality gluten-free Blend | Ensure the blend contains xanthan gum for structure. |
| Hot Coffee | Hot Water + 2 tsp Espresso Powder | If you truly hate coffee, just use hot water, but the flavor will be less deep. |
| Heavy Cream (Dairy) | Full Fat Canned Coconut Cream | Chill the can overnight, scoop the thick cream off the top (discard the liquid water). |
Layer by Layer: Comprehensive Directions for Baking and Assembly
This is where the magic happens. Preparation is key: measure everything, line your pans, and commit to following the temperatures closely.
Creating the Dark Chocolate Sponge Batter
First, preheat that oven to 350°F (175°C) and line your pans impeccably. Combine all your dry ingredients flour, sugar, cocoa, soda, powder, and salt in your mixer bowl. Give them a really good whisk to distribute the leavening.
Next, pour in the room temperature wet ingredients: eggs, buttermilk, oil, and vanilla. Mix until just combined. The mixture should look thick, like very heavy brownie batter. Now for the secret weapon: pour that scalding hot coffee directly into the mixing bowl while the mixer is running on low.
It will instantly liquefy the batter; stop mixing as soon as it's smooth. Bake immediately before the leavening agents lose their potency.
Mastering the Double Ganache: Preparing the Filling and Glaze
This is how to make chocolate ganache for cake that stays put. Put your finely chopped dark chocolate and butter into a bowl. Heat the heavy cream until it steams and just starts bubbling around the very edge. Remove it from the heat immediately and pour it right over the chocolate. Do nothing for five whole minutes.
This is crucial resting time. After five minutes, start whisking slowly in the absolute center of the bowl. You’ll see the mixture transform from cream and chunks to a smooth, shiny puddle. Once the center is smooth, gradually work your way outwards until every chunk is dissolved.
Crucial Chef’s Note: If your ganache looks oily or separated (broken), stop whisking furiously. Add one tablespoon of room temperature cream and whisk gently until it snaps back together into a gorgeous, cohesive emulsion.
Divide the batch: pull out 1 cup of this smooth mixture immediately. This is your Glaze. The rest is your Filling. Refrigerate the Filling until it’s thick and spreadable. I recommend whipping it right before assembly for a lighter texture.
The Precision Art of Layering and Crumb Coating
Your cakes must be totally, completely cold even slightly chilly is better than room temp. Use a serrated knife to level the domes. Spread the whipped chocolate ganache cake filling recipe evenly over the first layer. Stack the second layer on top.
Apply a thin, thin layer of the filling to the whole exterior of the cake this is the crumb coat. You need to trap all those stray crumbs! Chill the cake for 15 minutes. This ensures a clean canvas for the final pour.
Achieving the Mirror Glaze Finish
Retrieve the reserved ganache glaze. It should be thick, but pourable. If it's too thick, microwave it in 10 second bursts until it hits that perfect, satiny, drizzly consistency (ideally 95°F/35°C). Place the chilled, crumb coated cake on a cooling rack over a sheet pan (to catch the drips).
Start pouring the glaze quickly in the very center, letting it push itself out and over the edges. Don’t fuss with it too much; let gravity do the work. Once poured, leave it alone until it stops dripping, then carefully move it to a clean platter.
Expert Tips: Troubleshooting Your Chocolate Ganache Cake
We've all been there. I once tried to assemble a cake using warm filling and the whole thing slid onto the floor. Lesson learned: chilling is everything.
Preventing Splits: How to Emulsify a Broken Ganache
As mentioned above, if your beautiful dark mixture looks grainy, separated, or oily, it means the fat and water have separated. This usually happens because the cream was too hot or the chocolate was added too quickly.
To fix it, grab a separate small bowl, place 1 tablespoon of room temperature cream in it, and whisk in 1 tablespoon of the broken ganache, vigorously, until it smooths out. Then, gradually add the rest of the broken mixture to this small, smooth batch, whisking constantly until it comes back together. Patience is key!
Leveling Layers: Tools and Techniques for a Professional Stack
If you don't own a fancy cake leveler, don't worry. Use a long serrated bread knife and place your cake layer on a turntable. Keep the knife handle level on the counter and spin the cake while slicing steadily through the dome. Alternatively, simply slice the dome off and save it for making cake pops or a snack!
Judging Doneness: The Secret to an Undried Chocolate Sponge
Check your cakes at the 30 minute mark. Insert a wooden skewer or toothpick into the center. It should come out with a few moist, sticky crumbs attached, but not wet batter. If the skewer comes out completely dry, you've overbaked it, and the fudgy texture will be compromised.
Practical Guide to Storing Your Decadent Creation
You made an impressive chocolate dessert! Now, let’s ensure it stays fresh and delicious.
Short Term Storage: Refrigerating the Glazed Cake
Because the filling relies on heavy cream, this Chocolate Ganache Cake needs to be refrigerated. Cover it loosely with plastic wrap or store it in a cake carrier. It will keep beautifully for 4 5 days. Always serve it at room temperature.
Remove it from the fridge at least 90 minutes before serving so the ganache softens and the cake crumb becomes perfectly tender again.
Freezer Protocol: Best Practices for Unfrosted and Frosted Layers
You can absolutely freeze the sponge layers. Wrap them tightly in plastic wrap, then foil, and freeze for up to 3 months. Thaw overnight in the fridge. If the cake is fully glazed and you need to freeze it, place it in the freezer uncovered until the ganache is solid (about 2 hours), then wrap it tightly in plastic wrap and freeze.
Thaw overnight in the fridge, unwrapped, to prevent condensation from messing up the shiny glaze.
Perfect Pairings: Elevating Your Chocolate Ganache Indulgence
This cake is already a showstopper, but the right accompaniment can turn it into an event.
Coffee and Tea Complementary Notes
The richness demands a strong, cleansing beverage. Skip the sweet sodas. A simple, robust black coffee, like a fresh French press or a strong Americano, is a perfect counterpoint. For tea drinkers, look for something with tannins a smoky Earl Grey or a classic Assam works wonders, cleaning the palate between bites of that dense, rich chocolate.
Seriously, I drink a massive cup of tea while I indulge in this! This specific Chocolate Ganache Cake is truly a masterpiece, and sharing this chocolate ganache cake recipe makes my day.

Recipe FAQs
Why did my ganache break or look grainy/oily?
Ganache breaks (or 'seizes') if the temperature difference between the chocolate and the cream is too extreme, or if the mixture is stirred too vigorously, incorporating air. To fix a broken ganache, try adding a tablespoon of lukewarm water or milk to the mixture and whisking slowly and steadily from the center outwards until the emulsion comes back together.
Can I use water instead of hot coffee in the chocolate sponge?
Yes, you can substitute the hot coffee with an equal amount of hot water, or even hot milk, without significantly impacting the texture. However, the coffee serves a crucial role by intensifying the depth of the chocolate flavor without leaving a distinct coffee taste in the finished cake.
The heat from the liquid is essential as it "blooms" the cocoa powder, resulting in a darker, richer cake.
My whipped ganache filling is too runny. How do I fix it?
If your ganache is too soft, it simply needs more time to chill and solidify. Return the bowl to the refrigerator for 15-30 minutes, checking it periodically until it is firm enough to hold stiff peaks when whipped.
Alternatively, ensure your ratio of chocolate to cream is correct; for a stable filling, the chocolate content should be higher than for a glaze.
How should I store the finished Chocolate Ganache Cake, and how long does it last?
The finished cake can be stored under a cake dome or in an airtight container at cool room temperature (below 70°F) for up to two days. If you need to keep it longer, refrigerate it for up to five days.
Remember to let the refrigerated cake sit out for at least 30 minutes before serving, as the ganache will be quite firm when cold.
Can this recipe be adapted to be gluten-free or dairy-free/vegan?
The sponge is easily made gluten-free by swapping the all-purpose flour for a measure for-measure gluten-free baking blend. For a vegan cake, use a combination of oil and plant based milk/vinegar for the sponge, and substitute the heavy cream in the ganache with high fat, canned coconut cream (using only the solidified top portion) or a quality vegan heavy cream alternative.
I want a thicker, more structured cake. Can I add more flour?
It is not recommended to arbitrarily add more flour, as this will result in a denser, drier cake and interfere with the liquid ratios. If you desire taller, more structured layers, ensure you are not over mixing the batter, which can develop the gluten too much.
For presentation, you can always bake thinner layers and stack them higher, using more filling between each layer.
Can I bake the cake layers ahead of time and freeze them?
Absolutely. Once the cake layers are completely cooled, wrap each layer tightly in plastic wrap, followed by a layer of aluminum foil, and freeze for up to two months. When ready to use, thaw the layers overnight in the refrigerator (still wrapped) and then let them reach room temperature before assembling to prevent condensation.
Rich Chocolate Ganache Cake Recipe
Ingredients:
Instructions:
Nutrition Facts:
| Calories | 697 kcal |
|---|---|
| Protein | 9.0 g |
| Fat | 47.0 g |
| Carbs | 63.0 g |
