Twix Pie: No-Bake Salted Caramel Chocolate Dream
- The Ultimate No-Bake Indulgence: Introducing Our Twix Pie
- The Science of Success: Why This Layered Pie Recipe Triumphs
- Gathering Your Layers: Essential Components and Smart Swaps ( Count: 10)
- Billionaire Bar Method: Crafting the Perfect Three-Layer Dessert ( Count: 14)
- Insider Secrets: Mastering the Crust, Caramel, and Ganache ( Count: 19)
- Making Ahead and Maintaining Freshness: Storage Solutions ( Count: 21)
- The Final Flourish: Perfect Pairings and Presentation ( Count: 23)
- Recipe FAQs
- 📝 Recipe Card
The Ultimate No-Bake Indulgence: Introducing Our Twix Pie
If I told you there was a dessert that combined the satisfying crunch of shortbread, a ridiculously rich, chewy layer of salted caramel, and a decadent blanket of dark chocolate ganache, what would you say? You'd say, "Where has this been all my life?" And you'd be right.
This recipe for Twix Pie is a total game changer, delivering that nostalgic, buttery caramel punch we all crave, but in a sophisticated, deep dish format. Forget the fiddly process of baking individual shortbread bars; we are going big, easy, and undeniably delicious.
I know what you're thinking: making homemade caramel sounds like a nightmare involving thermometers and burned fingers. Trust me, I’ve been there, scraping scorched sugar from the bottom of a pan and wanting to weep.
But this No Bake Twix Pie uses the cheat code of condensed milk, transforming the filling process into a low-stress, high reward kitchen activity. It requires surprisingly little active effort, making it the perfect dessert when you need huge impact but minimal fuss.
So, grab your pie dish, clear some space in the fridge, and get ready to create something legendary. This isn't just another dessert; this is the Easy Twix Pie recipe you’ll be making for every celebration, holiday, and random Tuesday night for the rest of time.
Let's make some magic happen, shall we? ( Count: 3)
The Science of Success: Why This Layered Pie Recipe Triumphs
Every great recipe has a secret weapon, a fundamental structural choice that makes it succeed where others fail. When we talk about recreating the experience of a chocolate bar like Twix in pie form, texture is everything. You need distinct, defined layers a firm base, a stable chew, and a snappy coating.
That’s what we master here.
Why We Swapped Shortbread Bars for a Deep Dish Pie ( Count: 4)
Traditional Millionaire’s Shortbread (which is the grown-up blueprint for the Twix Pie ) involves baking a thick shortbread base, allowing it to cool, then spreading the caramel, chilling, and finally adding the chocolate. It’s glorious, but cutting those perfect squares is a chore.
Plus, rolling out dough? No thanks. By using a crushed biscuit crust pressed into a pie dish, we achieve that same buttery, crumbly base with about ten minutes less effort and zero risk of dough shrinkage.
The stability of the baked and cooled shortbread shell is the foundational key to handling the rich caramel layer that comes next.
The No-Bake Advantage: Speed and Stability ( Count: 5)
While we do technically bake the shortbread crust to make it structurally sound (don't skip this step!), the caramel and chocolate layers are entirely no-bake. This is where the magic of the condensed milk caramel comes in.
Traditional dry-sugar caramel requires precise heating and hydration, which is notoriously tricky. Our method skips the stress. By relying on sweetened condensed milk, we ensure the caramel sets into a creamy, fudgy slab right in the pie dish, totally eliminating the fear of runny filling.
This Twix Pie Recipe focuses on maximizing flavour while minimizing the risk of failure.
Flavor Profile Breakdown: Salted Caramel Meets Buttery Crust ( Count: 6)
The key to a truly addictive dessert is complexity, not just sweetness. This Twix Pie uses three distinct flavour profiles. First, the crust provides a salty, buttery, slightly savory note.
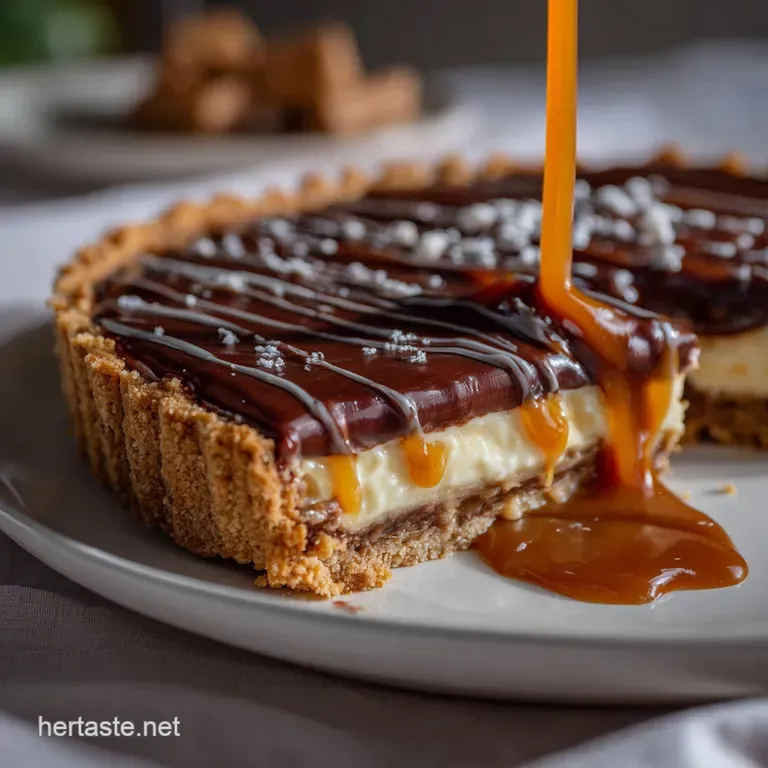
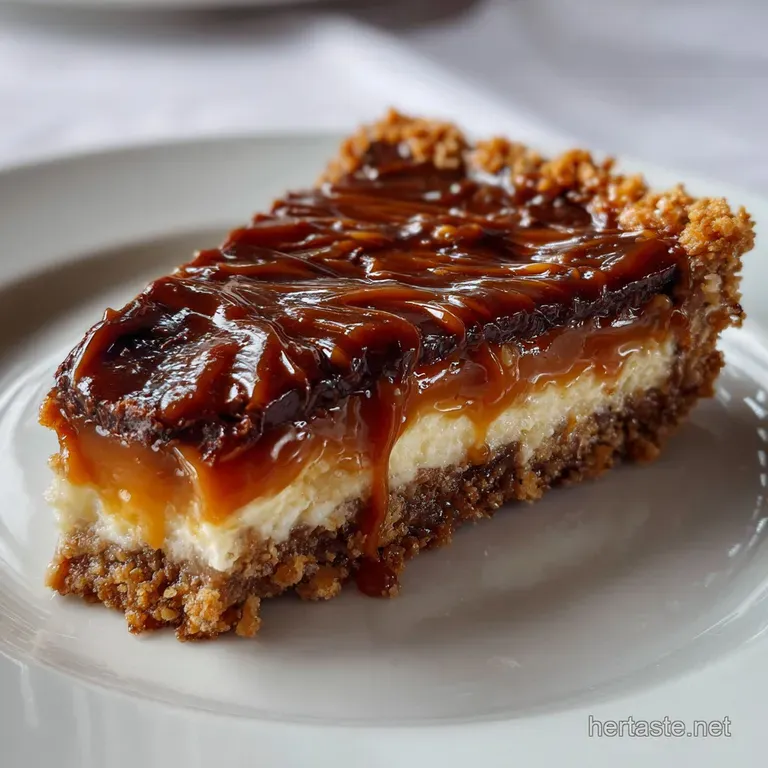
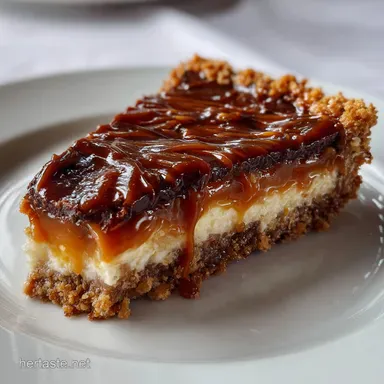
Second, the caramel is sweet, sticky, and deeply flavoured with brown sugar, but gets balanced by the crucial addition of flaky sea salt. That salt is non-negotiable! Finally, the dark chocolate ganache (70% cocoa is my preference) cuts through all the richness with a slight bitterness, offering a satisfying counterpoint to the sweetness.
This balance is what makes this a standout dessert, miles better than just eating a bag of candy.
Achieving the Non-Runny, Set Caramel Center ( Count: 7)
The secret to a caramel that holds its shape, allowing you to slice clean wedges of Twix Pie , is twofold: time and technique . When cooking the caramel, you must let it simmer and thicken on the stove for the full 5– 7 minutes, stirring constantly.
You are reducing the moisture content and allowing the sugars and fats to emulsify into a semi solid toffee. It needs to get slightly darker and visibly thicker. If it still looks liquidy when you pour it, it will be runny when you slice it. Patience now saves a sloppy mess later.
The Crucial Role of Chilling Time ( Count: 8)
You absolutely cannot rush the chilling phase for this Chocolate Caramel Pie . Think of the fridge as the oven for a no-bake dessert it’s where the structure is built.
After the caramel is poured, it needs a minimum of three hours to firm up enough to support the warm ganache without melting it or mixing with it. If you pour warm ganache onto soft caramel, you get a muddy mess.
Once the ganache is added, another couple of hours in the cold makes sure the final product is clean and shard like when cut. Yes, waiting is hard, but a firm slice of Twix Pie is the reward.
Balancing Sweetness with a Hint of Sea Salt ( Count: 9)
I touched on this already, but it bears repeating: Salt is essential. We use fine salt in the crust to enhance the butter, and we use flaky sea salt (like Maldon) both in the caramel and on top of the finished ganache.
The caramel filling is rich due to the condensed milk, and without salt, it can taste cloyingly sweet. Adding the flaky salt on top gives that incredible textural crunch and hits your palate with a salty burst right before the sugar overload, making you crave the next bite of this beautiful Twix Pie .
Gathering Your Layers: Essential Components and Smart Swaps ( Count: 10)
You don't need a massive list of ingredients for a spectacular dessert, just good quality ones. Since this is a simple, rich layering process, the quality of your chocolate and dairy really shines through.
The Best Biscuits for a Stable Shortbread Crust ( Count: 11)
For this particular Twix Pie Recipe , I always rely on Digestive Biscuits if I can find them they’re a British staple and have that perfect oaty, slightly salty crunch that mimics shortbread perfectly when crushed. They absorb the melted butter just right.
| Ingredient | My Recommendation | Swap/Substitute |
|---|---|---|
| Digestive Biscuits | McVitie’s or similar | Shortbread cookies, Graham crackers, or Vanilla Wafers (Nilla Wafers) |
| Unsalted Butter | European style high fat butter | Use salted butter, but reduce the added salt in the crust mixture by half. |
Upgrading Your Caramel Base: Cream vs. Milk
Notice that we use sweetened condensed milk, not heavy cream, for the caramel base of this Twix Pie . Heavy cream requires more precise cooking and risks breaking or turning grainy if the heat or cooking time is off.
Condensed milk already contains a high concentration of sugar and milk solids, meaning it needs far less cooking to thicken up beautifully. It practically guarantees a set, chewy, and gorgeous caramel center for your Twix Dessert .
Chef's Note: Adding a tablespoon of Golden Syrup (or corn syrup) is a pro move. This tiny step prevents the sucrose in the mixture from crystallizing as it cooks, keeping your caramel unbelievably smooth and glossy. Trust me; skipping this can leave you with gritty caramel.
Ingredient Deep Dive: Choosing Chocolate for the Silkiest Ganache ( Count: 12)
If you use waxy or low-quality chocolate chips for the ganache, you risk a dull finish and a less satisfying snap. For a truly luxurious Twix Pie , opt for baking bars or good quality chocolate chips that contain a higher percentage of cocoa butter.
I recommend 70% dark chocolate; it provides the robust, slightly bitter chocolate flavour needed to counteract the very sweet caramel. If you prefer a milder taste, use a 60% semisweet, but definitely avoid standard milk chocolate, which often struggles to set firm enough for a clean slice.
Troubleshooting dairy-free Options for This Decadent Dessert ( Count: 13)
Yes, you can absolutely adapt this Easy Twix Pie for dairy-free diets, though the texture might be slightly different. Use vegan shortbread or Graham crackers for the crust, swapped with vegan butter sticks (Miyoko's works great).
For the caramel, replace the sweetened condensed milk with a canned sweetened coconut condensed milk product. You might need to simmer it a touch longer to ensure it thickens enough. Finally, use a high-quality, full fat canned coconut cream (the solid part) heated with dairy-free dark chocolate for the ganache.
It's a wonderful alternative for enjoying this glorious Twix Pie .
Billionaire Bar Method: Crafting the Perfect Three Layer Dessert ( Count: 14)
This process is broken down into simple, manageable steps. Remember, chilling is the majority of the work here.
Step 1: Pressing and Setting the Foundation Crust ( Count: 15)
First things first: Preheat that oven to 350°F / 175°C. Crush your biscuits until they look like coarse sand, but don't over process them into dust. Mix in the melted butter, sugar, and salt. You want the mixture to look like wet beach sand that holds its shape when squeezed.
Press this firmly into the bottom and up the sides of your 9 inch pie dish. This firm pressing is critical ; use the bottom of a measuring cup or glass to compact it tightly. A firm base ensures your finished Twix Pie holds up when sliced.
Bake for 12– 15 minutes until it smells nutty and the edges are lightly golden. Then, cool it completely on a rack.
Step 2: Preparing and Cooling the Smooth Salted Caramel ( Count: 16)
This is the heart of the Twix Pie . In a heavy bottomed saucepan, combine the butter, brown sugar, condensed milk, and golden syrup over medium low heat. Stir everything together until the sugar dissolves. Once it begins to bubble gently, continue stirring constantly.
Watch the clock: you must stir and simmer for 5– 7 minutes. The mixture will darken slightly and noticeably thicken it should be about the consistency of thick, bubbling lava.
Once thick, remove it from the heat, stir in the vanilla and half the salt, and immediately pour it into your cooled crust. Now, patience! Chill for at least 3 hours.
Step 3: Layering the Decadent Chocolate Topping ( Count: 17)
Once the caramel is truly set and cold to the touch (it shouldn't feel sticky or wet), you can make the ganache. Chop your chocolate finely and place it in a bowl. Heat the heavy cream until just simmering you’ll see little bubbles around the edge.
Pour the hot cream over the chocolate and leave it alone for five minutes. Do not touch it! This allows the heat to melt the chocolate evenly. Then, starting in the center, gently whisk until it transforms into a smooth, dark, and glossy liquid.
Pour this warm ganache over the chilled caramel layer in your Twix Pie , spreading it gently if needed, but try not to disturb the caramel underneath.
Step 4: Final Chill and Release from the Pan ( Count: 18)
Return the assembled Twix Pie to the fridge. This final chill is usually 1– 2 hours, or until the chocolate topping is firm and dull rather than glossy and liquid. Once set, you can garnish.
Chopping the remaining Twix bars coarsely provides that final, essential textural element and leaves no doubt about what delicious Dessert Facile you have created! Sprinkle the remaining flaky salt over the top for good measure.
Insider Secrets: Mastering the Crust, Caramel, and Ganache ( Count: 19)
We’ve covered the basics, but sometimes the little things trip people up. Here are the true insider tips I’ve learned the hard way that guarantee success with your Twix Pie .
Preventing a Crumbly or Sticky Pie Crust
If your crust falls apart when you cut it, you didn't press it firmly enough before baking, or you didn't add enough fat. If it’s too sticky, you may have used too much butter or melted your butter too hot, causing it to separate from the crumbs. The fix?
If it’s too crumbly before baking, microwave a tablespoon of butter, mix it in, and press harder. If it's crumbly after baking, next time, add an extra tablespoon of sugar to help it bind.
Baking the crust briefly also helps set the structure don't treat this like a true no-bake Graham cracker crust; the shortbread needs the oven time.
How to Test Caramel for the Perfect Consistency ( Count: 20)
You don't need a candy thermometer for this condensed milk caramel, but how do you know when it's done? The visual check is key: the mixture should darken slightly to a rich fawn colour and it should coat the back of a spoon thickly.
If you drag your rubber spatula across the bottom of the pan, the caramel should hold its separation briefly before the liquid flows back together. That brief resistance means it has enough body to set beautifully in the Twix Pie .
Avoiding Ganache Separation (Breaking)
Ganache separates (or ‘breaks’) when the fat and liquid components stop emulsifying, usually because the cream was too cold, or you whisked too aggressively, incorporating air.
To fix a separated ganache (it will look oily or grainy): add one tablespoon of cold heavy cream to the mixture and gently whisk until it snaps back together, glossy and smooth. If that fails, heat 2 tablespoons of cream, remove from heat, and slowly whisk your broken ganache into it until stable.
This is a common pitfall when making rich Sweets Treats .
Cutting Clean Slices of Twix Pie
For a stunning presentation, the trick is warmth and speed. Use a thin bladed chef's knife. Dip the knife into a tall glass of hot water for 30 seconds, wipe it completely dry (moisture is the enemy), and then make a single, decisive cut. Repeat the heating and wiping process for every single slice. This ensures the chocolate layer cracks neatly instead of shattering or dragging, making your presentation of this rich Twix Pie flawless. You can compare the gorgeous clean slices here to the tricky cutting involved in something like my Apple Pie Bars with Streusel Topping Easy Sheet Pan Recipe — this cold set pie actually cuts much easier if you use the hot knife method.
Making Ahead and Maintaining Freshness: Storage Solutions ( Count: 21)
This Twix Pie is the ultimate make-ahead dessert. In fact, it's better on Day 2 than on Day 1, as the layers have had maximum time to meld and set.
Refrigeration Guidelines for Uncut Pie
Store the fully assembled and uncut Twix Pie in the refrigerator, loosely covered with plastic wrap, for up to 5 days. I recommend waiting to add the chopped Twix pieces and the final sprinkle of flaky salt until about 30 minutes before serving.
If you add the toppings too soon, the shortbread pieces from the candy bar can sometimes get damp or soft in the cold fridge environment.
Does Caramel Freeze Well? (Freezing Raw vs. Cooked Pie) ( Count: 22)
Yes, the dense, stable caramel used in this Twix Pie freezes exceptionally well! You can freeze the entire pie.
- Preparation: Place the pie, uncovered, into the freezer for 2 hours until rock hard.
- Wrapping: Once frozen, wrap the entire pie dish tightly in two layers of plastic wrap, followed by a layer of aluminum foil.
- Storage: It will keep beautifully in the freezer for up to 3 months.
- Thawing: Thaw the pie overnight in the refrigerator (still wrapped) to prevent condensation. Once thawed, unwrap, garnish, and serve. The texture of the crust and caramel remain fantastic. This is much easier to manage than dealing with the ice cream base in my Keto Chocolate Mousse Pie: Ultra Creamy, No-Bake, Low Carb Dessert , which is slightly more temperamental in the freezer.
The Final Flourish: Perfect Pairings and Presentation ( Count: 23)
You’ve done the work, you’ve waited the time, and now it’s time to enjoy the fruits of your labor specifically, perfect wedges of Twix Pie .
For presentation, nothing beats that contrast of dark chocolate against the golden caramel. If you're feeling fancy, drizzle a tiny bit of extra caramel sauce (store-bought is fine!) in a tight spiral over the top right before scattering the Twix pieces. The perfect pairing?
Because this pie is so rich, it demands a counterpoint. I love serving it with a light, barely sweetened whipped cream or even a scoop of tart raspberry sorbet. The acidity of the berries cuts through the fat and sugar beautifully, leaving your palate refreshed and ready for another bite of this ultimate Pie Recipe .
This Twix Pie truly is the dessert everyone talks about long after the party is over. ( Count: 24)

Recipe FAQs
How long will the Twix Pie keep, and how should I store it?
Store the Twix Pie covered tightly with cling film or foil in the refrigerator for up to 5 days. Since this is a no-bake dessert relying entirely on chilling for structural integrity, it is crucial to keep the pie cold until serving time. Do not store it at room temperature for extended periods.
Why is my salted caramel layer too runny or not setting properly?
The main culprits for a runny caramel layer are not boiling the mixture long enough to reach the necessary thickness or adding too much liquid binder. Ensure you follow the recipe's exact chilling time, as the caramel needs several hours (or preferably overnight) in the cold to stabilize completely.
Can I use a traditional graham cracker or cookie crust instead of shortbread?
Absolutely, though the shortbread crust provides the authentic Twix flavor profile. You can substitute the shortbread with crushed digestive biscuits, graham crackers, or even vanilla wafers for a slight flavor variation. Ensure your butter-to-crumb ratio is correct to achieve a firm, pressable crust.
Should this pie be served cold or at room temperature?
This pie is best served chilled directly from the refrigerator, as the cold temperature keeps the dense caramel and chocolate layers firm and clean for slicing. If the pie is left out at room temperature for more than 30 minutes, the layers may become excessively soft and the texture will be too gooey.
How do I get clean slices without the filling sticking to the knife?
For perfect, clean presentation, the secret is heat and friction reduction. Dip a large, sharp knife into very hot water, wipe it completely dry, and then make your cut immediately while the blade is warm. Repeat this hot water technique before making every single slice.
Can this recipe be made gluten-free or dairy-free?
The pie is easily adapted to be gluten-free by using certified gluten-free shortbread cookies for both the base and the topping mix. Converting to dairy-free is trickier, as the structure depends heavily on condensed milk and butter.
You would need to substitute with high-quality dairy-free condensed milk and margarine, which may slightly alter the setting time.
Can I freeze the finished Billionaire's Bar Twix Pie?
Yes, this pie freezes beautifully. You should wrap the whole pie (or individual slices) tightly first in cling film, then again in aluminum foil to prevent freezer burn. Thaw the pie slowly overnight in the refrigerator before unwrapping and slicing for the best texture.
No Bake Twix Pie Recipe
Ingredients:
Instructions:
Nutrition Facts:
| Calories | 1034 kcal |
|---|---|
| Protein | 10.7 g |
| Fat | 72.7 g |
| Carbs | 86.1 g |
