No-Bake Chocolate Peanut Butter Protein Crispy Bars
- An Irresistible Treat for Everyone
- A Yummy History Lesson
- Why They’re Awesome
- Sweet Transition
- Your Essential Ingredients Guide to No-Bake Protein Crispy Bars
- Mastering the Art of Professional Cooking: A Delicious look into into No-Bake Protein Crispy Bars
- No-Bake Protein Crispy Bars - Healthy Snack: All You Need to Know
- 📝 Recipe Card
An Irresistible Treat for Everyone
Oh my gosh, let me take you back to a sunny saturday afternoon. i was knee deep in a home workout plan, and i realized i needed a snack that would boost my energy without sending my sugar levels through the roof.
That's when i thought of the no-bake protein crispy bars - healthy snack i whipped up a few weeks prior.
Honestly, those bars were life changing! they were not just a crunchy, chocolatey bite; they were a full blown energy hit that made me feel like i could conquer the world.
If you’re looking for healthy no-bake snacks , you’re in for a treat!
A Yummy History Lesson
The charm of these squares goes beyond their simple ingredients. their origins can be traced back to classic rice crispy treats, but they get a modern twist by packing in protein and using natural sweeteners.
These bars have gained popularity in gyms and homes alike. honestly, when you have a dessert that’s easy to make and also gives you that lean protein punch, who wouldn’t love it?
Making these bars is a breeze too. it takes about 15 minutes to throw together, plus 30 minutes in the fridge to chill.
So that’s just about an hour of your life for some serious snacking delight. plus, they yield a solid 12 bars, making them perfect for sharing or not, no judgment here!
And don’t even get me started on the costs. with some simple ingredients like oats, peanut butter, and honey, these bars won’t break the bank.
You can honestly feel good about making these nutritious snack options for both you and your family.
Why They’re Awesome
Now, let’s jump into the good stuff the benefits! first off, these bars are high in protein, making them a solid choice for fitness snacks or a pick-me-up between meals.
They are also great for meal prep, allowing you to whip up a batch for the week ahead.
Nutritious and satisfying, they are excellent for special occasions or just a simple grab and-go option when you're tight on time.
Feeling a bit rebellious? these are better than a candy bar for sure. with a mix of nut butter recipes and a drizzle of dark chocolate, they can satisfy any craving without the guilt trip!
Plus, they're adaptable! want to make vegan protein bars? swap honey for maple syrup. you can even sprinkle some chia seeds in there for an omega-3 boost, turning them into chia seed energy bars .
Seriously, the possibilities are endless.
Sweet Transition
So, if you’re ready to dive into this, let’s talk about what you need to whip up these crunchy, chocolate-y delights! gather your ingredients, and i promise you won’t regret skipping that store-bought option for something so much better.
These easy no-bake recipes are truly a lifesaver when you need something fed with love. remember, you can control what goes into them making them just how you and your family like it.
Keep reading to check out the ingredient list!
Your Essential Ingredients Guide to No-Bake Protein Crispy Bars
Let’s dive into the nitty gritty of what makes up our No-Bake Protein Crispy Bars - Healthy Snack. The secret isn’t just in the mixing but in the quality and freshness of each ingredient!
Premium Core Components
When you’re crafting your protein bars , it's all about what you’re using . Here’s a runway of essential ingredients and how to choose them:
Rolled Oats (2 cups/60g): These little beauties are the base of your bars. Always go for 100% whole grain . Store in a cool, dry place and they’ll last a year!
Crispy Brown Rice Cereal (1 cup/30g): Look for something that’s light and crunchy. Check the label— no added sugars .
Natural peanut butter (1 cup/250g): don’t skimp here, folks! look for natural varieties with only peanuts and salt. and a little trick? if it’s hard to stir, zap it in the microwave for about 15-20 seconds .
Honey or Maple Syrup (½ cup/160ml): Go for local honey if you can. It packs flavor and doesn’t hurt your wallet.
Dark Chocolate Chips (½ cup/90g): Bittersweet is the way to go. Aim for at least 70% cocoa for those rich, chocolatey vibes. Store these in a cool spot to keep 'em fresh!
Signature Seasoning Blend
Now, let’s sprinkle some love into these bars with signature flavors. You know how everything tastes better with a little something extra?
Chocolate Protein Powder (1 scoop/30g): This is where those energy boosting benefits come from. Check if it's got natural sweeteners and no funky additives.
Coconut Oil (1 tbsp/15ml): This helps your chocolate melt perfectly. It also adds a rich flavor that makes you go, “Oh my gosh, yes!”
Smart Substitutions
Let's talk swaps. Sometimes we run out of stuff, and that's okay!
Peanut Butter Alternatives: No peanut butter? Grab some almond or sunflower butter instead. Instant deliciousness!
Sweetener Options: If honey isn’t on your list today, maple syrup is always a fab go-to for a sweet touch.
Protein Powder Variety: Mix it up! Use vanilla protein powder if that’s your jam. Trust me, it still tastes divine.
Kitchen Equipment Essentials
No fancy tools needed! Just the basics:
Mixing Bowl: You gotta have it. A big one, too!
Rubber Spatula: This thing is a game changer for mixing and spreading.
Baking Dish (8x8-inch/20x20 cm): Line it with parchment paper. You’re gonna thank me later when it comes to pulling the bars out!
Microwave Safe Bowl: For melting those chocolate chips with the coconut oil. Just don’t walk away! 30-second intervals, folks stir in between!
Why This Matters
Now, why am i going on about all this? because making homemade protein bars should feel doable . any kitchen hero can whip these up in 15 minutes of prep time .
Plus, they chill while you kick back for just 30 minutes . boom! snack heaven.
Did you know? A recent study found that meal prepping with nutritious snack options like these can boost your energy levels and help manage cravings a win-win!
These bars will keep you fueled for those moments when you need a quick pick-me-up, especially after a workout. seriously, just think of it as a fancy treat for doing something good for yourself.
You deserve it!
Ready to Get Started?
Alright, my friend! now that we've laid the groundwork on these essential ingredients, it’s time to roll up our sleeves and make some delicious no-bake chocolate peanut butter protein crispy bars.
I can almost taste that crunchy, chocolatey goodness just thinking about it! let's cook together! check out the detailed recipe section next.
Mastering the Art of Professional Cooking: A Delicious look into into No-Bake Protein Crispy Bars
Cooking can be a challenge, but honestly, there's something so satisfying about homemade goodies. especially when they’re good for you! so, let's dive into making these super easy no-bake protein crispy bars - healthy snack .
This recipe is simple, quick, and the perfect fit for anyone looking for a healthy pick-me-up. plus, they’re packed with protein a total win-win!
Essential Preparation Steps
Alright, first things first: mise en place . this fancy french term just means "everything in its place." gather all your ingredients oats, crispy rice cereal, protein powder , and more.
Having everything ready speeds up the process a ton.
Time management is key, too. you’ll need about 15 minutes to prep and then 30 minutes to chill in the fridge.
So, while those bars are cooling, you can tidy up your kitchen or binge watch a quick episode of your favorite show.
Multi tasking at its best!
Next, let’s talk organization strategies . lay out your utensils beforehand. a mixing bowl, baking dish, and spatula are all you need.
And not to forget, keep safety in mind while working with that microwave for melting chocolate. keep an eye on it and stir between intervals.
No one wants burnt chocolate!
Step-by-step Process
Now, let’s get into the fun stuff!
- Line your baking dish with parchment paper. This helps you pop the bars out later.
- Mix your dry ingredients : oats, crispy rice cereal, and 1 scoop of chocolate protein powder in a bowl.
- In another bowl, mix 1 cup of natural peanut butter with ½ cup of honey . If you’re like me, you might want to pop it in the microwave for about 15-20 seconds . It makes mixing so much easier.
- Combine everything together. Get in there and mix like crazy!
- Press that mixture firmly into the baking dish. You want it packed tight to hold its shape.
- Melt ½ cup of dark chocolate chips with 1 tablespoon of coconut oil in the microwave. Stir it up between 30-second intervals until it’s smooth. It's a chocolate dream!
- Spread that melted chocolate on top of your packed mixture.
- Now, chill it! Stick your bars in the fridge for at least 30 minutes .
- And voila! Once they’re solid, cut them into bars.
Expert Techniques
Want some insights from the pros? Here’s the deal:
- When you mix the wet and dry ingredients, make sure everything’s coated evenly. That peanut butter mixture can be thick, so use a spatula to really mix it all together.
- Quality checkpoints : Look for a nice even texture when pressing into the dish. If your mixture’s crumbly, it won’t hold well.
- Troubleshooting tips : If the bars fall apart, don’t sweat it! Just pack them tighter next time or add a bit more peanut butter.
Success Strategies
Let's wrap this up with some strategies for success. We all make mistakes in the kitchen! One common mistake is not pressing the mixture down firmly enough. Remember, pack it in there!
For quality assurance , taste test before chilling. It’s totally acceptable! Plus, you want to know if more chocolate or nut butter might elevate your bars.
Not all snacks need to be made on-the-fly. These make-ahead options are perfect for busy weeks. Store them in an airtight container in the fridge, and you have a delicious, nutritious snack option ready for you anytime!
So, what’s not to love? these no-bake protein crispy bars not only provide that much needed energy boosting snack but also cater to your craving for something sweet, thanks to those natural sweeteners in recipes .
In just 45 minutes , you’re set with 12 bars of guilt free treats that are perfect for you and your family.
As we gear up to our last section on additional information, remember, cooking is personal. each kitchen adventure teaches us something new.
Don't worry about perfection just enjoy the process and those delicious bars at the end!
No-Bake Protein Crispy Bars - Healthy Snack: All You Need to Know
Hey there, snack lovers! if you’re on the lookout for a healthy no-bake snack that hits the spot, then you’re gonna love these no-bake protein crispy bars.
Trust me, they’re a perfect blend of chocolate and peanut butter bliss, yet super easy to whip up. let’s dive into some pro tips and helpful info to make your snacking experience even better!
Pro Tips & Secrets
First off, let’s talk about making your kitchen life easier. timing is everything you’ll only spend about 15 minutes prepping these bars, and then just let them chill for about 30 minutes .
That’s some serious fast food right there, huh? and here’s a little chef’s insight: if your peanut butter is putting up a fight and not mixing well, pop it in the microwave for about 20 seconds.
It’ll smooth right out!
For extra flavor, consider adding a pinch of sea salt or a splash of vanilla extract. it’s like giving your bars a rock star upgrade! and when it comes to presentation don’t just throw those bars on a plate.
Try cutting them into fun shapes or drizzling a bit more melted chocolate on top. you want your homemade protein bars to look as good as they taste!
Perfect Presentation
Let’s make those treats as eye-catching as they are tasty! plating can boost your overall snack game. you can cut the bars into triangles or fun rectangles to mix things up.
And here’s where you get artsy: sprinkle some chia seeds on top or add crushed nuts for a beautiful garnish.
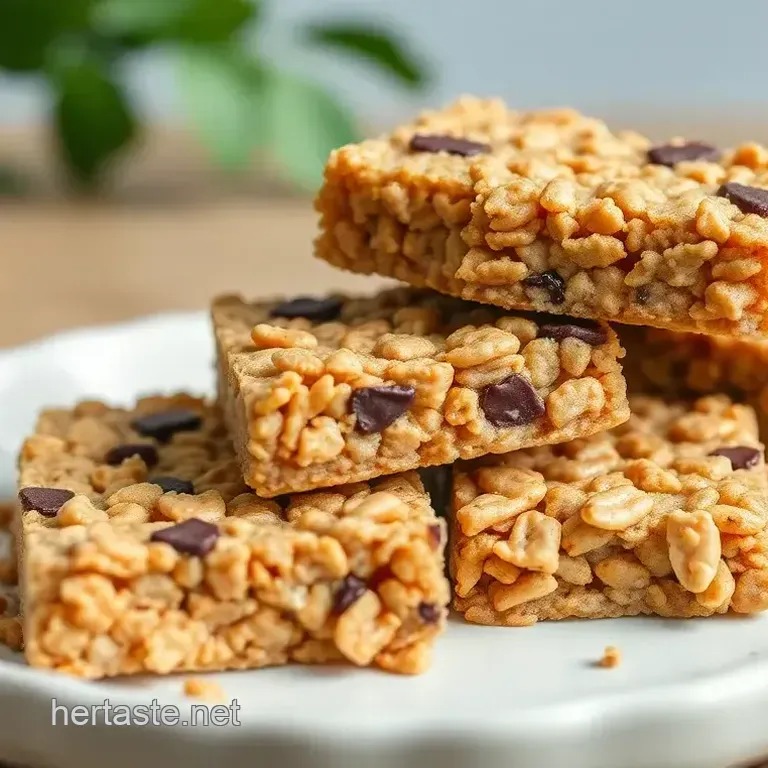
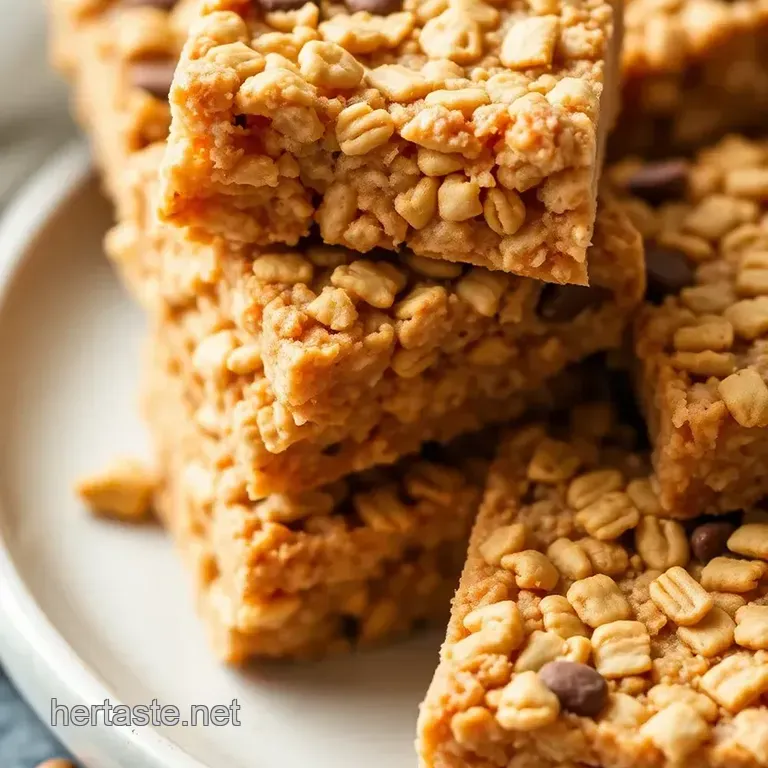
Color combinations matter too! The dark chocolate topping contrasting with the golden oats looks super appealing. Honestly, it’s like a feast for your eyes before you even take a bite!
Storage & make-ahead
Now, if you’re thinking of meal prepping , i’m right there with you! these bars store well in the fridge.
Keep them in an airtight container, and they’ll stay fresh for about a week. just be aware after a solid week, they start losing their crunch.
Not that you’ll let them last that long, right?
Need to reheat them? no worries! if you want that gooey feel again, just zap them in the microwave for a few seconds.
But let’s be real, who’s actually waiting to eat them when they smell this good?
Creative Variations
Feeling adventurous? let’s get creative! use different nut butters almond or cashew butter works wonders, and they lend a unique twist.
If dried fruit makes your heart sing, feel free to throw in some cranberries or apricots. not only do they add sweetness, but they also play nice with that chewy texture.
Oh, and for those following a strict diet, you can swap honey for maple syrup for a vegan twist. Remember, customizable nutrition bars are the name of the game here!
Complete Nutrition Guide
Each bar packs in around 200 calories and 8 grams of protein , making them a solid choice for a fitness snack .
And the great thing? you don’t have to feel guilty munching on these snacks! with nutrient dense ingredients like oats and peanut butter, they’re just as satisfying as they are healthy.
Depending on your dietary needs, this protein bars recipe gives you flexibility. Need to cut back on sugar? Use less honey or choose a natural sweetener.
Expert FAQ Solutions
Got questions? i’ve been there! one common concern is about cutting: don’t rush it. let the bars chill longer for better shape and easier slicing.
If they crumble when you slice, press that mixture down harder next time!
Another tip? Don’t shy away from experimenting. Change up flavors, add more protein powder, or toss in some seeds. The beauty of these easy no-bake recipes is you can make them yours !
Wrapping It Up
So there you have it! your go-to guide for the best no-bake protein crispy bars - healthy snack. you’ve got the basics, some snazzy pro tips, and loads of ways to make these bars your own.
They’re quick, satisfying, and perfect for any time of the day. so what are you waiting for? get in that kitchen and whip up these delicious high protein treats .
Your taste buds will thank you, and your tummy will be happy too! happy snacking, friends!
No Bake Protein Crispy Bars Healthy Snack

