Butterfinger Pie: Easy No-Bake Icebox Perfection
- The Ultimate No-Bake Butterfinger Dessert
- Why This Recipe Works: Mastering the Salty-Sweet Balance
- Essential Components for Your Butterfinger Pie
- Method: Constructing the Perfect Crunchy Icebox Pie
- Troubleshooting and Expert Tips for Pie Perfection
- Serving and Storage Guide
- Recipe FAQs
- 📝 Recipe Card
The Ultimate No-Bake Butterfinger Dessert
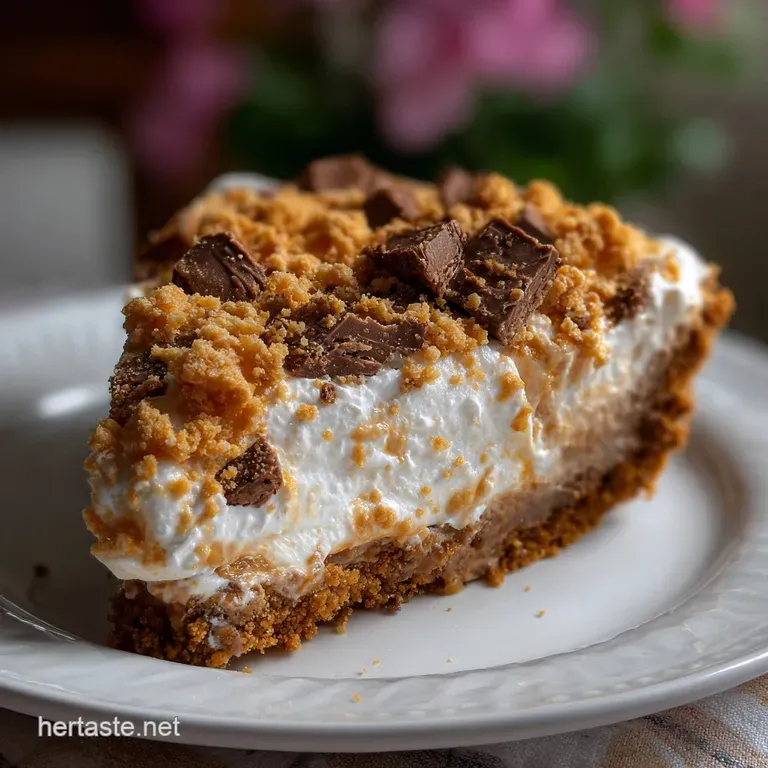
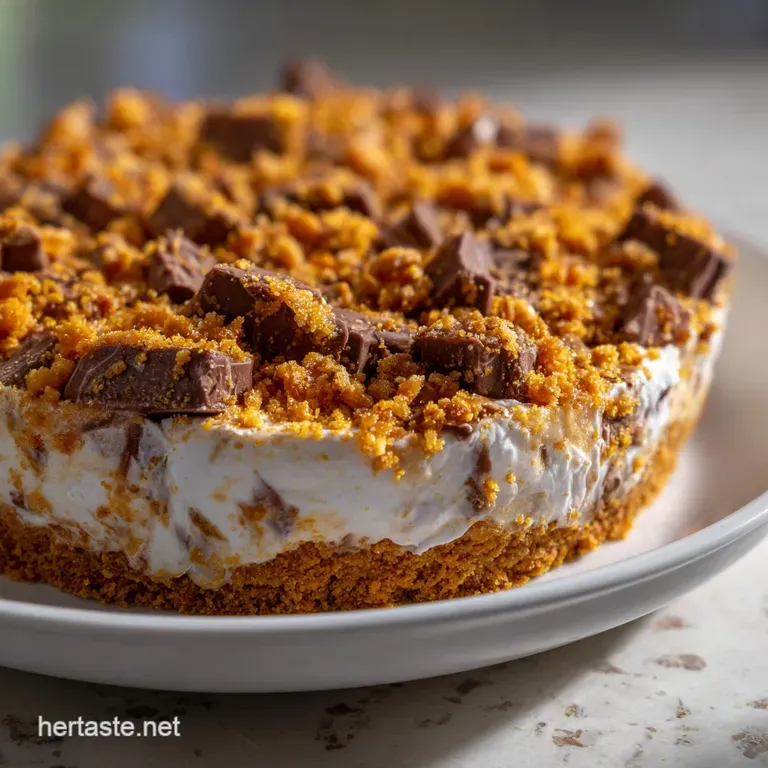
The minute you pull this glorious confection from the fridge, you know you’re in for a treat. That deep, dark chocolate crust, the impossibly creamy filling, and the unmistakable, glittering shards of golden candy waiting on top that is the signature look of my ultimate Butterfinger Pie .
It’s the perfect blend of salty, sweet, crunchy, and smooth, and honestly, the texture alone is enough to make this dessert iconic.
I call this the Lifesaver Pie because it is entirely no-bake and relies on ingredients you likely already have stashed away, provided you keep a supply of crunchy candy bars hidden for emergencies.
It’s cheap, it’s fast (the active prep time is less than 20 minutes!), and it holds up beautifully when you need a dessert that travels or feeds a crowd without requiring oven space.
Forget those complicated, high effort pies that demand precise pastry skills. We’re channeling pure, unadulterated pleasure here. Grab your mixing bowls and your favorite candy bar; let’s crack on with the fastest, easiest, and most delicious Butterfinger Pie recipe you will ever need.
Why This Recipe Works: Mastering the Salty Sweet Balance
When I first attempted an icebox pie years ago, I used plain graham crackers and it was... fine. But this version? This one delivers true depth. The secret to this specific No Bake Butterfinger Pie is the intentional layering of fats and textures that create stability and flavor complexity, preventing that dreaded "one-note sweetness" that plagues lesser dessert recipes.
Decoding the Peanut Butter, Chocolate, and Crunch Trifecta
This pie relies entirely on contrasting components. The salty peanut notes of the Butterfinger candy are essential for balancing the richness of the condensed milk and the tang of the cream cheese. If you skip the salt in the chocolate crust, you lose that necessary savory grounding.
Trust me, the reason this Butterfinger Pie is so addictive is the interplay between the bitter dark chocolate, the intense sweetness, and the savory salt.
The Zero Oven Method for Icebox Excellence
We are utilizing the magic of sweetened condensed milk and full fat cream cheese. When combined, these ingredients form a stable, rich base that thickens dramatically when chilled no gelatin or baking required.
Using this method is a foolproof way to guarantee a smooth, sliceable pie every time, making this an incredibly easy Butterfinger Pie recipe for beginners.
The Science of Texture: Balancing Creamy Filling and Crushed Candy
The structure of the filling is built upon lightened cream cheese, which means we whip heavy cream separately and fold it in. This aeration is key. If you just dump in the liquid ingredients, you end up with a pudding.
By incorporating air, we create a light mousse that can suspend the generous amount of crushed Butterfinger pieces evenly without them all sinking to the bottom.
Why No-Bake Construction Guarantees Stability
The freezer chill on the crust before filling is crucial; it helps set the butter and forms a barrier against the wet filling. If you try to rush the chilling time, the center of the pie filling will be sloppy, and your slices will look messy.
The entire appeal of a great icebox pie is the ability to cut pristine, sharp wedges.
Essential Components for Your Butterfinger Pie
Making this delicious pie is all about getting the foundation right. I recommend using the best quality full fat ingredients you can find, as they set the firmest.
Choosing the Perfect Chocolate Wafer Crust Base
We are using chocolate sandwich cookies (Oreos, specifically, including the filling) because they provide both the dark chocolate flavor and enough fat from the cream to bind perfectly with the melted butter. This gives us a sturdy, deeply flavorful crust.
If you prefer a nuttier base, you could opt for a vanilla wafer crust, but for the classic look of this pie, the dark chocolate is non-negotiable. This is the ultimate Butterfinger Pie with Oreo Crust experience.
Creamy Filling Staples: Cream Cheese vs. Whipped Topping
The structural integrity of this Chocolate Peanut Butter Pie hinges on fully softened cream cheese. It must be at room temperature, or you will get lumps, and no amount of beating will fix that.
We are also using real whipped cream for the lightness, which gives a far superior, less artificial mouthfeel than pre-whipped tubs.
Crushing the Crunch: Preparing the Butterfinger Pieces
Please, use a food processor for this step! Trying to chop Butterfingers by hand turns into a sticky, frustrating mess. I like to crush 80% of the candy finely so it disappears into the filling and then reserve the rest for a coarse chop for the dramatic, crunchy garnish on top.
Smart Swaps for Dietary Needs and Availability
| Ingredient | Smart Swap / Substitute | Notes |
|---|---|---|
| Cream Cheese | Mascarpone Cheese | Use slightly less sugar as mascarpone is naturally sweeter. |
| Heavy Whipping Cream | Thawed Whipped Dessert Topping (Cool Whip) | Use 12 oz (340g) thawed and fold gently; the pie might be slightly less firm. |
| Sweetened Condensed Milk | 1 ¼ cup Powdered Sugar + ½ cup Heavy Cream | Beat vigorously into the cream cheese until smooth and fully dissolved. |
| Chocolate Sandwich Cookies | Graham Crackers (use 1/2 tsp cocoa powder) | This lightens the color but maintains the crunch. |
Chef’s Note: If you are trying to cut back on carbs, this recipe's richness is similar to my [Keto Chocolate Mousse Pie: Ultra Creamy, No-Bake, Low Carb Dessert], which offers a similar indulgent experience using erythritol.
Method: Constructing the Perfect Crunchy Icebox Pie
The most challenging part of assembling this Butterfinger Pie is waiting for it to chill!
Pressing the Crust: Achieving Optimal Density
When you combine your crumbs, melted butter, and a tiny bit of salt, the mixture should feel like wet sand, holding its shape when squeezed. Press it hard into the pie dish. I use the flat bottom of a drinking glass to tamp it down firmly, especially around the edges.
A dense crust prevents a soggy bottom. Freeze it while you mix the filling this quick chill ensures maximum structural integrity.
Blending the Smooth Peanut Butter Filling
Ensure the cream cheese is velvety smooth before adding anything else. This step takes time. Once the condensed milk and vanilla are beaten in, the mix will be thick and shiny. Now for the whipped cream: fold it in gently, using a figure eight motion with a rubber spatula.
You are looking for a light, homogenous mousse, not a thick batter.
Layering and Sealing: The Key to Clean Slices
Once the filling is mixed and the fine Butterfinger pieces are incorporated, scoop it into the chilled crust. Smooth the top with the spatula, but don't obsess over perfection; the crunchy topping will hide any flaws.
The filling should be level and even, ensuring that every slice of this Easy Butterfinger Pie Recipe gets the same ratio of crust to cream.
The Crucial Chill Time for Setting the Pie Structure
This is where impatience hurts your final result. You must allow a minimum of four hours, but overnight (8+ hours) is truly best. The cold temperature allows the fat molecules in the cream cheese and the whipped cream to firm up, effectively turning the mousse into a solid, sliceable structure.
Troubleshooting and Expert Tips for Pie Perfection
When making desserts like this, a few small errors can derail the whole operation. Don't worry, I've made all these mistakes so you don't have to!
Avoiding the Soggy Bottom and Other Common Errors
My first mistake was not pressing the crust hard enough; the filling leaked through, creating a mushy edge. Always freeze the crust for at least 15 minutes before filling. Another common issue is grainy filling.
This happens when the cream cheese is cold and results in tiny white lumps. If this happens, try placing the bowl over a pot of steaming water for 30 seconds (don’t melt it!), then beat again quickly. The residual heat can sometimes soften those rogue lumps.
Pro Techniques for Decorating and Garnishing the Top
For the reserved, coarsely chopped Butterfinger pieces, don't sprinkle them until the pie is ready to go into the fridge for its final set. This ensures they stick slightly to the moist filling but don't become embedded and disappear entirely.
If you want a truly spectacular look, save 1/2 cup of the whipped cream and pipe small swirls around the edge of the pie just before serving, topping the swirls with additional candy pieces.
Serving and Storage Guide
How to Store and Freeze Leftover Dessert
Because this pie is dairy heavy, it needs constant chilling. Store any leftovers in an airtight container in the refrigerator for up to 5 days. For long term storage, this Butterfinger Pie freezes wonderfully!
Place the fully set pie (uncut) into the freezer for 1 hour until rock hard, then wrap it tightly in a layer of plastic wrap and a layer of foil. It will keep well for up to 3 months.
When ready to serve, thaw it overnight in the fridge or temper it at room temperature for 15 minutes for a soft, ice cream like slice.
Recommended Pairings and Cutting the Chilled Butterfinger Pie
Since this pie is intensely rich, you want a pairing that offers a break from the sweetness. I love serving this during holidays, especially around Easter Dessert Recipes , where the colors feel appropriate.
A strong cup of coffee is perfect, but if you want another dessert option, sometimes I serve this alongside fruit heavy items, maybe even some [Apple Pie Bars with Streusel Topping Easy Sheet Pan Recipe] for guests who prefer a baked, warm counterpoint.
To cut the perfect slice, run a long, thin knife under hot water, wipe it clean, and make your first cut. Repeat this process for every single slice. Cleaning the knife between cuts ensures those sharp, picture perfect edges that truly show off your beautiful Butterfinger Pie .
Enjoy every crunchy, creamy bite!

Recipe FAQs
Why is my Butterfinger pie filling too soft and doesn't hold its shape after chilling?
This issue usually arises if the cream cheese was not fully softened, or if the whipped cream/topping was overmixed and deflated. Ensure all dairy components are fully incorporated but stop mixing immediately once the whipped cream is just combined to retain its aeration.
Also, verify that you are adhering to the minimum chilling time of at least 6 hours; for the firmest texture, letting it set overnight is highly recommended.
Can I use a different type of crust, such as gluten-free or graham cracker?
Absolutely; this recipe is highly adaptable to different crusts. For a gluten-free option, look for gluten-free chocolate sandwich cookies or use a simple nut-based crust.
Graham crackers also work beautifully but may require slightly less melted butter than the chocolate cookies to achieve the proper consistency for pressing.
What is the best way to store leftover pie, and can I freeze a slice?
Store any leftover pie tightly covered in the refrigerator for up to 4 days to maintain freshness. Due to the high dairy content, it should not be left at room temperature for longer than two hours.
While you can freeze the pie for up to one month, note that the texture of the cream cheese filling might become slightly grainy or weep water upon thawing. If freezing, wrap the pie securely in plastic wrap followed by aluminum foil.
My chocolate cookie crust seems too dry and crumbly; what went wrong?
A crumbly crust typically indicates that you didn't add quite enough melted butter, or you didn't press the mixture firmly enough into the pie dish. If you notice it is too dry before chilling, add one more tablespoon of melted butter and mix until the texture resembles damp sand.
Ensure the crust is packed densely against the bottom and sides using the flat bottom of a dry measuring cup or glass.
What other candy bars can I use if I don't have Butterfingers?
You can easily substitute the Butterfinger with another crunchy, chocolate coated candy bar that provides textural contrast. Toffee based bars like Skor or Heath are excellent alternatives and will give a similar depth of flavor.
Alternatively, using crushed peanut brittle can add that signature salty sweet crunch without relying on store-bought candy bars.
Can I use whipped topping (Cool Whip) instead of fresh whipped cream for the filling?
Yes, substituting a prepared whipped topping is perfectly acceptable and will result in a slightly lighter and more stable filling that requires less handling. This substitution also eliminates the need for stabilizing the whipped cream.
If you use Cool Whip, you may want to slightly reduce the amount of powdered sugar specified in the recipe, as store-bought toppings are generally sweeter than homemade whipped cream.
How do I achieve clean, perfect slices when serving this icebox pie?
For the neatest presentation, ensure the pie has been chilled for at least 8 hours or overnight to achieve maximum firmness. Do not attempt to slice it immediately after the minimum 6-hour chill.
Use a large, sharp chef's knife that has been dipped in very hot water and wiped completely dry between each cut. This prevents the filling from sticking and dragging.
No Bake Butterfinger Icebox Pie

Ingredients:
Instructions:
Nutrition Facts:
| Calories | 712 kcal |
|---|---|
| Protein | 7.3 g |
| Fat | 38.6 g |
| Carbs | 48.6 g |
