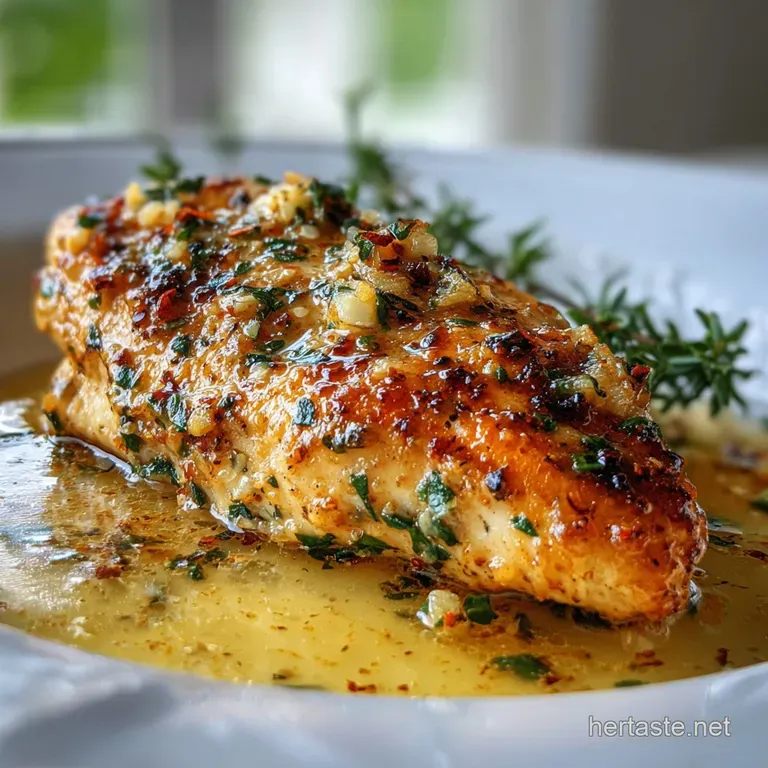
Mouthwatering Garlic Chicken Breast Recipe
- Time: Active 10 minutes, Passive 10 minutes, Total 20 minutes
- Flavor/Texture Hook: Shatter crisp exterior with velvety honey butter glaze
- Perfect for: Sophisticated weeknight dinners or high protein meal prep
- How to Make Your Mouthwatering Garlic Chicken Breast Recipe You'll Love
- The Science of Why it Works
- Essential Success Factors
- Selecting Your Elements
- Preparation and Execution Steps
- Mastering Texture and Flavor
- Adjusting the Recipe Volume
- Flavor Legends and Myths
- Preservation and Waste Reduction
- Artful Plating and Finishing
- Recipe FAQs
- 📝 Recipe Card
How to Make Your Mouthwatering Garlic Chicken Breast Recipe You'll Love
Imagine the high pitched hiss as cold chicken hits a shimmering pan. That’s the sound of texture being born. We've all been there: staring at a sad, chalky piece of poultry that tastes like nothing but salt and regret. This recipe shows you how to make mouthwatering garlic chicken breast you'll absolutely adore.
It isn't just about the garlic; it’s about the architecture of the flavor.
I used to think chicken breast was just a delivery vehicle for sauce, but I was wrong. It's about that initial sear. When you get the pan temp just right, the flour coating transforms into a golden crust that acts as a sponge for the honey and vinegar.
We're going to layer heat, sweetness, and acidity so every bite feels like a story.
We aren't just cooking meat here; we're creating a silk and shatter experience. By the time that chilled butter hits the hot pan to create the final glaze, you’ll see why this method beats any restaurant version.
It’s fresh, it’s vibrant, and honestly, you'll never go back to basic sautéing again. Let's get into the mechanics of why this works.
The Science of Why it Works
Maillard Reaction: This chemical interaction between amino acids and reducing sugars creates the golden brown crust and complex savory aromas during searing.
Protein Denaturation: Slicing the breasts horizontally reduces the distance heat must travel, preventing the outer layers from overcooking while the center reaches safety.
Emulsification: Whisking chilled butter into the warm honey and vinegar creates a stable, velvety sauce that clings to the meat rather than breaking into oil.
| Method | Cook Time | Texture | Best For |
|---|---|---|---|
| Stovetop | 8-10 mins | Shatter crisp edges | Maximum flavor development |
| Oven Finish | 12-15 mins | Consistent juiciness | Thicker, unsliced breasts |
| Air Fryer | 10-12 mins | Ultra dry exterior | Low oil crisping |
Choosing the right approach depends on your craving. While the stovetop provides that innovative sear we're looking for, the oven is great if you're multitasking. However, for this specific layered approach, the pan is your best friend because it allows you to build the sauce directly in the rendered chicken fats.
Essential Success Factors
To get that restaurant quality finish, we need to focus on moisture management. If the chicken is wet when it hits the flour, you get gummy paste instead of a crisp shell. I always pat the meat down with paper towels until it’s bone dry.
It’s a small step, but it makes a massive difference in how the flour adheres.
Another thing I've learned the hard way: don't crowd the pan. If the chicken pieces are touching, they steam instead of sear. You lose that "shatter" texture instantly. Work in batches if your skillet isn't large enough. It’s better to spend an extra five minutes than to end up with soggy meat.
| Component | Science Role | Pro Secret |
|---|---|---|
| All purpose Flour | Starch gelatinization | Dust lightly; excess flour creates a heavy, pasty coating. |
| Chilled Butter | Fat suspension | Use cold cubes to slow the melting for a creamier emulsion. |
| Apple Cider Vinegar | pH balance | The acidity cuts through the honey's sugar, brightening the garlic. |
The vinegar is the secret weapon here. It provides a sharp counterpoint to the raw honey, ensuring the dish doesn't veer into "cloying" territory. It’s all about the balance of those flavor layers.
Selecting Your Elements
You'll need a few high-quality basics to make this work. Each ingredient plays a specific role in building the final profile of the dish.
- 1.5 lbs chicken breasts: Halved horizontally. Why this? Ensures fast, even cooking without drying out the exterior.
- 1 tsp Kosher salt: For deep seasoning.
- 1/2 tsp cracked black pepper: Provides a subtle floral heat.
- 2 tbsp all purpose flour: The base for our crust.
- 2 tbsp avocado oil: Why this? High smoke point prevents the oil from burning during the sear.
- 4 cloves garlic: Minced fresh. Why this? Pre minced jarred garlic lacks the pungent sulfur compounds we need.
- 3 tbsp unsalted butter: Chilled and cubed.
- 1 tbsp raw honey: For a sticky, sweet finish.
- 1 tsp apple cider vinegar: To balance the sweetness.
- 1 tbsp fresh parsley: For a hit of grassy freshness.
If you find yourself out of certain items, don't panic. You can easily swap the honey for maple syrup, though the flavor will be earthier. For the oil, any neutral oil with a high smoke point works just avoid extra virgin olive oil for the initial sear as it can get bitter when overheated.
| Original Ingredient | Substitute | Why It Works |
|---|---|---|
| Avocado Oil | Grapeseed Oil | Both have high smoke points and neutral flavor profiles. |
| Apple Cider Vinegar | Rice Vinegar | Similar acidity levels. Note: Rice vinegar is slightly milder. |
| Raw Honey | Maple Syrup | Same viscosity. Note: Adds a distinct woody flavor to the sauce. |
When swapping, keep the ratios the same. The science of the emulsion stays the same even if the flavor profile shifts slightly. If you’re looking for a different vibe entirely, you might enjoy my Zesty Lemon Garlic recipe which uses citrus to provide that necessary acid hit.
Preparation and Execution Steps
- Prep the chicken. Slice the 1.5 lbs chicken breasts horizontally to create four thinner cutlets. Note: This ensures the meat cooks at the same rate the sauce thickens.
- Season thoroughly. Sprinkle 1 tsp Kosher salt and 1/2 tsp pepper over both sides of the meat.
- Dredge lightly. Coat each piece in the 2 tbsp flour, shaking off the excess until only a translucent veil remains.
- Heat the pan. Add 2 tbsp avocado oil to a large skillet over medium high heat until the oil shimmers and wisps of smoke appear.
- Sear the meat. Lay the chicken in the pan and cook for 3-4 minutes until a deep golden crust forms.
- Flip and finish. Turn the chicken and cook for another 3 minutes until the internal temperature reaches 165°F.
- Sauté the garlic. Reduce heat to medium, move chicken to the side, and add 4 cloves minced garlic until fragrant and pale gold.
- Deglaze the pan. Stir in 1 tbsp honey and 1 tsp apple cider vinegar, scraping up the browned bits from the bottom.
- Mount the sauce. Add the 3 tbsp chilled butter cubes one-by-one, swirling the pan until the liquid becomes a silky, opaque glaze.
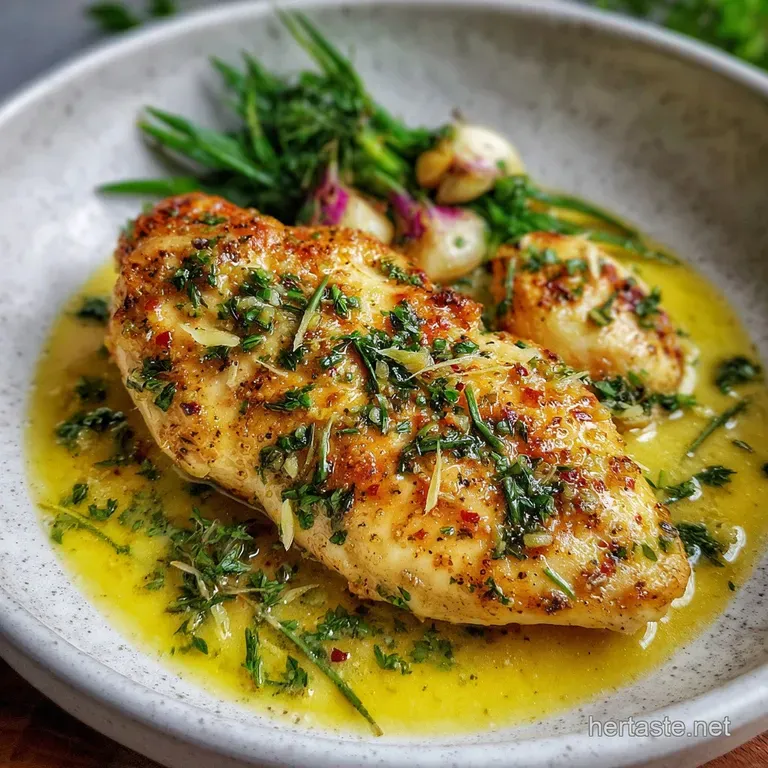
- Garnish and serve. Spoon the sauce over the chicken and top with 1 tbsp fresh parsley until the green pops against the gold.
Chef's Note: If the sauce looks like it’s separating (oily), add a teaspoon of water and whisk vigorously. The water helps re bind the fat and sugar into a smooth silk.
Mastering Texture and Flavor
Sometimes things don't go exactly as planned in the kitchen. If your chicken feels like a rubber ball or your garlic tastes like charcoal, don't toss it just yet. Understanding the "why" behind these issues is how you become a better cook.
Why is my chicken rubbery?
This usually happens from overcooking or not letting the meat rest. When protein fibers are heated too long, they contract tightly, squeezing out all the moisture. If you use a meat thermometer and pull the chicken at exactly 165°F, you'll avoid this entirely.
Also, ensure you aren't using "woody" chicken breasts if the raw meat feels exceptionally hard or fibrous, no amount of technique can fix that.
Why is the garlic bitter?
Garlic has a very low burn point because of its high sugar content. If the pan is screaming hot when you add the minced cloves, they will turn dark brown or black in seconds. This creates a sharp, acrid bitterness that ruins the honey glaze.
Always turn the heat down before adding the garlic, or even pull the pan off the burner for thirty seconds to let the temperature drop.
| Problem | Root Cause | Solution |
|---|---|---|
| Saturated, oily sauce | Butter added too fast | Add butter one cube at a time while whisking. |
| Pale, soggy exterior | Pan wasn't hot enough | Wait for the oil to shimmer before adding chicken. |
| Burnt honey smell | Heat too high during glaze | Keep the sauce at a gentle simmer, never a rolling boil. |
Common Mistakes Checklist
- ✓ Skipping the "pat dry" step (leads to steaming instead of searing)
- ✓ Using a non stick pan (prevents the formation of flavorful browned bits)
- ✓ Adding garlic at the start (garlic burns much faster than chicken cooks)
- ✓ Over flouring the meat (creates a thick, gummy coating)
- ✓ Not resting the meat for 3 minutes before serving (juices will run out)
If you're a fan of this flavor profile but want something a bit more decadent, you should definitely check out my Creamy Garlic Chicken recipe. It uses thighs for a higher fat content and a much richer sauce.
Adjusting the Recipe Volume
When you're cooking for a crowd or just for yourself, you can't always just double everything. For example, if you double the meat, you don't necessarily need to double the oil just use enough to coat the pan.
- Scaling Down (1-2 Servings): Use a smaller skillet (8 inch). You can use half an egg to help the flour stick if the chicken is particularly dry, or just rely on the natural moisture. Reduce the butter to 1.5 tbsp to keep the sauce to meat ratio balanced.
- Scaling Up (8+ Servings): Do not try to cook 3 lbs of chicken in one pan. Work in at least two or three batches. Keep the cooked chicken on a wire rack in a 200°F oven while you finish the rest. For the sauce, only increase the liquids (honey/vinegar) by 1.5x, as they don't reduce as quickly in large volumes.
Baking the chicken is an option for large groups, but you'll lose that specific "shatter" texture from the stovetop sear. If you do go the oven route, I'd suggest a quick 2 minute sear on the stove first, then finishing on a sheet tray.
Flavor Legends and Myths
There’s a massive myth that "searing seals in the juices." I hear this all the time, and it’s just not true. Searing actually dries out the surface of the meat that's how you get the crunch!
The reason seared meat tastes better isn't because it’s juicier, but because of the Maillard reaction creating hundreds of new flavor compounds.
Another one is that you need to marinate chicken for hours to get flavor inside. Since chicken breast is so lean and dense, marinades only penetrate a few millimeters deep. That’s why this recipe focuses on a "pan sauce" approach.
By coating the outside in a high intensity glaze, you get more flavor in every bite than a 12 hour soak would ever provide.
Preservation and Waste Reduction
Storage: Keep leftovers in an airtight glass container in the fridge for up to 3 days. The sauce will thicken and turn into a jelly like consistency due to the butter and honey, but it will liquefy again once heated.
Freezing: You can freeze the cooked chicken for up to 2 months. However, the honey butter sauce might separate slightly upon thawing. To fix this, reheat it in a pan with a splash of water and whisk it back together.
- Chicken Scraps
- If you trimmed off any fat or small bits of meat while halving the breasts, throw them in a freezer bag for your next batch of homemade stock.
- Garlic Peels
- Save your garlic skins! They add incredible depth to vegetable broths or can even be toasted and ground into a smoky powder.
- Leftover Sauce
- If you have extra glaze in the pan, toss some steamed broccoli or green beans in it. It makes for an innovative side dish that carries the main flavor through the whole meal.
For those looking for a whole bird experience that uses similar aromatics, the Juicy Lemon Herb recipe is a fantastic way to utilize these techniques on a larger scale.
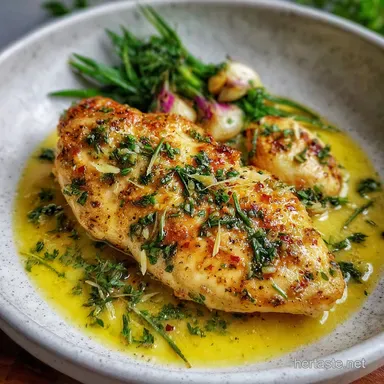
Artful Plating and Finishing
Presentation is the final layer of flavor. We eat with our eyes first, and a golden chicken breast looks much better when it has contrast. I like to slice the chicken on a slight bias before plating. This shows off the juicy interior and creates more surface area for the sauce to cling to.
Place the chicken over a bed of something neutral like mashed potatoes or fluffy rice. Spoon the glossy sauce over the top so it drips down the sides. The fresh parsley isn't just a garnish; the bright green color tells your brain the dish is fresh and balanced.
If you want to get fancy, add a few lemon slices to the plate the yellow against the gold and green is stunning.
Focus on the heights. Don't just lay things flat. Stack the chicken cutlets slightly to create a more innovative, architectural look on the plate. It makes a simple weeknight meal feel like a specialized event.
Trust me, the extra thirty seconds of plating makes the "mouthwatering" part of the title come true before the first bite!

Recipe FAQs
What is the best way to ensure crispy skin on my garlic chicken breast?
Pat the chicken completely dry before flouring. Moisture is the enemy of crispiness; it steams the chicken instead of searing it. Use paper towels until the surface is no longer damp.
Why does my garlic chicken sauce break or look oily?
Add the chilled butter cubes slowly, one-by-one, while whisking. This emulsifies the fat into the sauce base, creating a smooth, stable glaze. Adding it too fast or all at once can cause it to separate.
Can I use pre-minced jarred garlic instead of fresh?
No, fresh garlic is highly recommended for optimal flavor. Jarred garlic often loses its potent sulfur compounds and can taste slightly bitter or dull. Fresh garlic is key to achieving that vibrant garlic profile in the glaze.
How can I prevent my chicken breast from becoming rubbery?
Cook the chicken to an internal temperature of 165°F and let it rest briefly. Overcooking causes the protein fibers to contract excessively, squeezing out moisture. Using a meat thermometer is your best guide.
What's the secret to building deep flavor in this chicken recipe?
Mastering the Maillard reaction through proper searing is crucial. When you get the pan hot enough and don't crowd it, the chicken browns beautifully, creating hundreds of complex flavor compounds. This technique also creates those desirable browned bits for the pan sauce.
Is it true that searing locks in juices?
No, this is a common misconception. Searing is primarily for flavor and texture development via the Maillard reaction; it doesn't "seal" juices in. The real key to juiciness is cooking to the correct internal temperature and allowing a brief resting period. If you enjoyed perfecting the sear here, apply the same principle to get a gorgeous crust on your Sear Fig Sage Stuffed Chicken Delightful.
How should I store and reheat leftover garlic chicken?
Store leftovers in an airtight container in the refrigerator for up to 3 days. Reheat gently in a skillet over medium low heat with a splash of water to help re-emulsify the sauce.
Mouthwatering Garlic Chicken
Ingredients:
Instructions:
Nutrition Facts:
| Calories | 381 kcal |
|---|---|
| Protein | 39.5 g |
| Fat | 20.4 g |
| Carbs | 8.6 g |
| Fiber | 0.3 g |
| Sugar | 4.4 g |
| Sodium | 512 mg |
