Moss Cake: 5 Creative Ways to Craft a Lush Dessert
- An Enchanting Introduction to Moss Cake
- Your Essential Ingredients Guide to Create a Moss Cake
- Professional Cooking Method
- Put the 'Wow' in Your Dessert: Pro Tips & Secrets
- Making It Pretty: Perfect Presentation
- Storage & Make-Ahead Magic
- Get Creative: Unique Variations and Seasonal Twists
- Nutrition Breakdown: Keeping It Real
- Time to Get Baking!
- Frequently Asked Questions
- 📝 Recipe Card
An Enchanting Introduction to Moss Cake
Oh my gosh, have you ever stumbled upon a dessert so whimsical it felt like you walked straight into a fairy tale? let me tell you about my first encounter with a moss cake a dessert that seriously looks like it could sprout its own little forest!
Picture this: a rich chocolate moss cake that resembles a lush, green mossy landscape, perfect for any occasion.
I was instantly hooked! the whimsical design and delicious flavor hit me right in the feels. that’s the magic of a moss cake recipe: 5 ways to create a stunning dessert .
Curious yet? buckle up; we’re diving into the world of nature inspired desserts, and trust me, it’s enchanting!
Exploring the Mossy History
Did you know the idea behind this cake takes root from creative baking trends where nature meets artistry? yep, it’s all about bringing the outside in! originally gaining traction in trendy bakeries, this nature themed cake has exploded in popularity.
You can find it at birthday parties, baby showers, and all sorts of celebrations, each one uniquely charming. you can whip it up in about 1 hour of total time 30 minutes for baking and another 30 for cooling and decorating so it won’t eat up your whole day.
Honestly, it’s a medium difficulty cake, so basic baking skills are all you really need. let’s not forget the cost pretty budget friendly too! ±
Key Benefits of Making Moss Cake
Now, let’s chat about why you should consider putting this cake on your baking bucket list. first off, the health benefits are a fun perk! well, if you can count the joy of whipped buttercream and chocolate as health benefits!
Seriously though, this cake is not just about looks; it packs a flavor punch that pairs perfectly with your favorite decorative baking essentials .
It’s not just suitable for kids; this cake also makes a stunning centerpiece for more adult gatherings and holiday baking projects! picture it: a gorgeous, rustic cake at your next gathering, leaving your guests in awe not to mention, it gives you brownie points for creative cake decorating .
And, hey, it’s customizable too! want to swap chocolate for something fruity? go for it! the variations are endless. if you love the idea of making desserts that look as good as they taste, you're going to adore creating a forest inspired dessert .
Why Moss Cake Stands Out
Compared to other cakes, the moss cake brings something unique to the table. the vibrant green frosting mimics lush landscapes while also making your cake a visual treat.
Trust me, your friends will be snapping pics before digging in! and who could resist an edible moss recipe made from graham crackers and coloring? the creative assembly methods really let your personality shine through in the kitchen.
Whether you’re prepping for a festive occasion or just want an excuse to treat yourself, this dessert has you covered.
A few easy cake frosting ideas can take your dessert to the next level, and hey, they’re great conversation starters, too! if you’re uncertain about the how-to’s, don’t sweat it; i’ve got your back with some baking tips and tricks!
As we begin to look at what you need to create this showstopper, let’s gather up those cake assembly methods and other bits that will help you nail this stunning dessert.
Are you ready to dive into the delicious details? let’s get that ingredient list rolling!
Your Essential Ingredients Guide to Create a Moss Cake
Ah, the beauty of creating an absolutely stunning moss cake ! let’s get right to it with all my essential tips, tricks, and insights to make your baking journey smoother than a freshly whipped buttercream.
This cake isn’t just a dessert; it’s a forest inspired creation that will have your family and friends drooling. so, buckle up; here we go!
Premium Core Components
When you’re baking, quality ingredients are key to a masterpiece. For your Moss Cake , you'll need to get familiar with your essentials:
Detailed Measurements : We’re talking about 1½ cups (190g) of flour and 1 cup (200g) of sugar. And if you’re measuring in metric, you’ve got your conversions mastered too! Always double check because a weird texture can come from a mismeasured ingredient!
Quality Indicators : Freshness matters, folks! Look for soft, unblemished butter and bright eggs. If your cocoa powder smells kind of flat, toss it.
Storage Guidelines & Shelf Life : Keep those eggs in the fridge and flour in an airtight container. Most of these ingredients last quite a while if stored properly.
Freshness Tips & Selection Criteria : Check the expiration dates, and don’t be afraid to give your ingredients a little sniff test! Trust me; stale ingredients can ruin your cake.
Signature Seasoning Blend
What’s a cake without some delicious flavor enhancers ? For your Moss Cake , let’s chat about essential spice combos and herb selections:
Essential Spice Combinations : For our chocolate cake base, cocoa powder is crucial. If you want to switch it up, you can mix in some espresso powder to enhance the flavor.
Herb Selections & Pairings : Although herbs aren’t commonly found in traditional sweets, mint could be a fantastic whimsical addition . Think of it as a subtle nod to nature!
Regional Variations : Some folks might go wild and add a sprinkle of sea salt on top! It’s a unique take that offers a beautiful sweetness and stunning presentation.
Smart Substitutions
We all know that sometimes you run out of an ingredient while baking. Here’s how to handle it like a pro:
Common Alternatives : If you lack buttermilk, mix regular milk with a tablespoon of vinegar. Instant fix!
Dietary Modifications : Want to go vegan? Use almond milk and flax eggs instead. You won’t miss the dairy at all.
Emergency Replacements : If you're out of sugar, try honey or maple syrup as a natural substitute. Just adjust the liquid in your recipe accordingly.
Seasonal Options : In summer, fresh mint could spice your Moss Cake up! If it’s the fall, how about a pumpkin spice twist? So many ways to play with flavors!
Kitchen Equipment Essentials
Before diving into your Moss Cake Recipe: 5 Ways to Create a Stunning Dessert , let’s talk tools:
Must Have Tools : You’ll want mixing bowls, an electric mixer, and good old 9 inch round cake pans. Parchment paper is a lifesaver, trust me!
Alternative Equipment Options : If you don’t have an electric mixer, get a good whisk and channel your inner strong human!
Preparation Tips : Remember to preheat that oven to 350° F ( 175° C) !
Storage Solutions : Keep your baking goodies organized! Use labeled containers for dry ingredients. It’ll save you time and sanity!
So, are you ready to start your moss cake adventure ? all these ingredients and tips are here to help you whisk away to bakery heaven.
Stay tuned for step-by-step instructions , because creating this magical, nature themed cake is just around the corner! trust me; it's going to be one heck of a sweet journey.
Professional Cooking Method
Let’s dive into the wonderful world of professional cooking methods. whether you're whipping up a humble family dinner or crafting an extravagant dessert like the moss cake recipe: 5 ways to create a stunning dessert , there are essential steps and techniques you should know.
Trust me, it’ll make your time in the kitchen so much smoother, and you might even impress a few folks along the way!
Essential Preparation Steps
First things first, we need to talk about mise en place . it’s a fancy french term that just means “everything in its place.
” before you even think about firing up the oven, prep your ingredients. chop, measure, and line up everything you need so it’s within arms reach.
You’ll thank yourself later when you’re not fumbling around looking for that elusive cup of sugar.
Next is time management. i find that setting a timer for each task is a game changer. for instance, when you're working on that moss cake , bear in mind that your prep time is 30 minutes and cooking is another 30 minutes .
Keep an eye on those timers!
Staying organized is crucial too. i usually keep my utensils and bowls in a specific order. it keeps my space tidy and helps me work faster.
And don’t forget about safety! always read the recipe carefully and be cautious with hot equipment and knives. burns and cuts can ruin your cooking vibe faster than you can say “whoops!”
Step-by-step Process
Alright, let’s break it down into clear steps. Here we go:
- Preheat Oven: Set your oven to 350° F ( 175° C) —it’s like warming up for a major game!
- Prepare Cake Pans: Don’t skip this step! Grease and line your pans with parchment paper.
- Mix Dry Ingredients: In one bowl, combine your flour, sugar, cocoa powder, baking soda, baking powder, and salt .
- Combine Wet Ingredients: In another bowl, whisk together the buttermilk, oil, eggs, and vanilla. Blend it until it sings!
- Combine Mixtures: Slowly add the wet mix to your dry mix until it’s just combined. Be careful here; over mixing can lead to dry cake.
- Bake: Pour the batter into your prepared pans and put them in the oven for 25- 30 minutes .
- Cool Cakes: After baking, let them cool in the pans for 10 minutes before flipping them onto a wire rack.
- Frosting Time: Cream your butter and gradually add powdered sugar and a touch of milk. Adjust the flavor and color to get that perfect mossy green .
- Assemble Cake: Stack those layers high and frost away!
- Decorate: Sprinkle with edible moss and optional decorations, and voila! Your stunning dessert is ready.
Expert Techniques
Let’s step up your game with some expert tips. first, temperature control is a must. bake the cake until a toothpick comes out clean dry, but not too dry.
You want that perfect balance!
I’ve learned that timing is everything. don’t walk away from the oven! watch for visual cues; if the edges start pulling away from the pan and the cake springs back when poked, it’s done.
Lastly, let’s talk troubleshooting. if your cake doesn’t rise, it could be your baking powder's age always check those expiration dates! and if it’s too dry, you either baked it too long or your oven was too hot.
Trust me; i’ve been there more times than i care to admit.
Success Strategies
Now for some common mistakes to avoid . overmixing is a big one, and it can lead to a dense cake.
Also, remember to chill your frosting slightly before spreading it on the cake. it makes for smoother application.
Quality assurance tips? Taste as you go! And don’t be afraid to use your sense of smell. If something smells burnt, it probably is.
If you’re looking for make-ahead options, you can bake your layers a day in advance. just wrap them tightly and store them in the fridge or freezer.
This way, when it’s time to assemble, you’re ready to go!
Creating stunning desserts is all about the journey. Remember, with each baking adventure (like the chocolate moss cake ), you're improving your skills and learning new techniques, so enjoy the process!
Additional Information
What goes hand in hand with creating delicious desserts? well, knowing more about baking tips and tricks, of course! if you’re ready to expand your baking repertoire or dive into seasonal delights, there’s plenty to explore in the world of desserts.
Stay tuned for more delicious recipes and creative cake decorating ideas that will keep your friends and family begging for seconds!
Put the 'Wow' in Your Dessert: Pro Tips & Secrets
When it comes to pulling off a killer moss cake recipe: 5 ways to create a stunning dessert , i’ve got some insider tips that will elevate your baking game.
Seriously, folks, it’s about more than just throwing ingredients together. here's what you need to know.
First off, start with room temperature ingredients. it sounds simple, but trust me, it makes a difference. mixing your cold eggs, butter, or buttermilk with dry ingredients doesn’t quite cut it.
They just won’t blend well! so, give everything a bit of time on the counter before you go mixing it up.
And let’s talk about flavor enhancement . a teaspoon of vanilla can do wonders, but if you really wanna kick things up a notch, consider adding a pinch of espresso powder to your chocolate batter.
It brings out those rich chocolatey notes without tasting like coffee. mind blowing!
Need to save some time in the kitchen? here’s a little secret: while your cake layers are cooling, whip up that frosting.
Multi tasking is your friend. trust me, you won't feel like you're in the kitchen for ages, and you'll have more time to focus on the fun decorative stuff.
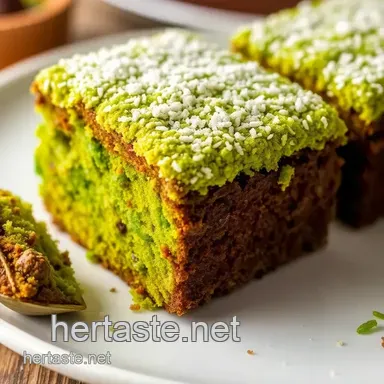
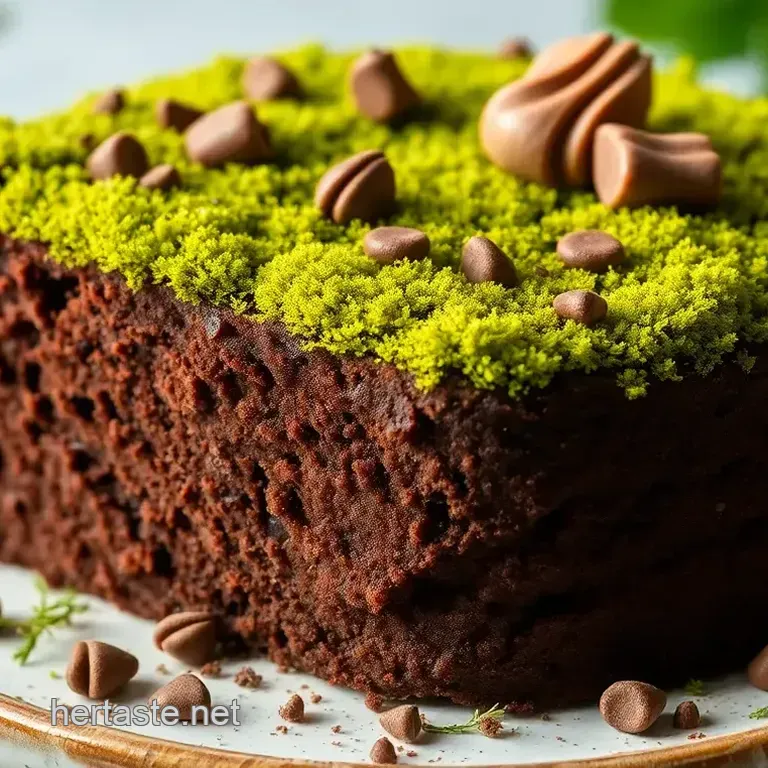
Making It Pretty: Perfect Presentation

Alright, let’s get our art on! when it comes to decorating that nature themed cake , presentation is everything. you wanna wow your guests, right? for plating, consider using a rustic wooden cake stand or a simple white platter.
That contrast really brings out the greens and browns of your moss cake.
For the frosting, don't just slap it on there. use a spatula to create peaks and swirls. this not only looks great, but it also catches the light beautifully.
And if you wanna get fancy, add a few edible flowers like violets or pansies. what’s more charming than a little pop of color against rich green buttercream?
Storage & make-ahead Magic
Now, if you're prepping for a party and wondering about storage, here’s the lowdown. once your moss cake is decorated, keep it in an airtight container in the fridge.
It should stay fresh for about 3 days. but honestly, it’s best within the first 48 hours after it’s made.
If you want to bake ahead, you can make the layers a day or two in advance. just wrap ‘em tightly in plastic wrap to prevent them from drying out.
As for re-heating, you don’t need to this cake is best served chilled or at room temperature.
Get Creative: Unique Variations and Seasonal Twists
Bored with the basic recipe? let’s mix it up! how about trying a strawberry moss cake for summer or a pumpkin spiced moss cake in fall? you can swap out the cocoa powder for matcha for a green tea twist.
Totally different vibe!
Or how about some dietary modifications ? Make it vegan by using flax eggs and almond milk instead of buttermilk. Your friends won’t even notice the difference, promise!
Nutrition Breakdown: Keeping It Real
I know, i know nobody wants to think about calories while devouring a slice of deliciousness. but hey, knowledge is power! each slice of our moist, chocolatey cake clocks in around 350 calories .
This beauty is packed with 4g of protein , thanks to those eggs, which isn’t too shabby for a dessert.
And don’t forget, there are benefits to all that rich chocolate in there. dark chocolate can be a source of antioxidants.
So really, are you even indulging if you get a bit of health in there? it’s all about the balance, right?
Time to Get Baking!
With these baking tips and tricks , you’re all set to wow your friends and family with your very own version of the moss cake recipe: 5 ways to create a stunning dessert .
Open that oven door and let that sweet, sweet aroma fill your kitchen. trust me, this is the kind of dessert you’ll want to make time and time again.
So, go on! Get in there and show off those whimsical cake designs . You got this! Happy baking!
Frequently Asked Questions
What is the Moss Cake Recipe: 5 Ways to Create a Stunning Dessert?
The Moss Cake Recipe features a rich chocolate cake adorned with vibrant green buttercream frosting, resembling a natural moss covered landscape. The recipe showcases five creative variations that cater to different tastes, making it a versatile dessert for any occasion.
Can I make any substitutions in the Moss Cake Recipe?
Yes! You can substitute buttermilk with regular milk mixed with vinegar or lemon juice. Additionally, for a gluten-free option, replace all-purpose flour with a gluten-free blend, and consider using coconut oil instead of vegetable oil for a different flavor profile.
How can I store leftover Moss Cake?
To store leftover Moss Cake, place it in an airtight container and keep it in the refrigerator for up to 3 days. If you prefer, you can freeze the cake for up to 3 months; just ensure it’s well wrapped to prevent freezer burn.
What are some creative decorations I can use for my Moss Cake?
You can get creative with decorations by using edible moss made from crushed graham crackers, chocolate mushrooms, and edible flowers. These elements enhance the forest like theme of the cake, making it visually stunning for any event.
Is there a way to make the Moss Cake Recipe healthier?
To make the Moss Cake healthier, you can reduce the amount of sugar in the cake and frosting. Additionally, consider substituting with unsweetened applesauce or mashed bananas in the frosting or using whole wheat flour for added fiber. Remember, the cake will still be indulgent while being a tad healthier!
What tips do you have for beginners making Moss Cake for the first time?
For beginners, ensure all ingredients are at room temperature to help with mixing and texture. Take your time with decorating; practice makes perfect! Lastly, don’t hesitate to watch tutorial videos on cake decorating techniques for better guidance.
Moss Cake Recipe 5 Ways To Create A Stunning Des