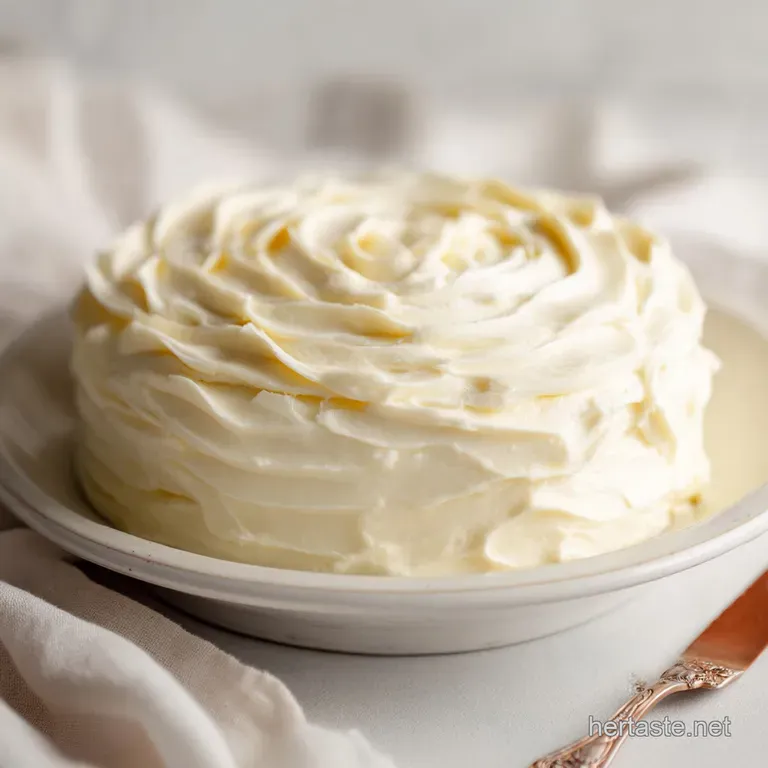
Easy Cream Cheese Frosting: Stable Fluffy Perfection
- Introducing the Ultimate Stable Cream Cheese Frosting
- The Science of Fluff: Achieving Velvety Texture and Perfect Stability
- Gathering Your Tools and Ingredients for Perfect Whipping
- Mastering the Method: Step-by-Step Guide to Non-Runny Perfection
- Troubleshooting the Frosting: How to Fix a Runny or Lumpy Batch
- Creative Flavor Swaps for Your Cream Cheese Base
- Maximizing Shelf Life: Storing and Freezing This Easy Cream Cheese Frosting
- Beyond Red Velvet: Creative Ways to Use This Versatile Frosting
- The Essential Cream Cheese Frosting: Fluffy, Stable, and Spot On
- Recipe FAQs
- 📝 Recipe Card
Introducing the Ultimate Stable Cream Cheese Frosting
When you peel back the foil and smell that tangy, sweet, dairy cloud, you know everything is going to be okay. It’s that perfect balance of rich butter and sharp, zesty cream cheese that makes the world stop turning for just a second. I’m talking about frosting, obviously.
Not just any frosting, but the kind that holds its shape, doesn't melt into a puddle, and manages to be both light and decadent simultaneously.
This recipe for Easy Cream Cheese Frosting is my tried and true, fail proof method. I know, I know, you’ve tried others that turned into a greasy soup on a warm day.
But trust me, this version is the kitchen lifesaver you need, ready in about ten minutes, and so incredibly cheap to make compared to those pricey bakery tubs. We avoid the typical pitfalls, ensuring stability and that velvety smooth texture every single time.
I promise you, mastering this Easy Cream Cheese Frosting is the key to unlocking next level desserts, whether you’re spreading it thick on cinnamon rolls or piping delicate swirls onto cupcakes.
Let's crack on and figure out the simple secrets behind making a truly great batch that stands up to the heat.
The Science of Fluff: Achieving Velvety Texture and Perfect Stability
If baking feels like magic, frosting is the practical chemistry that keeps the whole dessert standing upright. Understanding why ingredients behave the way they do is crucial for consistently perfect results.
This particular Easy Cream Cheese Frosting works because we respect the fats and the sugar structure.
Why Traditional Recipes Fail (And Ours Doesn't)
Most people fail their cream cheese frosting in one of two ways: either the ingredients are too warm and they get a runny mess, or they mix too quickly at the start and end up with lumps.
Traditional recipes sometimes call for all ingredients to be fully soft, which is actually a recipe for disaster if you live anywhere warm. We control the temperature carefully, treating the cream cheese and butter as two distinct entities until the perfect moment of marriage.
What Makes This Frosting “Essential”?
It comes down to structure. We load this frosting with just enough sifted powdered sugar to create a stiff scaffolding, but we also introduce the butter and cream cheese at a temperature that ensures they emulsify beautifully.
You get the volume and fluffiness you crave without sacrificing the structural integrity needed to frost a towering layer cake. That is the definition of the best Easy Cream Cheese Frosting .
Quick Glance: Yield and Prep Time
Honestly, the hardest part is waiting for the cream cheese to soften.
| Stage | Time |
|---|---|
| Prep Time | 5 minutes |
| Active Mixing Time | 5– 10 minutes |
| Total Time | 10– 15 minutes |
This batch yields about 3 cups, which is enough to generously cover a 9x13 sheet cake or a standard two-layer 8 inch cake.
The Crucial Role of Temperature Control (Cold Cream Cheese vs. Soft Butter)
While both ingredients need to be soft, they shouldn't be mushy. The butter should be very soft (the temperature you'd use for cookies, about 68°F), but the cream cheese needs to remain just slightly cooler than the butter.
This slight temperature difference helps the cream cheese resist over softening during the initial whipping phase. If your cream cheese is too warm, the final frosting will be runny and you’ll need significantly more sugar to rescue it.
How Powdered Sugar Creates Structure and Holds Shape
Powdered sugar is the muscle of this Easy Cream Cheese Frosting . It contains a small amount of cornstarch, which is absolutely vital for absorbing excess moisture (from the cream cheese) and creating a solid matrix.
If you try to use granulated sugar, you will get a gritty, runny, disastrous mess. Sifting the powdered sugar ensures the starch is evenly distributed and prevents the lumps that ruin a smooth finish.
The Mixer Speed Secret to Avoid Separation
This is a big one. When mixing the initial fats, we start low and build up to medium. When we add the sugar, we drop the speed to the absolute lowest setting to integrate the powder, preventing a giant sugar cloud, and more importantly, preventing the fat and moisture from separating.
Then, only in the final 60 seconds, do we crank the speed up to whip air into the mixture. This controlled approach results in the most reliable, stable, Easy Cream Cheese Frosting .
Gathering Your Tools and Ingredients for Perfect Whipping
You don't need fancy equipment, but a stand mixer with a paddle attachment makes the job effortless. The paddle is superior to the whisk for cream cheese frosting because it incorporates less air, leading to a denser, more structural frosting, whereas the whisk can sometimes result in an unstable fluff that collapses faster.
Detailed Ingredient List and Notes on Quality
Always use full fat ingredients. Seriously. This is not the time to be frugal or health conscious, because cutting the fat compromises the structure of your Easy Cream Cheese Frosting .
- Cream Cheese: 8 oz (225g) full fat, brick style. Never use the tubs labeled "spreadable." They have too much water.
- Unsalted Butter: ½ cup (1 stick / 113g) softened to a pliable stage. Using unsalted gives you control over the final flavor profile.
- Powdered Sugar (Icing Sugar): 3 to 3 ½ cups (360g to 420g) Always sifted! This is key to smooth, lump free frosting.
- Pure Vanilla Extract: 1 tsp. The good stuff makes a huge difference here.
- Fine Sea Salt: ¼ tsp. Essential. It sounds weird, but salt balances the overwhelming sweetness of the sugar and enhances the tangy cream cheese flavor.
Can I Use low-fat Cream Cheese? (Substitution Guide)
No. Just, no. low-fat cream cheese contains more water and stabilizers, meaning your frosting will be thin, watery, and almost impossible to stabilize without adding an obscene amount of sugar, which completely destroys the flavor balance of the best Easy Cream Cheese Frosting .
Stick to the full fat brick.
| Ingredient | Substitution Guide | Notes |
|---|---|---|
| Butter | Salted Butter (Omit the added salt) | Adjust the final salt content, tasting as you go. |
| Cream Cheese | Vegan Cream Cheese (Tubs/Blocks) | Use the block style; you might need to slightly increase the powdered sugar due to potential liquid content. |
| Vanilla | Almond Extract or Liqueur (e.g., Kahlua) | Start with half the amount (½ tsp) as flavor extracts are potent. |
| Powdered Sugar | None this is essential | You cannot substitute granulated sugar for structure. |
Best Vanilla Extract for Optimal Flavor Depth
If you can spring for pure vanilla extract, do it. The imitation stuff tends to lend a slightly plastic note when mixed with the tangy cream cheese. If you want maximum flavor depth, try a vanilla bean paste.
A little specks of vanilla bean look beautiful in this Easy Cream Cheese Frosting and the flavor is unbeatable.
Scaling the Recipe: Adjusting Quantities for Larger Batches
This recipe scales up beautifully. I frequently double it when making big sheet cakes for parties, or when I am making several batches of my Strawberry Sheet Cake with Cream Cheese Frosting Recipe . Just remember to increase your mixing time proportionally. A double batch might need an extra minute or two of creaming at the start to ensure everything is perfectly emulsified before the sugar goes in.
Mastering the Method: step-by-step Guide to Non-Runny Perfection
This is the process that ensures the texture is always spot on. Read these steps once, then execute. Don't wander off halfway through; commitment is key here!
Phase 1: Creaming the Foundation (Butter and Cream Cheese)
- Prep and Sift: Get that powdered sugar sifted and ready to go. Place the butter and the slightly cooler cream cheese into the bowl of your stand mixer.
- Initial Creaming: Start the mixer on low speed, then immediately raise it to medium. Beat for 1– 2 minutes, stopping frequently to scrape down the sides. We are looking for zero lumps a unified, pale yellow paste. This vigorous initial creaming is the secret to avoiding separation later.
Phase 2: Integrating the Powdered Sugar (Avoiding the Dust Cloud)
- Flavor First: Once the fats are smooth, add the vanilla extract and salt. Mix until they are just barely combined (about 10 seconds).
- Slow Sugar Addition: Crucial step: Reduce the mixer speed to the lowest possible setting. Slowly, gradually, add the sifted powdered sugar, about ½ cup at a time. Wait until the dust settles and the sugar is incorporated before adding the next batch. This takes patience, but it prevents sugar explosions and ensures smoothness.
Chef’s Note: Do NOT dump all the sugar in at once, even on low speed. It overwhelms the mixture and is the fastest route to a dense, lumpy frosting.
Phase 3: The Final Whip and Consistency Check
- Final Whip: Once all the sugar is in and incorporated, stop the mixer, scrape down the bowl one final time, and then increase the speed to medium high. Beat for exactly 60 90 seconds. You will see the frosting lighten significantly, becoming noticeably fluffier and higher in volume.
- Stop Immediately: Once it’s fluffy, switch the mixer off! Overbeating at this stage warms the ingredients, which breaks the emulsion and turns your perfect Easy Cream Cheese Frosting into a soupy mess.
Immediate Use vs. Allowing the Frosting to Rest
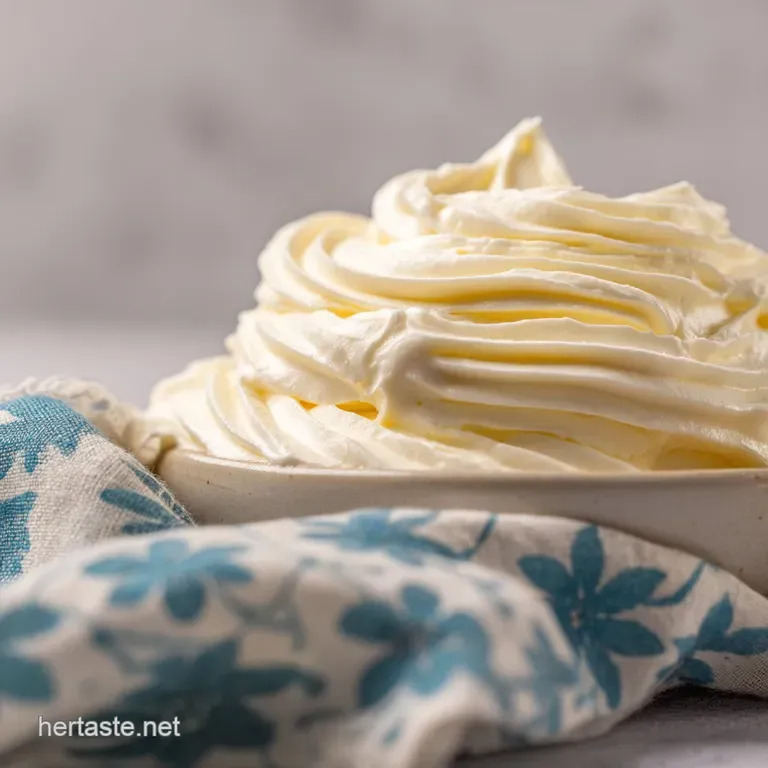
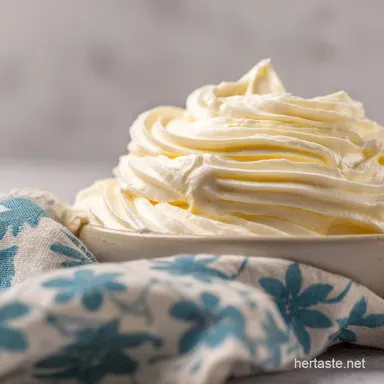
If you are just spreading this Easy Cream Cheese Frosting onto something like brownies or a layer of cake, feel free to use it immediately. However, if you need structural integrity like for piping rosettes or filling between heavy cake layers you must chill it.
A quick 30 minutes in the fridge firms it up beautifully, making it much easier to handle.
Troubleshooting the Frosting: How to Fix a Runny or Lumpy Batch
Don't panic! We have all been there. I once ruined a batch of Easy Cream Cheese Frosting by rushing the butter softening process in the microwave, ending up with partially melted goo. Disaster averted, here are the fixes.
The Solution for Frosting That is Too Soft (The Quick Chill Fix)
If your finished Easy Cream Cheese Frosting is too runny, it usually means your butter or cream cheese was too warm, or you over mixed it and generated too much heat. The solution is simple:
- Add 1/4 cup more sifted powdered sugar.
- Transfer the bowl to the refrigerator for 20 minutes.
- Take it out and beat it again on medium speed for 30 seconds. The cold temperature will firm up the fats, and the extra sugar will help absorb any released moisture, instantly stabilizing your Easy Cream Cheese Frosting .
Preventing Lumps: The Key Mixing Order for Smoothness
Lumps happen because the cream cheese wasn't thoroughly mashed and creamed with the butter before the sugar was added. If you have lumps now, stop adding ingredients and beat the mixture (butter/cheese only) until perfectly smooth. If the sugar is already in, there are two choices:
- Small Lumps: Keep mixing on medium speed for another minute; sometimes the mixer will eventually smooth them out.
- Big Lumps: Gently warm a small section of the frosting in a microwave safe bowl for 10 seconds (just to soften the cheese lump) and whisk it vigorously until smooth, then stir it back into the main batch.
Adjusting Sweetness and Tanginess Ratios
If your Easy Cream Cheese Frosting tastes too sweet, you need to boost the tang. Add 1/2 teaspoon of fresh lemon juice or even white vinegar. I know, vinegar sounds crazy, but it amps up the lactic acid flavor of the cream cheese without adding excessive liquid.
If it's too tangy, add another 1/4 cup of sifted powdered sugar.
When to Stop Mixing (The Danger of Overbeating)
This frosting is not like White Chocolate Frosting: Silky Swiss Meringue Buttercream , which requires extensive whipping. Overbeating this Easy Cream Cheese Frosting creates friction, which warms the fats. Once the mixture gets too warm, the emulsion breaks, leading to a greasy, separated frosting that looks grainy and wet. Stop mixing as soon as the frosting looks fluffy and holds a light peak. That’s it.
Adding Citrus Zest or Juice for Brightness
If you're using this for a lemon cake or a brighter, spring dessert, swap out a bit of the vanilla for citrus zest. The oils in the zest are powerful, so start small. For maximum impact in your Easy Cream Cheese Frosting , rub the zest into the powdered sugar before sifting this releases the essential oils beautifully.
Spice Infusions (Cinnamon, Nutmeg, or Cardamom)
Making frosting for a fall or holiday treat, like pumpkin loaf? Add a teaspoon of ground cinnamon and a pinch of nutmeg when you add the vanilla. This elevates the whole flavor profile. I often do this when using this recipe as a base for holiday treats, like when I'm making Cream Cheese Frosting for Cinnamon Rolls . It’s brilliant on those spice cakes, but if you’re looking for a heavier, nuttier frosting, check out my recipe for Christmas Cupcakes: Spiced Ginger Cake with Brown Butter Frosting .
Creative Flavor Swaps for Your Cream Cheese Base
The foundation of this Easy Cream Cheese Frosting is incredibly versatile. You can swap out the vanilla and experiment with different extracts and liquids to suit whatever you are baking.
- Coffee: Replace the vanilla with 1 2 teaspoons of very strong, cooled espresso or coffee extract. Perfect for mocha cakes.
- Peanut Butter: Add 1/4 cup of smooth peanut butter along with the vanilla.
- Maple: Use 1 2 tablespoons of good quality maple syrup (reduce the powdered sugar by about 1/4 cup to account for the liquid). This is divine Cream Cheese Frosting for Cinnamon Rolls .
Maximizing Shelf Life: Storing and Freezing This Easy Cream Cheese Frosting
One of the great things about this recipe is how well it holds up. You can make a batch of this Easy Cream Cheese Frosting ahead of time, which is perfect for busy holiday baking.
In the Fridge: Because it contains dairy, this frosting must be stored in the refrigerator. Place it in an airtight container and it will keep beautifully for up to 5 days.
When you are ready to use it, let it sit at room temperature for about 30 minutes, then re-whip it briefly for 15 seconds on medium speed to restore its smooth, fluffy texture. This is key for achieving that freshly made consistency.
Freezing: Yes, you can freeze this. This particular Stable Cream Cheese Frosting freezes exceptionally well, thanks to the high butterfat content. Place the unused frosting in a freezer safe bag or container and freeze for up to 2 months.
Thaw it overnight in the refrigerator, and then let it sit at room temperature for about an hour. It will likely look separated or curdled initially don't worry! Re-whip it vigorously on medium speed for 1- 2 minutes until it becomes smooth and fluffy again.
Beyond Red Velvet: Creative Ways to Use This Versatile Frosting
While everyone knows this is the required partner for Easy Cream Cheese Frosting for Carrot Cake , its applications are endless.
- Piped Dessert Cups: Use the chilled frosting as a filling layer for parfaits or dessert cups, alternating with crumbled graham crackers and fresh berries.
- Brownie Topping: Spread it thick on cooled chocolate brownies. The tang cuts through the richness of the chocolate beautifully.
- Cookies and Bars: Use this Easy Cream Cheese Frosting as a glaze over thick oatmeal raisin cookies or lemon bars.
- The Ultimate Cinnamon Roll Topping: This is truly the best Cream Cheese Frosting for Cinnamon Rolls you will ever make. It melts just slightly into the warm crevices, creating a perfect glaze.
This truly is the best Easy Cream Cheese Frosting I have ever developed, reliable and delicious every single time. It takes the stress out of making professional level baked goods at home. Go make some!
The Essential Cream Cheese Frosting: Fluffy, Stable, and Spot On
(The Secret to No-Fuss, Non-Runny Perfection)
Ingredients
| Ingredient | US Customary | Metric | Notes |
|---|---|---|---|
| Full Fat Cream Cheese | 8 oz | 225 g | Softened, brick style only! |
| Unsalted Butter | ½ cup (1 stick) | 113 g | Softened, but not melted. |
| Powdered Sugar (Icing Sugar) | 3 to 3 ½ cups | 360 g to 420 g | MANDATORY: Must be sifted. |
| Pure Vanilla Extract | 1 tsp | 5 ml | high-quality for best flavour. |
| Fine Sea Salt | ¼ tsp | 1.25 g | Essential flavor balancer. |
| Milk or Heavy Cream (Optional) | 1 2 Tbsp | 15 30 ml | For thinning, if needed. |
Instructions
Stage 1: Creaming the Foundation
- Prep the Ingredients: Ensure butter is soft and pliable, and the cream cheese is slightly cooler but not hard. Sift the powdered sugar and set it aside.
- Combine Fats: Place the softened cream cheese and butter into the bowl of your stand mixer fitted with the paddle attachment.
- Cream Until Smooth: Beat on medium low speed for 1 minute, scraping down the bowl aggressively. Increase to medium speed and beat for another 1– 2 minutes until the mixture is uniform, lightened, and absolutely lump free . This prevents separation in your final Easy Cream Cheese Frosting .
Stage 2: Flavouring and Thickening
- Add Flavour: Mix in the vanilla extract and salt until they are just combined.
- Incorporate Sugar Slowly: Reduce the mixer speed to the absolute lowest setting. Slowly add the sifted powdered sugar, ½ cup at a time. Do not increase the speed! Let each addition fully incorporate before adding the next. Stop and scrape down the sides once halfway through.
Stage 3: Final Whip and Adjustments
- Whip for Volume: Once all the sugar is absorbed, increase the mixer speed to medium high. Beat the Easy Cream Cheese Frosting for 60 to 90 seconds. The mixture will gain volume and fluffiness.
- Stop Mixing: Stop immediately when it reaches the desired texture. If the frosting seems too stiff, add milk or cream, 1 teaspoon at a time, mixing on low until desired consistency is achieved. If using for piping, chill it for 30 minutes to solidify this Stable Cream Cheese Frosting .

Recipe FAQs
Why is my cream cheese frosting runny or soupy?
This is the most common troubleshooting issue and is usually due to ingredients being too warm, especially the cream cheese or butter. Ensure both are slightly cool firmer than typical room temperature before mixing to incorporate less air and maintain structure.
If the finished frosting is runny, chill it in the refrigerator for 20-30 minutes to firm it up before attempting to spread or pipe.
How do I prevent lumps or graininess in the final frosting?
Lumps are typically caused by cold, unmixed cream cheese or undissolved powdered sugar. To prevent this, ensure your cream cheese and butter are perfectly softened and beat them together until completely smooth before adding any sugar.
Additionally, always sift your powdered sugar to break up any clumps before mixing it into the wet ingredients.
Can I use this frosting for piping intricate designs like borders or roses?
This recipe is inherently stable, but for very intricate piping in warm environments, it may benefit from extra structure. Consider adding 1-2 tablespoons of cornstarch along with the powdered sugar, or incorporating a small amount of meringue powder, which acts as a helpful stabilizer.
Ensure the frosting is chilled briefly before piping for the best results.
Can I make this frosting ahead of time, and how should I store it?
Absolutely. Cream cheese frosting can be stored in an airtight container in the refrigerator for up to 5 days due to the perishable dairy ingredients. Before using, let it sit on the counter for about 30 minutes to warm slightly, then beat it briefly with a mixer to restore its original fluffy texture.
Can I freeze leftover cream cheese frosting?
Yes, cream cheese frosting freezes quite well, allowing you to store leftovers for up to two months in a deep freeze. Thaw the container overnight in the refrigerator before using.
Be aware that the frosting might separate slightly upon thawing, so you must re-whip it thoroughly with a hand mixer until it becomes smooth again before applying it to a baked good.
How can I adjust the flavor, such as making it chocolate or lemon?
Flavor variations are simple to implement once the base frosting is complete. For a chocolate version, sift in 1/4 cup of unsweetened cocoa powder along with the powdered sugar for a deep color and flavor.
For a vibrant lemon flavor, add 1 teaspoon of fresh lemon zest and 1 tablespoon of juice at the end of the mixing process.
Do I need to refrigerate a cake covered in cream cheese frosting?
Yes, due to the high content of cream cheese and butter, any cake or dessert frosted with this recipe must be refrigerated if stored for longer than two hours. Always cover the cake loosely to prevent the frosting from drying out in the fridge.
For serving, allow the cake to sit at room temperature for 30 minutes before slicing for the best flavor and texture.
Fluffy Stable Cream Cheese Frosting
Ingredients:
Instructions:
Nutrition Facts:
| Calories | 778 kcal |
|---|---|
| Protein | 3.0 g |
| Fat | 43.0 g |
| Carbs | 98.0 g |
