Easy Icing: Fluffy 15-Minute Buttercream
- The Ultimate Guide to Foolproof Fluffy Icing
- Mastering the Texture: The Science Behind Perfect Buttercream
- Essential Pantry Staples for Your Fluffy Buttercream
- Simple Steps to Constructing the Brilliant Baker’s Icing
- Troubleshooting Your Icing: Common Errors and Quick Fixes
- Extending Shelf Life: Storing and Freezing Your Finished Icing
- Beyond the Cake: Creative Uses for This Fluffy Frosting
- Recipe FAQs
- 📝 Recipe Card
The Ultimate Guide to Foolproof Fluffy Icing
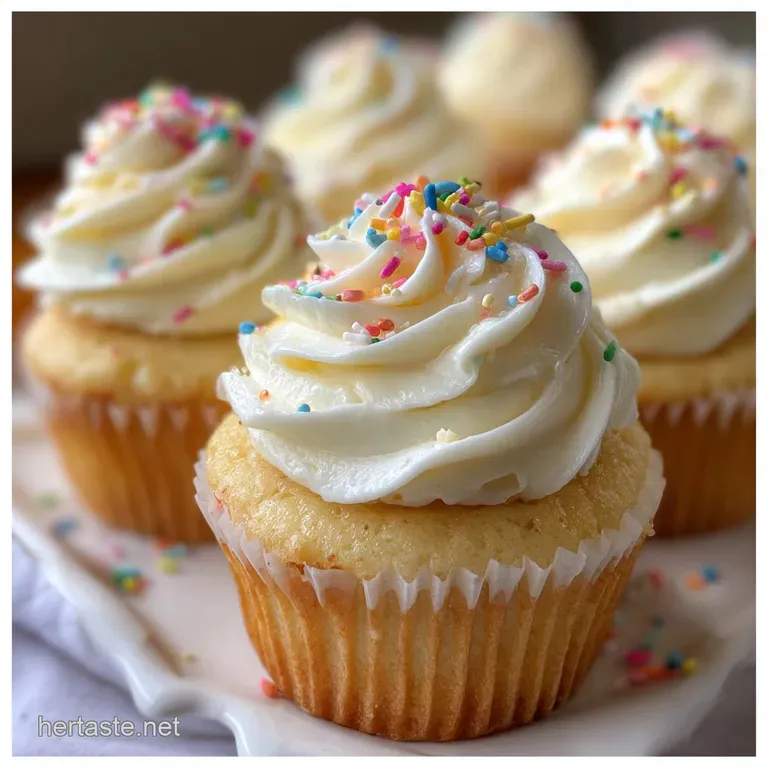
You know that cloud like texture? The one where the frosting melts perfectly on your tongue, smelling intensely of sweet vanilla? That’s what we are chasing today. Forget those dense, tooth achingly sweet, or gritty disasters you made in your teens; this Easy Icing recipe delivers smooth, stable perfection every single time.
It truly is the ideal accompaniment to virtually any baked good, creating that necessary balance between richness and light sweetness.
Why buy pre-made tubs when you can whip up something this glorious in fifteen minutes flat? Seriously, this simple recipe is a total lifesaver for last minute bakes because it uses inexpensive, common ingredients. It’s cheap, incredibly fast, and tastes infinitely better than anything you can buy ready-made.
Making Easy Icing at home means you control the quality and the flavor, which is half the fun of baking, isn't it?
This is my go-to, battle tested recipe for Homemade Vanilla Buttercream. We’re going deep into the science of whipping, the necessity of temperature control, and the exact liquid ratio needed for everything from spreading to detailed piping.
Get ready, because mastering this one skill means you'll never fear frosting a cake again. Making the best Easy Icing is simpler than you think.
Mastering the Texture: The Science Behind Perfect Buttercream
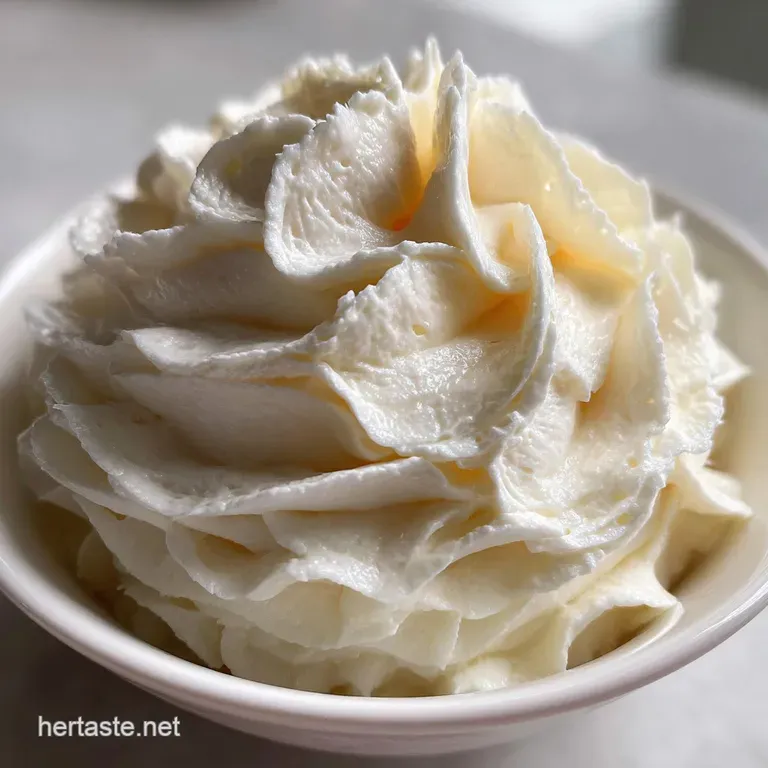
You might think mixing butter and sugar is foolproof, but there’s a massive difference between stirring them together and achieving true, fluffy excellence. This particular method maximizes air incorporation, giving you that beautiful, cloud like texture.
This specific American style is robust, holds detail well, and is much faster than its Meringue counterparts. We are aiming for a Vanilla Buttercream Recipe that stands tall and proud.
Why Home Icing Beats store-bought Every Time
Pre-packaged icing is often loaded with stabilizers and vegetable shortening, which dulls the flavour and leaves a weird, greasy mouthfeel. When you make your own Easy Icing , you are using real butter which means real flavour.
I use high-quality vanilla extract, and that instantly elevates the taste from "store-bought sugary" to "gloriously homemade." This recipe has a depth the store stuff just can’t touch.
The 15 Minute Secret to Cloud Like Texture
The secret isn't magic; it's aeration. We spend a solid 5 minutes creaming the butter before any sugar is added. This vigorous whipping introduces air into the fat structure, which is crucial. When the sugar is incorporated, those air pockets are stabilized.
This initial creaming is the reason this Easy Icing feels light and creamy instead of dense and oily.
Comparing Buttercream Styles: American vs. Swiss Meringue
Let’s be real: Swiss Meringue is stunning, but it involves heating egg whites and precise temperatures it’s a commitment. This recipe is an American style buttercream, meaning it relies heavily on butter and powdered sugar. It’s undeniably sweeter, but it’s infinitely faster, more forgiving, and provides the perfect canvas for things like sugar cookies or simple birthday cakes. If you want something less sweet, you might try my recipe for Easy Cream Cheese Frosting: Stable Non-Runny , but for quick volume, this Easy Icing wins.
The Role of Proper Whipping Temperature
Temperature is everything. If your butter is too cold, the sugar won't mix in properly, leaving you with lumps and a grainy mouthfeel. If the butter is too warm (melting or oily), the air you worked so hard to incorporate will collapse, leaving you with a greasy, runny mess.
The ideal temperature for butter is about 68°F (20° C). You should be able to press your finger into it and leave an easy, soft indentation. This perfect balance ensures a superior Easy Icing every time.
Achieving Stability Without Excessive Sugar
While powdered sugar provides structure, adding excessive amounts makes the icing gritty and overwhelmingly sweet. We achieve stability here by relying on two things: the high speed final whip (step 9) and the quality of the butter's fat content. The fat is what holds the structure.
The full 4 cups of sifted sugar provide necessary bulk, but the intense aeration keeps it from tasting heavy.
How Aeration Creates That Signature Fluff
Think of aeration as puffing up the butter. When you beat the butter for those initial 5 minutes, you’re creating microscopic bubbles. When you introduce the finely ground powdered sugar (the key to Powdered Sugar Icing Recipe success), those sugar particles catch and hold onto the bubbles, preventing them from popping.
The result is that incredibly light, signature fluff that everyone loves about Homemade Vanilla Buttercream.
Essential Pantry Staples for Your Fluffy Buttercream
You only need five ingredients, but the quality and preparation of each one matters immensely. This section covers the slight adjustments that take this from good to truly phenomenal. Getting the basics right is essential for perfect Easy Icing .
Butter Quality: Salted vs. Unsalted and Optimal Fat Content
I strongly recommend unsalted butter. Why? Because you can control the salt content precisely. I add a tiny pinch of fine sea salt not for seasoning, but to cut the cloying sweetness of the sugar. If you absolutely must use salted butter, omit the added pinch of salt entirely.
Use a European style butter if possible; they generally have a higher fat content (around 82%), which contributes to superior texture and less separation. This is fundamental for a stable, delicious Easy Icing recipe for cake .
| Ingredient Focus | Recommendation | Substitution/Fix |
|---|---|---|
| Butter | Unsalted, high fat content (European style). | If using salted, skip added salt. |
| Powdered Sugar | Brand name, fresh. | Must be sifted. Use fine mesh sieve. |
| Milk | Whole milk or heavy cream. | Use oat milk or water (for glazes only). |
| Vanilla | Pure vanilla extract or bean paste. | Avoid imitation if possible; the flavour difference is huge. |
Powdered Sugar: Why Sifting is Non-Negotiable
This is where I see most people fail when making Easy Icing . Icing sugar (or Confectioners' Sugar) clumps easily, and those lumps contain cornstarch, which is often added as an anti caking agent. If you don't sift, you will have tiny, hard, grainy balls in your otherwise beautiful icing.
They won’t dissolve, even with prolonged whipping. Please, I beg you, use a sieve.
Flavor Variations: Extracts and Zests That Elevate the Icing
While vanilla is the classic choice for a fantastic Easy Icing , don’t be afraid to experiment. Almond extract, used sparingly (start with 1/2 teaspoon), adds a wonderful complexity.
Citrus zest like lemon or orange can be beaten in with the butter initially to infuse the flavour deeply into the fat. For a holiday vibe, try replacing half the vanilla with maple extract.
Dairy Alternatives: Making dairy-free "Easy Icing"
You can absolutely make a dairy-free version of this buttercream. The key is using a high-quality, stick form vegan butter alternative. Look for ones that list their fat content as 80% or higher. Skip the tub spreads; they have too much water and will separate the icing. Use oat or almond milk for the liquid component.
The whipping steps remain identical, and you still end up with a wonderfully light, fluffy Powdered Sugar Icing Recipe .
Simple Steps to Constructing the Brilliant Baker’s Icing
Following these steps exactly, especially the timings, guarantees success. Remember, we are not just mixing; we are building air structure. This method delivers the Best Icing To Decorate Cupcakes.
Phase 1: Creaming the Base Ingredients Properly
First, the butter needs to be really ready. As mentioned, soft but not oily. Place the butter in your stand mixer bowl fitted with the paddle attachment (or a large bowl if using a hand mixer).
Beat the butter on medium high speed (speed 6 on a KitchenAid) for a minimum of 4– 5 minutes. You must scrape down the bowl halfway through. The butter will look pale yellow and significantly increased in volume.
This extended creaming is vital to getting that fluffy texture in your Easy Icing .
Phase 2: Gradually Incorporating the Dry Ingredients
Turn your mixer down to the absolute lowest speed. Now, gently incorporate the finely sifted powdered sugar, one cup at a time. This prevents the powdered sugar from exploding out of the bowl and coating your kitchen (we’ve all been there).
Once all the sugar is added, beat for 1– 2 minutes on low until it looks shaggy and fully combined.
The Final Whip: How Long is Too Long?
Scrape the bowl one last time. Add the vanilla, the pinch of salt, and 2 tablespoons of milk. Increase the speed to medium high. Beat for a final 3 minutes. This is the stage where the Easy Icing truly transforms.
It will become noticeably whiter, lighter, and almost marshmallow like in volume. Stop beating when it looks stiff and shiny. If you beat too long, particularly in a very warm kitchen, the friction can actually start to melt the butter, causing it to deflate.
Troubleshooting Your Icing: Common Errors and Quick Fixes
Don't panic if your first batch seems off. Buttercream is remarkably resilient, and 99% of problems can be fixed with temperature and a little patience. This ensures your Easy Icing remains foolproof.
Why Your Buttercream Looks Curdled (and How to Save It)
The "curdled" look (where it looks chunky and separated) usually happens because the temperature differential is too high either the butter was too cold when you started, or the liquid you added was too cold.
To fix it: Remove 1/4 cup of the curdled icing and microwave it for 10 seconds until it's barely melted (liquid fat). Pour this melted portion back into the remaining icing and beat vigorously on high speed for 30 seconds.
The melted fat acts as an emulsifier, binding the mixture back together into smooth perfection.
Preventing the Icing from Becoming Too Sweet or Grainy
The sweetness is managed by that necessary pinch of salt. Never skip it! It balances the flavour beautifully, preventing that sickly sweet taste common in many store-bought varieties. Graininess is always fixed by sifting your powdered sugar.
If you skipped the sift and it’s now grainy, unfortunately, the only real fix is to start over, or melt the whole batch and use it as a thin glaze (which is wasteful, so please, just sift!).
Adjusting Consistency for Piping vs. Spreading
This recipe, using 3 tablespoons of liquid, is perfect for piping intricate designs, as it’s stiff and holds sharp edges ideal for Buttercream Frosting For Cake Pops. If you want a softer, spreadable consistency for simply topping a loaf of Butternut Squash Bread: Easy Moist Autumn Loaf Recipe , add the full 4 tablespoons of liquid. For a very thin glaze, you would need to increase the liquid to 6 8 tablespoons and reduce the butter slightly, as detailed in the variations section.
Extending Shelf Life: Storing and Freezing Your Finished Icing
Yes, you can absolutely make this Easy Icing ahead of time! This is a massive advantage when prepping for a big event. Proper storage means your delicious Easy Icing is ready when you are.
Refrigerating Leftovers: Time Limits and Best Practices
If you have leftovers, place the icing in an airtight container and store it in the refrigerator for up to 5 days. Important: Do not store it near anything strongly flavoured, like onions or garlic, as fat absorbs smells easily.
When you are ready to use it, let it sit out at room temperature for about an hour until softened. Then, return it to the mixer and beat it again on medium speed for 2– 3 minutes until it’s light and fluffy again.
Freezing Buttercream: Preparing for Long Term Storage
Buttercream freezes brilliantly for up to 3 months. Place the completely finished Easy Icing in a freezer safe zip-top bag, pressing out as much air as possible before sealing. Lay it flat for easy stacking. Label the bag with the date.
Freezing this Homemade Vanilla Buttercream makes large batch baking much simpler.
Reactivating Icing After Freezing
Thaw the frozen icing overnight in the refrigerator. Then, let it warm up on the counter until it reaches room temperature (softened, not greasy). The icing will look slightly chunky or separated immediately after thawing this is normal.
Beat it on medium high speed for 3– 5 minutes. It will smooth out and become beautifully fluffy again, sometimes even fluffier than the original batch! You’ll be delighted with how well this Easy Icing holds up.
Beyond the Cake: Creative Uses for This Fluffy Frosting
This versatile frosting can do so much more than just cover a layer cake. I use a slightly stiffer version of this Easy Icing when making my Eggless Peanut Butter Cookies: Chewy Easy Recipe for sandwiching.
Dipping Sauce for Fruit
Add a touch more cream (up to 6 tablespoons) until the icing is a dippable consistency. It makes a decadent, sweet sauce perfect for dipping strawberries, apple slices, or pineapple skewers. It’s like a super rich fondue, but without the hassle.
Decorating Sugar Cookies
The stability of this particular Easy Icing is perfect for decorating sugar cookies because it crusts slightly. This means it dries to the touch, preventing smudges, but remains soft on the inside.
Thin it slightly with an extra tablespoon of milk for flood icing consistency, or keep it stiff for piping intricate borders. It’s definitely one of the best easy icing recipes available.
Cupcake Fillings
Use a piping bag and a small nozzle to bore a hole into the centre of baked cupcakes. Pipe a dollop of stiff Easy Icing into the cavity before topping the whole cupcake with a beautiful swirl. This adds a lovely surprise centre to the bake, keeping the whole cake moist and flavourful.
This perfect, easy icing recipe for cake really is the foundation for all great bakes!

Recipe FAQs
Why is my buttercream too runny or thin?
If the icing is too thin, it usually means you added too much liquid (milk/cream/extract) or your butter was too warm. To fix this, add 1/4 cup more powdered sugar and beat on high speed until it thickens, ensuring the sugar is fully incorporated.
If the weather is very hot, try placing the bowl in the refrigerator for 15 minutes before re-whipping.
My icing tastes gritty what went wrong?
Grittiness is caused by powdered sugar that has not fully dissolved into the butter and liquids. To fix this, stop mixing and let the mixture rest for 10 minutes to allow the sugar granules to absorb moisture.
Then, beat the icing again on high speed for at least five minutes until it achieves a perfectly smooth, silky texture.
How long can I store this easy icing, and can I freeze it?
Buttercream can be stored in an airtight container at room temperature for up to two days, or refrigerated for up to two weeks. You can also freeze it for up to three months; thaw it overnight in the fridge.
When chilling or freezing, let it come back to room temperature before re-whipping for 5 minutes to restore its essential fluffiness.
Can I make this American buttercream recipe dairy-free or vegan?
Yes, simply substitute the dairy butter with a high-quality, solid vegan butter stick (avoid soft margarines, as they contain too much water). Replace any dairy milk or cream with a neutral plant based milk, such as oat or almond milk.
Ensure your powdered sugar is certified vegan, as some brands use bone char in processing.
How do I create different flavor variations for this icing?
Flavor changes are simple: swap the vanilla extract for almond, lemon, coffee, or peppermint extract to change the profile. For chocolate, melt 2 ounces of unsweetened baking chocolate, let it cool slightly, and blend it in once the buttercream is complete.
You can also mix in citrus zest or a teaspoon of freeze dried fruit powder.
Is this buttercream stable enough for piping detailed decorations?
This recipe is perfect for general spreading and basic swirls, but for very detailed piping or hot environments, you may need a stiffer consistency. Beat in an extra half cup of powdered sugar or incorporate 1-2 teaspoons of meringue powder to increase stability and help the decorations hold their shape.
How do I achieve vibrant colors without watering down the icing?
Always use concentrated gel or paste food colorings, as liquid drops contain water which destabilizes the icing. Add the color after the icing is fully mixed, starting with a tiny amount, and remember that the colors often deepen significantly after resting for 15 minutes.
Fluffy 15 Minute Buttercream Icing
Ingredients:
Instructions:
Nutrition Facts:
| Calories | 860 kcal |
|---|---|
| Protein | 0.3 g |
| Fat | 44.5 g |
| Carbs | 120.5 g |
