Hershey Kiss Cookies: the Cracking Classic Recipe

- The Cracking Classic: Why Peanut Butter Blossoms Endure
- The Science of Sweet & Salty: How This Peanut Butter Cookie Recipe Delivers
- Gathering Your Supplies: Essential Ingredients for Flawless Hershey Kiss Cookies
- Rolling and Baking: The Step-by-Step Method to Making Peanut Butter Blossoms
- Pro Baker Secrets: Mastering the Peanut Butter Blossom Dough and Press
- Keeping the Classics Fresh: Storage and Freezing Your Kiss Cookies
- Elevating the Experience: Serving Suggestions and Perfect Pairings
- Recipe FAQs
- 📝 Recipe Card
The Cracking Classic: Why Peanut Butter Blossoms Endure
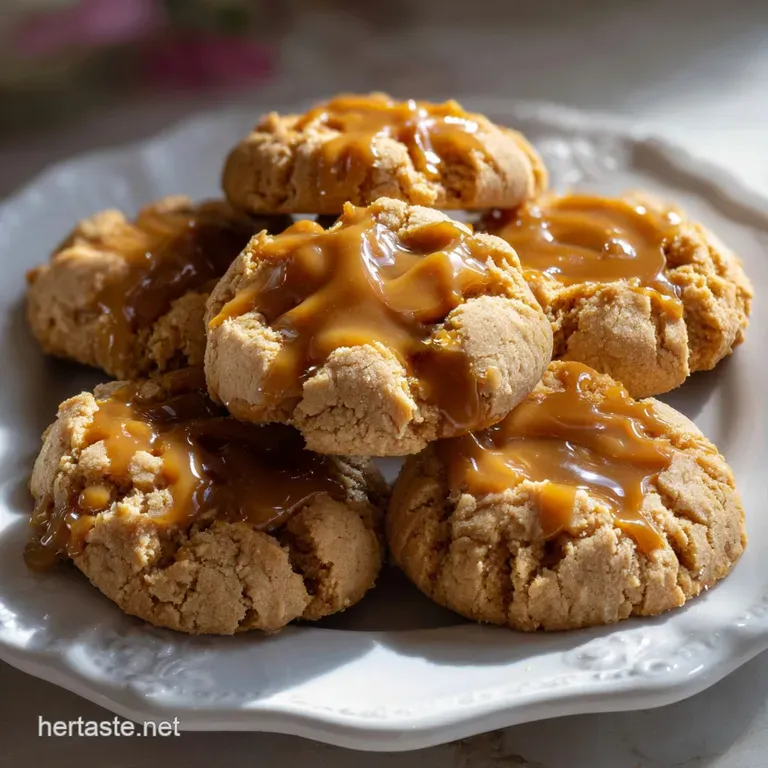
The aroma of these baking? Seriously intoxicating. It’s that deep, savory warmth of roasted peanuts combined with the intoxicating sweetness of melted sugar and vanilla. When these beauties come out of the oven pillowy soft, golden brown, and topped with a creamy milk chocolate peak you know exactly why they are a holiday legend.
This recipe for Hershey Kiss Cookies is the absolute best, delivering that perfect balance of salty, sweet, and unbelievably chewy.
I know, I know, baking can feel like a chore sometimes, especially when you are trying to produce dozens of cookies for a party or a cookie swap. But listen, the beauty of the Hershey Kiss Cookies recipe is its simplicity.
It requires standard pantry staples and relies on fundamental techniques, making it a reliable lifesaver when you need a huge batch of impressive treats without breaking the bank or your sanity.
We’re not reinventing the wheel here; we’re just perfecting it. We’re going deep into the science of texture and chilling, ensuring your resulting Peanut Butter Kiss Cookies are perfectly uniform, soft in the middle, and stable enough to survive the post oven kiss press without crumbling.
Trust me, these are going to be your new favourite classic Kiss Cookie Recipe .
The Science of Sweet & Salty: How This Peanut Butter Cookie Recipe Delivers
Baking isn't just mixing ingredients; it's a science, and we are aiming for the chemical reaction that gives us peak chewiness. This Hershey Kiss Cookies Recipe Easy method works because we use a high proportion of brown sugar to granulated sugar, and critically, we use smooth peanut butter as a primary fat source.
Peanut butter stabilizes the dough, adds irresistible flavour, and keeps the interior wonderfully soft long after they’ve cooled.
A Brief History of the American Kiss Cookie Tradition
Did you know these cookies date back to the 1950s? They were first popularized by Mrs. Freda Smith, who won a Pillsbury Bake Off contest with her "Peanut Butter Blossoms." Though the ingredients have been tweaked slightly over the decades, the concept remains the same: a salty sweet cookie base instantly fused with a melting Hershey Kiss Sugar top.
It's a testament to simple, perfect flavor combinations.
Defining the Perfect Cookie Texture
Nobody wants a dry, crumbly cookie, right? When making Hershey Kiss Cookies , we are aiming for defined edges that are chewy, but a center that is still slightly fudgy.
This is achieved through precise baking time (pulling them out before they look fully baked) and using room temperature butter and eggs. That fudgy center prevents the entire cookie from drying out when the oven heat hits it.
Key Equipment Checklist for Baking Success
You don't need a professional kitchen, but a few tools make these easier. A stand mixer is brilliant for creaming the butter and sugar thoroughly, which incorporates necessary air for lift. You definitely need a cookie scoop!
It’s essential for uniformity, which guarantees all your Hershey Kiss Cookies bake evenly. Pro Tip: Having your baking sheets lined with parchment or silicone mats is non-negotiable for easy cleanup and preventing stickage.
The Role of Sugar in Achieving Chewy Edges
We use both white granulated sugar and brown sugar in this recipe. The granulated sugar provides structure and creates that beautiful, crisp coating when you roll the dough balls in it before baking. The brown sugar, thanks to its molasses content, adds moisture and that delightful, complex chewiness we crave.
If you skip the brown sugar, your Kiss Cookie Recipe will be crispier and flatter, lacking that essential soft center.
Why Room Temperature Butter is Non-Negotiable
This is where I used to go wrong! I’d rush the creaming process with cold butter. Stop! Cold butter cannot trap air effectively, leading to dense, flat cookies. Room temperature butter creams perfectly with the sugars, creating tiny air pockets that expand in the oven.
The result is a lighter, fluffier base for your Peanut Butter Kiss Cookies . If you forget to take it out, cut your butter into small cubes and let it sit on the counter for 15 minutes. It works a treat.
The Perfect Dough-to-Peanut Butter Ratio
The balance of peanut butter to flour is crucial. If you add too much peanut butter, the cookies will spread too thinly. Too little, and you lose that distinct savory nuttiness. Our ratio here ensures the dough remains sturdy enough to hold its shape after rolling in the Hershey Kiss Sugar yet still delivers that dominant, mouthwatering peanut flavor.
This is why this particular recipe yields such fantastic Hershey Kiss Cookies .
Gathering Your Supplies: Essential Ingredients for Flawless Hershey Kiss Cookies
Before we crack on, let’s talk supplies. This recipe for Hershey Kiss Cookies uses basic pantry items, but the quality and type of ingredient really matters here, especially when dealing with peanut butter.
| Ingredient | Standard Requirement | Viable Substitution |
|---|---|---|
| Butter | Unsalted, room temperature | Vegetable Shortening (use 3/4 volume, less flavour) |
| Peanut Butter | Smooth, classic style (Jif, Skippy) | Smooth Almond Butter or SunButter (Note: SunButter may turn green) |
| Egg | Large, room temperature | 1/4 cup applesauce or 1 flax egg (for Eggless Peanut Butter Cookies: Chewy Easy Recipe ideas) |
| Flour | All-Purpose | Measure for-Measure gluten-free Flour Blend |
| Hershey Kisses | Classic Milk Chocolate | Mini Reese's Cups (for extra peanut flavor!) |
Ingredient Breakdown: What Type of Peanut Butter Works Best?
I cannot stress this enough: DO NOT USE NATURAL PEANUT BUTTER that separates oil easily. Natural peanut butter, while lovely on toast, changes the fat and moisture balance drastically in baking.
You need the stabilized stuff think Jif or Skippy for the perfect structure in these Peanut Butter Kiss Cookies . It prevents your dough from becoming overly oily and falling flat in the oven.
Choosing Your Chocolate: The Classic Kiss vs. Modern Twists
The standard milk chocolate Hershey Kiss is the iconic crown for these classic Hershey Kiss Cookies Chocolate . But hey, sometimes you want to spice things up! During the holidays, I often use the Peppermint Kisses or the Caramel filled ones.
They still achieve the right visual effect and add a fun twist. Just ensure whatever variety you choose, they are thoroughly chilled and unwrapped ahead of time. I once had a catastrophic baking session where I was frantically unwrapping Kisses while the first batch was already over baking. Learn from my chaos!
Handling gluten-free and dairy-free Swaps
If you need a gluten-free base for your Hershey Kiss Cookies , use a high-quality measure for-measure GF flour blend that includes Xanthan Gum. The texture holds up beautifully. For dairy-free versions, swap the butter for a solid plant based baking stick (like Miyoko's or Earth Balance sticks). Just remember that dairy-free options often melt faster, so a slightly longer chill time for the dough is a good idea. Looking for more inspiration? Check out my advice on Butterless Cookies: Chewy Spiced Oatmeal Recipe Without Butter .
Measurement Precision: Tips for Dry vs. Wet Ingredients
Baking is all about precision. When measuring flour, always use the 'spoon and level' method. Spoon the flour into your measuring cup and then level off the excess with a straight edge.
Never scoop directly from the bag; you could end up with 25% more flour than required, leading to dry, dense Kiss Cookies .
Chef's Note: Ensure your vanilla extract is pure, not imitation. You use a whole tablespoon in this recipe, and that depth of flavor really shines through, especially against the savory peanut butter.
Rolling and Baking: The step-by-step Method to Making Peanut Butter Blossoms
This is where the magic happens, but timing is everything. Follow these steps precisely for the most perfect, photogenic Hershey Kiss Cookies .
Preparing the Dough: Creaming and Mixing Techniques
Start by creaming the room temperature butter and both sugars until the mixture is visibly lighter in colour and texture. This should take a full three to five minutes on medium speed. Then, beat in the peanut butter until fully incorporated. Add the eggs one at a time, followed by the vanilla.
Once the wet ingredients are glossy and smooth, add your pre-whisked dry ingredients. Mix on the lowest speed only until the last streaks of flour disappear. Overmixing develops gluten , and gluten gives us tough, cakey cookies instead of chewy ones.
The Essential Sugar Coating and Uniform Rolling
Once your dough has had its minimum 30 minute chill (please don't skip this!), it’s time to roll. Use a 1.5 tablespoon scoop to ensure all your Hershey Kiss Cookies are the same size.
Roll the scooped dough ball quickly between your palms to smooth it, then dredge it heavily in the remaining granulated Hershey Kiss Sugar . The sugar creates a barrier that helps the cookie maintain its shape and gives that lovely crunchy edge.
Baking Time Logistics: When to Add the Hershey Kiss
Bake the cookies at 375°F (190°C) for exactly 8 to 10 minutes. Here’s the critical visual cue: the edges should look set, maybe barely golden, but the center should still look pale and slightly underdone. Remove them immediately. You must be quick now!
Grab your pre-chilled, unwrapped Kisses and gently press one into the center of each hot cookie. The warmth of the cookie will slightly melt the base of the chocolate, securing it in place. If you wait even two minutes, the cookies will set, and the Kiss won't stick properly, leading to chocolate fallout.
The Crucial Cooling Process for Stable Cookies
Once the chocolate is pressed in, leave the finished Hershey Kiss Cookies on the baking sheet for a full five minutes. The residual heat from the sheet continues the baking process (carry over cooking) and allows the fats to stabilize.
After five minutes, gently transfer them to a wire rack to cool completely. The chocolate will firm up as the cookies cool, guaranteeing that classic shape we all adore.
Pro Baker Secrets: Mastering the Peanut Butter Blossom Dough and Press
There are a few tricks I’ve picked up over years of making hundreds of dozens of these. Mastering the Kiss Cookie Recipe means understanding temperature control. If your kitchen is super hot, your dough will soften fast. Work quickly in small batches!
Troubleshooting: Why Are My Cookies Cracking or Spreading Too Much?
If your cookies are spreading into flat puddles, it’s almost always one of two things: 1) You skipped the chilling step, or 2) Your butter was too soft, or you used separated natural peanut butter.
If your cookies are cracking severely when you press the Kiss, it usually means you baked them for too long and they dried out, or you waited too long after removing them from the oven. For perfect Hershey Kiss Cookies , speed and cold temperature are your friends.
Achieving the Ideal Soft Center (Avoiding Over Baking)
I mentioned this, but it bears repeating: aim for under baked. When the timer goes off at 8- 10 minutes, the center of the cookie ball should look puffy and a little bit glossy. It should NOT be deep golden brown. If they are crunchy when they come out, they will be bricks once they cool.
We want that delightful chew in our Hershey Kiss Cookies .
The Quick Chill Trick for Perfect Dough Handling
If you are having trouble rolling the dough or if it's sticking to your hands, put the bowl of dough back in the fridge for another 15 minutes. Alternatively, if you need to bake a lot for your Christmas Cookie Recipes Holiday baking list, roll all the balls, place them on a tray, and stick the tray in the freezer for 10 minutes before rolling in sugar and baking.
Cold dough spreads less!
Keeping the Classics Fresh: Storage and Freezing Your Kiss Cookies
These Hershey Kiss Cookies are a staple of Christmas Cookie Recipes Holiday baking for a reason they store exceptionally well! Knowing how to keep them fresh means you can bake ahead of time and reduce holiday stress.
Short Term Storage: How to Keep Them Chewy on the Counter
Once completely cool (this is critical no heat!), store the finished Hershey Kiss Cookies in an airtight container at room temperature. They will retain their freshness and soft texture for up to a week.
If you notice they are getting slightly hard, slip half a slice of plain white bread into the container; the moisture from the bread will migrate to the cookies and soften them right back up. Yes, seriously, it’s my favorite trick!
The Best Method for Freezing Baked or Unbaked Dough
You have two options for extending the life of your Hershey Kiss Cookies .
- Freezing Baked Cookies: Bake and cool the cookies fully. Place them in a single layer in a rigid, freezer safe container. Separate layers with parchment paper. They freeze beautifully for up to three months. Thaw them overnight on the counter.
- Freezing Unbaked Dough: Scoop and roll the dough balls (without the sugar coating). Freeze the dough balls solid on a parchment lined tray. Once frozen, transfer them to a zip-top bag. When ready to bake, thaw them just slightly, roll them in the Hershey Kiss Sugar , and bake as directed, adding 1- 2 minutes to the total baking time. This is a game changer for spontaneous baking!
Elevating the Experience: Serving Suggestions and Perfect Pairings
These Hershey Kiss Cookies are a stunning treat all on their own, but pairing them with the right beverage or dessert component turns a simple cookie into a true experience.
This is especially true if you are adding these delicious Peanut Butter Kiss Cookies to a festive platter.
Drink Pairings That Complement Peanut Butter and Chocolate
- Milk: The undeniable classic. Cold whole milk cuts through the richness of the peanut butter and complements the sweetness of the milk chocolate.
- Coffee: A dark roast or espresso shot offers the perfect bitterness to balance the sugar. The intensity of the coffee matches the intensity of the peanut butter.
- Tea: For a lighter option, pair the Hershey Kiss Cookies with a strong, traditional black tea or a spiced chai latte.
I guarantee that once you try this perfected method for making Hershey Kiss Cookies , you won't need another recipe. They're consistently chewy, brilliantly flavored, and truly easy Easy Sugar Cookies to master. Happy baking!

Recipe FAQs
Why did my Peanut Butter Blossoms come out dry or crumbly?
Dryness is usually a result of over baking or inaccurate flour measurement. Ensure you are using the 'spoon and level' method for measuring flour and remove the cookies immediately when the edges are just beginning to set but the centers still look slightly soft.
Remember that residual heat on the baking sheet will continue to cook them slightly once removed from the oven.
When is the exact moment I should press the Hershey's Kiss into the cookie?
The timing is crucial: the chocolate must be added the second the cookies are removed from the oven while they are piping hot. Press down firmly enough to cause the cookie to crack slightly around the chocolate base, which helps the Kiss anchor securely as the cookie cools and sets.
If you wait even a minute too long, the surface will harden, and the chocolate will not adhere properly.
My cookies spread too flat what went wrong?
Excessive spreading is typically caused by using butter that is too warm or not creaming the butter and sugar for the correct amount of time, incorporating enough air. If your kitchen is warm or you notice the dough seems oily, chilling the formed dough balls for 30 minutes before rolling them in sugar and baking will firm up the fats and minimize spread.
Can I use natural peanut butter instead of commercial creamy varieties?
It is strongly recommended to use standard, stable commercial peanut butter (like Jif or Skippy) for consistent results in baking. Natural peanut butter tends to have excessive oil separation, which can result in a greasier, flatter cookie texture that often struggles to hold the classic domed blossom shape.
If you must use natural, ensure it is stirred thoroughly and chilled beforehand.
How should I store these cookies, and how long do they stay fresh?
These cookies stay wonderfully fresh for about 3 to 5 days when stored in an airtight container at room temperature. For optimal structure, wait until the chocolate Kisses are fully set before layering them in the container.
Avoid refrigerating the cookies, as the cold air tends to dry out the peanut butter base quickly.
Can I freeze the dough or the baked cookies?
Yes, both the dough and the baked cookies freeze beautifully, making them excellent for meal prepping or holiday baking. For dough, freeze pre-rolled balls (before dipping in sugar) on a baking sheet, then transfer them to a freezer bag for up to 3 months; bake straight from frozen, adding 2 3 minutes to the total bake time.
If freezing baked cookies, ensure the Kisses are completely hardened first.
What if I want to use a chocolate other than the classic Hershey's Kiss?
While the Kiss is the traditional choice, feel free to experiment with other small, heat sensitive chocolates for variation. Excellent substitutions include unwrapped mini peanut butter cups, unwrapped chocolate stars, or even a couple of regular M&M's pressed into the top.
Ensure the replacement chocolate is added while the cookie is hot for proper adhesion and melting.
Easy Peanut Butter Kiss Cookies
Ingredients:
Instructions:
Nutrition Facts:
| Calories | 1549 kcal |
|---|---|
| Protein | 16.3 g |
| Fat | 75.4 g |
| Carbs | 136.4 g |
