No Bake Unicorn Fudge the Easiest Whimsical Dessert Ever
- Escaping the Oven: Why This Whimsical Fudge is the Best Treat
- Gather Your Supplies: Essential Ingredients for the Perfect Pastel Swirl
- Necessary Tools of the Trade (No Stand Mixer Required)
- The Path to Pastels: Step and by-Step Guide to Making Magical Fudge
- Essential Aftercare: Maximizing the Shelf Life of Your No Bake Unicorn Fudge
- Recipe FAQs
- 📝 Recipe Card
Escaping the Oven: Why This Whimsical Fudge is the Best Treat
Okay, let’s be real. I love baking, you know I do. But sometimes, the oven is just... the enemy. Maybe it’s 90 degrees out, or maybe you only have 20 minutes before the kids descend into chaos.
Whatever the reason, we all need a showstopper dessert that requires zero technical skill and absolutely no temperature checking. Enter the No Bake Unicorn Fudge . It’s brilliant. It's creamy, ridiculously cute, and honestly, the hardest part is waiting for it to firm up in the fridge.
This is the kind of recipe you text to your friend right after you finish making it, complete with a blurry photo and a caption that says, "OMG, you have to try this. Seriously."
Achieving Showstopper Results Without the Technical Challenge
The biggest myth in homemade candy is that you need a sugar thermometer and a degree in confectionery to succeed. Absolutely not. The beauty of this unicorn fudge recipe is that the ingredient ratio is so stable, it practically makes itself.
We are leveraging the magical power of sweetened condensed milk, which acts as the sugar, binder, and fat all in one tidy can.
You get these impossibly vibrant, gorgeous pastel swirls that look like you spent hours perfectly tempering chocolate and mixing fondant. You didn't. You spent five minutes with a microwave and some food dye. That’s the kind of cooking I can get behind maximum visual impact, minimal effort.
The Magic Behind the Simplest Fudge Recipe Ever
This isn't old and fashioned fudge, where you boil sugar to the soft and ball stage and cross your fingers hoping it doesn't crystallize. That is high and stakes drama. This is the two and ingredient fudge formula, perfected.
The base is essentially melted white chocolate mixed with condensed milk. The cocoa butter in the chocolate, when combined with the thick, sugary liquid of the condensed milk, creates an instant matrix that sets up incredibly firm and creamy once chilled. That's it. It’s pure, simple chemistry.
We add a little butter for extra richness and vanilla extract for that classic sweet flavor profile, but really, the heavy lifting is done by the chocolate and the milk. It makes this the easiest no bake fudge squares you will ever encounter.
Who is the Effortless No Bake Unicorn Fudge Designed For?
Look, if you’re trying to impress someone (or maybe just entertain small, demanding children), this is your secret weapon.
| Category | Why This Fudge Works |
|---|---|
| Busy Parents | It's a quick 15 minute active project. |
| Kids Cooking | Safe, microwave and based, and heavily involves sprinkles! |
| Gifting | Cuts perfectly, travels well, and looks professional. |
| Beginners | Zero heat source, no risk of burning sugar. |
It truly is a fun kids activity food, especially if you let them take charge of the swirling and the sprinkle application (though be warned, they may use the entire jar of sprinkles).
Gather Your Supplies: Essential Ingredients for the Perfect Pastel Swirl
I know what you're thinking: Unicorns? That sounds like a lot of niche ingredients. Nope. You probably have most of this already, provided you have a well and stocked baking cabinet.
The key thing here and I cannot stress this enough is that you must use Sweetened Condensed Milk . If you accidentally grab evaporated milk (I did this once, and the result was more soup than fudge), you will have a serious problem. Read the label twice. Condensed. Milk.
Right then, let's crack on.
- Quality White Chocolate: This is the base and the texture. Don't skimp. If the bag says "baking chips" and costs $1, put it back. You need actual white chocolate that contains cocoa butter.
- The Condensed Milk: The 14 ounce can is standard. Don't try to measure this by volume; just dump the whole can in.
- Gel Food Colouring: Essential for those vibrant, swirling colors without watering down the fudge. (More on this later, but seriously, chuck the liquid dyes in the bin for this project.)
- Vanilla Extract & Salt: That little bit of salt balances the incredible sweetness of the chocolate and milk. Don't skip it; it stops the fudge from tasting flat.
Related Recipes Worth Trying
- Lazy Keto Meals Speedy Cheesy Avocado Bake in Under 20 Minutes — Lazy Keto Meals for Beginners dont get easier than this cheesy avocado bake Its the ultimate Easiest Keto Meal packed with bacon ready in 20 minutes and...
- Naturally Sweetened Healthy Stuffed Baked Apples Recipe — Craving cosy comfort These wholesome healthy stuffed baked apples are truly cracking They are so easy to make and the spiced oat filling bakes to perfection
- Easy LemonHerb Baked Tilapia Recipe Ready in Under 30 Minutes — Our foolproof method for healthy Baked Tilapia Get flaky tender fillets baked at 400F in under 30 minutes The easy lemonherb dressing makes it a speedy...
Necessary Tools of the Trade (No Stand Mixer Required)
Choosing the Best White Chocolate Base for Creamy Fudge
This is my #1 tip for perfect, non and grainy fudge. If you use cheap, waxy "compound white chocolate" (the kind that stays shiny and doesn't quite melt smoothly), your final texture will be weirdly grainy and brittle. Look for chocolate chips or blocks that list cocoa butter in the ingredients.
Using good quality white chocolate ensures an incredibly creamy, smooth bite, which is exactly what we want from our no bake unicorn fudge .
Achieving Dazzling Unicorn Hues: Food Colouring Tips
Forget the little plastic bottles of liquid colour you buy at the grocery store. They are great for frosting, but they contain too much water, and water hates melted chocolate. If you add liquid colour to your melted fudge base, it will thicken up unevenly and seize.
You must use gel food colouring. It's highly concentrated, so you only need a drop or two per colour, and it won't affect the final setting consistency. Pink, baby blue, and lavender purple are my go and to’s for this colorful fudge recipe , but you do you!
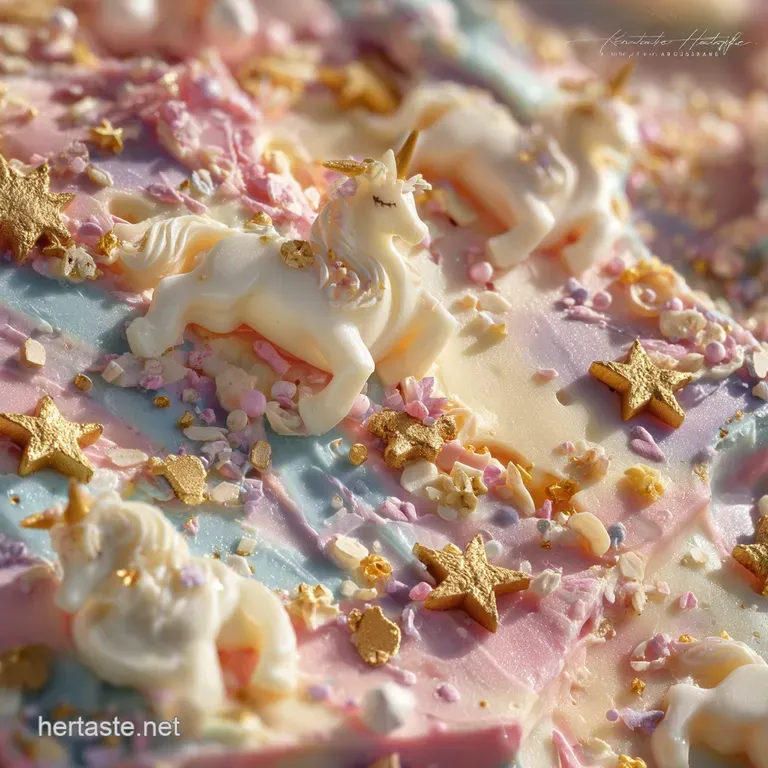
Sprinkle Strategy: Elevating Your No Bake Unicorn Fudge with Edible Bling
I'm opinionated about sprinkles. They shouldn't just sit there looking pretty; they should be part of the experience.
Here’s the sprinkle strategy I use:
- Mix different sizes and textures (jimmies, sanding sugar, little edible pearls).
- Apply the sprinkles immediately after swirling, while the fudge is still wet and pliable.
- Gently press the sprinkles into the surface using a piece of parchment paper or the back of your spatula. This ensures they don't fall off when you cut the squares.
This little bit of edible bling is crucial to making it a whimsical unicorn treat!
The Essential Kitchen Equipment for Melt and Mix Success
Honestly, the list is short. You need a large microwave and safe bowl (preferably glass or ceramic, as plastic can hold residual heat and cause scorching). You need three smaller bowls for dividing the colour. And you need a good rubber spatula. That's it. No complicated machinery, no fancy beaters.
Lining Your Pan: Achieving Clean, Professional Fudge Slices
Right, the pan. You need an 8x8 square pan (for thicker squares) or a loaf pan (for a tall, narrower slab).
Crucial step: line it with parchment paper. But don't just lay it flat. Cut the parchment so it hangs over two opposite sides, creating a sling. This allows you to lift the entire, set block of fudge straight out of the pan without having to dig at the corners.
It makes cutting unbelievably easy, and your unicorn fudge recipe uk friends will thank you for the neat edges.
CRITICAL NOTE: Always give the bottom of your pan a light spritz of cooking spray before laying down the parchment. This tiny bit of sticky oil holds the paper in place, stopping the fudge base from leaking underneath and creating a messy bottom layer.
The Path to Pastels: Step and by-Step Guide to Making Magical Fudge
Mastering the Microwave: Melting the Base Without Scorching
This is where my biggest fudge mistake happened years ago. I thought, I’ll melt it all on high heat! It's fast! Reader, it was not fast; it was disastrous. The sugar in the condensed milk scorched and separated into a grainy, oily mess.
The Rule: Microwave your white chocolate, butter, salt, and condensed milk mixture at 50% power, using 30 second bursts. Stir aggressively after every burst. It will look chunky at first. Keep stirring. The residual heat will melt the remaining chips.
Total melting time should be under two minutes. You want a silky, uniform consistency.
The Critical Moment: Combining Ingredients and Dividing the Batch
Once that mixture is glossy smooth, work fast. Stir in the vanilla extract. Then, here is a secret for perfect texture: stir in the remaining reserved 1/4 cup of chips. Why? This addition of unmelted chocolate acts as a "seed" to help the whole thing set faster and gives a slightly more toothsome texture (not just mush).
Now, quickly divide the warm fudge into your three small bowls. Use a measuring cup if you want precision, but honestly, eyeballing it is fine. It needs to be divided before it cools down, or you won't be able to mix the colours in smoothly.
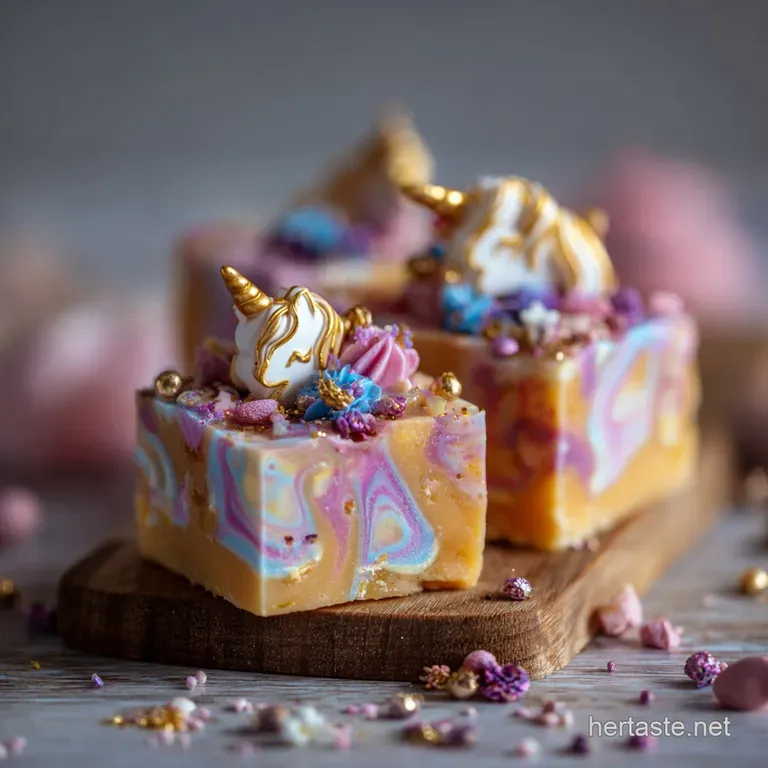
Crafting the Signature Marble Swirl (The Unicorn Technique)
Add your gel colour to each bowl and mix until fully incorporated. You should have three small bowls of beautifully bright, warm fudge.
Now, take a large spoon and start dolloping alternating colours randomly into your prepared pan. Pink blob here, blue blob next to it, purple on top. Don't layer it perfectly; randomness is the key to the natural "marble" effect of the easy no bake dessert .
Once all the fudge is dolloped in, grab a butter knife or a skewer. Run the tip gently through the colours in a slow, S-shape pattern, maybe twice.
STOP! If you over and swirl, the colours will blend into one murky, disappointing grey and purple mess. You are aiming for distinct ribbons of colour, not a single shade. Less is more here.
Patience is a Virtue: Chilling Time and Knowing When It's Ready
Once swirled and topped with sprinkles, pop the pan into the fridge. Resist the urge to poke it every five minutes.
It needs a minimum of two hours, but I prefer four. You know it’s ready when you can press your finger gently onto the top and there is no give, and the texture is firm, cool, and solid. If it feels slightly sticky or soft, leave it alone. The chill time is non and negotiable for clean cuts.
Essential Aftercare: Maximizing the Shelf Life of Your No Bake Unicorn Fudge
Proper Sealing and Refrigeration Techniques
Because this recipe uses condensed milk, it keeps best when refrigerated, though it is stable enough to sit out at a party for a few hours.
To store it: Cut the fudge into squares first. Layer the squares between pieces of parchment paper inside an airtight container. Kept this way, it will last easily for 10 14 days in the fridge. You can also freeze it (un and cut) for up to three months; just thaw it overnight in the fridge before serving.
My Fudge is Too Soft/Grainy: Troubleshooting Tips
We talked about scorching, but sometimes other things go wrong.
| Issue | Likely Cause | Fix/Prevention |
|---|---|---|
| Grainy Texture | Chocolate melted too fast/hot, or cheap chocolate used. | Use 50% power. Stir constantly. Use quality white chocolate. |
| Too Soft/Sticky | Not enough chocolate, or liquid colouring was used. | Put it back in the fridge. If still too soft, next time add 1/4 cup more chocolate chips to the base. |
Displaying and Serving Your Whimsical Dessert
When you finally lift that beautiful block of set fudge out of the pan (using your parchment paper sling, of course!), you need to cut it perfectly. Nobody wants messy, crumbling squares.
The trick? The hot knife. Heat a large, sharp chef’s knife under steaming hot water for 30 seconds. Wipe it completely dry (water is the enemy!). Slice swiftly down. Repeat the heating and wiping process for every single cut .
This gives you those clean, sharp, professional edges that make your no bake dessert look like it came from a fancy bakery.
Switching Up the Base: Alternatives to Vanilla Extract
Vanilla is the classic choice for white chocolate, but if you want to push the whimsical feel even further, try a substitution.
- Almond extract is gorgeous but potent. Use 1/2 teaspoon instead of 1 teaspoon of vanilla.
- Peppermint extract (a few drops) makes it perfect for holiday gifts.
- Lemon oil (food grade) adds a bright, slightly sour note that cuts through the sweetness nicely.
Veganizing the Magic: Dairy and Free Substitutions
Yes, you can absolutely make a vegan version of this magical treat. It requires two main swaps:
- Vegan White Chocolate: There are great quality oat or rice and based vegan white chocolate alternatives available now. Use the same volume.
- Coconut Sweetened Condensed Milk: This is readily available in most major grocery stores. It behaves exactly like its dairy counterpart, setting up perfectly.
The texture might be marginally softer due to the fat content of the coconut milk, but it will still deliver those incredible colors and creamy sweetness. Go forth and spread the unicorn magic!

Recipe FAQs
Help! My fudge looks oily and grainy. Have I mucked up the whole batch?
Not entirely! This common mishap usually means the white chocolate mixture got too hot too fast. To avoid separating the fats and sugars (which causes that dreaded grainy texture), always melt the base ingredients on 50% power in short bursts, stirring vigorously after each interval.
How do I keep the colours bright when making this No Bake Unicorn Fudge? I don't want a muddy mess!
The secret is two-fold: only use concentrated gel food colouring (liquid dyes add too much moisture), and when you swirl the colours together, resist the urge to faff about think two or three gentle drags with a skewer, and then stop before the colours merge into a single hue.
I've made a huge batch for a party. How should I store this fudge and how long will it keep?
Store this confection in an airtight container at cool room temperature for up to a week, or keep it chilled in the fridge for up to two weeks; for the best soft texture, let the refrigerated fudge warm up slightly (about 15 minutes) before serving.
My niece is dairy intolerant. Can I make this with vegan ingredients?
Absolutely, yes. Swap the standard condensed milk for canned sweetened coconut condensed milk and ensure you use a high-quality vegan white chocolate alternative to maintain the creamy, melt-in-the-mouth consistency the recipe promises.
Is there a cheat sheet for getting the fudge to set faster? Two hours feels like ages!
For a rapid set, pop the tray in the freezer for about 30 45 minutes until it is completely firm to the touch; remember that the warmer the mixture is when it goes into the fridge, the longer it will take to chill down properly.
Easy No Bake Unicorn Fudge Recipe
Ingredients:
Instructions:
Nutrition Facts:
| Calories | 300 calories |
|---|---|
| Fat | 15 g |
| Fiber | 0.5 g |
