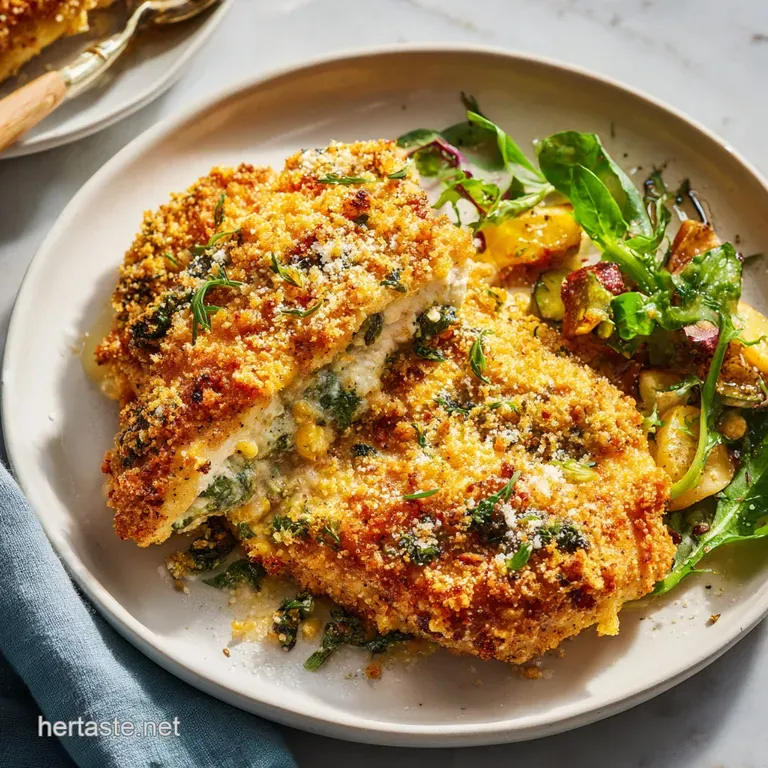
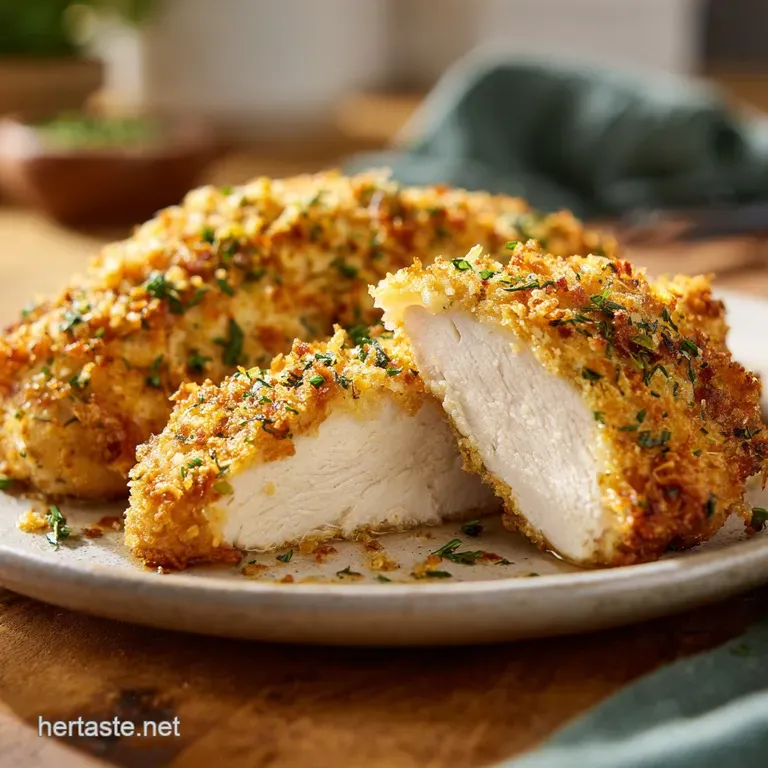
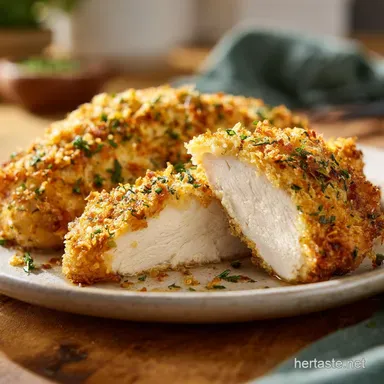
Ranch Chicken: Shattering Crust and Juicy Center
- Time: Active 10 minutes, Passive 15 minutes, Total 25 minutes
- Flavor/Texture Hook: Shattering Panko crust with a velvety, herb infused interior
- Perfect for: High impact weeknight dinners or impressive urban meal prep
- Why Real Ranch Chicken Needs Better Technique
- How the Mayo Barrier Creates Ultimate Juiciness
- Selecting Your Essential Flavor Components
- Necessary Gear for Maximum Crunch
- Transforming Protein into Golden Perfection
- Solving Texture and Heat Issues
- Adapting Flavor for Urban Kitchens
- Preservation and Waste Reduction Secrets
- Elevating Your Visual Plating Levels
- Dispelling Modern Kitchen Myths
- Very High in Sodium
- Recipe FAQs
- 📝 Recipe Card
Why Real Ranch Chicken Needs Better Technique
Forget everything you know about that soggy, beige bake often served at lackluster potlucks. You don't need a slow cooker to make this protein tender, and you certainly don't need a heavy cream of-whatever soup base to keep it moist.
The rhythmic thud of a meat mallet against the counter is the first signal that we're doing things differently today. We're chasing a specific urban flair here, focusing on a shattering crust and a bold flavor profile that refuses to be muted by traditional, lazy cooking methods.
Most people assume that "ranch" implies a heavy, damp mess, but that is a culinary myth we're going to bust right now. By focusing on a over high heat flash roast and a specific fat to crumb ratio, we transform a humble bird into something that looks like it belongs in a high end bistro.
The sizzle of the melted butter hitting the Panko in a 425°F oven creates an aroma that is instantly recognizable yet completely elevated. We are not just making dinner; we are engineering a texture first experience that highlights the contrast between a silky interior and a jagged, golden shell.
When I first attempted a version of this, I made the mistake of using standard breadcrumbs and skipping the pounding step. The result was an uneven, dry disaster that lacked any visual punch.
I've since learned that the secret isn't in the packet of seasoning, but in how you protect the protein from the intense heat of the oven. This recipe is the result of stripping away the fluff and focusing on what actually works: a moisture lock barrier and a precision timed roast.
Let's get into the mechanics of why this method dominates the classic version.
How the Mayo Barrier Creates Ultimate Juiciness
Understanding the physics of heat transfer is what separates a dry breast from a succulent one. When we coat the meat in a thick layer of mayonnaise rather than a thin egg wash, we are creating a thermal insulator.
This fat rich coating slows down the evaporation of internal juices, ensuring the meat remains velvety even as the exterior reaches high temperatures to brown the crumbs. It is a bold move that pays off in every single bite.
- Thermal Protection: The high fat content in the mayo acts as a heat shield, preventing the lean protein from tightening too quickly.
- Enzymatic Seasoning: Using dry ranch seasoning within a fat based binder allows the herbs to bloom and penetrate the meat surface more effectively.
- Crumb Adhesion: The viscosity of the garlic infused mayo provides a superior "glue" that keeps the Panko attached during the violent expansion of steam in the oven.
- Maillard Acceleration: The small amount of sugar and protein in the coating, combined with melted salted butter, encourages rapid browning at 425°F.
| Thickness | Internal Temp | Rest Time | Visual Cue |
|---|---|---|---|
| 1/2 inch | 165°F | 3 minutes | Juices run clear, crust is rigid |
| 3/4 inch | 165°F | 5 minutes | Center is opaque and firm |
| 1 inch | 165°F | 7 minutes | Coating is deep mahogany gold |
Achieving the right thickness is the most critical variable in this equation. If your chicken is uneven, the thin tapered ends will turn to leather before the thick center even finishes.
By pounding the meat to a consistent 1/2 inch, we ensure that every square inch of the protein reaches the safety of 165°F at the exact same moment the Panko reaches its peak golden hue. This precision is what allows for that stunning visual impact on the plate.
Selecting Your Essential Flavor Components
The quality of your components dictates the final visual and taste outcome. Choosing a high-quality mayonnaise is non negotiable because the stabilizers in cheap brands can break down oddly under high heat, leading to a greasy rather than velvety finish.
Similarly, the Panko breadcrumbs provide the structural integrity needed for that "shattering" effect that standard crumbs simply cannot replicate.
| Component | Science Role | Pro Secret |
|---|---|---|
| Mayonnaise | Moisture Barrier | Use full fat versions to ensure the coating doesn't "break" or curdle in the heat. |
| Panko | Structural Crunch | Toss with melted butter first to ensure every flake browns evenly. |
| Parmesan | Flavor Catalyst | Finely grate it so it melts into the cracks of the Panko for a unified shell. |
Right then, let's look at what you need to gather. While the list is short, each item has a specific job to do. If you're missing something, don't panic. There are ways to pivot without losing the soul of the dish. For example, if you want to swap the Panko for something else, keep in mind that the texture will shift significantly. If you're looking for a different flavor profile entirely, you might enjoy my Zesty Lemon Garlic Chicken which uses a similar over high heat approach but with a citrus butter focus.
- 1.5 lbs chicken breasts (boneless, skinless): Pound them to 1/2 inch. Why this? Ensures even cooking and maximum surface area for the crust.
- 0.5 cup mayonnaise: high-quality, full fat. Why this? It acts as the ultimate moisture lock for lean meat.
- 1 cup Panko breadcrumbs: Japanese style. Why this? Larger surface area means more crunch per bite.
- 2 tbsp dry ranch seasoning: Bold herb blend. Why this? Provides the signature tangy, herby punch without liquid volume.
- 0.5 cup Parmesan cheese: Finely grated. Why this? Adds umami and acts as a "cement" for the crumbs.
- 1 tsp garlic powder: For extra depth.
- 1 tbsp melted salted butter: For the crumb mix.
- 0.5 tsp each sea salt and black pepper: Base seasoning.
- 1 tbsp fresh chives: For a bright green garnish.
| Original Ingredient | Substitute | Why It Works |
|---|---|---|
| Mayonnaise (0.5 cup) | Greek Yogurt (full fat) | Similar acidity/fat. Note: Slightly tangier and less "browning" potential. |
| Panko (1 cup) | Crushed Saltines | High starch content. Note: Will be saltier and less jagged than Panko. |
| Parmesan (0.5 cup) | Pecorino Romano | Similar salty/hard texture. Note: Much sharper, more pungent flavor. |
Necessary Gear for Maximum Crunch
To achieve that restaurant quality finish, you need more than just an oven. A large rimmed baking sheet is standard, but the real secret is the wire cooling rack. By elevating the chicken, you allow the hot air of the 425°F oven to circulate entirely around the bird.
This prevents the "soggy bottom" syndrome that plagues most oven baked recipes. Without the rack, the side touching the pan will essentially steam in its own juices, destroying the crust we worked so hard to build.
A meat mallet is also essential for the urban cook. It isn't just about aggression; it's about engineering. If you don't have one, a heavy skillet or even a rolling pin can work, but the flat side of a mallet gives you the most control.
You want to avoid tearing the muscle fibers; the goal is simply to even out the topography of the breast. Finally, an instant read thermometer is your best friend. In a over high heat environment, 60 seconds can be the difference between juicy and overdone. Trust the numbers, not the clock.
Transforming Protein into Golden Perfection
- Place the chicken breasts between two sheets of plastic wrap and pound to an even 1/2 inch thickness. Note: This ensures the edges don't dry out before the center is cooked.
- Pat the meat bone dry with paper towels on both sides. Until the surface is matte and tacky.
- Season the meat lightly with 0.5 tsp sea salt and 0.5 tsp cracked black pepper.
- In a shallow dredging bowl, whisk 0.5 cup mayo, 2 tbsp ranch seasoning, and 1 tsp garlic powder until smooth.
- Coat each piece of chicken thoroughly in the mayo mixture, ensuring no bare spots remain.
- In a separate bowl, combine 1 cup Panko, 0.5 cup Parmesan, and 1 tbsp melted butter.
- Press the mayo coated chicken firmly into the crumb mixture. Until the crust is thick and jagged.
- Arrange the chicken on a wire rack set over a baking sheet.
- Bake in a preheated oven at 425°F (220°C) for 12–15 minutes. Until the crust is deep golden and sizzles.
- Check that the internal temperature has reached 165°F, then remove and garnish with fresh chives.
Chef's Tip: Freeze your butter for 10 minutes before melting it into the crumbs. It seems counter intuitive, but cold processed fats in breading often create more "pockets" of steam, leading to a lighter, airier crunch.
Solving Texture and Heat Issues
The most common hurdle with this dish is the crust falling off or becoming mushy. This usually happens because the chicken was too wet before the mayo was applied. Moisture is the enemy of adhesion.
If there is a layer of water on the surface of the meat, the mayo will simply slide off during the roast, taking the Panko with it. Always pat the meat dry until your paper towel comes away completely clean.
Preventing a Soggy Bottom
If you find the underside of your chicken is damp while the top is crispy, it’s a circulation problem. Using a wire rack is the primary fix, but you also need to make sure you aren't overcrowding the pan. If the pieces are touching, they create a "steam zone" between them.
Leave at least an inch of space between each breast to allow that 425°F air to move freely and dehydrate the crust into a crisp shell.
Fixing Uneven Surface Browning
Ovens often have hot spots. If one side of your tray is turning mahogany while the other is still pale, rotate the pan 180 degrees halfway through the 12 15 minute cook time. Also, ensure your Panko was thoroughly tossed with the melted butter.
The butter acts as a conductor; without it, the breadcrumbs will toast unevenly or remain white and starchy tasting even when the meat is done.
| Problem | Root Cause | Solution |
|---|---|---|
| Crust slides off | Surface moisture | Pat chicken bone dry before coating with mayo. |
| Breading is pale | Lack of fat/heat | Ensure butter is mixed into crumbs; check oven temp. |
| Chicken is dry | Overcooking | Use a thermometer; pull at exactly 165°F. |
Common Mistakes Checklist
- ✓ Skipping the pounding step (leads to unevenly cooked meat).
- ✓ Using low-fat or fat free mayonnaise (leads to a watery, broken coating).
- ✓ Placing chicken directly on a baking sheet instead of a rack.
- ✓ Crowding the pan so pieces are touching.
- ✓ Pulling the chicken based on time rather than internal temperature.
Adapting Flavor for Urban Kitchens
Scaling this recipe is straightforward, but you must be careful with the spices. If you are doubling the recipe to 3 lbs of chicken, do not simply double the salt. Start with 1.5x the salt and ranch seasoning, then taste your mayo binder. Spices can become overwhelming when scaled linearly.
For the liquids and mayo, you can go 1:1, but keep an eye on the crumbs. You may need slightly less Panko than a full double batch would suggest because the coating efficiency increases as you work with more volume.
If you are cooking for a crowd and want to turn this into a handheld option, it works beautifully in an Ultimate Chicken Caesar Wrap. The crunch of the Panko stands up well to dressing and greens. If you're cutting the recipe in half for a solo dinner, use a small toaster oven but keep the wire rack it's even more crucial in smaller, cramped heating elements where steam builds up faster.
| Method | Time | Texture | Best For |
|---|---|---|---|
| Standard Oven | 15 mins | Balanced crunch | Classic dinner |
| Air Fryer | 10 mins | Maximum shatter | Quick lunch |
| Stovetop Fry | 8 mins | Golden/Heavy | Decadent finish |
Stovetop cooking offers a different visual more of a traditional "fried" look with a heavier oil saturation. The oven method, however, provides a cleaner, more sophisticated "urban flair" that highlights the herb profile of the ranch seasoning without the heavy grease of a pan fry.
Preservation and Waste Reduction Secrets
Leftover Ranch Chicken can be tricky because the Panko naturally wants to absorb moisture from the meat as it sits in the fridge. To store, let the chicken cool completely on a clean rack before moving it to an airtight container. This prevents steam from being trapped inside, which would turn your crust into a sponge.
It will stay safe in the fridge for up to 3 days.
When it comes to zero waste, don't toss those leftover Panko crumbs that didn't stick to the chicken. If they haven't touched raw meat, toast them in a dry skillet with a little more ranch seasoning and use them as a "ranch dust" over roasted broccoli or popcorn.
If you have extra mayo binder, it makes an incredible base for a coleslaw dressing just thin it out with a splash of apple cider vinegar.
Reheating for Success
Never use a microwave for this. It will kill the texture instantly. Instead, place the chicken back on a wire rack in a 350°F oven or air fryer for 5-7 minutes. This recrisps the crust while gently warming the interior.
If you're in a rush, a dry skillet over medium heat can work, but you'll need to flip it frequently to avoid burning the Parmesan in the crust.
Elevating Your Visual Plating Levels
Presentation is where we really inject that bold, urban flair. The goal is to move away from the "casserole" look and toward something that feels intentional and stunning. The contrast of the golden crust against a dark plate, accented by the vibrant green of fresh chives, creates a visual hook that makes the dish feel much more expensive than its ingredients suggest.
| Level | Tweak | Visual Result |
|---|---|---|
| Simple | Slice into strips | Family style, easy to grab |
| Polished | Fan out slices | Elegant, highlights juice |
| Restaurant | Stack over greens | Vertical height, high end feel |
Simple Presentation
Slice the breast into thick 1 inch strips on a bias. Arrange them in a casual pile on a wooden board or a large white platter. This is great for a relaxed vibe where people are helping themselves. It’s approachable but still looks better than a whole, un cut breast sitting alone on a plate.
Polished Presentation
Fan the sliced chicken out across a dark slate or navy plate. This allows the guest to see the velvety white interior of the meat contrasted against the jagged golden crust. A tight sprinkle of chives across the "meat" side of the slices adds a professional touch that suggests precision.
Restaurant Style
To go full "bistro," create a small mound of lightly dressed arugula or microgreens in the center of the plate. Lean the sliced chicken against the greens to create vertical height. Drizzle a tiny bit of high-quality olive oil around the perimeter of the plate and finish with a crack of fresh black pepper.
It’s a bold look that turns a 25 minute meal into a masterpiece.
Dispelling Modern Kitchen Myths
One of the most persistent myths is that you need to marinate chicken for hours to make it tender. In reality, with a lean cut like the breast, a long marinade in an acidic base (like ranch dressing) can actually "cook" the outside of the meat, making it mealy.
Our mayo based flash roast method provides all the moisture and flavor you need in a fraction of the time without compromising the structural integrity of the protein.
Another common misconception is that searing the meat before baking "locks in the juices." Science tells us that searing simply creates flavor through browning; it doesn't create a waterproof seal. In this recipe, the mayonnaise and Panko actually create a physical barrier that slows down moisture loss.
Skipping the sear and going straight into a 425°F oven allows the crust to develop perfectly without overcooking the delicate meat underneath. Trust the barrier, not the sear.
Finally, don't believe the lie that "low-fat" is a healthy swap here. In a over high heat roast, low-fat mayo or cheese will simply evaporate or burn, leaving you with a dry, chalky mess. The fat is functional it provides the thermal protection that makes this dish work.
Enjoy the bold flavors and the velvety texture for what they are: a well engineered culinary success.

Very High in Sodium
1125 mg 1125 mg (49% 49% of daily value)
The American Heart Association recommends limiting sodium intake to about 2,300mg per day, with an ideal limit of 1,500mg for most adults.
Tips to Reduce Sodium
-
Choose Low-Sodium Ranch Seasoning-25%
Dry ranch seasoning packets are a significant source of sodium. Opt for a low-sodium version or make your own blend using herbs and spices.
-
Reduce Parmesan Cheese-15%
Finely grated Parmesan cheese adds a salty flavor. Try using half the amount or a lower sodium variety, and boost flavor with other seasonings.
-
Use Unsalted Butter-5%
The salted butter contributes to the overall sodium content. Switch to unsalted butter and adjust other seasonings as needed.
-
Embrace Fresh Herbs and Spices
While not directly impacting sodium in this specific recipe adjustment, using fresh chives and incorporating a wider array of herbs like parsley, dill, or basil can enhance flavor without adding salt.
-
Rinse Before Coating-2%
If you're using chicken that has been brined (less common for breasts but good practice), rinsing it under cold water before pounding can remove excess surface salt.
Recipe FAQs
What is ranch chicken?
It is a quick cooking chicken dish coated in a savory ranch and mayonnaise binder. The meat is crusted with a mixture of Panko, Parmesan, and butter, then baked at 425°F until golden and crispy.
What are the ingredients of a good chicken ranch?
A quality version relies on high-quality mayonnaise, dry ranch seasoning, and garlic powder. These create a thick binder that holds the Panko, Parmesan cheese, and melted salted butter crust to the 1.5 lbs of chicken breasts.
Can you use ranch dip mix on chicken?
What is cowboy chicken?
No, this is a common misconception. While some recipes use that name, this specific dish is strictly a ranch crusted preparation defined by its signature Panko Parmesan exterior and 25-minute total preparation time.
How to ensure the chicken breast stays juicy during high heat baking?
Pound the breasts to an even 1/2 inch thickness before coating. This ensures the meat cooks through uniformly in exactly 12 15 minutes at 425°F, preventing the edges from drying out before the center hits 165°F. If you enjoyed the moisture retention here, you will find similar success with the roasting techniques used for other poultry dishes.
How to get the crispiest breading without frying?
Place a wire cooling rack over your baking sheet to allow airflow under the meat. Patting the chicken bone dry before applying the mayonnaise mixture is also critical for the crust to adhere and crisp properly in the oven.
How to know exactly when the chicken is finished cooking?
Use a meat thermometer to confirm the internal temperature reaches 165°F. Do not rely on time alone, as oven calibration varies; checking the internal temperature is the only way to guarantee a safe, perfectly cooked result.
Crispy Ranch Chicken
Ingredients:
Instructions:
Nutrition Facts:
| Calories | 619 kcal |
|---|---|
| Protein | 59 g |
| Fat | 33 g |
| Carbs | 16 g |
| Fiber | 1 g |
| Sugar | 1 g |
| Sodium | 1125 mg |
