Green Bean Casserole: the Ultimate Creamy Crispy Homemade Classic
Elevating the Classic: Why This Green Bean Casserole is Different
Let’s be honest, Green Bean Casserole gets a bad rap, right? Usually, it’s a gloppy, slightly beige mess a texture nightmare featuring overcooked beans drowned in something mysterious from a tin. It just lacks life.
But listen, the idea of a Green Bean Casserole (GBC) is brilliant: earthy mushrooms, creamy sauce, and something delightfully crunchy on top. That’s what we’re chasing here. This recipe ditches every single shortcut you’ve ever relied on and builds flavour from the absolute ground up.
We are making a proper, beautiful Green Bean Casserole from Scratch. And trust me, you will never go back.
The Secret to a Velvety, Luxurious Sauce
The real difference and maker is banishing the condensed mushroom soup and replacing it with a rich, silky velouté. A velouté is just a fancy name for a sauce thickened with a roux (butter and flour), but instead of milk (like a béchamel), we use stock.
The richness comes from finishing it with heavy cream. We sauté the mushrooms first, making sure they get good color and concentration. Then, we use those lovely browned bits as the flavour base for our roux.
A critical warning: You have to whisk the liquid in slowly. If you dump all the stock in at once, you’re guaranteed a lumpy disaster. Slowly, steadily, and only use warm stock. It makes all the difference in keeping things beautifully smooth.
From Soggy Bottoms to Golden Perfection
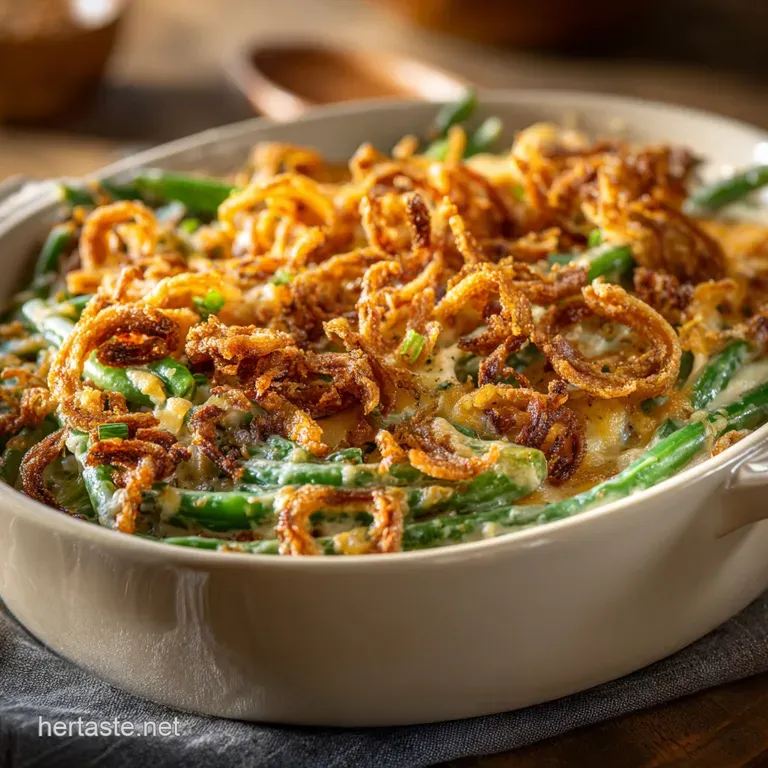
If your GBC is ending up soft, gray, and mushy, you’ve got two problems: the beans are overcooked, and the topping is steamed, not fried. We fix the beans by blanching them until they are bright green and still firm tender and crisp (al dente) is the goal. They will finish cooking perfectly in the oven.
The topping? We are saying goodbye to those sad tinned onions and making our own crispy shallots. They are thin, shatteringly crunchy, and provide an addictive burst of savory flavor. It takes a tiny bit of extra effort, but it’s completely non and negotiable for success.
A History of the Dish, Deconstructed
Did you know the classic Green Bean Casserole was invented in 1955 by Dorcas Reilly at the Campbell's test kitchen? It was meant to be quick, easy, and use ingredients that most American households already had. It was a smash hit, and it’s earned its place in holiday tradition.
But look, 1955 technology had limits. We have better ingredients now. We have better skills now. We are taking that beloved comfort food scaffolding and swapping out the weak parts for structural steel. Think of this as the artisanal, small and batch, incredibly creamy version of that 1950s legend.
Sourcing the Key Components for Maximum Flavor

Selecting the Freshest Green Beans
I'm opinionated about beans. Skip the frozen ones if you possibly can. You want that fantastic texture and bright colour. If you can find slender haricot verts (French green beans), grab them. They are thinner and tend to cook more evenly.
If you’re using standard grocery store green beans, make sure they are firm and pass the snap test they should snap cleanly when you bend them, not wilt or bend softly.
Always trim the ends, obviously, and don't worry about cutting them down further; leaving them long looks quite elegant in the baking dish.
Building the Flavor Base: Mushrooms and Aromatics
The deep, earthy flavour here is down to the fungi. I always go for a mix of cremini (brown) mushrooms, maybe a few shiitakes if I’m feeling fancy. The key is to slice them thinly and sauté them until they are properly brown. Do not rush this step.
If you crowd the pan or cook them too quickly, they just steam and turn rubbery. I like to crank the heat, let the moisture cook off, and then let the mushrooms brown. This concentrates their flavor beautifully before we bring in the garlic and the dried thyme.
Essential Gear: Tools for the Perfect Bake
You don't need much, but a few tools make the process much less of a faff.
- A deep and fry pan/Dutch oven: Essential for safely frying the shallots. Don’t try to shallow and fry them in a skillet.
- A spider strainer or slotted spoon: For retrieving the shallots quickly.
- A cooling rack: Set this up over paper towels. Getting the shallots out of the oil and onto air circulation immediately is how they get that perfect, sustained crunch.
Related Recipes Worth Trying
- Baked Mac and Cheese Ultimate ThreeCheese Casserole — This Ultimate Baked Mac and Cheese recipe guarantees a velvety smooth sauce base not grainy or oily Perfect your technique for this easy baked mac and...
- Leftover Ham Casserole with Potatoes and Cheese The Ultimate Cheesy Comfort Bake — Leftover Ham Casserole with Potatoes and Cheese is the ultimate way to use postholiday gammon This creamy hearty Leftover Ham Potato Casserole features a...
- Gift Box Cake Elegant Vanilla Bean Recipe for Sharp Dazzling Presentation — Master the stunning Gift Box Cake with our detailed tutorial This elegant vanilla bean design uses Swiss Meringue Buttercream and polished chocolate ganache...
Mastering the Homemade Technique
Achieving Crunchy Perfection: Frying the Shallots
This is where I used to fall apart. I’d always burn the last batch. The trick I learned (the hard way!) is to monitor the temperature constantly. Keep that oil around 160°C (320°F). Toss the sliced shallots in flour just a light coating is enough and fry them in small batches.
They will look pale yellow for a long time, and then, suddenly, they will go golden brown incredibly fast.
When the bubbles around them start to slow down and they reach a light golden color, pull them out. They will continue to brown for a minute on the cooling rack, which is why salting them instantly is crucial. If you wait until they look dark brown in the oil, they will be burnt husks by the time they hit the plate.
Crafting the Lush Mushroom Velouté
After you’ve successfully fried your shallots, reserve about four tablespoons of that frying oil. This oil is now infused with intense shallot flavor. Use that to start your sauce instead of plain butter! It adds incredible depth.
Sauté your browned mushrooms, sprinkle in the flour to make the roux, and stir it for a minute or two until it smells slightly nutty that’s how you know you’ve cooked the raw flour taste out. Then, whisking constantly, add your warm chicken or vegetable stock.
Finish it with heavy cream and fresh nutmeg. Season it boldly. I mean, aggressively . Cream dulls seasoning, so you need to over and salt it slightly now for it to be perfect later.
Blanching and Preparing the Beans
If you skip the ice bath, your beans will be dull, soft, and slightly sad. Don't do that. Boil the beans for three to four minutes until they are bright emerald. Pull them out and immediately plunge them into ice water. This sets the chlorophyll and stops the cooking process cold.
Drain them completely, pat them dry if necessary, and they are ready to meet the sauce. This ensures they have structure, even after a half hour in the oven.
The Final Assembly and Baking Guide
Preheat the oven to 180°C (350°F). Gently fold the beans into that gorgeous mushroom velouté. Pour it all into a baking dish. We are baking this naked, initially. Bake for 20 minutes until the sauce is deeply bubbly.
Then, pull it out. Scatter about two and thirds of your gorgeous, homemade crunchy shallots over the top. Return it to the oven for just five to ten minutes. This warms the topping without incinerating it. The last third of the shallots? Save those.
Scatter them over the casserole right before it goes to the table for maximum auditory satisfaction. Crunch!
Troubleshooting and Next and Level Tips
Making Green Bean Casserole Ahead of Time (Storage Tips)
This Green Bean Casserole with fresh green beans is a fantastic make and ahead option, which is critical for holiday stress.
- Prep Day 1: Complete everything up to the final assembly (blanch the beans, make the sauce, fry the shallots).
- Storage: Combine the beans and the sauce, pour into the baking dish, cover, and refrigerate for up to 48 hours. Store the crispy shallots in an airtight container at room temperature. Humidity is their enemy!
- Baking Day: When ready to bake, let the casserole sit out on the counter for 30– 60 minutes to take the chill off. Bake as directed, adding a few extra minutes to account for the chill (maybe 35– 40 minutes total). Add the toppings as planned at the end.
Perfect Pairings: What to Serve Alongside
Look, GBC is a powerhouse side, so you want partners that can hold their own. You need something soft and something acidic.
- Soft: I always pair this with a ridiculously creamy mash. Or maybe some sweet potato purée.
- Acidity: A super tart cranberry and orange relish cuts through the richness beautifully.
- Meat: Slow and cooked brisket or a classic roast turkey are its spiritual partners. Trying to make a Crockpot Green Bean Casserole is a tempting idea, but honestly, the oven gets the crisp crust just right. Keep the Crockpot for the gravy!
Dietary Swaps: Vegan and Gluten and Free Alternatives
If you have guests with dietary needs, don’t stress. This Green Bean Casserole recipe easy to adjust.
- Vegan: Swap the butter for olive oil or a plant and based block butter. Replace the heavy cream with full and fat canned coconut milk (it gives amazing richness without a strong coconut flavor, promise!). Use vegetable stock.
- Gluten and Free: Substitute the all and purpose flour for a good quality GF all and purpose blend (ensure it contains xanthan gum for structure). You might need slightly less, so start slowly when making the roux. Just make sure the flour for coating the shallots is also GF. It’s that simple.

Recipe FAQs
Green bean casserole recipe easy
For easier holiday assembly, both the homemade mushroom velouté and the crispy fried shallots can be prepared up to two days in advance. Store the cooled velouté securely chilled, and keep the shallots in an airtight container at room temperature to ensure they maintain their essential crispness.
This allows you to combine and bake the casserole quickly when needed, drastically cutting down on active prep time.
Green bean casserole with fresh green beans
Achieving that luxurious, lump free velouté is key to this elevated casserole. Whisk the cold stock into your hot roux slowly to prevent the flour from seizing, maintaining a perfectly silky base.
If a few stubborn lumps do appear, simply pass the finished sauce through a fine mesh sieve before incorporating the cooked mushrooms for an undeniably smooth result.
Best green bean casserole recipe
The true success of this casserole lies in mastering the velvety velouté: ensure you incorporate warm stock into your roux gradually while whisking vigorously to guarantee a perfectly smooth, lump free sauce.
For the crucial crispy shallots, slice them paper thin, dust lightly with flour, and fry in batches in oil maintained at medium heat, removing them just as they turn golden brown to prevent burning.
You can confidently prep the beans and the mushroom velouté up to two days ahead, storing them refrigerated, and simply assemble and bake on the day of your event.
Green bean casserole healthy
Ditching the canned soup for a fresh mushroom velouté dramatically reduces the dish’s sodium and preservative content, making this scratch made casserole a significantly more wholesome option than the traditional version.
For a lighter preparation, substitute half the heavy cream in the velouté with low-sodium chicken stock or evaporated skim milk to maintain the sauce’s body while reducing overall fat. Enjoying a rich dish made from fresh ingredients ensures maximum flavour and a higher nutritional return.
Green bean casserole ingredients
A proper homemade casserole is built upon three pillars: fresh French cut green beans, a luxurious mushroom velouté made from scratch, and thinly sliced, homemade crispy fried shallots.
For the sauce, mastering a smooth, lump free roux is absolutely critical to achieving that velvety texture, replacing the need for any canned soup. If pressed for time, blanching and trimming the beans can be done up to two days ahead, storing them refrigerated until assembly.
Green bean casserole French's
This elevated dish shines with homemade shallots, but you may substitute them with a 6 oz can of French's Fried Onions, adding them only during the final 10 minutes of baking to maintain their crispness.
The key differentiator here is the homemade velouté; ensure your roux cooks for at least two minutes before adding liquid to prevent a raw flour taste and achieve that essential smooth, velvety texture.
If you must substitute the homemade sauce, use 10 oz of high-quality organic cream of mushroom soup, thinned with a splash of whole milk to improve its texture.
Crispy Homemade Green Bean Casserole

Ingredients:
Instructions:
Nutrition Facts:
| Calories | 544 kcal |
|---|---|
| Protein | 7.7 g |
| Fat | 34.1 g |
| Carbs | 51.7 g |
