Create Your Own Cookie Baking Kit
- Master the Art of Cookie Baking
- What Makes This Recipe Special
- Health and Nutrition Highlights
- Recipe at a Glance
- Essential Components Guide
- Kitchen Equipment Essentials
- Perfect Cooking Technique for Your DIY Baking Kit
- Professional Secrets to Cookie Baking Bliss
- Perfect Presentation: Make Cookies Shine
- Storage and Make-Ahead: Cookie Lifespan
- Creative Variations: Switch It Up!
- Complete Nutrition Guide: Cookie Health
- Expert FAQ Solutions: Troubleshooting Issues
- 📝 Recipe Card
Have you ever wondered why homemade cookies somehow taste better than anything store-bought? i mean, seriously, what kind of magic is happening in your kitchen that can turn a handful of ingredients into warm, gooey bites of happiness? if you’re nodding your head, i get it!
Baking cookies has this special way of connecting us to nostalgia, joy, and maybe even a whiff of childhood.
And today, i’m excited to share a recipe that’s not only easy to whip up but feels like a gift to both yourself and anyone else lucky enough to snag a cookie!
What makes this diy baking kit for homemade cookies truly special is all about accessibility. you don’t have to be a seasoned pro in the kitchen this recipe is perfect for beginners and will only take about an hour from start to finish.
Seriously, it’s that straightforward! the hardest part? waiting for the cookies to cool. so, grab your apron, because you’re about to embark on a delightful baking adventure!
Let’s take a quick stroll down memory lane. did you know the art of cookie making can be traced back to the 7th century in persia? it’s amazing how something so simple has deep roots, reminding us of gatherings and celebrations over centuries.
In anglo saxon england, the concept evolved into what we now recognize as biscuits a format for cookies! and honestly, who doesn’t find a bit of magic in cookies, especially when they're shared among family and friends?
Now, the unique selling point of this recipe? it’s adaptable! you can customize these cookies to your heart’s delight, whether you crave chocolate chips, nuts, or even a gluten-free version.
Plus, who can resist the enticing aroma of freshly baked cookies wafting through the house? not me! beyond just taste, baking together can be a fabulous family activity that nurtures bonds and enhances creativity.
Master the Art of Cookie Baking
Let’s dive into the rich culinary heritage of cookies! from buttery batches to chewy delights, the origins of cookies are as diverse as the regions they come from.
Not surprisingly, chocolate chip cookies have taken the world by storm in modern times, making them the true stars of the dessert realm.
For many of us, a plate of warm chocolate chip cookies signals comfort and joy, a reminder of lazy sundays or festive gatherings.
Imagine making your own cookies, experimenting along the way, while feeling that connection to the generations who baked before you.
There’s something incredibly rewarding about this like a thread of history woven into your kitchen adventures. plus, the popularity of cookie recipes has surged over the last few years, thanks to food bloggers and home bakers sharing the love through instagram and tiktok!
What Makes This Recipe Special
Ready for some secret sauce? what sets this recipe apart are those unique flavor combinations and foolproof techniques . you’ll find that the method outlined here is expert tested, making sure you achieve perfect cookie textures every time, without any kitchen stress.
And trust me, the cookie preparation is so easy, it’s practically foolproof; everything is laid out step by step.
Let’s not forget about essential baking tips and time saving hacks, which make baking feel less like a chore and more like a fun project.
If you’re a beginner, this is the perfect chance to dive into the world of homemade desserts without overwhelming yourself.
Health and Nutrition Highlights
Now, we all know cookies aren’t exactly health food, but there’s a silver lining! there are key nutritional benefits to homemade cookies, especially when you choose your cookie dough ingredients thoughtfully.
You control what goes into your batch, meaning you can opt for less sugar or swap in whole grains if that’s your vibe.
From protein to fiber, these cookies can fit into a balanced diet after all, life is all about moderation, right?
Recipe at a Glance
Let’s take stock quickly:
- Total Preparation Time: Approximately 1 hour
- Skill Level Required: Easy
- Serving Size: Yields about 24 medium sized cookies
- Cost Efficiency: A fantastic deal for dessert lovers on a budget!
And now that you’re well acquainted with the basics, don’t you think it’s time to roll up those sleeves and explore the all-important ingredients? Get ready, because the next section will guide you through what you’ll need to assemble your very own cookie baking kit !
Essential Components Guide
Oh my gosh, have you ever thought about what makes your baking endeavors really stand out? whether you're whipping up a batch of chocolate chip cookies or exploring unique cookie variations , understanding your ingredients is key to mastering easy cookie recipes !
So, let’s dive into the essentials: the premium core ingredients, stunning seasonings, smart substitutions, and the must have equipment for a successful baking experience.
Premium Core Ingredients
When it comes to cookie dough ingredients, you really want to focus on quality . Here’s how to navigate this delicious world:
Detailed Measurements: For that classic cookie dough texture, you’re looking at about 2 ½ cups of all-purpose flour and 1 cup of unsalted butter , softened. Don’t skimp on these basics!
Quality Indicators: Freshness is everything. Check that your flour isn’t stale and that your baking soda still has fizz when you toss a bit in vinegar.
Selection tips: go for butter that’s marked “grass fed” if you can swing it. it lends a lovely depth to your cookies.
And pay attention to the sugar! brown sugar should be packed, and granulated sugar should be nice and fine.
Storage guidance: keep ingredients like flour and sugar in a cool, dry place. also, trust me on this stick your baking soda in the fridge; it helps keep it fresh and ready for your cookie making kit .
Signature Seasoning Blend
Honestly, the magic is often in the spices and herbs !
Spice Combinations: When you think cookie seasoning, think vanilla. But you can also experiment with a sprinkle of cinnamon for a festive touch.
Herb Selections: For adventurous bakers, a hint of dried lavender can elevate your sweet treats.
Flavor Enhancers: Consider adding a dash of malt extract or coconut flakes to shake things up!
Aromatic Additions: Always, and I mean always, use pure vanilla extract instead of imitation; the flavor difference is night and day.
Smart Substitutions
Now, life happens. Sometimes you don’t have exactly what you need on hand, and that's okay!
Alternative Options: Can't find unsalted butter? You can use salted butter instead just reduce the added salt in your recipe.
Dietary Swaps: Need a gluten-free cookie? Absolutely! Just grab a 1:1 gluten-free flour blend and you’ll be good to go.
Emergency Replacements: No eggs? No problem! Applesauce works in a pinch, about ¼ cup per egg.
Seasonal Variations: You can play with seasonal flavors too. Think pumpkin spices in the fall or dried cranberries during the holidays!
Kitchen Equipment Essentials

Okay, let’s chat about baking supplies . You’re not going to make magic happen without the right tools:
Must Have Tools: A good mixing bowl is your best friend. You also definitely need measuring cups and spoons, and let's not forget a whisk or electric mixer for those times when you just want to minimize the elbow grease!
Recommended Appliances: A decent stand mixer can save you so much time, especially if you're tackling a homemade dessert kit that includes several batches.
Helpful Gadgets: Get yourself a cookie scoop or tablespoon for nice, uniform sizes. Trust me it makes a difference!
Home Alternatives: If you don’t have a cooling rack, use the back of a baking sheet. It works just as well!
Pro Ingredient Tips
Let’s wrap up with some pro tips to ensure your baking is top-notch:
Selection Secrets: Always check for the freshest eggs they should stand tall in the shell. Quality matters!
Quality Markers: Check that your chocolate chips are real chocolate, not just flavored. It’ll make all the difference.
Storage Solutions: Store your cookies in an airtight container with a slice of bread for freshness.
Money Saving Tips: Buy in bulk! Flour, sugar, and chocolate are super cheap in large quantities, and you’ll always have what you need for those family baking activities .
Now that we’ve got the essentials down, are you ready to dive into the fun part? The instructions section is just around the corner, where we’ll tackle the step-by-step baking guide to make the best ever cookies right from your DIY baking kit! Get your apron on; it’s time to bake!
Perfect Cooking Technique for Your DIY Baking Kit
Oh my gosh, have you ever found yourself yearning for some homemade cookies but had no clue where to start? same here! that’s why i’m super excited to share this create your own cookie baking kit: all-in-one delight!
You can easily whip up a batch of the buttery, chocolatey goodness right in your own kitchen.
And trust me, it’s pretty darn satisfying. let’s dive into how to prepare and execute this cookie adventure like a pro!
Essential Preparation Steps
First things first: mise en place ! seriously, outfit yourself like you mean business. lay out all your cookie dough ingredients before you even think about turning on the oven.
Here’s the lowdown on self prep:
Ingredient checks : gather your flour, butter, sugar (both granulated and brown), eggs, vanilla, and, of course, those decadent chocolate chips! if you’re feeling adventurous, throw in some chopped nuts for that crunch.
Prep techniques : use a whisk for the dry ingredients flour, baking soda, and salt and make sure they’re well mixed. this step is key because you want that baking soda evenly distributed.
Precision in cookie making is vital; skip this, and you might end up with some flat blobs instead of lovely, tender treats.
Time management : plan for about 10 minutes of active prep time and another 30 minutes to chill the dough.
Yep, the dough deserves a little break too! it helps improve the texture, making your cookies super chewy trust me, you don’t want to skip this.
Organization tips : have your kitchen tools for baking ready to go: mixing bowls, a whisk (or electric mixer), and the baking sheet lined with parchment paper.
Efficient organization will streamline your process big time!
Professional Cooking Method
Now onto the nitty gritty. Here’s your step-by-step guide to mastering cookie baking:
Preheating : Start with preheating your oven to 350°F (175°C). This is crucial! An oven that’s not hot enough can ruin your cookie experience.
Mixing : in one bowl, combine your flour mixture. in another, cream together your softened butter with the sugars until it looks light and fluffy.
This generally takes a solid 2-3 minutes of beating at medium speed don’t cut corners here!
Adding Wet : Add your eggs one at a time. Mix in the pure vanilla extract and blend until everything looks harmonious.
Bringing it together : Gradually fold in your flour mixture. You want to stir until just combined. Overmixing will lead to tough cookies no, thank you!
Chocolate (or nuts) : Carefully fold in those chocolate chips. If you’re going rogue, toss in the chopped nuts now too.
Chill time : Pop that dough in the fridge for at least 30 minutes. A little patience here pays off with lovely cookie textures.
Scoop and bake : scoop your dough onto the prepared baking sheet, making sure there’s space (about 2 inches) between each one.
Bake for 12-15 minutes. you’ll know they’re ready when the edges turn golden brown. success indicators include that tantalizing cookie aroma wafting through your kitchen!
Expert Techniques
So, you’ve got your cookie batter and have perfected the baking process. But wait! Here are some expert tips to ensure you nail those cookies every single time:
- Critical Steps : Room temperature butter is a must! If your butter’s too cold, you won’t achieve that fluffy texture.
- Precision Points : Pay attention to baking measurements . A couple of grams can make or break your batch.
- Quality Checks : Use a cookie scoop for uniform sizes. This ensures even baking!
Success Strategies
Finally, let’s talk troubleshooting. not everything goes according to plan, and that’s okay! if your cookies spread too much, it may be a sign that your dough is too warm.
Stick it back in the fridge for a while.
Don’t fret about minor mishaps; keep an eye on baking time and temperature! underbaked cookies can still make for chewy delights if slightly raw in the middle.
Like my grandma always said, “less is more,” especially when it comes to baking!
By now, all your cookie dreams should be a step closer to reality. And if you’ve stumbled along the way, rest assured that a little experience makes all the difference in the world!
Stay tuned for the next section you won’t want to miss all the fun options and variations you can play with! Whether you end up with classic chocolate chip cookies or adventurous flavor profiles, your DIY baking kit is about to become your secret weapon in the kitchen!
Professional Secrets to Cookie Baking Bliss
So, picture this: you’ve gathered a bunch of friends for a cozy night in, perhaps to dive into a diy baking kit that promises delicious homemade cookies.
Sounds delightful, right? but what will really elevate your cookie game are some professional insights and expert techniques. here's how you can impress everyone!
Kitchen Wisdom
First off, let's talk about baking essentials like cookie dough ingredients . always opt for high-quality butter. it makes a world of difference.
And did you know? while baking, if you want to ensure those chocolate chip cookies remain soft, slightly underbake them! the remaining heat will continue cooking the cookies once they’re out of the oven.
Trust me; this little tip is a game changer!
Success Guarantees
If you're following a cookie baking kit , most instructions are foolproof for a reason. they are designed to guarantee success no matter your experience.
Just keep an eye on your baking measurements precision is key! i remember a time i was baking my first batch and mistakenly added a cup instead of a teaspoon of baking soda.
Let’s just say, the cookies turned into a very... unique experiment. lesson learned!
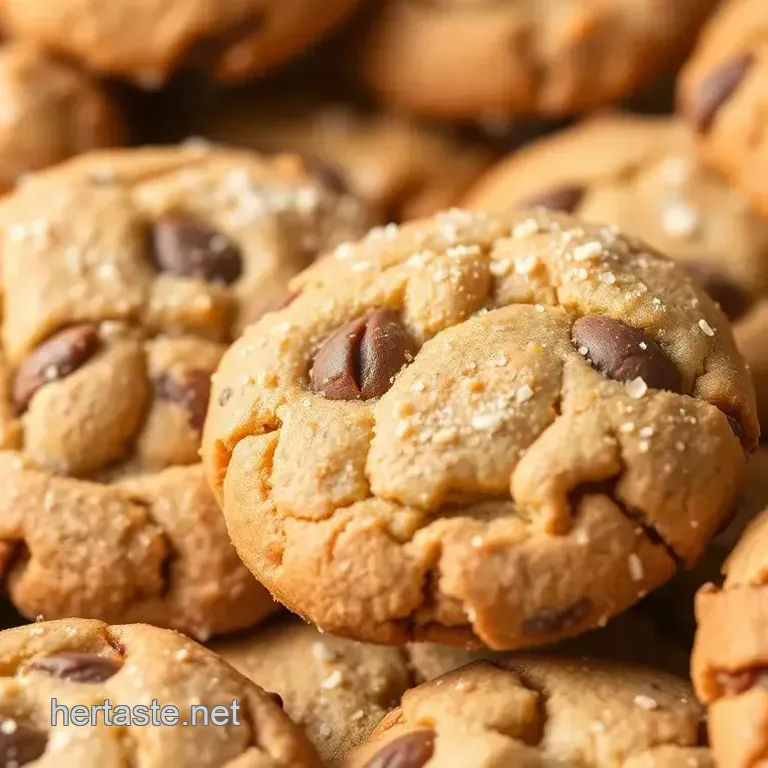
Perfect Presentation: Make Cookies Shine
Once those cookies are out of the oven and smelling divine seriously, who doesn’t love the aroma wafting through the kitchen? it’s time to think about plating techniques and garnish ideas .
Visual Appeal Tips
Imagine this: a plate filled with golden brown cookies accompanied by a sprig of mint or a drizzle of melted chocolate.
For a rustic touch, try serving them on a wooden board with some fresh fruit for color. the contrast makes for a visually appealing dessert platter.
And don’t forget about those cookie serving suggestions ! a glass of chilled milk or a scoop of vanilla ice cream takes it to the next level.
Storage and make-ahead: Cookie Lifespan
Let’s be honest, no one wants hard, stale cookies. For optimum enjoyment, paying attention to storage guidelines is crucial.
Preservation Methods
If you have leftovers though i doubt it you can store those beauties in an airtight container at room temperature. they’ll keep for several days! but did you know you could also freeze the cookie dough for those late night cravings? just wrap it tightly, and you’re good to go.
Reheating Instructions
When you do pull them out of the freezer, just pop them in a preheated oven at 350°F for about 5-7 minutes to regain that soft, gooey texture. Mmm!
Creative Variations: Switch It Up!
Are you feeling adventurous? It’s easy to adapt this homemade cookies recipe to suit your taste!
Flavor Adaptations
Need gluten-free cookie recipes? switch to a gluten-free flour blend and voilà! or spice things up by adding some spices like cinnamon or nutmeg for a seasonal twist.
You could even throw in some nuts for a crunchy texture. think outside the box with the cookie variations ! chocolate chip isn't the only star of this show; try mixing in dried fruits or lemon zest for a delightful surprise.
Complete Nutrition Guide: Cookie Health
I know, cookies aren’t the first thing that springs to mind when you think “healthy.” But hear me out!
Health Benefits
These easy cookie recipes aren't just delicious; they can be nutritious too! You can amp up the nutritional values of cookies by swapping some sugar with applesauce or using whole wheat flour.
Portion Guidance
Just remember, moderation is key! A serving size is usually around two medium cookies. That’s your ticket to guilt free indulgence.
Expert FAQ Solutions: Troubleshooting Issues
Still a bit nervous about your cookie making kit? Totally normal! Here are some common concerns:
Expert Answers
What if my cookies are flat? this could be due to your butter being too warm. try chilling your dough before baking next time! want to know about baking substitutes ? if you're out of eggs, banana or applesauce work great as egg replacements in cookie recipes.
Success Tips
Lastly, keep a close eye on your baking time and temperature . Just a minute too long can ruin the perfect cookie!
In conclusion, whether you’re a pro or just starting your baking adventure, this diy baking kit is your passport to delicious homemade cookies.
Embrace the chaos of flour flying everywhere, the laughter over a fallen cookie mountain, and revel in each gooey, chocolate filled bite.
With every batch, you’re not just baking; you’re creating memories, one sweet treat at a time!
Create Your Own Cookie Baking Kit