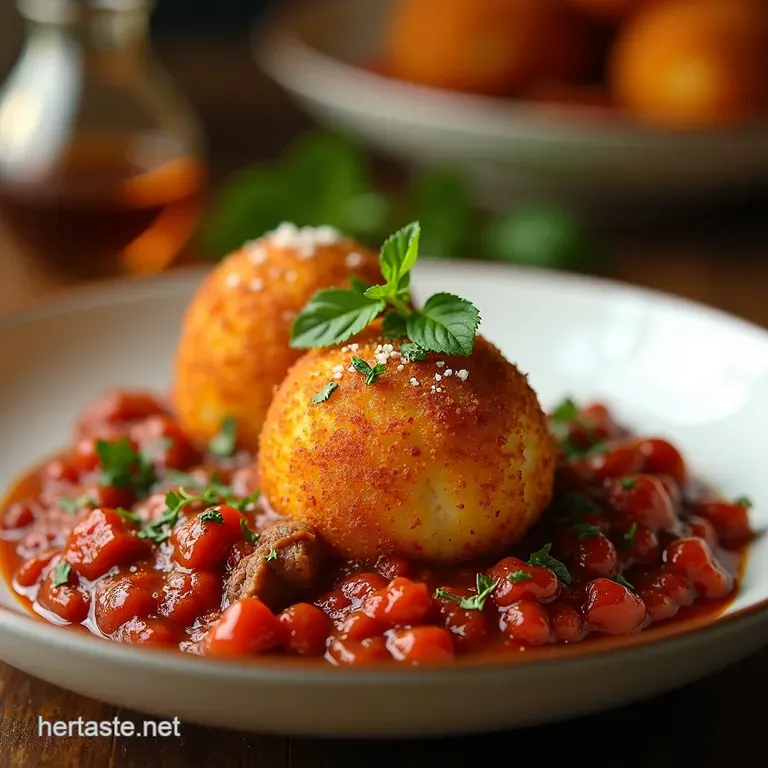
The Best Classic Arancini Golden Crispy Italian Rice Balls with Hearty Beef Ragu

- Unveiling the Soul of Sicily: Why This Arancini Recipe Reigns Supreme
- Assembling Your Components for Authentic Italian Rice Balls
- Essential Tools for Perfect Spheres and Crispy Coats
- Mastering the Risotto Base: The Foundation of Great Arancini
- Step-by-Step Assembly: Forming and Stuffing Your Golden Oranges
- Achieving Maximum Crunch: The Art of Deep Frying
- Elevating Your Next Batch: Pro Tips for Next-Level Italian Rice Balls
- Storage and Revival: Keeping Arancini Delicious Long-Term
- Recipe FAQs
- 📝 Recipe Card
Unveiling the Soul of Sicily: Why This Arancini Recipe Reigns Supreme
There is a profound magic that happens when humble rice, rich stock, and savory fillings are bound together, fried to a perfect golden hue, and presented as a masterpiece. We are delving deep into the heart of Sicilian street food tradition with what I confidently call the Best Classic Arancini: Golden, Crispy Italian Rice Balls with Hearty Beef Ragu .
These aren't merely appetizers; they are handheld monuments to Italian culinary dedication. This Italian Rice Balls Recipe is meticulously crafted to ensure that every bite delivers the essential creamy texture, the bright notes of saffron, and the comforting depth of slow cooked meat.
More Than Just a Snack: Understanding the Arancini Legacy
The name Arancini literally translates to "little oranges," a nod to their traditional spherical shape and sun-kissed exterior. Hailing originally from Sicily, these delights evolved out of necessity a brilliant way to utilize leftover risotto.
However, what began as resourceful cooking has transformed into a celebrated staple served in street stalls, trattorias, and family gatherings across the globe. This recipe guides you through crafting the authentic experience, focusing on the Classic Arancini Recipe structure, where the creamy risotto perfectly cushions the filling, yielding a complex flavour profile that cheap imitations simply cannot touch.
The Hug in a Bite: Setting Expectations for Deep Fried Perfection
When you commit to making Italian Rice Balls , you are signing up for a rewarding but multi stage process. This endeavor is rated Medium difficulty, primarily because timing and temperature management are key.
You are aiming for a specific textural contrast: an ultra crisp, crackling exterior that shatters delicately to reveal a molten core of saffron scented risotto embracing rich beef and strings of melted cheese.
Forget fast food approximations; this is about achieving that perfect, molten interior, making the chilling and frying stages critical checkpoints in your journey toward Fried Arancini Recipe success.
Why Our Classic Ragù Filling Makes the Difference
While you can find many fillings for Italian Rice Balls with Mozzarella or vegetables, the quintessential version features a rich meat sauce. Our filling starts with a hearty beef ragù, built upon a foundation of good quality ground beef, aromatics, and a slow simmer with crushed tomatoes and broth.
Crucially, this filling must be completely cooled ideally overnight before assembly. This cooling process ensures the filling is firm enough to be neatly encased by the rice, preventing sogginess or rupture during the rolling and frying stages.
If you seek out the robust flavour associated with Italian Rice Balls with Meat , patience with this ragù is your greatest ally.
Assembling Your Components for Authentic Italian Rice Balls
Creating truly great Cheesy Italian Arancini Rice Balls requires preparation across three distinct fronts: the binding risotto base, the flavourful filling, and the crisp breading station.
We estimate this takes about 45 minutes of active prep time, but the payoff is worth the investment. The ragù filling, as noted, should be prepared ahead.
For the risotto, we are looking at the precise technique that transforms Arborio rice into the ideal binder, seasoned beautifully with saffron. The final component is the triple dredge system, ensuring maximum adhesion for that glorious golden crust.
Essential Tools for Perfect Spheres and Crispy Coats
You don't need overly specialized gear, but having the right equipment facilitates precision. A heavy bottomed Dutch oven is essential for maintaining the slow, even simmer required for the ragù.
For frying, a deep, wide pot or a dedicated fryer is necessary to hold enough oil to submerge the balls completely, promoting even cooking. A wide, rimmed baking sheet, ideally lined with parchment paper, is crucial for spreading the hot risotto thinly to ensure rapid and uniform chilling a non-negotiable step for stable Italian Rice Balls .
You will also need three shallow dishes organized meticulously for the breading sequence.
Sourcing the Right Arborio: Rice and Saffron Requirements
The backbone of any respectable Arancini Recipe Italian entry is the rice itself. You must use Arborio rice (or Carnaroli, if you can find it). These short grain varieties contain the high starch content necessary to release the creamy binders that hold the ball together.
Do not attempt this with long grain rice. On top of that,, the characteristic golden hue and subtle floral notes come from the saffron threads. A mere pinch is enough; bloom these threads in your warm broth before you begin cooking the risotto to maximize colour diffusion.
Building the Hearty Beef Ragu: What You'll Need
To achieve a deeply satisfying centre for your Italian Rice Balls with Mozzarella , the ragù needs time to concentrate its flavours. Start by browning 1 lb of lean ground beef until beautifully coloured, then sauté finely diced yellow onion and minced garlic.
The key flavour lift comes from deglazing the pot with 1/2 cup of dry red wine, allowing it to reduce significantly before adding a 14.5 oz can of crushed tomatoes, beef broth, and dried oregano. Let this mixture simmer gently for at least 30 minutes, seasoning well with salt and pepper.
Once cooled, combine this rich sauce with the cubed, drained fresh mozzarella or provolone this cheese will provide that irresistible, molten stretch when you bite in.
The Triple Dredge: Breadcrumbs, Flour, and Egg Prep
The breading process is your insurance policy against structural failure. Prepare three dishes in sequence: the first holds all-purpose flour, the second holds four large eggs lightly beaten (your 'glue'), and the third holds 3 cups of fine dried breadcrumbs .
Panko is too coarse for the traditional look and feel we seek. The flour step removes excess moisture, the egg binds the flour to the rice, and the breadcrumbs create the final textural shield. Each ball must be rolled completely in each coating before being returned to the chilled tray.
Mastering the Risotto Base: The Foundation of Great Arancini
The success of your Italian Rice Balls hinges entirely on the risotto. This isn't meant to be soupy; it must be rich, creamy, and cooked perfectly al dente —tender but retaining a slight resistance in the centre.
Start by gently sautéing a finely minced shallot in butter and olive oil. Toast 1 1/2 cups of Arborio rice until the edges turn translucent, then deglaze with 1/2 cup of dry white wine. You will then begin adding the warm, saffron infused broth, one ladleful at a time, stirring patiently.
Once absorbed, repeat until the rice is cooked through about 20 minutes total. Off the heat, stir in 1/2 cup of grated Parmesan and one large egg yolk. The yolk acts as an extra stabilizer once chilled, contributing to the Best Rice Ball Recipe structure.
Related Recipes Worth Trying
- Ultimate Cheesy Arancini Rice Balls Recipe Golden Gooey — Master homemade Cheesy Arancini Rice Balls with this guide Learn the chilling secret for perfect shaping and a crispy crust Pure Italian comfort food
- The Bees Knees of Italian Stromboli Provolone Deli Meat Bake — Forget the calzone This is the ultimate Italian Strombolia hearty deli meat bake wrapped in crispy pizza dough Get my secret for the perfect seal marinara...
- My Best Ever Italian Stromboli A Deliciously Stuffed Salami Provolone Roll — Forget the soggy takeaway This Easy Italian Stromboli A Deliciously Stuffed roll is proper comfort food Packed with sharp provolone and salami its the best...
step-by-step Assembly: Forming and Stuffing Your Golden Oranges
Once the risotto is chilled for at least two hours (or overnight seriously, do this!), you can begin assembly. Scoop about 1/3 cup of the cold rice mixture into the palm of one hand, flattening it gently into a disk.
Spoon a generous teaspoon of the cooled ragù mixture and one small cube of mozzarella into the centre. This is the moment requiring a light touch. Gently cup the rice around the filling, rolling softly between lightly oiled hands to form a dense, smooth sphere, roughly two inches in diameter.
Ensure there are no cracks where the filling can escape. Place the formed balls onto your lined baking sheet.
Achieving Maximum Crunch: The Art of Deep Frying
This is where the transformation occurs. The final stage determines if you have a crispy delight or a greasy mess. The key is controlling the heat.
Infusing the Rice: Tips for Creamy, Al Dente Saffron Risotto
To ensure the risotto is deeply infused, add your pinch of saffron threads directly into the warmed chicken or vegetable broth well before you start cooking the rice. This allows the beautiful yellow colour and subtle flavour to penetrate every grain as the starch releases during cooking.
Remember, the final texture must be creamy enough to hold its shape, but the individual grains should remain distinct, not mushy that's the al dente balance.
The Crucial Cooling Phase for Stable Rice Balls
As mentioned, this step is non-negotiable for the structural integrity of your Italian Rice Balls . Spreading the cooked risotto thinly onto a baking sheet maximizes the surface area exposed to the cold, rapidly stopping residual cooking and firming up the starch.
If the mixture is even slightly warm when you attempt to form the balls, they will inevitably fall apart when they hit the hot oil. Plan for a minimum of two hours in the refrigerator, or better yet, chill overnight.
Techniques for Sealing the Mozzarella Filling Inside
When sealing the rice around the filling, work quickly but gently. Overworking the rice will warm it up prematurely and make it sticky. The goal is to create a continuous, uniform layer of rice around the filling without compressing the centre too much.
If you find the rice resisting a tight seal, lightly dampen your hands with ice water this prevents sticking without adding unwanted moisture to the exterior coating.
Oil Temperature Secrets for Even Browning
For the best Fried Arancini Recipe , your oil temperature must stabilize precisely at 350° F ( 175° C) . Use a thermometer; relying on intuition here is risky.
If the oil is too cool (below 325° F/ 160° C), the Italian Rice Balls with Peas or meat will absorb too much fat, resulting in a greasy texture.
If it’s too hot (over 375° F/ 190° C), the exterior will burn instantly before the mozzarella core has a chance to melt into that luscious, gooey state. Fry in small batches of three or four to avoid drastically dropping the oil temperature.
Elevating Your Next Batch: Pro Tips for Next Level Italian Rice Balls
To truly master Cheesy Italian Arancini Rice Balls , consider making the ragù a day ahead. Flavours deepen beautifully overnight, resulting in a richer, less acidic filling.
Also, after the final breading, if you have time, letting the fully assembled, breaded balls rest in the refrigerator for 30 minutes before frying helps the coatings adhere even more securely to the rice.
A final sprinkle of fine sea salt immediately upon removal from the oil enhances the overall savoury profile dramatically.
Storage and Revival: Keeping Arancini Delicious Long Term
The beauty of these Italian Rice Balls is that they freeze incredibly well. Once fried, allow them to cool completely on a rack. Place them in a single layer on a parchment lined tray in the freezer until solid. Then, transfer them to an airtight freezer bag.
They will keep well for up to three months.
Flavor Twists: Exploring Non-Traditional Arancini Stuffings
While we champion the classic meat version, don't feel constrained! For a change of pace, try mixing in finely chopped, sautéed Italian Rice Balls with Peas and diced ham for a classic Arancini al Prosciutto e Piselli .
Alternatively, for seafood lovers, a rich filling made from crabmeat or smoked salmon blended with ricotta makes a sophisticated alternative.
Pairing Perfection: Serving Suggestions Beyond the Plate
While irresistible on their own, these dense orbs shine when served alongside something bright. A simple, zesty dipping sauce is perfect perhaps a homemade marinara warmed through, or even a bright lemon aioli for a modern twist.
Pair them with a robust, earthy Italian red wine that can stand up to the richness of the beef and cheese.
Troubleshooting: Why Your Arancini Might Be Falling Apart
If your balls disintegrate in the fryer, it almost always boils down to one of three issues: 1) The risotto was too warm during assembly, lacking the necessary chilling; 2) You didn't use enough egg wash to cement the breadcrumbs; or 3) You overcrowded the pot, causing turbulent, uneven frying that ripped the coating.
Revisit the cooling and handling techniques for your next attempt.
Freezing Your Italian Rice Balls for Future Feasts
For making large batches for entertaining, skip the frying step entirely during the initial prep. Assemble the balls completely, bread them perfectly, and lay them out on a parchment lined tray. Freeze until rock solid, then transfer to freezer bags.
When you are ready to eat, thaw them slightly in the refrigerator for about an hour, then fry directly from cold, increasing the initial frying time by about 2- 3 minutes until they achieve that deep golden colour and the centre is thoroughly heated through.

Recipe FAQs
I'm a novice cook; is making these Italian Rice Balls going to be too tricky?
Don't you worry your head! While this recipe is listed as 'Medium' due to the multiple stages making the ragù, cooking the risotto, and then the assembly each individual step is quite straightforward.
The key is organisation, like laying out all your baking trays before you start; just take your time with the chilling and forming, and you'll absolutely nail it!
My risotto keeps falling apart when I try to shape the balls. What am I doing wrong?
Ah, the classic sticky wicket! The biggest culprit is usually the temperature; the risotto mixture must be thoroughly chilled ideally overnight so it firms up properly.
Also, keep a small bowl of ice water handy and lightly dampen your palms between shaping each ball; that prevents the rice sticking to you like glue.
Can I make the ragù filling and the risotto base ahead of time to save time on the day?
Absolutely, that's the smart way to approach it! The ragù flavour actually improves overnight, so making it a day prior is highly recommended. You can also cook the risotto base the day before; just spread it thinly on a tray, cover, and chill. Having both fillings cold makes the shaping process a doddle!
What oil is best for frying the Italian Rice Balls to get that perfect golden crisp?
For that authentic, non-greasy crisp, you want an oil with a high smoke point Vegetable or Canola oil is perfect for deep frying. Ensure your oil is properly heated to 350°F (175°C); if it’s too cool, the rice balls will soak up the grease like a sponge.
Trust me, temperature control is paramount here!
I don't eat beef. What's a good substitution for the traditional ragù filling?
That's no problem at all; you have a couple of smashing alternatives! For a vegetarian option, slow cook some mixed mushrooms (porcini and cremini work brilliantly) with white wine until thick that makes a wonderful "Arancini al Funghi." Alternatively, you could use slow cooked shredded chicken mixed with a tomato sauce base instead of the beef.
Classic Italian Rice Balls

Instructions:
Nutrition Facts:
| Calories | 400 kcal |
|---|---|
| Fat | 20g |
| Fiber | 2g |
