The Soft Crumb Classic Achievably Chewy Sourdough Bread

- The Secret to Superior Crumb: Achieving That Perfect 'Squish'
- Why This Recipe Masters Soft and Chewy Sourdough Bread
- The Essential Elements for Flavorful Dough Construction
- The Art and Science of Dough Development: Mixing to Final Shaping
- Mastering the Bulk Fermentation and Cold Retard Timing
- Baking to Perfection: Achieving that Golden, Soft Crust
- Troubleshooting Common Texture Hurdles
- Caring for Your Loaf Post-Bake: Storage and Slicing Insights
- Recipe FAQs
- 📝 Recipe Card
The Secret to Superior Crumb: Achieving That Perfect 'Squish'
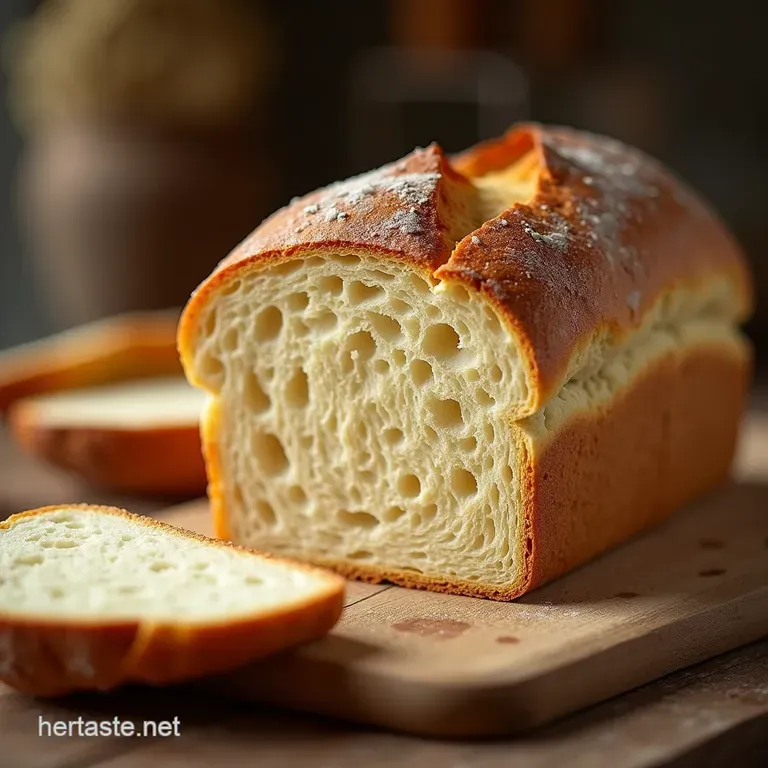
Right then, pull up a stool! There’s nothing quite like the smell of freshly baked bread wafting through the house on a Sunday morning it’s pure bliss, right up there with a proper cup of tea and the crossword. You want Soft and Chewy Sourdough ? Excellent choice.
We’re going to coax that tang and texture out of the dough without making it so tough you need a saw to slice it! Forget those frisbees masquerading as sourdough; we’re aiming for that perfect ‘squish.’ This recipe is designed to deliver the unmistakable depth of flavour from a natural sourdough starter, but with a focus squarely on texture.
We’re aiming for a beautifully open, yet incredibly moist interior the kind that begs for a thick smear of proper salted butter. This isn't your rustic, super crusty country loaf; this is the everyday sourdough you dream about, perfect for everything from posh sandwiches to dipping into your stew.
While the ingredient list is simple, achieving this texture demands patience and keen observation, placing this recipe firmly in the Medium difficulty bracket. The total active work time is about 45 minutes spread over the initial day, balanced against 14– 18 hours of rest, resulting in one standard loaf ready to serve 10 12 delicious slices.
Why This Recipe Masters Soft and Chewy Sourdough Bread
What separates this loaf from its more rustic cousins is a careful orchestration of hydration, protein management, and temperature control. Many home bakers default to super high hydration (80%+) when chasing open crumb, but that often leads to a sticky mess that dries out quickly.
We aim for a balanced approach, which is the core of this soft chewy bread recipe . We intentionally integrate a small percentage of whole wheat flour not just for flavor complexity, but because its bran helps ‘catch’ moisture during the bake, keeping the final product moist.
Setting the Stage: Understanding High Hydration Dough Handling
While our hydration level is manageable, it still requires gentle hands. When working with a wetter dough, the key is minimizing handling that forces gas out. We use an initial autolyse phase to allow the flour to fully hydrate before the starter and salt are introduced.
This means the dough absorbs water more efficiently, leading to a more extensible, elastic structure that naturally contributes to that desirable chewiness we are seeking in this soft chewy sourdough sandwich bread .
The Philosophy Behind Our Yielding Texture
The secret weapon for achieving that ‘squish’ without sacrificing structure lies in two areas: the inclusion of a small amount of softened butter and a precise cold retardation period.
Butter, introduced near the end of the mix, coats the gluten strands, inhibiting excessive tightening and resulting in a softer mouthfeel. Combine this with an Overnight Sourdough Bread proofing schedule, and the slow, cold environment allows acids to develop flavor without drying out the interior crumb structure.
Starter Health Check: Ensuring Maximum Rise Potential
For any successful sourdough venture, especially one focusing on texture, your starter must be vigorous. Before beginning, ensure your 100% hydration starter has reliably doubled (or even tripled) in size within 4 to 6 hours of feeding.
A weak starter will result in poor oven spring and a dense texture, no matter how perfectly you execute the subsequent steps in Baking Sourdough Bread .
The Essential Elements for Flavorful Dough Construction
The building blocks of this loaf are simple: flour, water, starter, and salt. However, the quality and precision with which you treat these elements directly influence whether you end up with the Easiest Sourdough Bread Recipe success or a frustrating miss.
Milling Matters: Selecting the Right Flour Blend
For the best balance of strength and tenderness, we specify a high protein Bread Flour (450g) alongside a smaller amount of finely ground Whole Wheat Flour (50g). The higher protein content in the bread flour is crucial for developing strong gluten networks capable of holding gas, while the whole wheat adds depth and helps retain moisture, answering the question: what makes sourdough bread chewy ?
It’s the balance of strength and moisture retention.
Accurate Measurement: Why Digital Scales are Your Best Friend
When Baking Sourdough Bread , volume measurements are the enemy of consistency. Sourdough relies on precise ratios, particularly concerning hydration. Digital scales are non-negotiable for this process; 360g of water needs to be exactly 360g.
Accuracy here prevents the dough from being too slack or too tight, ensuring the structure needed for a soft crumb.
The Starter's Role: Active Levain Guidelines
We incorporate 100g of active starter, fed recently and actively bubbling. This levain introduces the necessary yeast and bacteria to kickstart fermentation and develop that signature tang. It should be used when it is at or just past its peak height.
Optional Enhancements for Extra Tenderization
To actively promote a softer final product, this Simple Sourdough Bread Recipe includes an optional step: incorporating 20g of softened, room temperature unsalted butter during the final mixing stage.
This fat coats the developing gluten, keeping the structure pliable and contributing significantly to the soft final texture.
The Art and Science of Dough Development: Mixing to Final Shaping
The initial mixing process is where structure is born. We begin with the Autolyse Technique: Integrating Water and Flour Gently . Mixing just the flours and 340g of the warm water until no dry streaks remain, then resting for one hour, allows the gluten to begin forming naturally without the salt inhibiting the process.
After the rest, we add the starter and the remaining 20g of water. Once that's incorporated, we add the salt (and butter, if using). The kneading at this stage should be gentle; we use the pincer method or a few quick folds right in the bowl to fully integrate the ingredients without tearing the nascent structure.
Related Recipes Worth Trying
- Easy Beginner Sourdough Bread Recipe Chewy Crumb — Learn how to bake your first incredible Sourdough Bread Recipe with Starter using simple steps Get that perfect tangy flavour and crust today
- The Best Overnight Sourdough Cinnamon Rolls Recipe — Wake up to the Best Sourdough Cinnamon Rolls unbelievably soft thanks to an overnight cold proof This sourdough discard recipe delivers amazing flavour Get...
- The Best OldFashioned Bread Pudding Recipe with Vanilla Sauce — Learn how to make Grandmas classic bread puddinga rich custardy dessert thats surprisingly easy Perfect for quick party desserts
Mastering the Bulk Fermentation and Cold Retard Timing
Bulk fermentation is the most critical period. It's where we build strength and develop flavor. Over the next 3– 4 hours, depending on your kitchen temperature, we perform four sets of Stretch and Fold Mastery: Building Strength Without Deflating .
These sets are spaced 30 minutes apart. You will feel the dough transform from a shaggy mass to a cohesive, puffy, and smoother entity. After the final fold, let the dough rest undisturbed until it has increased in volume by about 30 50%.
Immediately after bulk fermentation, we perform a gentle pre-shape, rest for 20 minutes (bench rest), and then execute the final shape tightly and confidently before placing it seam side up into the prepared banneton for the long chill.
The Overnight Sourdough Bread approach involves refrigerating this shaped dough for 12– 16 hours. This cold retardation is vital; it slows yeast activity while allowing organic acids to deepen the flavour profile, all while firming up the dough for easier scoring.
Baking to Perfection: Achieving that Golden, Soft Crust
The bake dictates the final appearance and texture balance. High heat and steam are essential for maximizing oven spring and ensuring the crust remains pliable enough to complement the soft interior.
Determining Readiness: The Poke Test Explained
Before baking, look for visual cues. The dough should show signs of life but still hold its shape. The best indicator is the poke test: gently poke the dough with a wet finger. If the indentation springs back immediately, it’s under proofed. If it springs back slowly, leaving a slight indent, it’s ready.
If the indent stays completely, it’s likely over proofed.
Steam Injection: The Crucial Final Phase for Soft and Chewy Sourdough Bread
About an hour before you intend to bake, place your Dutch Oven inside the oven and preheat it to 500° F ( 260° C). The intense, immediate heat transfer achieved by loading dough into a screaming hot vessel is what gives the loaf its lift.
Once loaded, score decisively, replace the lid, and bake at this high temperature for 20 minutes. The trapped moisture acts as steam, keeping the surface soft long enough for the loaf to expand fully.
After 20 minutes, reduce the heat to 450° F ( 230° C) and remove the lid to allow the crust to caramelize to a deep golden brown over the next 20– 25 minutes.
Troubleshooting Common Texture Hurdles
It's rare to get perfection on the first try when learning Baking Sourdough Bread , but understanding what went wrong helps immensely.
When Your Crumb is Too Dense: Quick Fixes and Future Adjustments
A dense crumb usually points to one of two issues: either the starter wasn't active enough, leading to insufficient gas production, or you handled the dough too roughly during shaping, expelling the gas built up during bulk fermentation.
For future bakes, focus intensely on the gentle handling during the shaping stage and ensure your bulk fermentation sees a visible rise (even if small).
Flavor Deep Dive: Extending the Cold Proof for Tang Development
If you find your loaf isn't tangy enough, don't worry about the density yet; focus on flavor next time. Flavor complexity deepens with time. If the dough structure feels extremely robust (not too wet), try extending the cold proofing time in the refrigerator from 16 hours up to 20 hours.
This allows the lactic and acetic acids more time to flourish, enhancing the overall profile of your Simple Sourdough Bread Recipe .
Optimal Cooling Times Before Committing to the First Slice
This step is painful but vital: allow the loaf to cool completely on a wire rack for at least two hours. Cutting warm sourdough releases steam too quickly, gelatinizing the starches prematurely and resulting in a gummy texture rather than the desired chew.
Creative Flour Substitutions for Flavor Variation
While the base recipe is optimized for the soft texture, you can certainly experiment. For a slightly sweeter note, try substituting up to 50g of the bread flour with high-quality White Spelt flour.
If you want a rustic texture without sacrificing too much softness, use a 50g inclusion of fine Rye flour instead of the whole wheat, making sure to keep hydration the same Rye absorbs water differently than wheat and can make the dough feel sticky quickly.
Caring for Your Loaf Post Bake: Storage and Slicing Insights
Once perfectly cooled, store your Soft and Chewy Sourdough Bread in a paper bag at room temperature for the best texture preservation for the first two days. Avoid plastic bags initially, as this traps moisture and can soften the crust too much or encourage mold.
Freezing works well if you slice it first; simply pop slices into a freezer bag and toast them straight from frozen.

Recipe FAQs
My sourdough always comes out dense and tough. How do I make sure I get that proper Soft and Chewy Sourdough Bread texture?
Ah, the dreaded sourdough frisbee! For a softer chew, focus on two things: hydration and bulk fermentation. This recipe uses slightly higher water content, which keeps the crumb moist.
Also, ensure you don't under proof; the dough needs to be noticeably puffy and jiggly before shaping to guarantee a beautiful open, yielding interior.
Can I skip the long cold proof in the fridge? I'm in a hurry!
While you technically can, I wouldn’t advise it if you’re aiming for top-notch flavour and texture. The long, cold rest (Step 7) develops that deep, complex sourdough tang we crave. It also firms the dough up significantly, making it much easier to handle and score beautifully without deflating it.
What’s the secret to getting that lovely oven spring when baking in a Dutch Oven?
The secret sauce is the heat! Make sure your Dutch Oven is screaming hot before the dough goes in preheating it for a full hour at 500°F (260°C) is crucial. The trapped steam created by the lid on for the first 20 minutes prevents the crust from setting too early, allowing the dough to expand fully.
Don't skimp on that preheat!
My starter seems sluggish this morning. Can I use it anyway for this Soft and Chewy Sourdough Bread?
If your starter isn't active meaning it hasn't reliably doubled within 4 to 6 hours after feeding it's best to wait. A sluggish starter won't produce enough lift, leading to a flat, gummy loaf, especially in a recipe focused on a soft texture. Feed it again and use it only when it's at its peak activity.
How should I store my finished sourdough loaf to keep it soft for a few days?
Resist the urge to slice it straight away; letting it cool completely for at least two hours is vital for the crumb structure to set. Once cool, wrap it tightly in a clean tea towel or place it in a paper bag at room temperature.
Avoid plastic bags, as these trap moisture against the crust, making it soggy rather than chewy.
I don't have whole wheat flour. What's the best substitute for the 50g in this recipe?
Whole wheat adds flavour and a touch of structure, but you have a couple of good options. You can substitute it entirely with your main Bread Flour for a slightly lighter loaf. Alternatively, rye flour works brilliantly, offering a deeper, earthier flavour that pairs wonderfully with the sourdough tang.
Chewy Sourdough Loaf

Ingredients:
Instructions:
Nutrition Facts:
| Calories | 250 Cal |
|---|---|
| Fat | 1g |
| Fiber | 3g |
