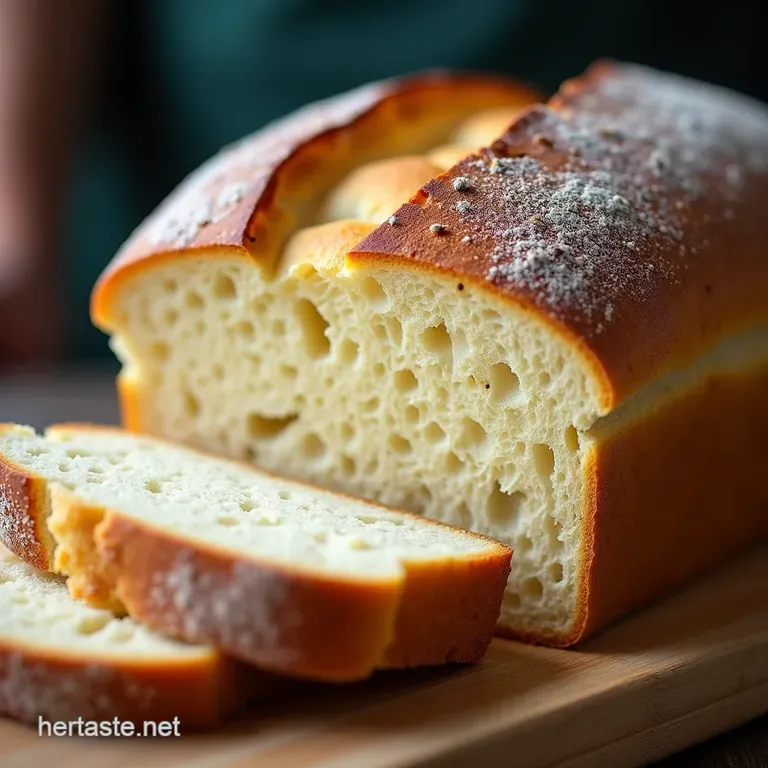
The Crust Above the Rest Beginner Sourdough Loaf
- Unlocking the Secret to Effortless Home-Baked Sourdough Bread
- The Essential Toolkit for Your First Artisan Bake
- The Day-One Rhythm: Mixing and Developing Strength
- Shaping Mastery: Transforming Dough into Oven Potential
- Baking Day: Orchestrating the Perfect Steam Environment
- Troubleshooting Common Pitfalls in Sourdough Bread Production
- Elevating Your Loaf: Flavor Variations and Add-ins
- Recipe FAQs
- 📝 Recipe Card
Unlocking the Secret to Effortless Home Baked Sourdough Bread
Baking proper sourdough at home can feel like mastering the art of the perfect cuppa it takes practice, patience, and a wee bit of understanding what the dough is telling you.
This outline is designed to demystify the process, making that glorious, tangy loaf accessible even if you're just dipping your toe into the world of wild yeast. We’ll focus on simplicity without sacrificing that quintessential, chewy crumb.
This Sourdough Bread Recipe blueprint is for a cracking loaf of beginner friendly sourdough, stripping the process back to its glorious basics. Forget complex overnight routines; this is a robust, forgiving loaf designed to yield a beautiful, open crumb and that characteristic tang we all crave.
It’s the perfect gateway loaf for home bakers ready to graduate from yeasted bread think of the best artisan loaf you’ve snagged from a fine bakery, but baked right in your own kitchen.
Why This Forgiving Method Replaces Complicated Techniques
Many guides on creating Homemade Bread using wild yeast can feel intimidating, focusing heavily on specific temperature control or ultra long development times. Our approach simplifies the key mechanics.
We prioritize building strength through well timed stretch and folds during the bulk fermentation phase rather than demanding complex coil folds or extended kneading. This makes the Easy Sourdough Bread Recipe manageable for those balancing work and life, proving that artisanal quality doesn't require an all-day commitment to the mixing bowl.
The Philosophy Behind Our Accessible Wild Yeast Loaf
The true magic of sourdough lies in the symbiosis between the flour, water, and your established Sourdough Bread Starter . This recipe leans into that natural process.
We use a higher ratio of starter to flour than some traditional methods, giving the wild yeasts and bacteria a strong early boost. This robust initial activity helps ensure a successful rise even if your kitchen runs a little cooler than ideal.
The goal is not just a loaf, but a reliable result every time you follow these Recipe Steps .
Achieving That Coveted Open Crumb Without the Fuss
That beautiful, airy interior the open crumb comes down to two main factors: sufficient gas production during bulk fermentation and proper shaping that creates surface tension.
By letting the dough rest sufficiently during the autolyse (where flour and water hydrate without starter or salt), we maximize the flour’s potential before we start working the gluten.
Then, the gentle, repeated stretching develops strength incrementally, trapping those gas bubbles gently so they can expand dramatically in the oven.
Setting Expectations: The Tang Factor in Beginner Baking
The flavour of your Sourdough Bread is heavily influenced by the fermentation temperature and time. A longer, cooler proof (like the cold retard we incorporate) encourages the production of acetic acid, which delivers that signature sharp tang.
If you prefer a milder flavour, you can slightly shorten the time in the refrigerator. Remember, the flavour profile of Sourdough Bread Nutrition is also tied to these slow fermentation processes, making it easier on digestion compared to fast acting commercial yeast breads.
The Essential Toolkit for Your First Artisan Bake
To successfully bake this loaf, precision is paramount, which means moving beyond cups and teaspoons. While the active Sourdough Bread Starter itself is living, the rest of the environment needs to be controlled, starting with your measuring tools.
Metric Measurements for Precision (No Guesswork Allowed)
For any serious baking, especially involving wild yeast where small deviations can have large impacts, a digital kitchen scale is non-negotiable. We utilize grams for all components starter, water, flour, and salt ensuring that the 500g of bread flour accurately correlates to the 375g of water, achieving the correct hydration level necessary for easy handling.
Is Your Starter Ready? The Float Test Explained
Before you even begin mixing the dough, you must verify the vitality of your Sourdough Bread Starter . The float test is the simplest check: drop a small spoonful of recently fed starter into a glass of room temperature water.
If it floats immediately, it is active, full of CO2, and ready to leaven your dough. If it sinks, give it another 2- 4 hours and test again.
Beyond Water and Flour: Necessary Baking Equipment
While the ingredient list is wonderfully simple (flour, water, salt, starter), the equipment setup is crucial for achieving that baker’s crust. You absolutely need a Dutch Oven (cast iron is best) to mimic the professional steam injection used in commercial ovens.
Next,, a lame or a very sharp razor blade is required for scoring. This controlled incision directs the dough’s expansion, leading to maximum oven spring and that desirable "ear."
The Day-One Rhythm: Mixing and Developing Strength
The process begins with ensuring your starter is active and bubbly. We start with the autolyse: mixing the 500g of strong bread flour with the 375g of warm water, along with the 100g of ripe starter, until just combined. Cover this shaggy mass and let it rest for 30 to 60 minutes.
This rest period allows the flour to fully hydrate before the salt is introduced, making the dough more extensible. After the rest, sprinkle the 10g of fine sea salt over the dough.
Use the pincer method pinching and squeezing the dough gently with wet hands to fully integrate the salt over a couple of minutes. This is the foundation of our Sourdough Bread Recipe with Starter .
Related Recipes Worth Trying
- The Best Overnight Sourdough Cinnamon Rolls Recipe — Wake up to the Best Sourdough Cinnamon Rolls unbelievably soft thanks to an overnight cold proof This sourdough discard recipe delivers amazing flavour Get...
- The Best OldFashioned Bread Pudding Recipe with Vanilla Sauce — Learn how to make Grandmas classic bread puddinga rich custardy dessert thats surprisingly easy Perfect for quick party desserts
- CloudSoft Mexican Conchas The Ultimate Sweet Bread Rolls Recipe — Bake truly authentic Mexican Conchas This trusted recipe guarantees pillowy soft sweet bread rolls with that perfect sugary crackly crust Learn the secrets now
Shaping Mastery: Transforming Dough into Oven Potential

Once bulk fermentation is complete the dough should look puffy and have increased in volume by about 30-50% it’s time to gently handle it. Turn the dough onto a very lightly floured surface and perform a pre-shape into a loose round, encouraging a little surface tension.
Allow this to rest, uncovered, for 20- 30 minutes; this is the bench rest. Next comes the final shaping. Whether you choose a round boule or an oval batard, the key here is creating tight surface tension by gently pulling the edges toward the centre and then flipping it over to seal the seam against your work surface.
This tension is what holds the loaf’s structure against the oven's heat. Place this shaped dough seam side up into a generously floured banneton before moving into the cold proof phase.
Baking Day: Orchestrating the Perfect Steam Environment
The final stages transform your carefully nurtured dough into a magnificent loaf. This requires temperature precision and the creation of steam.
Building the Bulk Fermentation: Stretch, Fold, and Watch It Grow
During the bulk fermentation period (which follows salt incorporation), we build the gluten structure. Over the initial 2 to 3 hours, perform four sets of stretch and folds, spaced 30 minutes apart.
This gentle action aligns the gluten strands without knocking out the gas produced by the wild yeast, which is crucial for achieving good volume in your Homemade Bread . Pay attention to how the dough feels it should transition from slack and wet to smooth and elastic.
The Cold Proof: Enhancing Flavor Overnight
After the final shaping, the dough is placed in the refrigerator for 12 to 18 hours. This cold proof (or cold retard) is non-negotiable for deep flavour. The cold temperature slows down the yeast activity dramatically while allowing the bacteria to continue producing organic acids, delivering the complex, satisfying profile that defines artisan Sourdough Bread .
Scoring Techniques for Maximum Oven Spring
When you are ready to bake, preheat your oven and Dutch Oven to a scorching 500° F ( 260° C) for a full hour. This ensures the cast iron is radiating intense, consistent heat.
Remove the hot pot, flip your cold dough onto parchment paper, and score the top decisively with your lame. A deep, angled cut allows the dough to expand predictably, resulting in maximum oven spring.
Dutch Oven Magic: Achieving Deep Golden Crusts
The initial bake, lid on for 20 minutes at 500° F, traps the moisture evaporating from the dough, creating the steam environment necessary for a thin, crackly crust and maximum rise.
After 20 minutes, reduce the heat to 450° F ( 230° C), remove the lid, and continue baking for another 25 to 30 minutes. Don't pull the loaf early!
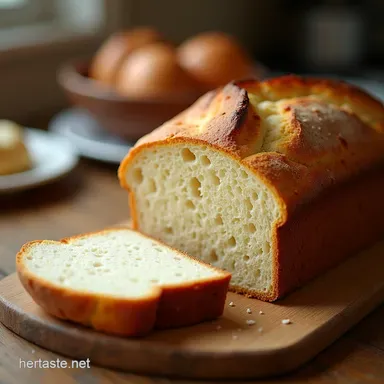
A deep, mahogany brown colour indicates fully developed flavour and a shattering crust. Let it cool completely at least two hours before slicing to allow the internal structure to set.
Troubleshooting Common Pitfalls in Sourdough Bread Production
Even with a solid Sourdough Bread Recipe , hiccups happen. Understanding why can save future bakes.
What To Do When Your Dough Won't Rise (And Why)
If your bulk fermentation stalls, it is almost always due to a combination of cold ambient temperature or an under active starter. If the dough doesn't look significantly puffier after 5 hours, it needs warmth.
Try placing the covered bowl in the oven (turned OFF) with the light on, or near a warm appliance. If the starter was weak, feeding it more frequently for a couple of days before the next bake can revitalize it.
Elevating Your Loaf: Flavor Variations and Add-ins
Once you master the basic loaf, experimenting with inclusions is fun.
Storage Secrets: Keeping Your Sourdough Fresh for Days
Resist the urge to refrigerate your finished loaf; refrigeration degrades the texture. Store your cooled Sourdough Bread cut-side down on a wooden cutting board at room temperature, covered loosely with a clean kitchen towel. Freezing is ideal: slice the loaf first, then freeze.
You can toast slices straight from the freezer.
Incorporating Seasonal Flavors (Think Apples and Spices)
To make a seasonal loaf, incorporate inclusions during Step 5, immediately after incorporating the salt. For an autumn loaf, fold in 75g of finely diced, dried apples tossed in cinnamon and nutmeg.
For savoury options, use roasted garlic or grated sharp cheese, ensuring any wet additions are mixed in just before the first set of folds.
Feeding Schedules for a Happier, Healthier Starter
A healthy Sourdough Bread Starter is your most valuable asset. For daily bakers, feeding once every 12- 24 hours at room temperature is standard.
If you bake weekly, store the starter in the refrigerator and feed it vigorously (1:3:3 ratio of starter:flour:water) 1-2 days before you plan to mix your dough to ensure peak activity for your next batch of Easy Sourdough Bread Recipe .

Recipe FAQs
My starter isn't floating! Can I still make this Sourdough Bread?
If your starter doesn't float, it's usually not quite ready or vigorous enough, which can result in a dense loaf. Give it another feed, ensuring the temperature is warm (around 75°F/24°C), and wait until it has roughly doubled in size and passes the float test before mixing your dough.
Patience pays off when it comes to wild yeast!
Why is my Sourdough Bread dough so sticky and hard to handle?
Sourdough dough, especially high hydration recipes, is naturally stickier than commercial yeasted dough; it’s part of the charm! Use wet hands instead of floured hands during the stretch and folds to prevent the dough from tearing and sticking to you.
Remember, the texture will drastically improve after the bulk fermentation and shaping stages.
How do I know when the bulk fermentation is finished?
Don't rely strictly on the clock; rely on what you see! You are looking for the dough to increase in volume by about 30% to 50% (not double) and appear puffy with visible bubbles on the surface. It should feel lighter and jiggly when you gently shake the bowl.
Under proofed dough won't have enough structure for a good oven spring.
My loaf came out flat what went wrong with my Sourdough Bread?
A flat loaf usually points to one of two issues: either under proofing (not enough gas production) or poor shaping (not building enough surface tension). For your next attempt, aim for a tighter final shape to create a strong skin, and ensure your starter was truly active when you mixed the dough.
Can I make this recipe without a Dutch Oven?
Yes, though a Dutch Oven is brilliant for trapping steam to get that artisan crust. If you don't have one, place a pan on the bottom rack while preheating and pour a cup of boiling water into it right as you place your dough into the oven. This creates the necessary steam.
Just be extremely careful when handling hot water!
How long can I keep my baked Sourdough Bread fresh?
For the best texture, keep it stored at room temperature in a paper bag for up to two days, which allows the crust to breathe. Avoid the fridge, as this stales the bread quickly. If you have leftovers, slice it up and freeze what you won't eat within 48 hours; it toasts beautifully straight from the freezer!
Beginner Sourdough Loaf
Instructions:
Nutrition Facts:
| Calories | 290kcal |
|---|---|
| Fat | 1g |
| Fiber | 3g |
