Homemade Elderberry Syrup: a Delightful Immune Booster

- A Sweet Sippin’ Journey: My Elderberry Syrup Adventure
- A Quick Peek at Elderberry Syrup's History
- Why Elderberry Syrup Rocks
- Ready to Get Cooking?
- Your Go-To Essential Ingredients Guide: Elderberry Syrup Edition
- Homemade Elderberry Syrup: A Delightful Immune Booster
- Pro Tips & Secrets to Crafting the Perfect Elderberry Syrup
- Perfect Presentation: Making Your Syrup Shine
- Storage & Make-Ahead: Keep it Fresh
- Creative Variations: Make it Your Own
- Complete Nutrition Guide: Know What You’re Sippin’ On
- A Delicious Conclusion
- Frequently Asked Questions
- 📝 Recipe Card
A Sweet Sippin’ Journey: My Elderberry Syrup Adventure
Oh my gosh, you guys! have you ever tried making your own elderberry syrup? a couple of winters ago, i found myself battling the common cold like it was a heavyweight championship match.
Between the sore throat, coughing, and endless tissues, i was exhausted! that’s when i stumbled upon an elderberry syrup recipe while scrolling through my phone, and i thought, “why not?” i mean, who wouldn't want a delicious way to kick those sniffles to the curb?
Now, let me tell ya, making this syrup brought back memories of my grandma brewing up herbal remedies in her kitchen.
You know, the kind of place that smells like a cozy hug? it felt like i was stepping into a time machine.
And let me clarify elderberry syrup isn't just some old wives' tale. it’s a natural immune booster that’s made not only a comeback but also found its way into modern health routines.
So, let’s dive into the goodness!
A Quick Peek at Elderberry Syrup's History
Elderberry syrup has been a staple in folk medicine for ages. early settlers used it for its health benefits of elderberry , particularly during harsh winters when sickness was rampant.
Fast forward to today, and this sweet concoction is getting a lot of love! it’s become a trendy addition to health smoothies, tea, and even halloween cocktails.
Seriously, who wouldn’t want a witchy looking drink that also supports their immune system?
As for the nitty gritty this recipe is super easy peasy! you’re looking at about 40 minutes total from start to finish.
With just a few basic ingredients and no fancy equipment, it’s perfect for anyone, even if your kitchen skills are at a beginner level.
Plus, it yields about 1 cup of syrup enough to keep you going for a few weeks.
Why Elderberry Syrup Rocks
Now, let’s talk about what makes this syrup so awesome! first off, elderberry syrup benefits are off the charts. it’s packed with antioxidants and vitamins that help kick your immune system into high gear.
Just a spoonful a day can help stave off seasonal sniffles and keep you feeling your best.
Not only is it a great homemade natural remedy for colds , but it’s also a super versatile ingredient. you can drizzle it over pancakes, stir it into yogurt, or mix it into your morning smoothies.
Plus, making it at home is a fantastic way to skip out on any weird additives you might find in store-bought versions.
Talk about a win-win!
You can even adjust this diy elderberry syrup to suit your taste. want it sweeter? add more honey! prefer a spicier kick? toss in some ginger.
The options are endless, and you can make a unique twist on this herbal medicine recipe while still reaping all those health benefits.
Got kids? they’ll love this syrup too. it's a sneaky way to get them to enjoy their vitamins!
Ready to Get Cooking?
So, are you itching to whip up your own batch of elderberry syrup ? grab your elderberries, your honey, and a little bit of water, and let’s go! creating this syrup not only feeds your body but warms your heart too.
Whether it’s for your family or to share as a thoughtful gift, i promise it’ll become a staple in your home.
And hey, let’s not forget to cover syrup preservation tips so you don't end up with a sticky mess! store it in a clean glass jar, and it’ll live in your fridge for about six months.
And trust me, on those cold winter mornings when you hear the coughs and sniffs, you’ll be so grateful to have your homemade syrup ready to go.
Alright, now that you’re on board with all the good stuff about elderberry syrup, let’s dive into the ingredients you’ll need for this delightful concoction…
Your Go-To Essential Ingredients Guide: Elderberry Syrup Edition
Oh my gosh, if you’ve never whipped up your own elderberry syrup , you are seriously missing out! not only is it delish, but those elderberry syrup benefits are through the roof.
So, grab your apron, and let’s dive into the world of essential ingredients and some stellar tips to make your syrup making journey a breeze!
Premium Core Components
First things first, let’s chat about the core ingredients you’ll need. It’s all about getting quality stuff, folks!
Elderberries : fresh or dried, you’re gonna need 2 cups (200 g) . look for plump berries with a deep purple color.
Avoid any that look shriveled because we want only the best for those natural immune boosters !
Water : We want about 4 cups (950 ml) . Use filtered if you can to keep it clean.
Honey : For that sweetness, grab 1 to 1.5 cups (200 to 300 g) . Go wild with it; you're the boss of your sweetness level!
Extras : You might like a dash of vanilla extract (1 teaspoon) , a cinnamon stick , or even a couple of cloves to jazz it up. You do you!
Storage Is Key
Once you make your syrup, you’ll want to keep it fresh. store it in a clean glass jar in the fridge.
And hey, it’s good for up to 6 months ! that’s some serious shelf life for a delicious homemade concoction! for the most part, just keep it in an airtight container, and you’re golden.
Signature Seasoning Blend
Now, while Elderberry Syrup is already a winner, think about what you’d like to put in there. The best elderberry recipes don’t shy away from combos!
Spices : Try adding a bit of fresh ginger or lemon zest for zing. Seriously, this can elevate your syrup game!
Herb Pairings : If you're feeling fancy, a touch of thyme can work wonders with elderberry.
And don't forget, you can use this sweet syrup in cocktails, making it super versatile! Imagine an elderberry margarita yes, please!
Smart Substitutions
Sometimes things don’t go as planned, and that’s okay! Common alternatives can save the day.
No elderberries on hand? Black currants can step right in. They’ve got a similar taste profile!
For a vegan elderberry syrup recipe, use maple syrup or agave nectar instead of honey. Boom, sweetness achieved!
Running low on honey? White sugar or coconut sugar could work, but it might change that sweet tangy flavor a bit.
Kitchen Equipment Essentials
You won’t need a ton of gadgets, just the basics to get going.
- Medium sized saucepan : For heating things up.
- Fine mesh strainer or cheesecloth : This is how we’ll catch the berry solids.
- Measuring cups and spoons : Don't forget these gems!
Honestly, the cleanup after this can be a pain, so try to rinse your tools while you cook.
Creative Ways to Use Elderberry Syrup
Okay, so you’ve made your syrup. What now?
Drizzle it on pancakes and waffles. Oh, what a morning treat!
Mix it into hot tea or lemonade. It’s a game changer for your drinks!
Add it to yogurt or smoothies for that immune boost.
Closing Thoughts
As you dive into the making of your elderberry syrup , think about how these ingredients and methods meld together.
Each scoop packs a punch of health benefits , giving your immune system the love it deserves, especially during flu season!
Next up, let’s get into the nitty gritty of how to make elderberry syrup. Grab your ingredients, and let’s do this!
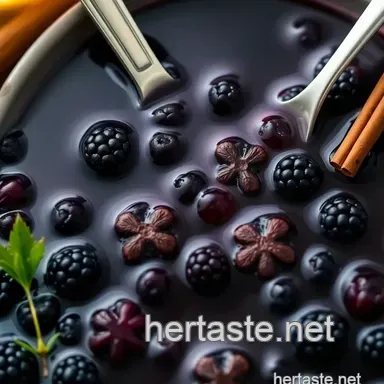
Homemade Elderberry Syrup: A Delightful Immune Booster
Okay, so let’s talk about one of my all-time favorite little kitchen projects: making homemade elderberry syrup ! seriously, you guys, this syrup isn’t just sweet and tangy; it’s like a cozy hug in a bottle and a natural immune booster you’ll want handy all winter long.
If you've ever been curious about how to make elderberry syrup , you’re in the right place!
First off, elderberry syrup has been used in folk medicine for ages if you don’t know, it’s believed to help support our immune systems.
Honestly, it’s like finding a superhero in a berry! so, let’s dive into the essential preparation steps before we get swirling those elderberries.
Essential Preparation Steps
Mise en Place
Before you start cooking, set everything up! You’ll need:
- 2 cups (200 g) of elderberries (fresh or dried).
- 4 cups (950 ml) of water.
- 1 to 1.5 cups (200 to 300 g) of honey sweetness is up to you!
- Optional spices a teaspoon of vanilla extract, and throw in a cinnamon stick and a couple cloves if you’re feeling fancy!
Time Management Tips
Set aside about
10
minutes
for prep and
30
minutes
for cooking. Trust me, if you get everything ready first, this part becomes a breeze!
Organization Strategies
Make sure your tools are at hand: a medium sized saucepan, measuring cups, and a fine mesh strainer. Being organized is half the battle!
Safety Considerations
When dealing with hot liquids, use caution nobody wants to end up with a sticky syrup on the floor (or worse!).
Along with these steps, pay attention to your ingredients because quality really makes a difference. You want those elderberries to taste their best!
Step-by-step Process
Here’s how to whip up this magic syrup:
Prepare Elderberries
If you’re using fresh berries, rinse them under cold water. Dried? Just toss 'em in!Combine Ingredients
In your saucepan, throw in the elderberries and water. If you’re using spices, go ahead and add those too.Simmer
bring to a boil over medium heat, then reduce and let it simmer for about 30 minutes .Stir it occasionally; it’s great bonding time for you and the syrup sauce!
Mash and Strain
After simmering, grab a potato masher and gently squish the berries. Pour that liquid through a fine mesh strainer into a separate bowl. Say goodbye to the solids.Sweeten
While the liquid is still warm, stir in your honey and vanilla extract. Taste test along the way to get that sweetness just right!Cool and Store
Let it cool completely before transferring it to a clean jar. You can refrigerate it for up to six months!
Expert Techniques
Now, let’s sprinkle in some expert techniques to put you on the path to success.
- Quality Checkpoints : The syrup should have a deep purple color and a lovely aroma. Pretty much a sign of elderberry success.
- Troubleshooting Tips : If your syrup is too thick, add a splash of water. If it’s too sweet? Mix in a little more lemon juice (a natural immune booster as well!).
Success Strategies
Want to nail it the first time? Here are some success strategies .
Common Mistakes to Avoid : Don’t skip the straining step; the solids can mess with that smoothly sippable texture.
Quality Assurance Tips : Always taste as you go! You’re the boss of your syrup.
Perfect Results Guide : Remember the timing — 30 minutes of simmering gives you that bold flavor.
make-ahead Options : You can whip up multiple batches and bottle them for gifts or winter emergencies!
Now, I’m telling you, this syrup can be your secret weapon against those pesky winter colds. You can drizzle it over pancakes or mix it into tea there are so many creative ways to use elderberry syrup!
Additional Information
As you venture into the elderberry world, remember that the health benefits of elderberry are backed by both tradition and studies.
So, not only are you enjoying a delicious syrup, but you’re also giving your immune system some love, especially in flu season.
Plus, if you're keen on herbal medicine recipes, elderberry fits right in!
With a ton of versatility like using it in cocktails or making a vegan elderberry syrup recipe using maple syrup this drinkable delight will keep your pantry buzzing.
So, whether you’ve got kids or just want to explore the wonders of natural remedies , give this elderberry syrup a whirl.
You won’t regret it!
Now, let’s dive into more uses for elderberry syrup and how you can maximize its potential in your life!
Pro Tips & Secrets to Crafting the Perfect Elderberry Syrup
Oh my gosh, if you’re diving into this elderberry syrup recipe , there’s a few things i’ve learned along the way that’ll make your syrup even better! let’s spill some secrets and pro tips.
First off, the quality of your ingredients matters! use fresh or high-quality dried elderberries to really hit those flavor notes.
Trust me, you’ll taste the difference. when i first started making elderberry syrup, i thought all berries were created equal, but that is so not true.
Now, if you’re in a hurry (and let’s be honest, who isn’t?), here’s a time saving technique : while the berries are simmering, prep your storage jars.
Just make sure they’re clean and dry. it cuts down your clean-up time later. score!
When it comes to flavor enhancement, don't shy away from experimenting ! a cinnamon stick and a couple of cloves can take your syrup from "meh" to "wow!" and don’t forget the vanilla extract; it’s like the cherry on top.
Just a teaspoon elevates the whole thing.
Lastly, presentation counts! When you’re ready to serve or gift this syrup, put it in a cute glass bottle, label it, maybe even tie some twine around it. Hello, Pinterest perfect!
Perfect Presentation: Making Your Syrup Shine
Let’s talk about plating techniques . i know syrup isn’t exactly like plating a gourmet meal, but a good presentation makes it all the more inviting.
Drizzle some syrup over a bowl of yogurt, add a few elderberries if you’re feeling fancy, and you’ve got yourself an instagram worthy snack!
Garnish ideas can also enhance the appeal. sprigs of mint or thin slices of lemon can pop on a glass.
And if you combine colors like bright yellow with deep purple you’re gonna have everyone asking, “where’s that from?”
Storage & make-ahead: Keep it Fresh
Now, let’s dive into how to keep your elderberry syrup alive and kickin’! once you make this homemade syrup for colds , you’ll want to store it properly.
Keep it in a refrigerated airtight container and it’ll usually last up to 6 months . seriously, who thought it could last so long?
For best results on that freshness duration , make sure it’s completely cooled before you seal it up. a warm syrup in a jar creates condensation, and that can lead to spoilage.
The last thing you want is a science experiment in your fridge!
Creative Variations: Make it Your Own
You might wonder, “can i get creative with this elderberry syrup?” absolutely! one of my favorite things is to play with seasonal twists .
Add some citrus zest in the summer or a pinch of ginger during colder months it just screams cozy vibes.
If you’re into dietary modifications , try using agave nectar or even maple syrup instead of honey. You’ll get that sweet touch while catering to vegan friends. And hey, it’s a win-win!
Complete Nutrition Guide: Know What You’re Sippin’ On
Now, let's chat about why you should be thrilled about this syrup. it’s packed with health benefits of elderberry , especially for immune system support .
The nutritional properties of elderberry make it a go-to during flu season. with elderberry syrup for kids , you can dive into those natural immune boosters without worrying about weird chemicals.
For the health conscious, the elderberry syrup dosage is about one tablespoon daily. it can be mixed in drinks, drizzled over your breakfast, or just taken straight up.
And speaking of breakfast, adding it to oatmeal is a game changer!
A Delicious Conclusion
So, whether you're a seasoned pro or a newbie in the kitchen, this elderberry syrup recipe is super friendly! you’ll be whipping up dozens of elderberry recipes before you know it.
Not only does this syrup taste amazing, but you’re also giving your body some solid support against the sniffles.
Give it a shot and remember, cooking's about fun and flavor! try those tips, make your personal touch known, and share it with friends.
I promise you’ll feel like a herbal medicine wizard before long! happy cooking, my friend!
Frequently Asked Questions
What is the shelf life of homemade elderberry syrup?
Homemade elderberry syrup can last in the refrigerator for up to 6 months when stored in an airtight container. Always check for any signs of spoilage, such as off odors or mold, before using it.
How do I know if my elderberry syrup is sweet enough?
The sweetness of your elderberry syrup can be adjusted easily. Since honey is added while the syrup is still warm, you can start with a lower amount and stir in additional honey until it reaches your desired sweetness. Remember that the syrup may taste less sweet when chilled, so taste it warm for the best judgment.
Can I make elderberry syrup recipe with dried elderberries?
Yes, you can definitely use dried elderberries in this elderberry syrup recipe! Simply use the same amount as you would fresh elderberries; however, you may want to soak them in water for a few hours before cooking to help hydrate them and enhance the flavor.
What are some variations I can try with my elderberry syrup?
There are many delicious variations you can experiment with! Adding a splash of citrus zest like lemon or orange can provide a fresh twist, while spices like ginger can add warmth. For a different sweetening option, try agave nectar or maple syrup for a vegan alternative.
Is there a specific way to use elderberry syrup for health benefits?
To enjoy the potential immune boosting benefits of elderberry syrup, take 1 tablespoon daily as a preventative measure during flu season, or every 2-3 hours when feeling under the weather. However, consult your healthcare provider for advice tailored to your individual health needs, especially if pregnant or nursing.
How should I store and use elderberry syrup?
Store your elderberry syrup in a clean, airtight jar or bottle in the refrigerator. It's perfect for mixing into beverages, drizzling over pancakes or yogurt, or simply taking by the spoonful to reap its benefits. Just remember to shake well before each use, as natural separation may occur.
Homemade Elderberry Syrup A Delightful Immune Bo