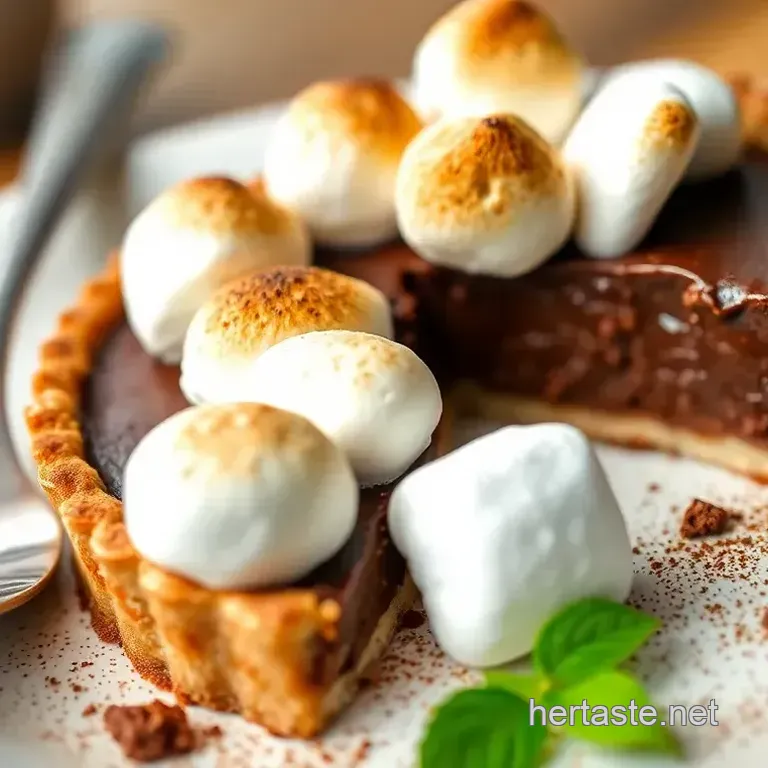
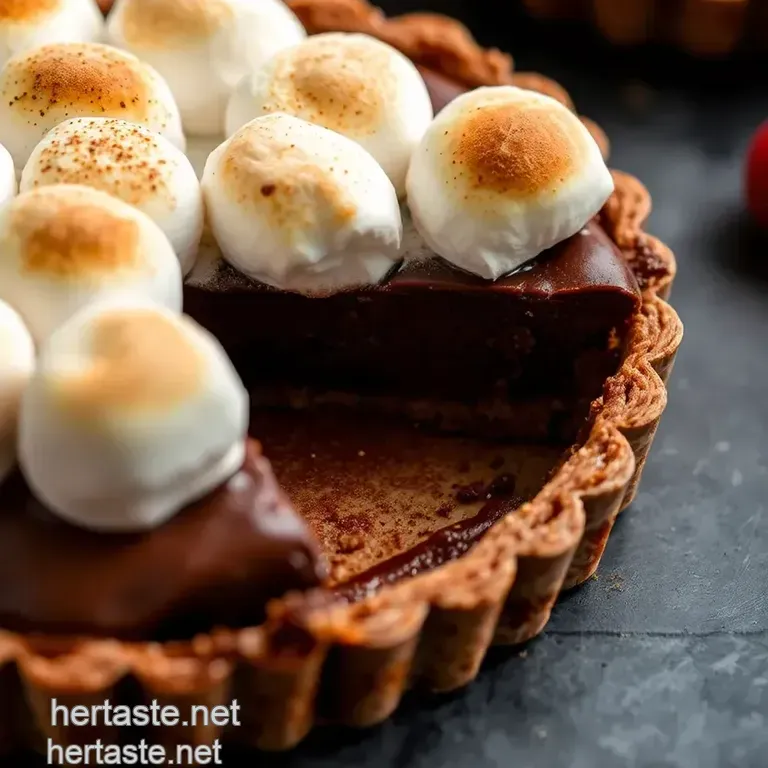
Decadent Chocolate Tart with Toasted Marshmallow
- Look into into Decadence: Bake Chocolate Tart with Toasted Marshmallow
- A Slice of History
- Why You’ll Love This Tart
- The Good Stuff: Ingredients
- Essential Ingredients Guide: Your Secret Weapon for Sweet Success
- Mastering Professional Cooking: A Guide to Perfectly Bake Chocolate Tart with Toasted Marshmallow Meringue
- Additional Recipe Information
- 📝 Recipe Card
Look into into Decadence: Bake Chocolate Tart with Toasted Marshmallow
Oh gosh, let me take you back to that one day at my friend’s birthday party. you know, the kind where everyone’s mingling, laughter fills the air, and you’re just waiting for the dessert table to be unveiled? that’s when my eyes landed on a bake chocolate tart with toasted marshmallow .
The rich, glossy chocolate topped with a cloud of meringue was enough to make my heart skip a beat! i swear, i almost missed the chance to wish her a happy birthday because i was so mesmerized by that tart.
In that moment, i realized there’s something special about desserts that remind us of celebrations, friendships, and those little moments of joy.
Now, if you’re here for more than just my nostalgia, let’s dig into this delightful dessert that brings a smile to any chocoholic’s face.
A Slice of History
The chocolate tart recipe has been around since, well, forever (okay, maybe not forever, but you get the point). it draws its roots from classic french patisserie, where pastries mean business.
Marrying chocolate with toasted marshmallow? genius! it has turned into a fan-favorite as folks seek unique toasted marshmallow desserts that have a bit of a twist.
Today, this dessert is pretty poppin’. you can find versions of it at fancy dinner parties or even chilled in that bakery case down the street.
And let's be real, no one is complaining about a rich chocolate dessert after a nice meal. plus, you only need about 1 hour and 20 minutes to whip this up! sounds like a sweet deal to me, especially since it serves around 8 people perfect for sharing (or for keeping all to yourself).
Why You’ll Love This Tart
Forget about your typical chocolate cake; this tart is on another level. let's talk health benefits. dark chocolate? yes, please! it’s packed with antioxidants and might even boost your mood.
When topped with a fluffy meringue , it turns an ordinary dessert into a gourmet delight. not to mention, it's a fantastic pick for desserts for chocolate lovers .
Thinking of preparing something special for a date night? this tart is a showstopper and perfect for occasions where you want to impress.
You can casually mention to your guests how it’s an elegant spin on a chocolate meringue pie , and watch them nod in approval.
Plus, the unique blend of flavors keeps your guests curious everyone's talking about how luxurious it tastes.
What’s more? You can even go wild with flavor variations for tarts! Swap in different chocolates or add a splash of espresso or sea salt for a funky twist.
Now that you’re probably drooling, let’s jump into how we’re going to bring this joy to our plates.
The Good Stuff: Ingredients
So, here’s the scoop! you’ll need some basic ingredients, but don't fret, they’re easy to find. grab some all-purpose flour and dark chocolate (the richer, the better, my friends!).
And don't forget the mini marshmallows for that glorious topping. with just a few simple items, you’re on your way to mastering both the crust and the meringue.
Before diving into the cooking, make sure you’ve got the right baking equipment for tart making. Trust me, you don’t want to be scrambling for a pan mid-recipe!
Ready to tackle this? Stay tuned, because in the next section, we’re diving headfirst into crafting this showstopper tart together!
Whether it’s for a gathering or just because you need a chocolate fix, this bake chocolate tart with toasted marshmallow will leave everyone begging for seconds.
So, let’s get our hands doughy and whip up some magic!
Essential Ingredients Guide: Your Secret Weapon for Sweet Success
Let’s be honest, if you want to bake a chocolate tart with toasted marshmallow meringue , you gotta get your ingredient game on point.
It’s not just about tossing stuff into a bowl. knowing how to pick quality ingredients, store them, and whip them into magical desserts can make all the difference.
So, let’s dig in!
Premium Core Components
First up, measurements . it’s key to know your stuff! for the crust, you’ll need 1 ½ cups (190 g) all-purpose flour.
For the filling, think 8 oz (225 g) dark chocolate. precision matters, friends, especially when you're trying to nail that rich chocolate tart recipe flavor.
When you’re eyeballing your ingredients, remember: quality indicators are everything. go for dark chocolate that’s at least 70% cocoa for deep flavor.
The smell of freshly opened chocolate? ugh, it’s just pure heaven! as for butter, it should be cold and unsalted to ensure that crumbly goodness in your crust.
Storage is your friend! keep your dark chocolate in a cool, dry place. the shelf life? usually around 2 years if you can resist that long! for powdered sugar, it should stay fresh for up to 3 months after opening if sealed tightly.
Freshness is key. When picking your eggs, do the float test. If they sink, they’re fresh. If they float, say goodbye, partner!
Signature Seasoning Blend
Now, let’s talk flavors. the essential spice combinations you need are pretty straightforward. you might think, “isn’t chocolate enough?” but trust me, a pinch of sea salt in your filling amps it up.
Honestly, salt and chocolate are like peanut butter and jelly!
Herbs? yeah, how about mint paired with chocolate? it’s a classic combo that gives a fresh twist. think of it as your flavor enhancer .
Also, if you want a touch of something different, consider adding a hint of orange zest .
Smart Substitutions
Sometimes, life happens, and you’re out of an ingredient. No worries. For a tart crust, if you’re low on flour, you can use almond flour for a gluten-free option.
If you need an emergency replacement for the chocolate hard to imagine, right? try using carob powder or even nutella for a different spin.
And let’s not forget about mini marshmallows. they’re perfect for those laid back baking days when you need a quick toasted marshmallow dessert fix.
Kitchen Equipment Essentials
You’ll need some must have tools to make this tart sing. A 9 inch tart pan with a removable bottom is ideal for easy serving. It’s like the golden ticket for staying classy!
Not into fancy gadgets? No problem. A regular pie dish will work too. Just remember to ensure your crust is thick enough to hold the filling.
When it comes to mixing, a simple whisk is fine for the filling. if you’ve got an electric mixer, go for it.
You want to get those egg whites to stiff peaks for your meringue.
Let’s Get Ready to Bake!
Once you have all your ingredients and tools ready, we’ll dive right into the fun part: crafting your own delicious chocolate tart with toasted marshmallow meringue .
Remember, patience is key, especially when you’re perfecting your baking techniques for desserts . cool your tart completely before slicing to avoid a gooey mess!
Stay tuned because the next section will give you step-by-step instructions to bring this decadent delight to life. you won’t want to miss it! whether it’s a special occasion or just a tuesday, this tart is sure to impress.
Let’s bake, babe!
Mastering Professional Cooking: A Guide to Perfectly Bake Chocolate Tart with Toasted Marshmallow Meringue
Ah, the thrill of baking! it’s like jazzing up your kitchen with a little flair, and today, we're diving into a classic that’s sure to impress: the decadent chocolate tart with toasted marshmallow meringue .
This recipe is not just about satisfying a sweet tooth; it's all about learning some cool professional cooking methods along the way.
So grab your apron and let’s roll!
Essential Preparation Steps
You’ve heard the term mise en place , right? it’s a fancy french word for having everything in its place.
Before you even think about cracking eggs, gather your ingredients. you want to have your 1 ½ cups of flour , 8 oz of dark chocolate , and those cute mini marshmallows ready to go.
Now, time management is essential. set a timer for every phase of this recipe. you’ll thank yourself later when everything runs smoothly.
And organization? keep your workspace tidy! i mean, who wants a kitchen that looks like a tornado hit it while you're trying to whip up a toasted marshmallow dessert ?
Safety is key, folks! Be careful with your oven and knives. After all, no one wants to end up in the ER because they got a little too excited about baking.
Step-by-step Process
Let’s break this down step by step.
Make the Tart Crust:
- Start by mixing 1 ½ cups of flour and ⅓ cup powdered sugar like you’re building a sandy beach.
- Add ½ cup of cubed butter until it’s crumbly. Don’t worry, a little mess is okay! We’re not all robots here.
- Mix in the egg yolk and a splash of ice water until it holds together. Press it into your tart pan and chill for 30 minutes .
Pre-bake your Shell:
- Preheat your oven to 350° F .
- Line the tart shell with parchment and some pie weights (or beans). Bake for 15 minutes , then remove the weights and go for another 10 minutes until it's golden.
Chocolate Filling:
- Heat ½ cup heavy cream until it’s just bubbling and pour that goodness over 8 oz of chopped dark chocolate . Let it sit for 2- 3 minutes to work its magic, then stir until smooth.
- Whisk together ½ cup sugar , 2 eggs , 1 teaspoon vanilla , and a sprinkle of sea salt. Mix this chocolate dream together and pour into that beautiful tart shell. Bake for 20 minutes (it’s okay if it looks a little jiggly).
Meringue Magic:
- Beat 3 egg whites with cream of tartar until frothy. Gradually add ¾ cup sugar until stiff peaks are your new best friend.
- Spread that fluffy goodness over your cooled tart and top with mini marshmallows .
Toast it Up:
- Grab that kitchen torch (or your broiler if you’re feeling fancy) and toast those marshmallows until they’re golden and puffy. Oh my gosh, it’s going to look amazing!
Expert Techniques
Now, a quick heads-up. a couple of common mistakes can trip you up. don’t overmix the meringue or it’ll get all sad and flat.
And if your tart crust shrinks, try chilling it longer next time trust me, i've been there.
Keep an eye on that oven temperature; baking is a science, and the right heat is key. Remember, the ideal baking temperature for this tart is 350° F .
Success Strategies
You want that perfect result, right? chill your crust for at least 30 minutes! and while the tart bakes, this is the time to prep your meringue; being efficient is the name of the game here.
If you can, make the tart a day ahead. It allows the flavors to meld beautifully. Those rich chocolate desserts just get better with time!
Serve Up the Sweetness
When you plate your tart, consider fresh berries as a garnish. the tartness pairs perfectly with the sweetness of the chocolate.
You can even drizzle it with some chocolate sauce if you're feeling indulgent why not, right?
Now that you’ve got the deets on how to bake chocolate tart with toasted marshmallow , you're well on your way to creating a dessert that’ll win hearts (and taste buds) at dinner parties or cozy family nights.
In the next section, we’ll explore some Additional Information for enhancing your tart adventures even further. Let’s keep the deliciousness rolling!
Additional Recipe Information
Alright, my chocolate loving friends! if you’re on the hunt for the ultimate chocolate tart recipe , look no further than this bake chocolate tart with toasted marshmallow that oozes decadence from every slice.
Let’s dive into some pro tips, fancy presentation ideas, and more, so you can nail this dessert and impress your guests because we all know you’ll want to show off!
Pro Tips & Secrets
Chef’s personal insights : first off, don’t rush. baking is all about timing, so allow your tart to chill completely before slicing.
This will make sure you serve it up just right, without all that gooey middle trying to escape.
Time saving techniques : if you’re pressed for time, consider prepping the tart crust the day before. just pop it in the fridge overnight.
It saves time and the flavors meld together beautifully! you can also use a store-bought crust if you're really in a pinch.
Flavor enhancement tips : want to elevate your dessert? try adding a tablespoon of espresso powder to the chocolate filling.
It brings out the richness of the dark chocolate without tasting like coffee. trust me, it works wonders!
Presentation advice : the final touch will make or break your dessert. toast the marshmallows right before serving for that extra charm.
Just a quick swirl of the kitchen torch and you’ll have a beautiful toasted topping!
Perfect Presentation
Now, let's talk about plating techniques . That first impression matters! Place your sliced tart on a plate, and consider a generous drizzle of chocolate sauce or caramel.
For garnish ideas , fresh berries are your best friends here. they add a pop of color and a slight tartness to balance the sweet, rich chocolate.
And hey, don’t forget about sprigs of mint for that elegant touch!
Color combinations are also key. Dark brown with bright berries and creamy white from the meringue creates a stunning visual. You want people to say “Wow!” before they even take a bite.
Visual appeal tips : Stack your slices on a cute tiered stand for parties, or serve individual mini tarts for a gourmet feel.
Storage & make-ahead
Here’s how you can handle storage and keep your tart as fresh as possible. if you want to make it in advance, keep it unassembled in the fridge.
The crust can be pre-baked, and you can whip up the chocolate filling a day ahead. just assemble the meringue topping right before serving, and you’re golden!
Storage guidelines : Once baked, cover your tart lightly with plastic wrap and store it in the fridge. It should stay good for about 3 days.
Reheating instructions ? well, the good news is you won’t really need to reheat it, but if you must, do so at a low temperature.
Just pop it in the oven at 300° f for a few minutes.
Freshness duration : honestly, we all know this dessert doesn't last long everyone's gonna devour it! but if you do need to stash some away, get through it in 3 days for flavor’s sake.
Creative Variations
Get wild with flavor adaptations ! swap in different chocolates dark, milk, or even white chocolate for a killer taste twist.
Don’t shy away from adding a splash of orange zest for those seasonal vibes!
For dietary modifications , think about making a gluten-free tart by subbing almond flour for all-purpose flour in the crust. It’s easy peasy!
And let’s not forget regional variations ! in the south? top it with some pecans for a delightful crunch. up north? try a sprinkle of sea salt for a sweet salty combo that’s straight-up addictive.
Complete Nutrition Guide
Now, if you're curious about the health perspective, here’s a detailed breakdown . Each slice (trust me, it’s rich, so slice small) has about 350 calories .
Health benefits : Dark chocolate is full of antioxidants, so you can treat yourself guilt free! Plus, that meringue topping is made with egg whites, which gives a bit of protein.
For dietary considerations , always consider those with allergies. You can easily modify things if needed!
Finally, a gentle reminder about portion guidance : One slice is satisfyingly rich! There’s no need for the “cheat day” mind set when you're enjoying this classic dessert with chocolate!
Expert FAQ Solutions
Got questions? You’re not alone! Here are some answers to common queries.
Common questions : Can I make this without a kitchen torch? Absolutely! Just pop the tart under the broiler for a minute but keep a close eye on it!
Troubleshooting guide : If your meringue doesn't form stiff peaks, remember you need clean bowls and tools. Grease can mess things up!
Success tips : For a perfect meringue, use room temperature egg whites. They whip better, and you won’t be stuck dealing with sad, runny meringue.
Variations explained : If you’re feeling adventurous, consider adding spices like cinnamon or nutmeg to your chocolate mix for a unique twist.
Conclusion
There you have it! with these tips and tricks, your bake chocolate tart with toasted marshmallow is sure to steal the show.
Don’t shy away from experimentation and remember: baking is about having fun and sharing sweet treats with loved ones. so roll up those sleeves and get your bake on! your taste buds (and your friends) are gonna thank you.
Happy baking!
Bake Chocolate Tart With Toasted Marshmallow